The Yorick Programming Language
The Yorick Programming Language, written by David Munro, "...is an interpreted programming language for scientific simulations or calculations, postprocessing or steering large simulation codes, interactive scientific graphics, and reading, writing, or translating large files of numbers..."
The size of the Yorick 2.2.03 binaries and supporting files, i.e., the relocate directory with doc and g removed for my ARM9 cross compilation was ~5MB. The interpreter binary was ~1.2MB with ~1.5MB for the Yorick include files (demo and test files deleted) but you can trim this further depending on what you use. Things like the C include files can be removed (you only need these if you're writing your own Yorick extensions). The lib can also be trimmed if you were not using the hex or drat libraries and didn't ever need to run codger on target. You could also trim out Gist, which is a Computer Graphics Metafile (CGM) file viewer.
Page Contents
Useful Links
Easy Yorick Install On Ubuntu
Really very very easy. Just do sudo apt-get install yorick! If you want to develop your own Yorick plugins then your will also need to do a sudo apt-get install yorick-dev.
apt-get install yorick yorick-dbg yorick-dev
Get Yorick Home Path, Y_HOME
For some of my little make jobs I want to be able to compile Yorick on two targets. On one target it is built from scratch so Yorick lives in one directory but on my Linux box it lives under /usr/bin and /usr/lib. Really the /usr/bin/yorick binary just points to /usr/lib/yorick/bin/yorick as Yorick tends to live under the one installation directory.
Usually to generate a plugin Makefile you'd just type...
yorick -batch make.i
... and get an auto generated Makefile with variables pointing to your Yorick installation written into the Makefile for you. For example, on my Ubuntu atp-gett'ed installation I get the following.
# these values filled in by "yorick -batch make.i"
Y_MAKEDIR=/usr/lib/yorick
Y_EXE=/usr/lib/yorick/bin/yorick
Y_EXE_PKGS=
Y_EXE_HOME=/usr/lib/yorick
Y_EXE_SITE=/usr/lib/yorick
Y_HOME_PKG=
One way to get the Yorick installation directory for a system that is independent of the particular Yorick installation is as follows.
YORICK_HOME="$(echo "print, Y_HOME" | yorick | grep '^".*yorick' | sed -e 's/"//g' | tr -d '\r' | sed -r 's/\/ *$//g')"
echo $YORICK_HOME
You can then substitute YORICK_HOME into the auto-generated Makefile so that it should work regardless who has the plugin and where their particular Yorick is installed (it might not be /usr/lib/yorick if they have installed in manually, for example).
Yorick Arrays
Major Differences VS C Arrays
- Yorick arrays start at index 1 but C arrays start at index 0.
- Yorick arrays are column-major whereas C arrays are row-major.
- This means that array[1][2] in C addresses row 1,
column 2 (remember because C indices start at 0 this means the second row, third column).
I.e., the C-syntax is
array[ROW][COL] - But in Yorick, array(1,2), addresses column 1, row 2 (in C column 0, row 1 taking
into account the start index of 1 instead of 0.
I.e, the Yorick-syntax is
array(COL, ROW).
- This means that array[1][2] in C addresses row 1,
column 2 (remember because C indices start at 0 this means the second row, third column).
I.e., the C-syntax is
Yorick arrays are column major and indices start at 1.
What Is Row/Column Major?
For all languages, arrays are are contiguous blocks of items. Therefore, in memory we can store a 1D arrays as follows:
| ITEM[0] | ITEM[1] | ITEM[2] |  ...  | ITEM[N]
|         |         |         |       |
0 *sz     |         |         |       |
          1 *sz     |         |       |
                    2 *sz     |       |
                              3 * sz  :
                                      |
                                      N * sz
Here we store the first array element at the lowest memory address and increment upwards. You can see that each element is contiguous in memory. It is worth noting that the array is contiguous in terms of the language's model of the memory. For systems with an MMU this means virtual memory (which if the array crosses a page boundary it is only contiguous in virtual memory, not necessarily physical memory)
What happens when we try to store a 2D array? Consider the following array:
int someArray[2][3] = { { 1, 2, 3},
                        { 4, 5, 6} }
This is something we're very used to in C. We read this as an array with 2 rows and 3 columns. But how is this laid out in memory? It still has to be a contiguous chunk of memory but now there are two layout options. The C way is to lay out the array as follows:
| ITEM[0][0] | ITEM[0][1] | ITEM[0][2] | ITEM[1][0] | ITEM[1][1] | ...
|            |            |            |     ^^^    |
0 *sz        |            |            | Note: new  |
             1 *sz        |            | row starts |
                          2 *sz        |            |
                                       3* sz        |
                                                    |
                                                    4 * sz
The array items are represented as a contiguous flow of values. The first row is laid out as it was for the 1D array, then the second row is appended to this block as if it were a 1D array and so on. Each row, therefore, starts at address row_index*3.
The C syntax specifies the fastest increasing index in memory from right to left. What does "fastest" mean? I'm using Munro speak here, and what he means is that, if we looked at the above memory layout, as we move one position from left to right the first dimension to increase is the "fastest", so in the C sense this is column.
Another way to think about this is considering an int p* = someArray pointer. As we increment this pointer by one (p++) it will traverse the columns in a row, which is what Munro calls the fastest increasing dimension, and then once all the columns in one row are iterated over it will move to the columns in the next row (so therefore the row is the second fastest increasing dimension) and so on.
We can see this in the above definition, int [2][3], where the right most dimension is [3] and represents the fastest increasing dimension in memory. The next dimension to the left is [2] and is the second fastest increasing dimension: rows.
This method of thinking about an array can be used for any number of dimensions. Consider int anotherArray[2][3][4][5]. We know that the fastest increasing dimension is 5, so if int *p = anotherArray then...
- *p == anotherArray[0][0][0][0]
- *(p+1) == anotherArray[0][0][0][1]
- ...
- *(p+4) == anotherArray[0][0][0][4]
We also know that:
- *(p+a*5) == anotherArray[0][0][a][0]
- *(p+b*4*5) == anotherArray[0][b][0][0]
- *(p+c*3*4*5) == anotherArray[c][0][0][0]
So when we say row-major, we mean that, in terms of the syntax, the right most index is the fastest incrementing dimension and going left the speed of increment decreases.
Column-major therefore means, that, again in terms of the syntax, the right most index is the slowest incrementing dimensions and going left the speed of increment increases.
I keep saying "in terms of syntax" because as Yorick is implemented in C its physical array storage is C-like. It is only in the scripting language itself that column-major notation is used.
Row-major means that, syntactically, the right most index is the
fastest incrementing dimension and going left the speed of increment decreases.
Column-major means that, syntactically, the right most index is the
slowest incrementing dimensions and going left the speed of increment increases.
Adding More Dimensions: Row/Column Major Syntax in C VS Yorick
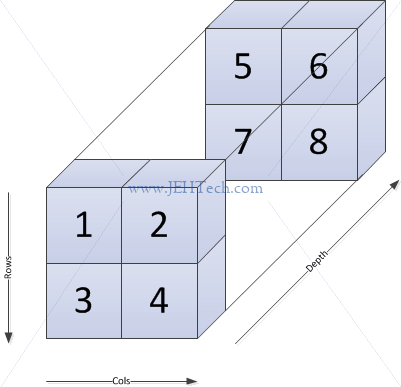
So, now moving onto ad 3D example... I'd normally visualise a 2x2x2 array as is shown to the right.
The 2x2x2 array is an array of two 2x2 arrays. Each 2x2 array is what one would normally expect: a set of rows and a set of columns. So, the front 2x2 block has 2 rows and 2 columns, as does the back 2x2 block. The new dimension is the depth (or what I call "depth" anyway), the third dimension.
Given the description so far I would intuitively expect C to access
the array using this syntax: array[DEPTH][ROW][COL]. I would
expect Yorick to access the array using this syntax: array(COL, ROW, DEPTH).
In C: array[DEPTH][ROW][COL]
To be double sure, look at the noddy little program below:
#includeint main(int argc, char *argv[]) { int array[2][2][2] = { { { 1, 2}, /* Depth, 0, row 0 */ { 3, 4} /* Depth, 0, row 1 */ }, { { 5, 6}, /* Depth, 1, row 0 */ { 7, 8} /* Depth, 0, row 1 */ } }; int r,c,d; for(d = 0; d < 2; ++d) for(r = 0; r < 2; ++r) for(c = 0; c < 2; ++c) printf("[d%i][r%i][c%i] == %i\n", d, r, c, array[d][r][c]); return 0; }
It outputs the following...
[d0][r0][c0] == 1
[d0][r0][c1] == 2
[d0][r1][c0] == 3
[d0][r1][c1] == 4
[d1][r0][c0] == 5
[d1][r0][c1] == 6
[d1][r1][c0] == 7
[d1][r1][c1] == 8
So, in C, one have to visualise the inner most brace as being your slowest-incrementing dimension.
In Yorick: array(COL, ROW, DEPTH)
So, we can test how Yorick dimensions work. I would assume, given the
Yorick syntax, Yorick would represent the array above using the
syntax array(COL, ROW, DEPTH).
And again, to be sure, we make a little noddy program:
myarray = [
             [
                [ 1, 2], /* Depth, 0, row 0 */
                [ 3, 4]  /* Depth, 0, row 1 */
             ],
             [
                [ 5, 6], /* Depth, 1, row 0 */
                [ 7, 8]  /* Depth, 0, row 1 */
             ]
          ];

for (d=1; d<3; ++d)
   for (r=1; r<3; ++r)
      for (c=1; c<3; ++c)
         print, swrite(format="[d%i][r%i][c%i] == %i", d-1, r-1, c-1, myarray(c, r, d))
And, this outputs exactly the same as our little C program (the
d/r/c-1 in the swrite() function is so that
we print out the indexing from zero, as the C program would have done).
This shows that our intuitive understanding of the syntax works for
adding extra dimensions to arrays in Yorick is correct...
Array Indexing
The Yorick docs on this pretty much explain everything but the Yorick equivalent of "fancy" indexing on arrays with 2 or more dimensions puzzled me for a second... had to think it through so here's a graphic :)
Lets say we define the following array
a = [ [1,2,3], [4,5,6] ]
This is an array with 3 columns and 2 rows, which we can see by using dimsof():
> dimsof(a)
[2,3,2]
 ^ ^ ^
 ^ ^ # rows
 ^ ^
 ^ # columns
 ^
 # dimensions
The array can be indexed as if it were a flat object:
> a(1)
1
> a(2)
2
> a(3)
3
> a(4)
4
> a(5)
5
> a(6)
6
And you can slice it as you might expect:
> a(2:3, 1:2)
[[2,3],[5,6]]
The "fancy" indexing took me a second though:
> a([2,1],[1,2])
[[2,1],[5,4]]
The Yorick docs says dimensions from the dimensions of the index list; values from the array
being indexed
... which is very true, but I still needed a pretty picture :)
The dimensions used in the fancy index will be the dimensions of the resulting array. So in the above example the array in the column index has 2 elements to the resulting array will have 2 columns. The array in the row index as 2 elements so the resulting array will have 2 rows. Therefore we know the result is a 2-by-2 array.
Now for the values. TODO
Slices Are Views Onto Arrays But Beware Of Array Copy
In Python's NumPy, slices are like views into the array, and this is also the case in Yorick. BUT... if we transliterate the NumPy example into Yorick script, we will see a different result! See below:
> a = [1,2,3,4,5,6]
> b = a(2:4)
> b
[2,3,4]
> b(:) = 111
> b
[111,111,111]
> a /*<-- LOOK: Unlike the NumPy example, a has not been affected! */
[1,2,3,4,5,6]
In the Python NumPy example a would have been effected. Now, it's not quite that the slice isn't a view. It still is. Observe the following.
> a(2:4) = 111
> a
[1,111,111,111,5,6] /*< Aha! the slice is a view into the array */
So, the slice is in fact a view into the array. The caveat is that in Yorick when we did b = a(...whatever...), b will be a copy of and not a reference to the array (slice). This can be quite an expensive operation so beware!
In Python's NumPy assigning one array (or non primitive) variable to another copies a reference and not the value. In Yorick however, in the specific case of array = array, the entire array is copied... Beware of this as for large arrays this can get expensive!
The Yorick manual entry for
eq_nocopy() says that having multiple variables
reference the same data can be confusing, which is why the default
"=" operation copies the array.
To copy an an array by reference use
eq_nocopy(). Note, however, that you can only do this for the
entire array, not slices. Munro
explains this here: ...Unlike NumPy, Yorick does not have any way to refer to
a slice of an object. All slicing operations happen immediately and result in a
temporary array...
. Munro discusses it further in the
FAQ.
All slicing operations happen immediately and result in a temporary array (i.e., a copy-by-value).
When Arrays Are Not Copied By Value
Arrays Passed To Functions By Reference
Arrays are passed to functions by reference in the sense that if you modify the array in the function, the caller's array is modified...
> y = [1,2,3,4]
> func cheeseit(x) {
    x(1) = 9999 /*<-- NOTE: Will change array in caller's scope */
  }
> cheeseit(y)
> y /*<-- NOTE: y has been changed by function */
[9999,2,3,4]
For a pass-by-copy kind of semantic, do the following, but note copying an array will be expensive if this is a large array!
> y = [1,2,3,4]
> func cheeseit(x) {
    x_local = x;       /*<-- x is copied to x_local, but copy is EXPENSIVE! */
    x_local(1) = 9999; /*<-- Changes to x_local will NOT affect array in caller's scope */
}
> cheeseit(y)
> y /*<-- NOTE: y is NOT changed by the function */
[1,2,3,4]
OXY Objects Store References
Above we just saw that when copying an entire array, or a slice of an array, the copy is done by value and not by reference. There is a caveat however... when assigning an array belonging to an OXY object to another OXY object, a reference to the array is copied. The array is not copied by value in this instance!
> a = save(q=[1,2,3,4])
> b = save(q=a.q) /* b's copy of a.q is a reference to a.q. unlike bare
> a.q              * array-to-array copy, which is by value, this copy is
[1,2,3,4]         * by reference! */
> b.q
[1,2,3,4]
> a.q(1)=999
> a.q
[999,2,3,4]
> b.q
[999,2,3,4]          /* LOOK! b.q must be a reference to a.q! */
This is not just true of copying OXY members between objects. If a.q is replaced by a vanilla array (just normal variable and not an OXY object), the result is the same! Note, however, that assigning from an OXY object array member to a normal variable is a copy-by-value.
Broadcasting
Yorick, being a nicely vectorised language, lets you do mathematical operations between scalars and arrays, and arrays and arrays. The only condition is that the arrays are what is called "conformable".
Two operands are conformable if the dimensions which they share in common have the same length. This means that if we have two operands, A and B, where A has the smaller rank, that dimsof(A)(2:) == dimsof(B)(-dimsof(A)(1)+1:). Eek! That's a little horrid right?! It just expresses that the dimensions shared in common have the same length.Try thinking of it this way: if you can create the array B by joining together a load of A arrays then they will be conformable because the dimensions they share in common must be of equal length as B is just made up of many A's. The image below is meant to make that a little more clear...
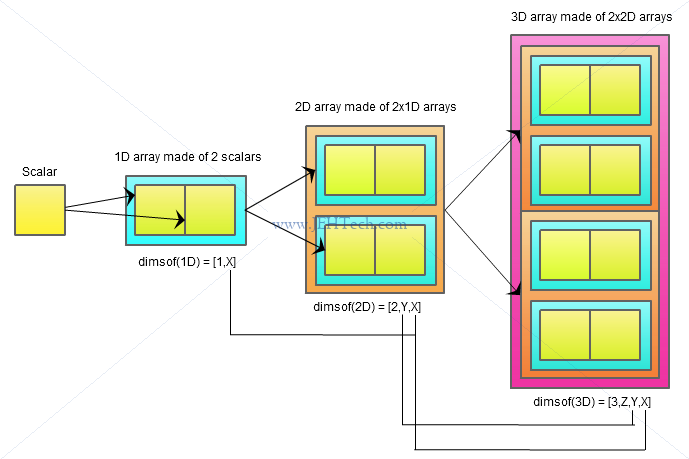
The image is trying to show that, as the manual says, the shorter operand repeats its values for every dimension that is does not have. This is what is called broadcasting.
As a little side note, it appears that Yorick actually created the term broadcasting, to the extent that it inspired Python's NumPy broadcasting... wowzers!
We can see that because, for example, the 2D array is made up of two 1D arrays, the 1D array can be multiplied, added, etc with the 2D array by "expanding" into a 2D array by repeating itself in the second dimension so that it has the same shape. The same goes for 1D op 3D or 2D op 3D in the above example.
Let's see this in practice...
 Copyright (c) 2005.  The Regents of the University of California.
 All rights reserved.  Yorick 2.2.01 ready.  For help type 'help'
> a = [1,2]
> b = [a,a]
> c = [b,b,b]
> a
[1,2]
> b
[[1,2],[1,2]]
> c
[[[1,2],[1,2]],[[1,2],[1,2]],[[1,2],[1,2]]]
>
> a+b
[[2,4],[2,4]]
>
> a+c
[[[2,4],[2,4]],[[2,4],[2,4]],[[2,4],[2,4]]]
> c+a
[[[2,4],[2,4]],[[2,4],[2,4]],[[2,4],[2,4]]]
>
> b+c
[[[2,4],[2,4]],[[2,4],[2,4]],[[2,4],[2,4]]]
> c+b
[[[2,4],[2,4]],[[2,4],[2,4]],[[2,4],[2,4]]]
As per our little image above... the arrays are conformable and so can be operands to the normal mathematical operations. BUT... the above does not give the whole story. "In common" can be more flexible. For example, we can do the following...
> aa = [1]
>
> dimsof(aa)
[1,1]
> dimsof(b)
[2,2,2]
>
> aa + b
[[2,3],[2,3]]
> aa + c
[[[2,3],[2,3]],[[2,3],[2,3]],[[2,3],[2,3]]]
> bb = [[1], [1]]
> bb+c
[[[2,3],[2,3]],[[2,3],[2,3]],[[2,3],[2,3]]]
Now, given the above definition, one might thing that the common dimension between aa and b does not have the same length, yet they are clearly conformable as far as the Yorick interpreter is concerned. What's going on?
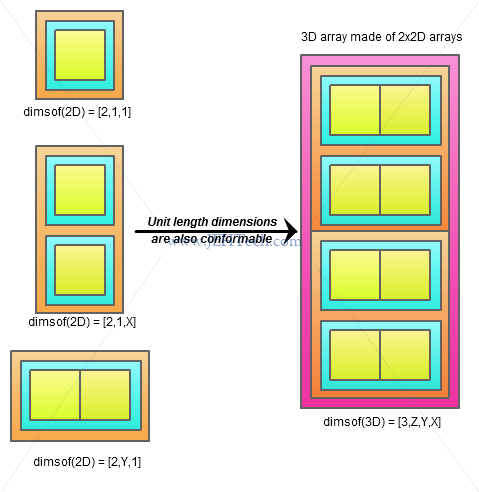
The reason that this works is that Yorick will broadcast any
unit-length dimension in addition to a missing final dimension
.
Therefore, pictorially, we can see the following...
So far we seem to have the following definition...
Yorick operands are conformable if the dimensions they share in common have exactly the same length or the shared dimensions in the "smaller" operand that are not the same length as in the other are unit length.
One does have to take a little care in what is understood by "dimensions in common", however. This might appear obvious to you, but I had to do a double take...
> a = [1,2]
> dimsof(a)
[1,2]
> b = [[7,8,9,0],[6,5,4,3]]
> dimsof(b)
[2,4,2]
> a+b
ERROR (*main*) operands not conformable in binary +
WARNING source code unavailable (try dbdis function)
If we look at the dimensions with the following formatting we might be fooled into thinking that a and b share a common dimension of exactly the same length, and therefore should be conformable.
/* Caution: This is an INcorrect grouping of the dimsof result */
                +++
dim_a =    [ 1, |2| ]
dim_b = [ 2, 4, |2| ]
                +++
Remember that because Yorick is column major the dimsof array has the format [2, cols, rows]! Writing out the dimensions as I have above is quite misleading, and the mistake I at first made, because a has 2 columns and b has 2 rows and 4 columns. They are therefore NOT conformable. Remember to group your dimensions correctly:
/* This is the right way! */
             +++
dim_a = [ 1, |2| ]
dim_b = [ 2, |4|, 2 ]
             +++
Pseudo Index
The Yorick manual example starts with the outer product of two vectors. The following is taken from the linked-to Wikipedia article...
Assume that there are two column vectors $u$ and $v$.
$u = \begin{pmatrix} u1 \\ u2 \\ u3 \\ u4 \end{pmatrix}$ and $v = \begin{pmatrix} v1 \\ v2 \\ v3 \end{pmatrix}$
The outer product of the two column vectors is defined as follows...
$u \otimes v = uv^T = $ $\begin{pmatrix} u_1 \\ u_2 \\ u_3 \\ u_4 \\ \end{pmatrix}$ $\begin{pmatrix} v_1 & v_2 & v_3 \\ \end{pmatrix} = $ $\begin{pmatrix} u_1v_1 & u_1v_2 & u_1v_3 \\ u_2v_1 & u_2v_2 & u_2v_3 \\ u_3v_1 & u_3v_2 & u_3v_3 \\ u_4v_1 & u_4v_2 & u_4v_3 \\ \end{pmatrix}$
The matrix multiplication of those two vectors puzzled me for a little bit (I've only ever been used to multiplying matrices with dimension sizes greater than 1). It may be easier to think of it as follows...
$\begin{pmatrix} u_1 \\ u_2 \\ u_3 \\ u_4 \\ \end{pmatrix}$ $\begin{pmatrix} v_1 & v_2 & v_3 \\ \end{pmatrix} \equiv $ $\begin{pmatrix} u_1 & 0\\ u_2 & 0\\ u_3 & 0\\ u_4 & 0\\ \end{pmatrix}$ $\begin{pmatrix} v_1 & v_2 & v_3 \\ 0 & 0 & 0 \end{pmatrix}$
How do we do this using Yorick? All one dimension vectors in Yorick are column vectors (even if they are displayed textually as-if they are a row!). So can we just transpose() the $v$ vector?
> a * transpose(b)
ERROR (*main*) operands not conformable in binary *
WARNING source code unavailable (try dbdis function)
> transpose(b)
[100,200,300]
> dimsof(transpose(b))
[1,3]
Apparently not! transpose(b) didn't do what it might have... I thought it would turn the column vector into a row vector, but it doesn't. The reason for this is that a row vector is actually a 2D array, i.e., it has an extra dimension.
And this makes sense... as we saw in our section on adding extra
dimensions to arrays and how to syntactically express this:
we know a 1D vector is array(col) and a 2D vector is
array(col, row). Thus, is makes sense that a row vector
is a 2D array with one column!
So, to convert $v$ into a row vector we need to add an extra dimension...
To convert $v$ into a row vector we need to make each column element it's own row in a 2D vector. If $v$ has 3 columns, $v^T$ has 3 rows, where each row has only one element. To do this in Yorick, as said, we need an extra dimension... enter the pseudo index...
> b
[100,200,300]
> b(-,)
[[100],[200],[300]]
> b(,-)
[[100,200,300]]
The syntax (-,), really the symbol "-", is the pseudo index. "-" means "add an extra dimension here".
Munro calls the - sign, when used as an index, a
pseudo-index because it actually inserts an additional dimension into
the result[ing] array which was not present in the array being indexed
.
And, as we noted above, to go from a column vector to a row vector (i.e, transpose
the column vector) we need to increase the dimensionality of our array.
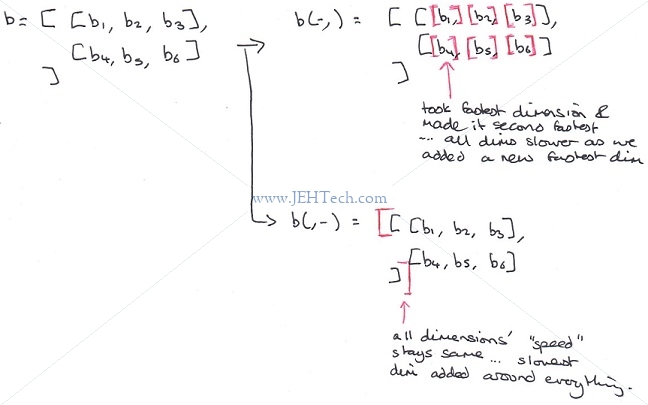
So, based on this, we can say that b(-,) is saying add a row dimension to the column vector, or more generally add another most-slowly-increasing dimension to the existing vector. In the example above we get a 2D vector with 3 rows and 1 column.
How the extra dimension is added is both interesting and important. If b(-,) is saying add a row dimension, why does b(,-) == [[100],[200],[300]] and not [[100,200,300]]? They both have a row dimension added!
I think of it in the following way. Remembering that Yorick is column major, anything to the left of the "," in (,) indicates a faster dimension and anything to the right a slower dimension. Therefore, (-,) is saying add a faster dimension and (,-) is saying add a slower dimension... and this kinda works...
This generalises... suppose we can c a two dimensional array and we write c(-,).
> c = [[1,2,3],[4,5,6]]
> c
[[1,2,3],[4,5,6]]
> c(-,)
[[[1],[2],[3]],[[4],[5],[6]]]

/*
 * c hand-formatted is...
 *    [
 *       [ 1,  2,  3],
 *       [ 4,  5,  6]
 *    ]    |   |   |
 *         |   |   |
 * c(-,) hand-formatted is...
 *    [    |   |   |
 *       [[1],[2],[3]],
 *       [[4],[5],[6]]
 *    ]
 */
To add the extra dimension, each column element becomes a row with one column, and therefore the rows become depths. More generally it is like we shift the dimensions up one... The fastest increasing dimension is changed so that each individual element inside it is now the fastest increasing dimension and all the containing dimensions become one slower! Ie., we've added a new fastest dimension.
Now we can look at b(,-) . Given the discussion so far it looks like we are saying add a column dimension. We have seen that b(,-) == [[100,200,300]]. And this also makes sense... we've added a new slowest dimension.
So back to the original example of outer product. To accomplish this in Yorick we need to do transpose(u*v(-,)) I.e., the transpose of v is v(-,):
> u = [1,2,3,4]
> v = [1, 10, 100]

> v(-,)
[[1],[10],[100]]

> u * v(-,) /* This won't be quite right! */
[ [  1,   2,   3,   4],
  [ 10,  20,  30,  40],
  [100, 200, 300, 400] ]

> transpose(u*v(-,)) /* YAY, now we're good! */
[ [1, 10, 100],
  [2, 20, 200],
  [3, 30, 300],
  [4, 40, 400] ]
Matrix Multiplication & Inner Product
Remember to keep in mind that Yorick is column-major so the indices are a(col, row)!
The concept of matrix multiplication, the type we learnt in school, is shown in the little animation below. For each row vector of the LHS matrix we take the dot product of that vector with each column vector from the RHS matrix to produce the result:
In Yorick the '+' sign labels an array index for use in the dot product (a.k.a. inner product or scalar product) and can be used to calculate vector inner products or matrix multiplications. Munro has generalised the "school-learnt" matrix multiplication concept so that we are not constrained as to the choice of row/column vectors we take from the LHS and RHS. For example, we might want to take the dot product of column vectors from the LHS and column vectors from the RHS.
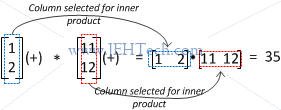
For two 1D arrays, a and b, the operation is fairly straight forward. Writing a(+) and b(+) marks the only dimension in each array as being used for the inner product. Therefore, the calculation becomes $\Sigma a(i)b(i)$. Let's take a look at this pictorially, otherwise the 2D example melts my brain a little...
Now we move on to the more complex examples... as always, remember to keep in mind that Yorick is column-major, so the indices are M(col, row).
LHS column vectors and RHS row vectors
I feel like the above needs a little explanation before continuing with the others.
Munro describes the plus symbol as "marking an index for use in an inner product". But what exactly do we mean? It means that the index used is the one that we iterate over by summing the multiplication of each element with it's respective "partner" in the dot product. Thus a(, +) means iterate over the row indices in the dot product summation. If we are iterating over the row index, then the column index must remain constant, so we will be taking column vectors.
To understand what the + sign means we could think of it as meaning "selecting the dimension to be iterated over in the summation of the inner product", because what the above does is to select all dimensions not marked by a + sign, and then iterate over the marked dimension marked for the inner product.
So, if the + sign marks rows, we are NOT selecting row vectors and then using the row vector for the inner product. We ARE selecting column
vectors and using the rows from each column vector in the inner product. The same is also happening with respect
to b(+,): we are selecting rows and iterating over the columns.
I.e., for the + sign we select the vectors in the other dimensions and iterate over the marked dimension in those selected vectors.
Munro describes the plus symbol as "marking an index for use in an inner product". I prefer
to think of it as "selecting the dimension to be iterated over in the summation of the inner product".
I.e., for the + sign we select the vectors in the other dimensions and
iterate over the marked dimension in those selected vectors.
So, now we can continue looking at the other possible ways to multiply out these square matrices...
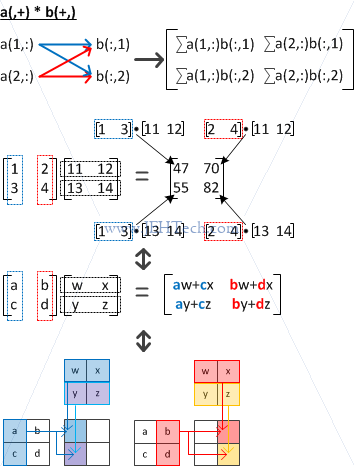
LHS column vectors and RHS column vectors
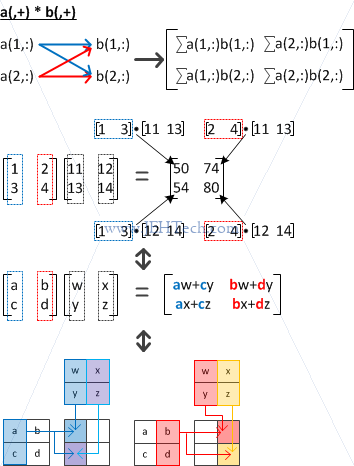
LHS row vectors and RHS row vectors
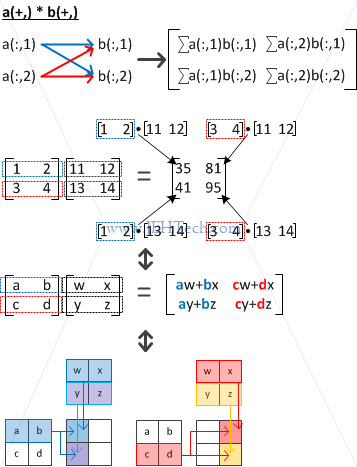
LHS row vectors and RHS column vectors

We can see from the above that the index marked with the + sign is used for the inner product. Note that all these combinations are only possible because the matrices are square (for rectangular matrices, normal matrix multiplication shapes apply).
For example, in the pictures above, a(,+) marks the row index as being used for the inner product. I.e by selecting all rows in each column we create the vectors being used on the LHS of the dot product. Therefore we select a(1,:), a(2,:) all the way through to a(n,:).
Therefore, the indices marked with the + sign must have the same length.
Indices marked with the + sign must have the same length.
Lets say dimsof(a) = (2, n, m) and dimsof(b) = (2, m, l). The process for c = a(,+)*b(+,) becomes:
for i in 1..n
   v1 = a(i, :) // 1d vector, length m
   for j in 1..l
      v2 = b(:, j) // 1d vector, length m
      r(i,j)  = v1(+) * v2(+)
Normal or "School-Learnt" Matrix Multiplication vs Yorick
The only matrix multiplication I was ever taught was "normal" matrix multiplication:
$$\begin{pmatrix} a(1,1) & a(2,1)\\ a(1,2) & a(2,2)\\ \end{pmatrix} \begin{pmatrix} b(1,1) & b(2,1)\\ b(1,2) & b(2,2)\\ \end{pmatrix} = $$ $$\begin{pmatrix} a(1,1)b(1,1) + a(2,1)b(1,2) & a(1,1)b(2,1) + a(2,1)b(2,2)\\ a(1,2)b(1,1) + a(2,2)b(1,2) & a(1,2)b(2,1) + a(2,2)b(2,2)\\ \end{pmatrix} = $$ $$\begin{pmatrix} a(:,1)b(1,:) & a(:,1)b(2,:)\\ a(:,2)b(1,:) & a(:,2)b(2,:)\\ \end{pmatrix}$$
What you might notice is that the way the matrix multiplication works in Yorick, as described above, the index of the RHS changes most quickly. In "normal" matrix multiplication, it is the LHS index that is changing most quickly.
The figure below compares the closest operation we've seen so far with what I'd think of as a "normal" matrix multiplication...
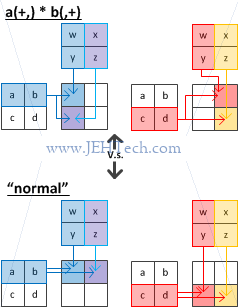
Visually we can see that transpose(a(+,)*b(,+)) is equivalent to the "normal" matrix multiplication.
Another way to do this is to note that... $$\begin{pmatrix} a(:,1)b(1,:) & a(:,1)b(2,:)\\ a(:,2)b(1,:) & a(:,2)b(2,:)\\ \end{pmatrix} \equiv \begin{pmatrix} b(1,:)a(:,1) & b(2,:)a(:,1)\\ b(1,:)a(:,2) & b(2,:)a(:,2)\\ \end{pmatrix}$$
Therefore, to accomplish this "normal" matrix multiplication between a and b, in Yorick we would write b(,+) * a(+,) to do the "normal" matrix multiplication AB.
transpose(a(+,)*b(,+)) is equivalent to the "normal" matrix multiplication.
As we've noted, all these combinations above are only possible because the matrices are square. Remember that the indices marked for inner product must share the same length. If, for example a has 3 rows and 2 columns and b had 8 rows and 2 columns, the only possible operation would be a(+,)*b(,+).
An Example With SVsolve
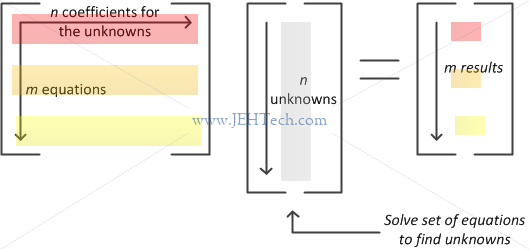
The function SVsolve can be used to solve sets of simultaneous linear equations. Let's say that we have two arrays. Array a will represent the coefficients of the unknowns in our set of equations. Lets say that that we have n unknowns and m equations. The array a is an n x m matrix. Our linear equations, as we would normally write them (i.e., as I was taught in school) therefore look like this:
So if I were to pass the coefficient matrix (2D array) and the result vector (1D array) to SVsolve everything will work fine right? Err... no! Doh! Why not? It comes back to the issue above... the matrix multiplication is (at least for me) slightly unintuitive (probably just me!).
SVsolve() solves for A(,+)*x(+) = B. As we've seen, A(,+) will multiply the columns of A with x(+). Oops: SVsolve() is trying to do this:
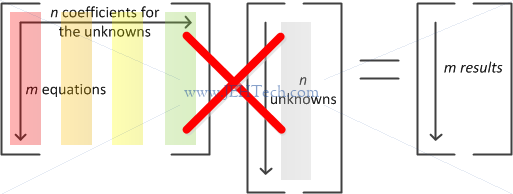
So, the solution is to transpose() the array you are using before passing it to SVsolve()!
Rubber Indices In Yorick
Yorick has one other indexing syntax which has proven useful, which I
call rubber indices. They address the problem of writing
interpreted code which extracts slices of arrays when you don't know
beforehand how many dimensions the array has. An example is an
opacity array for which you know that the most slowly varying index
represents photon wavelength, but there might be zero, one, two, or
three faster varying dimensions representing position in space.
--
PYTHON MATRIX-SIG
> a = [ [ [1,2,3],
[4,5,6]
],[
[11, 22, 33],
[44,55,66]
] ]
> a
[[[1,2,3],[4,5,6]],[[11,22,33],[44,55,66]]]
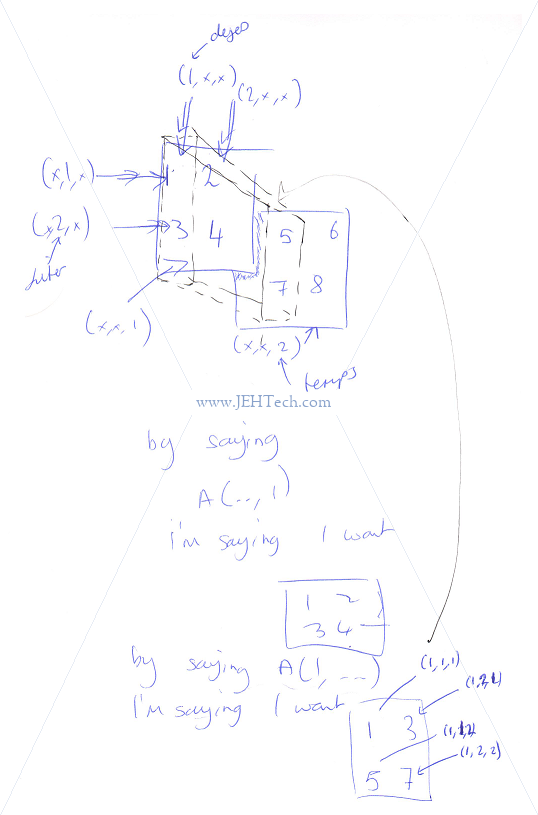
> a(1)
1
> a(1,1,1) ## Give me the first element in the inner array, from 1st array
1 ## in the middle array, from the first array (of arrays) from the
## outer array
> a(1,:) ## Give me the first element in each inner array, contained in the
[1,4] ## same parent array. This is a little incorrect because we don’t
## specify all array dimensions in the indices
> a(1,:,:) ## Give me the first element in each inner array, from each
[[1,4],[11,44]] ## outer array, contained in the overall array
> a(1,..) ## The RUBBER INDEX says the same thing: Give me the first
[[1,4],[11,44]] ## element from the innermost array and do the same recursing
## outwards
> a(1,*) ## Another RUBBER INDEX that collapses all arrays into one.
[1,4,11,44]
> a(:,1,1) ## Give me everything from the first array, i.e., the array
[1,2,3] ## itself, from the element in the middle array from the first
## element in the outer array.
> a(:,1,..) ## Give me everything from the first array, ie. the
[[1,2,3],[11,22,33]] ## array itself, from the first element in the middle
## array from all elements in the outermost array.
Oxy Objects
Copying Oxy Objects
When you assigned an OXY object from one variable to another is is copied by reference. Thus changing an object member will be reflected in both variables as assignment is not copy for OXY objects.
> a = save(q = 123)
> a.q
123
> b = a
> save, a, q=321 /*<--  Changing a's member variable will change b's! */
> a.q
321
> b.q
321              /*<-- LOOK, b has been affected by the change to a! */
Given the rational behind Yorick as a number cruncher, this makes a lot of sense. It's a little like passing an array into a function. If we think as an OXY object as a potential "bag" of large data, copying it would be hugely expensive, so that is why an object assignment is NOT a copy!
To actually make a real copy of the object you have to manually copy each member of one object to the other.
> a = save(q=101)
> b = save()     /*<-- Must manually re-create a new... */
> save, b, q=a.q /*    ...object if we are to copy a */
> a
object [1]: group
> a.q
101
> b.q
101
> save, a, q=999
> a.q
999
> b.q
101              /*<-- Changing a.q has not affected b.q. We did a proper copy!
BUT, this is further complicated by arrays as member variables and OXY objects as member variables. For example, examine the following.
> a = save(q=[1,2,3])
> b = save()
> save, b, q=a.q
> b.q
[1,2,3]
> a.q
[1,2,3]
> a.q(1) = 111
> a.q
[111,2,3]
> b.q
[111,2,3]
In the above example we used the same recipe as above, but because q is now an array the reference to the array is copied and not the value. Again, make sense for Yorick as a number cruncher of large data arrays, but if you wanted a copy, this could throw you. The same copy-of-reference problem would occur if q has been another OXY object.
You make have done a double-take here because previously, when describing arrays, we said array assignment copies the array values, i.e. a complete copy of the array is made. This is clearly not the case when saving an OXY object member as an array. OXY object members appear always to be references unless the member stores a non-array primitive.
OXY object members appear always to be references unless the member stores a non-array primitive. Be cautious, when setting an OXY object member to equal an array: remember, unlike vanilla array to array copy, the OXY object member stores a reference to the assignee!
If you want to copy an array "into" an OXY object (actually create a nameless array and assign the reference to the OXY object member), use array slicing and take, if you want the entire array, a slice of the entire array:
> a = [1,2,3]
> b = save(a=a(:)) # By taking a slice of the entire array we force a copy.
> b.a              # Slicing operations happen immediately and result in a
[1,2,3]            # temporary array, the reference to which is then stored
> a                # in the OXY object member.
[1,2,3]
> a(1)=99
> a
[99,2,3]
> b.a
[1,2,3]
To fully, deep copy, an OXY object your therefore have to build a new object from scratch, and copy in all primitive types and then recursively copy in all member OXY objects and also take care to copy the arrays correctly.
Yorick "Namespaces"
If you are writing a lot of Yorick scripts that get included in other scripts etc etc, you can end up with a lot of variable and function names in the global scope... this can lead to global namespace pollution.
You can create a kind-of namespace in Yorick. There is no "namespace" command but you do have access to save() and restore() which can be used to save a set of variables in an object and restore those variables from that object respectively. The general idea is this:
/* a and blah are already in the global namespace */
a = 1
func blah(void) { ... }

/* Our script starts here...
 * Now we defined our own namespace that will be accessed through the
 * object my_new_namespace. The save() function saves the variable a and
 * function blah in this object. */
my_new_namespace = save(a, blah)
//{
   /* Here we overwrite the variable a and function blah in the global namespace
    * with these new values */
   a = 101
   func blah(does_something_else) { ... }
//}

/* We restore() the original namespace that existed before we modified it by
 * swapping the data from my_new_namespace.a and my_new_namespace.blah with
 * their the current values in the global namespace - the ones we just defined.
 * Thus the global namespace appears untouched by our script, and the variables
 * and functions in our script can be accessed using my_new_namespace.xxx.
 */
my_new_namespace = restore(my_new_namespace)
The are a couple of subtleties to watch out for here and they have to do with when statements are evaluated. For example, if you assign from one variable in your module's "namespace" to another variable in your module's "namespace", you would not use the namespace prefix my_new_namespace.xxx. For example:
//------------
// my_module.i
//------------
my_new_namespace = save(a, b, blah, blah_oops)
   a = 222
   b = a
   func blah(void) { print, my_new_namespace.a; }
   func blah_oops(void) { print, a; }
my_new_namespace = restore(my_new_namespace)

//------------
// main_program.i
//------------
a = 111
b = 999
func blah(void) { print, a; }

require, "my_module.i"

print, "global a", a
print, "global blah"
blah, []

print, "my_module a", my_new_namespace.a
print, "my_module blah"
my_new_namespace, blah, []
print, "my_module blah_oops"
my_new_namespace, blah_oops, []
The program will output the following:
"global a"  111
"global blah"
111
"my_module a"  222
"my_module blah"
222
"my_module blah_oops"
111
We can see that although my_module.i has it's own "global" symbols a, b, blah and blah_oops, when it is included from the main module, it does not effect that module's global scope. Instead to access these symbols from my_module.i the prefix my_new_namespace.xxx has to be used.
Note the difference between blah() and blah_oops() in my_module.i: when the function is called, it is evaluated after the save()/restore() commands, so to access the module's "globals" it now has to used the prefix my_new_namespace.xxx. The function blah_oops() represents an error! It does not access the module's variable, it accesses the variable from the global scope (if it exists - otherwise Yorick will error out!).
Also note the that my_module.i assigns a to b but in this case it is accessing my_module.i's symbol a. This is because the evaluation of this bit of code is immediate and occurs before the restore().
Watch out for these subtle little caveats!!
Writing Yorick Plug-Ins
Here I cover "manually" writing a plugin, i.e, not using Codger to auto-generate the C code using the PROTOTYPE Yorick comment method. Most of the stuff you need to know in order to do this can be found in yapi.h and the source code comments are pretty comprehensive.
One point to note about terminology. Whenever I talk about "stack" I will, unless made explicitly clear, be talking about the Yorick stack. This is a stack maintained by the Yorick interpreter and has nothing to do with your process/thread stack!
An Intro: Create The Plugin Shell And The Basics
Create The Shell
To create the Yorick makefile, there must be at least one .i file available. You will most likely also need the equivalent .c file. In this example I will call the plugin "jehtech", so I have created the files "jehtech.i" and "jehtech.c".
/*
 * FILE: jehtech.i
 */
plug_in, "jehtech"

extern jehtech_Version;
/* DOCUMENT void jehtech_Version()
 *
 *    Return string describing version of the library
 */
/*
 * FILE: jehtech.c
 */
#include "yapi.h"
#include "ydata.h"

#ifndef NULL
#define NULL '\0'
#endif

void Y_jehtech_Version(int argc)
{
   ystring_t *verStr = NULL; /* ystring_t is char*, so this is char** */

   /* Push a ystring_t* onto the stack. This is a char** */
   verStr = ypush_q(0);
   if( !verStr )
      y_error("Could not push return string onto stack");

   /* p_strcpy is Yorick's mem-managed of strcpy(). Returns char* */
   *verStr = (ystring_t)p_strcpy("v1.0");
}
Once these are created we can create the Makefile for this plugin. From the linux command line:
$ yorick -batch make.i
created Makefile
 automatically generated make macros and dependencies:
PKG_NAME=jehtech
PKG_I=jehtech.i
OBJS=jehtech.o
 edit Makefile by hand to provide PKG_DEPLIBS or other changes
In your working directory you will now have a ready made Makefile. Run it by typeing make all.
In the directory of compilation you will now have the object and library files jehtech.o and jehtech.so. There will also be two new files ywrap.c and ywrap.o, the object file having been added into the library.
Now, from this directory, fire up Yorick to test our little plugin...
$ rlwrap yorick
 Copyright (c) 2005.  The Regents of the University of California.
 All rights reserved.  Yorick 2.2.01 ready.  For help type 'help'
> #include "jehtech.i"
> jehtech_Version()
"v1.0"
The function jehtech_Version() has correctly returned the version string!
So, we kinda just dived into the deep end of the pool here so now to explain what we've done...
The example above shows us how to extend Yorick by binding a Yorick function name to a C function. There are two component files, the Yorick include file and the C file that implements the functionality. This C-implemented functionality will often call upon other libraries that you are in some way wrapping.
The Yorick include file so far has two lines of note:
-
plug_in, "jehtech"
This line declares this script file as one that defines a plugin or library. When this file is included Yorick will go off and try to find the dynamic library jehtech.so and attempt to load it. - extern jehtech_Version; Declares a symbol that will be added to the Yorick interpreters list of recognised symbols. The magic Yorick binding will associate this symbol with the C function Y_jehtech_version. Whenever a Yorick script calls the function jehtech_Version(), under the hood Y_jehtech_version() will be called.
Quick Debug Tip
If Yorick is complaining that it cannot find a library you can always try setting export LD_DEBUG=libs before running Yorick (or export LD_DEBUG=help to get help). You'll get debug output describing libraries being searched for and loaded. You can also set export LD_DEBUG=all for an absolute shed-load of debug info, which might be too much, but at least you'll be able to see where the loader is searching for libraries and what, if anything, it finds. To clear the loader debug output just set export LD_DEBUG=.
Passing Values To C Functions From Yorick
Parameters Passed On Yorick Stack
Yorick maintains a parameter stack that it uses to pass values to an interface function (for example Y_jehtech_version()) and receive return values. Function parameters are pushed in-order onto the stack and whatever is at the top of the stack when the interface function exists, is it's return value.
So, if we have a Yorick function with parameters a, b, c, they will be passed to the C interface function on the Yorick stack. At stack position 0 will be c, at position 1, b, and at position 2, a. If the function wanted to return the multiple a*b*c it would put the result on the top of the stack, at position 0, to return this value to the Yorick interpreter.
All interface functions will have the same return value, void, and the same parameter list, consisting of one integer, usually called argc, which gives the number of parameters pushed onto the stack (note I mean the Yorick stack and *not* the C stack!).
void Y_functionName(int argc) {
   /* argc gives the number of elements pushed onto the **Yorick** stack.
    * Note this has nothing to do with the C stack! */
   ...
   /* Anything left or placed on the top of the **Yorick** stack is the
    * function's return value */
}
Lets see this in action by creating a new function jehtech_ParameterOrder(a,b,c) and the associated interface function Y_jehtech_ParameterOrder():
/*
 * FILE: jehtech.i
 */
... snip ...
extern jehtech_ParameterOrder;
/*
 * FILE: jehtech.c
 */
... snip ...
void Y_jehtech_ParameterOrder(int argc)
{
   long hundreds = ygets_l(0),
        tens     = ygets_l(1),
        units    = ygets_l(2);

   ypush_long(hundreds*100 + tens*10 + units);
}
With the above modifications added and the plugin recompiled (just use make all, no need to regenerate the Makefile!) we can run the Yorick interpreter and see the results.
$ rlwrap yorick
 Copyright (c) 2005.  The Regents of the University of California.
 All rights reserved.  Yorick 2.2.01 ready.  For help type 'help'
> #include "jehtech.i"
> jehtech_ParameterOrder(1,2,3)
321
The signature, written in C parlance, for jehtech_ParameterOrder() is long jehtech_Parameters(long units, long tens, long hundreds).
We can clearly see that the last parameter is at the top of the stack and the first parameter is at the bottom.
Function parameters, passed on the Yorick stack, are pushed on in parameter order. This means that the last parameter will be at the top of the stack and the first at the bottom.
As explained in yapi.h, the stack has space for at least 8 new elements when your plug-in's interface C function is called. It notes that if you are going to push more than 8 things onto the stack however, that you must reserve that space to avoid stack overflow.
If you push more than 8 items onto the Yorick stack you must reserve enough space using ypush_check() to avoid stack overflow!
Getting Scalar Parameters
The previous example showed how a function could retrieve 3 long parameters. The function ygets_l(stack_index) reads the long value at position stack_index in the stack. Note that it does not pop the value, it only peeks at the value. Position zero is the top of the stack.
All of the functions that peek at scalars on the stack are called ygets_X, where X is a single character representing the type of value, l for long, for example. Here is a list of the scalar-peaking functions. Each function has one intargument, the stack position to peak.
| long ygets_l(int iarg) |
| double ygets_d(int iarg) |
| ystring_t ygets_q(int iarg) |
| ypointer_t ygets_p(int iarg) |
| char ygets_c(int iarg) |
| unsigned char ygets_uc(int iarg) |
| short ygets_s(int iarg) |
| int ygets_i(int iarg) |
| float ygets_f(int iarg) |
Getting Array Parameters
All yorick array dimensions are represented by the list [rank, ndim1, ndim2, ..., ndimY]. The first parameter of the list, rank, gives the number of dimensions that the array possesses. The size of each dimension is given by ndimX. For example, a 2D array with 10 columns and 90 rows will be described by the list [2, 10, 90]. The size of the array dimension list is limited in Yorick. It will be a maximum of Y_DIMSIZE long's. This means that Yorick arrays cannot have more than Y_DIMSIZE-1 dimensions.
The first thing to remember is that Yorick arrays are column major. Therefore a 2D array is described by the dimensions list [2, #columns, #rows]. Very easy to see this in action. We'll make the following additions to our project (note: generally you should not use printf like I'm doing here).
/*
 * FILE: jehtech.i
 */
...
extern jehtech_ArrayTest;
/*
 * FILE: jehtech.c
 */
...
#include <stdio.h>
...
void Y_jehtech_ArrayTest(int argc)
{
   long i;
   long dimInf[Y_DIMSIZE];
   long ntot;
   long *ary = ygeta_l(0, &ntot, dimInf);
   printf("jehtech_2DArray: ntot == %ld\n", ntot);
   printf("jehtech_2DArray: dimInf = [");
   for(i = 0; i <= dimInf[0]; ++i) {
      printf("%ld%s", dimInf[i], i == dimInf[0] ? "]" : ", ");
   }
   printf("\n");
}
Recompile the plugin and running Yorick, we can get the following:
$ make all
...
$ rlwrap yorick
 Copyright (c) 2005.  The Regents of the University of California.
 All rights reserved.  Yorick 2.2.01 ready.  For help type 'help'
> #include "jehtech.i"
> jehtech_ArrayTest, [1,2,3]
jehtech_2DArray: ntot == 3
jehtech_2DArray: dimInf = [1, 3]
> jehtech_ArrayTest, [[1,2,3], [1,2,3]]
jehtech_2DArray: ntot == 6
jehtech_2DArray: dimInf = [2, 3, 2]
> jehtech_ArrayTest, [[[1,2,3,4], [1,2,3,4]], [[1,2,3,4], [1,2,3,4]]]
jehtech_2DArray: ntot == 16
jehtech_2DArray: dimInf = [3, 4, 2, 2]
Great so we can, from our C code, get an array of long's, or at least so far, it's dimensions so that we can determine what shape the array is. But what about accessing the array values? Yorick specifies everything column major, so in the array [[1,2,3,4], [5,6,7,8]] to access the third column, second row, we would write a(3,2). However, under the hood Yorick stores arrays C-style... i.e., from C, when passed an array, we would access it as a[2][3] or a[2*num_cols + 3].
Lets see this in action to see that this is in fact the case. We'll make the following additions to out project files...
/*
 * FILE: jehtech.i
 */
...
extern jehtech_Dump2D;
/*
 * FILE: jehtech.c
 */
...
void Y_jehtech_Dump2D(int argc)
{
   /* PRE: array is 2D! */
   long row, col;
   long dimInf[Y_DIMSIZE];                       /* [rank, #cols, #rows] */
   long *ary = ygeta_l(0, NULL, dimInf);
   for(row = 0; row < dimInf[2]; ++row) {        /* dimInf[2] is #rows   */
      for(col = 0; col < dimInf[1]; ++col) {     /* dimInf[1] is #cols   */
         printf("%ld\t", ary[row*dimInf[1] + col]);
      }
      printf("\n");
   }
}
Recompiling and running Yorick we then see the following...
$ rlwrap yorick
 Copyright (c) 2005.  The Regents of the University of California.
 All rights reserved.  Yorick 2.2.01 ready.  For help type 'help'
> require, "jehtech.i"
> jehtech_Dump2D, [[1,2,3,4], [5,6,7,8]]
1	2	3	4
5	6	7	8
Run Yorick From Python
Cool... this looks promising as to test some Yorick I have been using Robot Framework so being able to do this would make tests easier! Haven't done anything with it yet but Munro has written a Python module interact with Yorick.