GIT Source Control
GIT is a software configuration management (SCM) tool. This page offers notes on some of the more useful GIT commands and workflows such as merging, rebasing, hunks and patches.
Page Contents
References
- GIT SCM.
- Pro Git eBook.
- Ry's Git Tutorial, Ryan Hodson.
- Git Basics - Undoing Things, Git Docs.
- Undoing Changes, Atlassian Git Tutorial Page.
- How to undo the last commits in Git?, SO Thread.
- Awesome page... just found this and it looks great: Visualizing Git Concepts with D3. Visit this page, it is really cool!
- Common Git Scenarios.
To Read / To Do
https://stackoverflow.com/questions/35941566/delete-remote-branch-via-git
https://stackoverflow.com/questions/1889559/git-diff-to-ignore-m
https://stackoverflow.com/questions/1822849/what-are-these-ms-that-keep-showing-up-in-my-files-in-emacs
https://stackoverflow.com/questions/1510798/trying-to-fix-line-endings-with-git-filter-branch-but-having-no-luck/1511273
https://stackoverflow.com/questions/10002239/difference-between-git-checkout-track-origin-branch-and-git-checkout-b-branch/10002469#10002469
https://stackoverflow.com/questions/20106712/what-are-the-differences-between-git-remote-prune-git-prune-git-fetch-prune

https://git-scm.com/docs/git-merge
https://stackoverflow.com/questions/4693588/git-what-is-a-tracking-branch/4697054#4697054
https://stackoverflow.com/questions/3471827/how-do-i-list-all-remote-branches-in-git-1-7
https://medium.com/@zaran.56/how-to-recover-restore-deleted-git-branch-5a068c07bed2
https://stackoverflow.com/questions/3640764/can-i-recover-a-branch-after-its-deletion-in-git
https://stackoverflow.com/questions/5308816/how-to-use-git-merge-squash
https://www.atlassian.com/git/tutorials/git-prune
http://www.totallynota.ninja/2016/06/why-i-prefer-merging-over-rebasing-in.html
GitHub Related Sites
https://app.codacy.com
https://circleci.com
https://travis-ci.org
https://cirrus-ci.com
https://ci.appveyor.com
Where Git Finds Your SSH File
I had a little problem on Windows. When I connected from my office location Git would fail to SSH into GitHub. When I connected from home Git would connect to GitHub with no problem whatsoever.
The reason for this is that when connecting from the office my HOME DIRECTORY changed and git was looking for my key files relative to the home directory!
The solution was found in this SO thread answer. The solution is to create a shell script that will involke the ssh client with the a parameter to tell it where to look for key files: give this parameter an obsolute path that is not relative to HOME.
#!/bin/sh
ssh -i /absolute/path/to/key/folder/id_rsa $*
In the above script id_rsa is the key filename. You might have saved your private key with a different file name. Save the script somewhere and give it executable permissions (chmod +x filename).
Then set the environment variable GIT_SSH to the absolute path to the script you just created.
export GIT_SSH=/path/to/your/script.sh
Now your git push operations etc should work just fine.
Create A Public/Private Keypair And Add To Your Keyring
https://ourcodeworld.com/articles/read/1421/how-to-create-a-ssh-key-to-work-with-github-and-gitlab-using-puttygen-in-windows-10
References:
- Set up SSH for Git, Atlassian Documentation.
- Connecting to GitHub with SSH, GitHub Help.
Check your home directory (if on a corporate network it might not be what you expect).
echo $HOME
echo ~
Older school
To create SSH key pair:
ssh-keygen
New school
$ ssh-keygen -t ed25519 -C "your_email@example.com"  # Create a new SSH key, using the provided email as a label.
$ eval "$(ssh-agent -s)"                             # Start the ssh-agent in the background
$ ssh-add ~/.ssh/id_ed25519                          # Add your SSH private key to the ssh-agent
To see your public key type:
cat ~/.ssh/id_rsa.pub
To check that SSH is working...
ssh -T git@bitbucket.org
# or...
ssh -T git@github.com
If you see an error message saying "Could not open a connection to your authentication agent"
make sure that your ssh agent is running. If it isn't run eval `ssh-agent -s`
to start it [Ref].
For more detailed debugging use:
ssh -vvv -T git@bitbucket.org
To see if the key has been added to the client keyring...
ssh-list -l
# or...
ssh -vT address-of-server
Followed the GitHub instructions to create the private/public RSA key pair. Having obtained this key it can be added to the keyring using the following, but this addition is not permanent.
ssh-add ~/.ssh/some_key_name
If the SSH agent isn't running use:
eval $(ssh-agent)
So to make the addition permanent I consulted this SO thread. When you created the OpenSSH key pair you probably stored it as ~/.ssh/some_key_name (the private key) and ~/.ssh/some_key_name.pub (the public key). To add these permanently to your keyring edit the file ~/.ssh/config (and if it is empty just create it). Add the following line (replicate once for each key you wish to permenantly add):
IdentityFile ~/.ssh/some_key_name
PuttyGen
- Generate key: Click "Generate" and add a passphrase for the key.
- Save PuTTY private key: Click "Save private key" and save with a ".ppk" extension, e.g., "my-new-key.ppk"
- Save OpenSSH public key: Copy and paste from top text box into a file and save as a ".pub" file, e.g., "id_rsa_my-new-key.pub"
- Save OpenSSH private key: From top menu select "Conversions > Export OpenSSG key (force new file format)". Save as id_rsa file, or for e.g., just "ids_rsa_my-new-key"
Debugging A Git Connection
First try connecting over HTTPS:
ssh -T -p 443 git@ssh.github.com
If this works you can then try to debug your SSH connection. You can use GIT_SSH_COMMAND [Ref] as so, replacing the git command with whatever you like:
GIT_SSH_COMMAND="ssh -vvv" git push
If this isn't playing ball, checkout your ~/.ssh/config file. It should contain this [Ref]:
Host github.com
  Hostname ssh.github.com
  Port 443
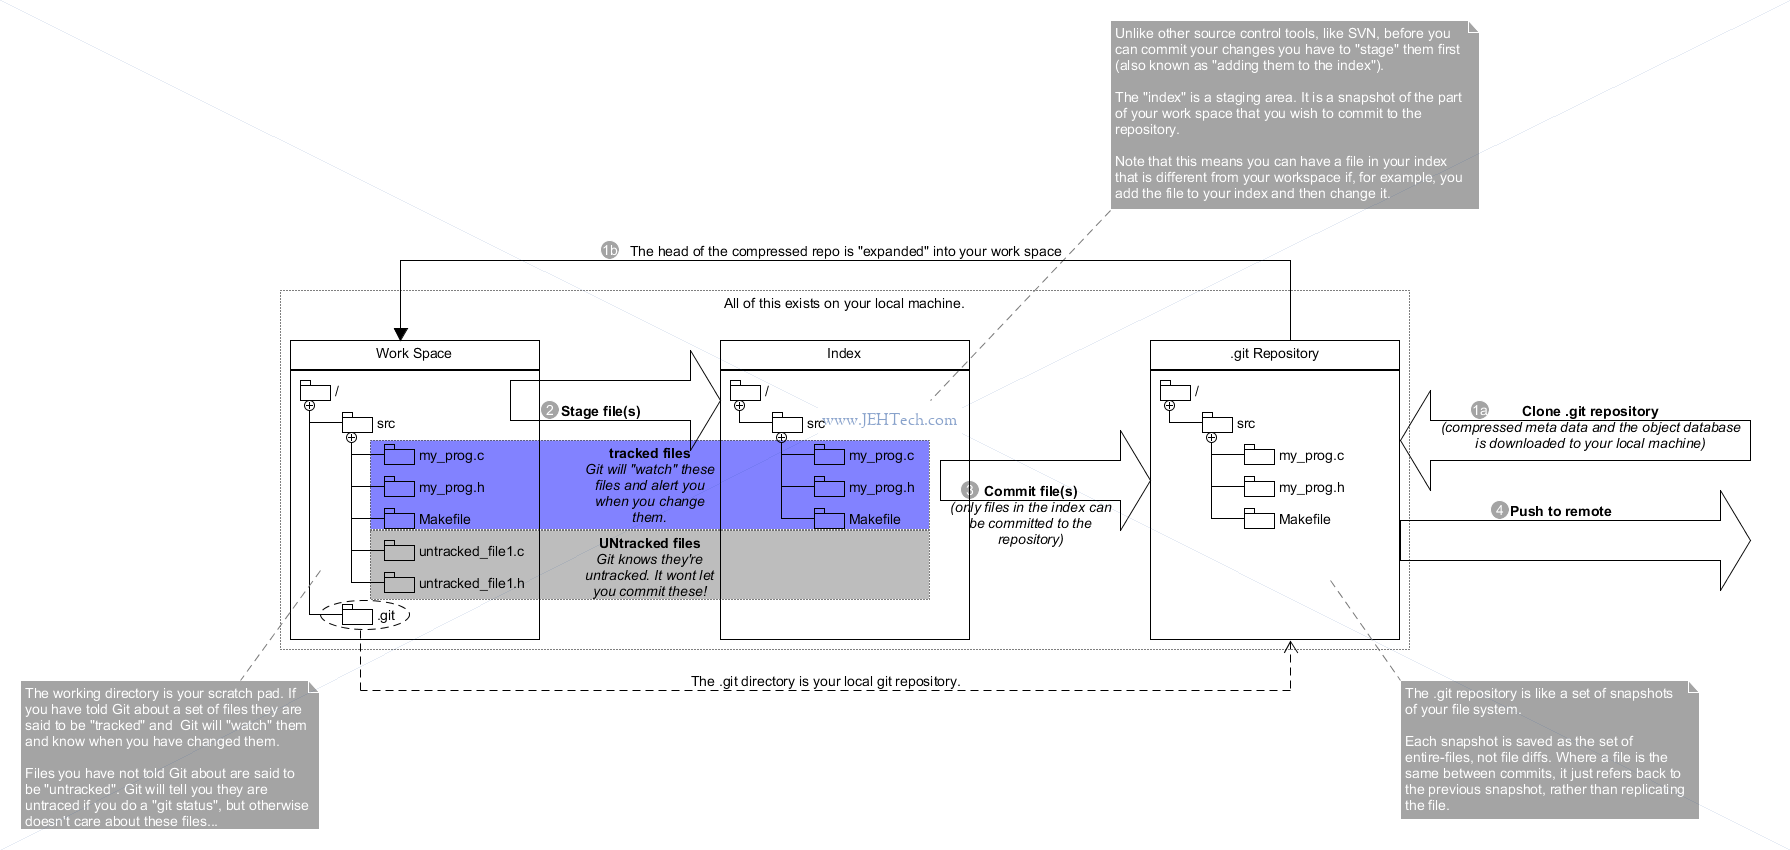
Git Workspace v.s. Index v.s. Repository
Configuring Git
Setup your user name and email globally:
git config --global user.name "name"
git config --global user.email "email"
You can override the global settings for specific repos by chaning to the repo's root and running:
git config user.name "name"
git config user.email "email"
Setup your editor and diff tool:
git config --global core.editor gvim
git config --global merge.tool vimdiff
To see your config setup:
git config --list
To see a specific key’s config:
git config key-name
For example...
git config user.name
Search (Grep) Your Repo
Using git grep ignores git internal files and generated files, which can make your
grepping life a lot easier!
Cheat Sheet Of Basic Git Commands
Creating Git Repos
To create a repo in the CWD:
git init
Cloning Git Repos
To clone a repo:
git clone https://repo_addr [dirname]
git clone git://repo_addr [dirname]
This pulls down data for the repo into dirname, if provided, or to an automatically decided
dirname in the CWD otherwise. Note you get the entire repo including all the history
copied locally. A remote called "origin" will be automatically added to point
to https://repo_addr.
If you want to control the amount of history you download use the --depth=n option. Normaly you would
use --depth=1 to get just the HEAD with no history. This equals faster cloning at the expense of
a history.
To do an even faster clone, you may also consider --single-banch --branch branch-name.
Checking Out Repos
Checking out a commit makes the entire working directory match that commit. This can be used to view an old state of your project without altering your current state in any way. Checking out a file lets you see an old version of that particular file, leaving the rest of your working directory untouched.
git checkout commit-hash | tag-name | branch-name
Convert Existing Directory Into A Git Repo And Push To Remote
cd <localdir>
cd <localdir>
git init
git add .
git commit -m 'message'
git remote add origin <url>
git push -u origin main
Git Branches
A branch is lightweight moveable pointer to a commit and the default branch name is "master". HEAD points to current branch head, so changes when you change branch.
To list all the branches in the repo type:
git branch
You can filter the list with the --merged and --no-merged options
to see branches that are not merged back in etc.
To create and checkout a new branch use:
git branch new-branch-name
git checkout new-branch-name
The shorthand for the above is:
git checkout -b new-branch-name
To locally delete a branch (branch history still exists and is recoverable):
git branch -d branch-name
To delete a branch on the remote:
git push origin --delete branch-name
To switch branches use:
git checkout branch-name
Now, HEAD will point to new branch and NOT prev branch.
Note that switching branches changes files in your working directory. When you switch branches, Git resets your working directory to look like it did the last time you committed on that branch.
Finding A Branch Point With Git
The guy who figured this out answered this title's question on StackOverflow. Bloody genious!
diff -u <(git rev-list --first-parent topic) \
             <(git rev-list --first-parent master) | \
     sed -ne 's/^ //p' | head -1
Or more robustly...
git config --global alias.oldest-ancestor '!zsh -c '\''diff --old-line-format='' --new-line-format='' <(git rev-list --first-parent "${1:-master}") <(git rev-list --first-parent "${2:-HEAD}") | head -1'\'' -'
Adding Files To Your Git Repo
You must add files from your workspace into the Git index so that Git knows what to track...git add . # adds all files (tracked or not) in cwd git add -u # puts all changed tracked files into staging area (i.e., wont add new files) git add -A # does both of the above
Note that if you modify a file after staging, the modifications after the stage will not be committed in this commit unless added again.
Committing Files
Each commit is pointer to snapshot plus author/committer details, msg etc and pointer to prev commit (or commits if this is a result of merge).
To commit all staged changes:
git commit -m "your msg here"
To commit all tracked files, staged or not, use:
git commit -a -m "..."
Any tracked file that is not staged will be automatically staged.
To ammend the last commit, adding in all currently staged files use:
git commit --amend
This will give you the chance to modify the last commit (launches text editor) and will also add any currently staged files into the last commit. For example:
git commit -m "a commit where I forgot to add a file"
git add forgotten_file
git commit --amend
Git Logs: Viewing Your History
To get a summary of changes made with author, date, full commit hash and description:
git log
To do the same but for a particular directory:
git log <options> -- <dirname>
To get a one-line-per-commit summary (short hash and description):
git log --online
To get just the commit ID:
git log -1 --pretty=format="%H" HEAD
To get a log between versions/tags/commits/branches etc:
git log chng..chng
where chng can be a tag name, a commit's hash, a branch name etc.
To limit the log to the last 5 entries:
git log -5
To view the differences introduced in each commit:
git log -p
To see only the files in the last commit (or replace git log with a specific revision!)
git diff-tree --no-commit-id --name-only $(git log --oneline --format="%H" -1) -r
Note, however that this will not tell you what happened to each file - was it updated, deleted etc? To get state:
git diff-tree --no-commit-id $(git log --oneline --format="%H" -1) -r | awk '{print $5,$6}'
To view the logs for the last two weeks:
git log --since=2.weeks
Use "<number>.<time-period-type>". So, for example, the time period could also be "days" or "hours".
To grep the log for commits that introduces a change to the code that added or removed a search string:
git log -S<search-string>
To do the same, (i.e. search the commit diff) but using regular expressions [Ref]:
git log -G'helper.*function' --full-history --all
To search through the commit messages use [Ref]:
# case sensitive
git log --all --grep='your-regexp-here'
# case insensitive
git log --all --grep='your-regexp-here' -i
To really pretty-print your logs:
git log --oneline --decorate --graph --all
To show the log with full path names and status of changed files:
git log --name-status
To show the log with abbreviated pathnames and a diffstat of changed files:
git log --stat [-M]
Add the -M option to detect and show moves.
To show all the commits in which a certain file is changed and a certain function (awesome!):
git log -L:func-name:path-to-file
Get revisions committed by specific author
git log [--oneline] [--name-only] --author=name
Tagging Files With Git
Tags are "nice" names by which you can identify snapshots of a repo. For example, you will likely tag releases.
git tag -a <tag-name> -m "Description of tag"
        ^^
        -a means create an annotated tag (stores name, date and msg)
To list all the available tags in your repo:
git tag
To search for tags with names matching a given pattern:
get tag -l <pattern>
To see/search for tags on remote:
git ls-remote --tags /some/url/to/repo ["refs/tags/MyTag^{}"]
#                                       ^                  ^
#                                       Quotes are required here!
An important point to note is that git push does NOT transfer tags to remote servers!
You must do this explicity using git push origin <tagname>
Delete tags locally:
git tag -d tag_name
List tags on remote:
git ls-remote --tags origin
Delete tags on remote:
git push --delete origin tag_name
Push commits and tags in one go:
git push --follow-tags
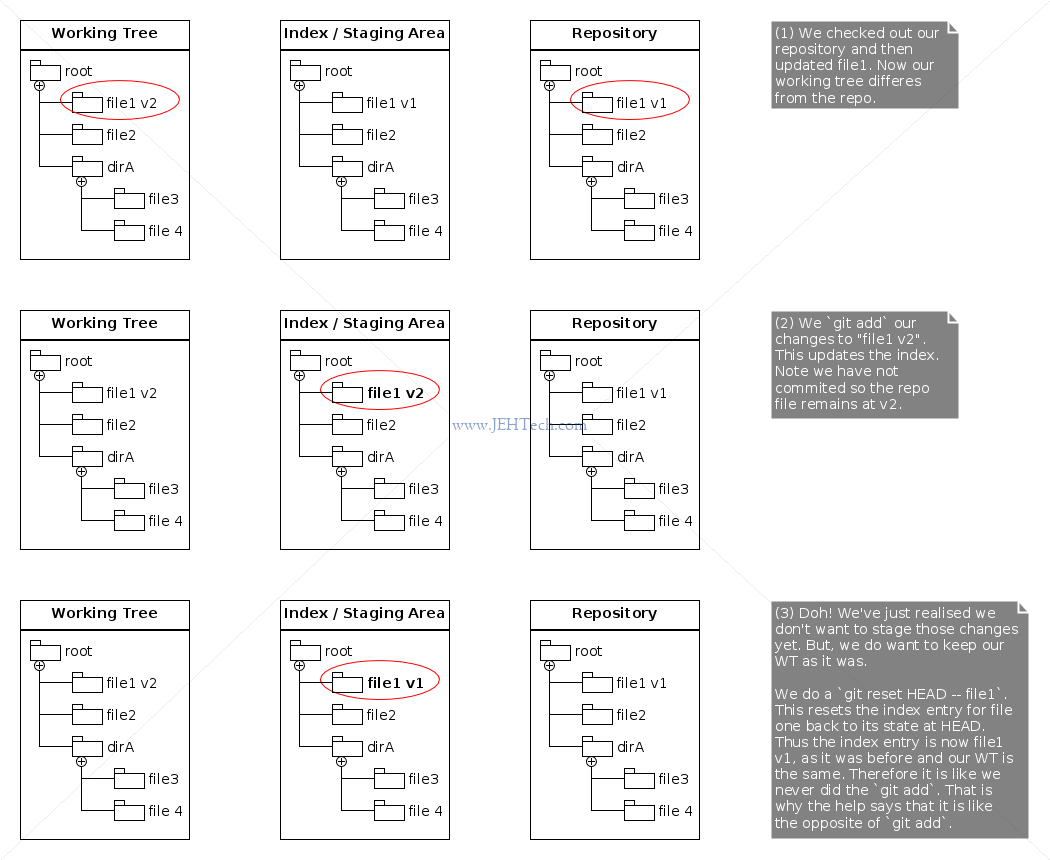
Undoing Things
This section remains a little cheat sheety in style. I'm going to expand on it in a later section...
Revert unstanged changes:
Kinda like reverting a file in the SVN sense
git checkout -- filename
By refering to the diagram describing the working directory vs the index we can understand what this is doing. We have modified a local file but not staged the changes yet. By checking out the file we're just overwriting the changes in the working directory, which Git, because we haven't staged these changes, knows nothing about.
To unstage a file:
git reset HEAD -- filename
This resets the index entry for "filename" to its state at HEAD, therefore removing it from the index. Note this changes the index entry, which is distinct from your working directory. The file in the working directory is not touched.
To undo all uncomitted changes to tracked files:
git reset --hard
The option --hard resets (to the most recent commit) the index and the working tree.
A Note About Reset:
A git reset actually alters your history and can only work
backwards from the current commit. By altering the history you could
potentially loose history. Also once a change is pushed to a shared
repository, resetting the change afterwards can become troublesome! You
will also loose all uncommitted changes.
If git revert is a "safe" way to undo changes, you can think of git reset as the dangerous method. When you undo with git reset(and the commits are no longer referenced by any ref or the reflog), there is no way to retrieve the original copy — it is a permanent undo. Care must be taken when using this tool, as it’s one of the only Git commands that has the potential to lose your work.
To remove a file from repo withOUT deleting it locally:
git rm --cached myfile.name
To remove untracked files use:
git clean -f
To undo a commit use:
git revert commit-id
The
git revertcommand undoes a committed snapshot. But, instead of removing the commit from the project history, it figures out how to undo the changes introduced by the commit and appends a new commit with the resulting content. This prevents Git from losing history, which is important for the integrity of your revision history and for reliable collaboration.
Listing Files In The Git Repo
To list files currently being tracked on branch master:
git ls-tree -r master [--name-only]
The above will list all files and directories in master, recursively,
that are being tracked. Each line output is for one file and consists
of the file's latest comment hash and the file path. If
--name-only is used then the commit hash is ommitted.
To do the same, but list on the current branch:
git ls-tree -r HEAD --name-only
Diffing With Git
git config --global difftool.prompt false
git diff: What you have changed but NOT staged
git diff --staged: What will go into next commit
git diff --cached: Synonym for --staged
git difftool -y [--dir-diff dir] [tool=(kdiff3|p4merge|...)] :      To use external diff tool
To view only the names of files changed between two commits:
git diff 99f6eae 0544f6a --name-only
To produce a diff between commits but only for a subset of files, for example do:
diffstart=99f6eae
diffend=0544f6a
wanted=$(git diff $diffstart $diffend --name-only  | grep -v "\(xls\|tsv\)$")
git diff $diffstart $diffend --full-index  -- $wanted
The difftool can be configured by setting the configuration variable difftool.<tool>.path. To set a default
tool edit the file ~/.gitconfig and in the [diff] section add or change the line tool = your-tool.
For anything else out of the ordinay see this SO thread.
Diffing Between 2 Repos
From this SO thread:
Question:
How can we get the difference between two git repositories?
The scenario: We have a repo_a and repo_b. The latter was created as a copy of repo_a. There have been parallel development in both the repositories afterwards. Is there a way we can list the differences of the current versions of these two repositories?
Answer:
In repo_a:
git remote add -f b path/to/repo_b.git
git remote update
git diff master remotes/b/master
git remote rm b
Git Parlance & Internal Structure
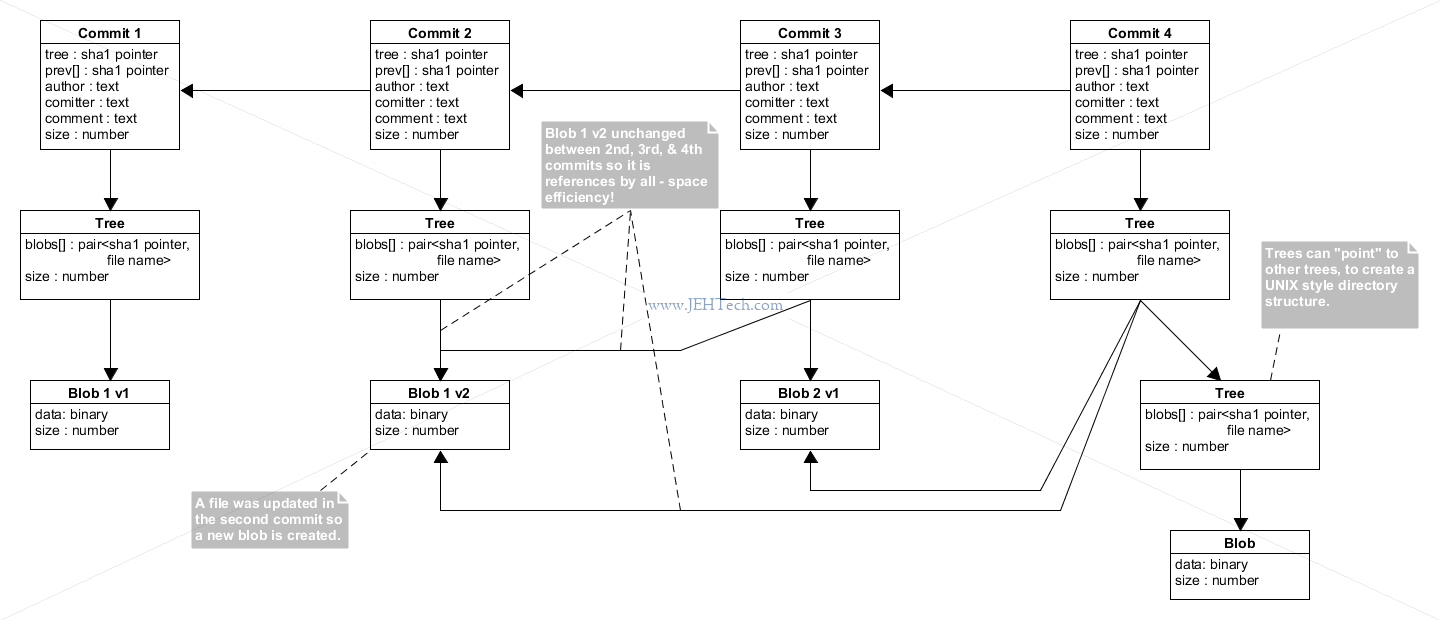
What Are Commits And How Do They Store Snapshots?
The Git Book on the internals of Git (Git Objects) has a good explanation of how Git repos are organised [Ref] [Ref].
To summarise a little:
- Commit - stores meta data (author, committer, comment) and pointer to the top level tree snapshot as well as the previous commit (or commits if a merge commit). The commit object itself is identified by a sha1 pointer. Note that we said "top level": the commit is a snapshot of your entire repo.
- Tree - corresponds to a directory - collection of pointers (pair of sha1 hash and file name) to file blobs and trees.
- Block - a binary blob representing a file with an associated sha1 hash.
Commit-ish & Tree-ish?!
Two terms you might see in the documentation are "commit-ish" and "tree-ish" [Ref].
"Commit-ish" means an identifier that references a commit object in the repo. For example a tag is an identifer that references a commit, as is the sha1 hash for that commit.
"Tree-ish" means an identified that references part of the repo's tree. Again, a tag can be "tree-ish" because it references a commit, from which we can access the files and folders that the commit is a snapshot of.
What is HEAD?
TODO:
    https://stackoverflow.com/questions/5772192/how-can-i-reconcile-detached-head-with-master-origin
    https://git-scm.com/book/tr/v2/Git-Internals-Git-References
The HEAD file is a symbolic reference to the branch you’re currently on. By symbolic reference, we mean that unlike a normal reference, it doesn’t generally contain a SHA-1 value but rather a pointer to another reference
Specifying Revisions
Read the Docs :)
Immediate Parents
You can iterate through immediate parents using the hat character (^) there ^n
selects the nth immediate parent. Note that <rev>^ is a shorthand for
<rev>^1.
Grand Parents
The notation ~n selects the nth generation grand-parent. For example,
~1 selects the first parent, and ~2 selects the first grand-parent,
and ~3 selects the first great grand-parent
Parent v.s. Grand Parent Selection
Straight from the Docs:
G   H   I   J
 \ /     \ /
  D   E   F
   \  |  / \
    \ | /   |
     \|/    |
      B     C
       \   /
        \ /
         A
A =      = A^0
B = A^   = A^1     = A~1
C = A^2  = A^2
D = A^^  = A^1^1   = A~2
E = B^2  = A^^2
F = B^3  = A^^3
G = A^^^ = A^1^1^1 = A~3
H = D^2  = B^^2    = A^^^2  = A~2^2
I = F^   = B^3^    = A^^3^
J = F^2  = B^3^2   = A^^3^2
Revert & Reset
As we have seen in previous quotes above, revert is a safer version of
reset. The former creates a new commit which represents the changes needed to
to revert the former HEAD to a previous commit. It does not change any of the previous
commits.
A reset on the other hand has the potention to obiliterate information.
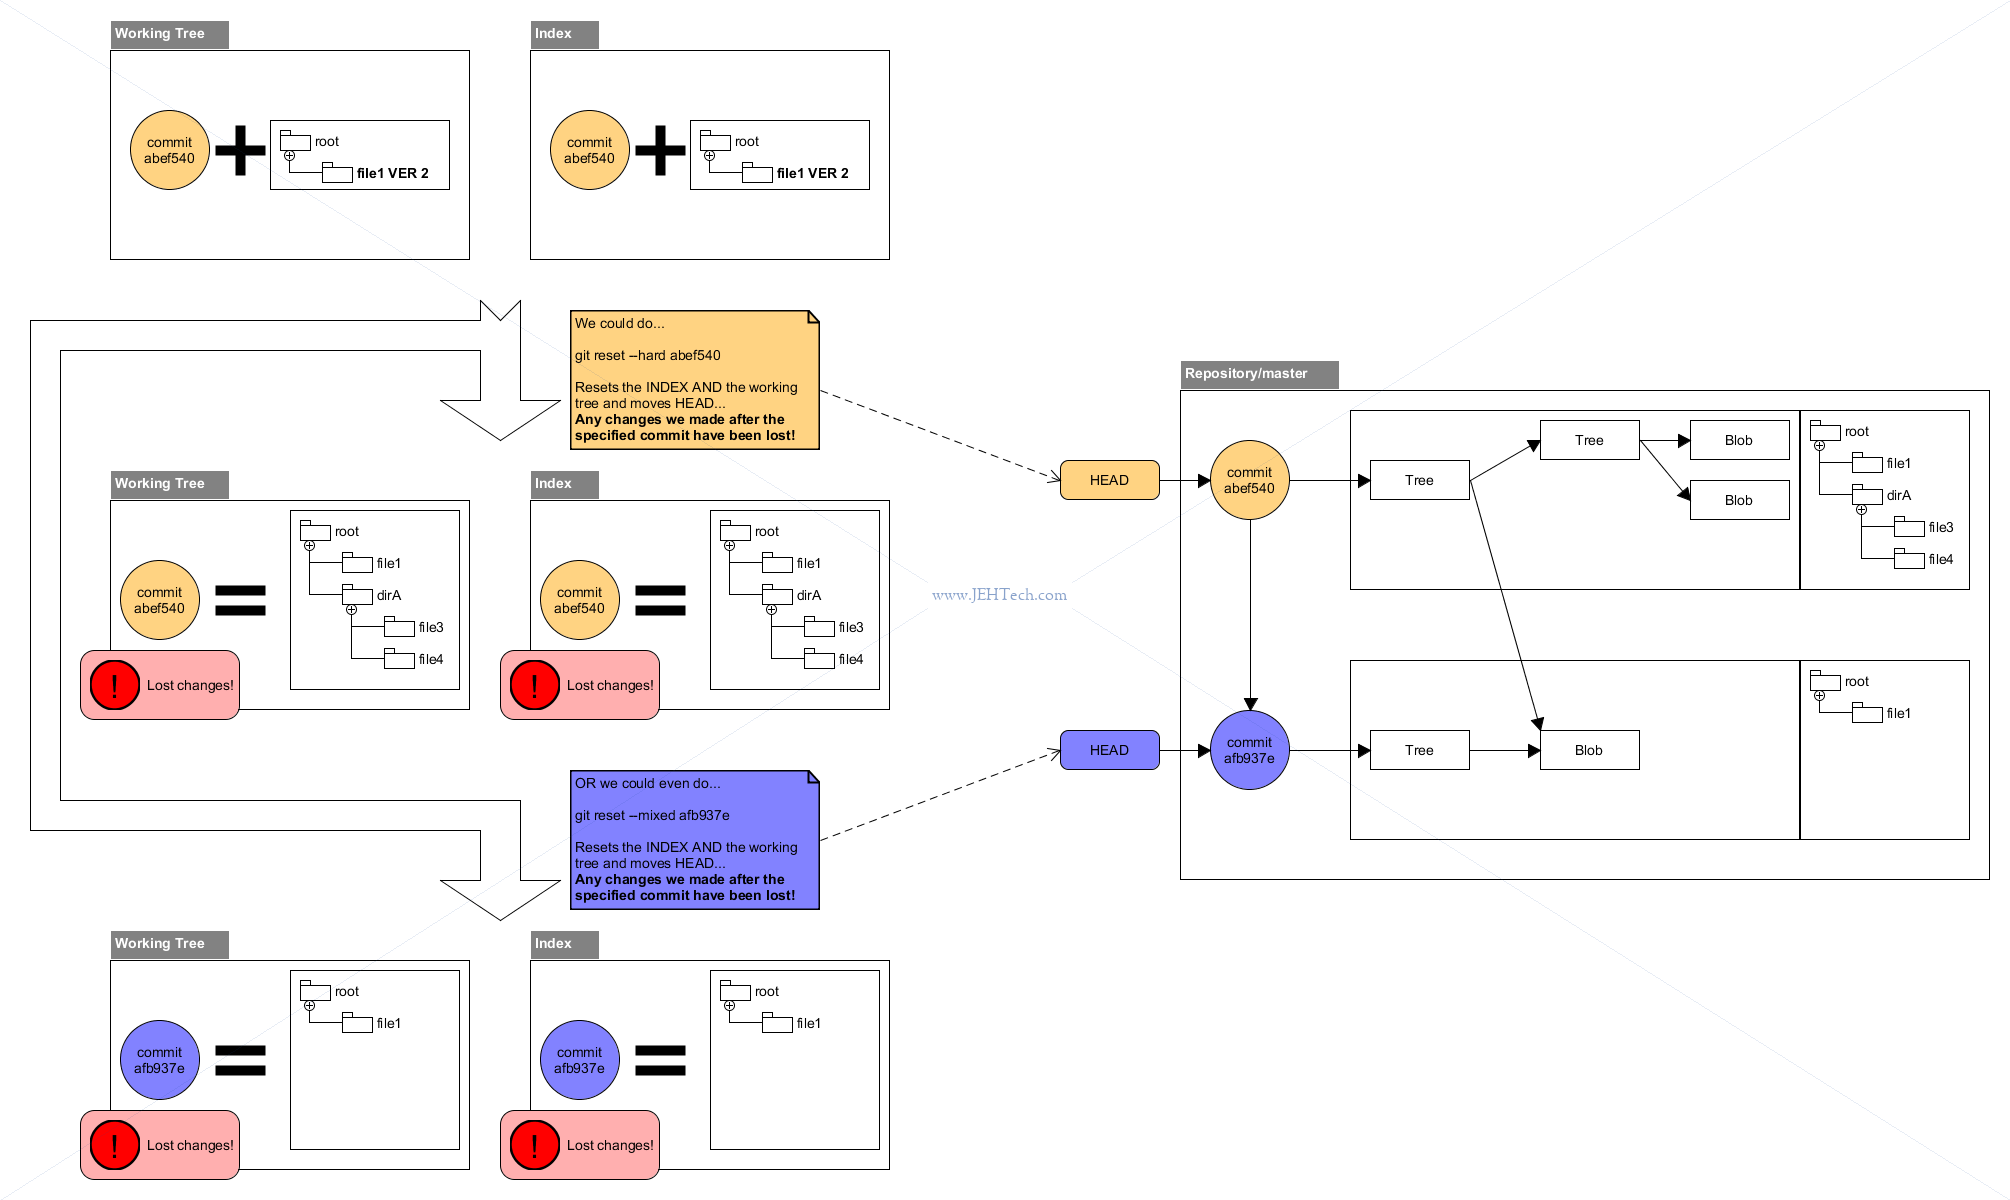
Resetting The Index (aka. The Staging Area)
One of the cheat-sheet snippets we saw earlier was git reset HEAD -- filename,
which unstaged a file. From the Git help we get the following explanation:
git reset [-q] [<tree-ish>] [--] <paths>...This form resets the index entries for all <paths> to their state at <tree-ish>. (It does not affect the working tree or the current branch.)
This means that git reset <paths> is the opposite of git add <paths>.
The effect can be visualised as shown in the diagram below:
Moving Your Branch HEAD Around & Maybe Modify The Working Tree + Index
Another form of the git reset command can be used to move the HEAD of the
current branch around. In all forms the HEAD of the branch is moved to a specific
commit. What happens to the index and woking tree depends on the mode in which it is
used...
git reset [<mode>] [<commit>]This form resets the current branch head to <commit> and possibly updates the index (resetting it to the tree of <commit>) and the working tree depending on <mode>. If <mode> is omitted, defaults to "--mixed". The <mode> must be one of the following:
--soft:Does not touch the index file or the working tree at all (but resets the head to <commit>, just like all modes do). This leaves all your changed files "Changes to be committed", as git status would put it.
--mixedResets the index but not the working tree (i.e., the changed files are preserved but not marked for commit) and reports what has not been updated. This is the default action.
If
-Nis specified, removed paths are marked as intent-to-add.
--hardResets the index and working tree. Any changes to tracked files in the working tree since <commit> are discarded.
--mergeResets the index and updates the files in the working tree that are different between <commit> and HEAD, but keeps those which are different between the index and working tree (i.e. which have changes which have not been added). If a file that is different between <commit> and the index has unstaged changes, reset is aborted.
In other words,
--mergedoes something like agit read-tree -u -m <commit>, but carries forward unmerged index entries.
--keepResets index entries and updates files in the working tree that are different between <commit> and HEAD. If a file that is different between <commit> and HEAD has local changes, reset is aborted.
Soft Reset: Move HEAD, Touch Nothing!
Mixed Reset: Move HEAD, Touch Only The Index
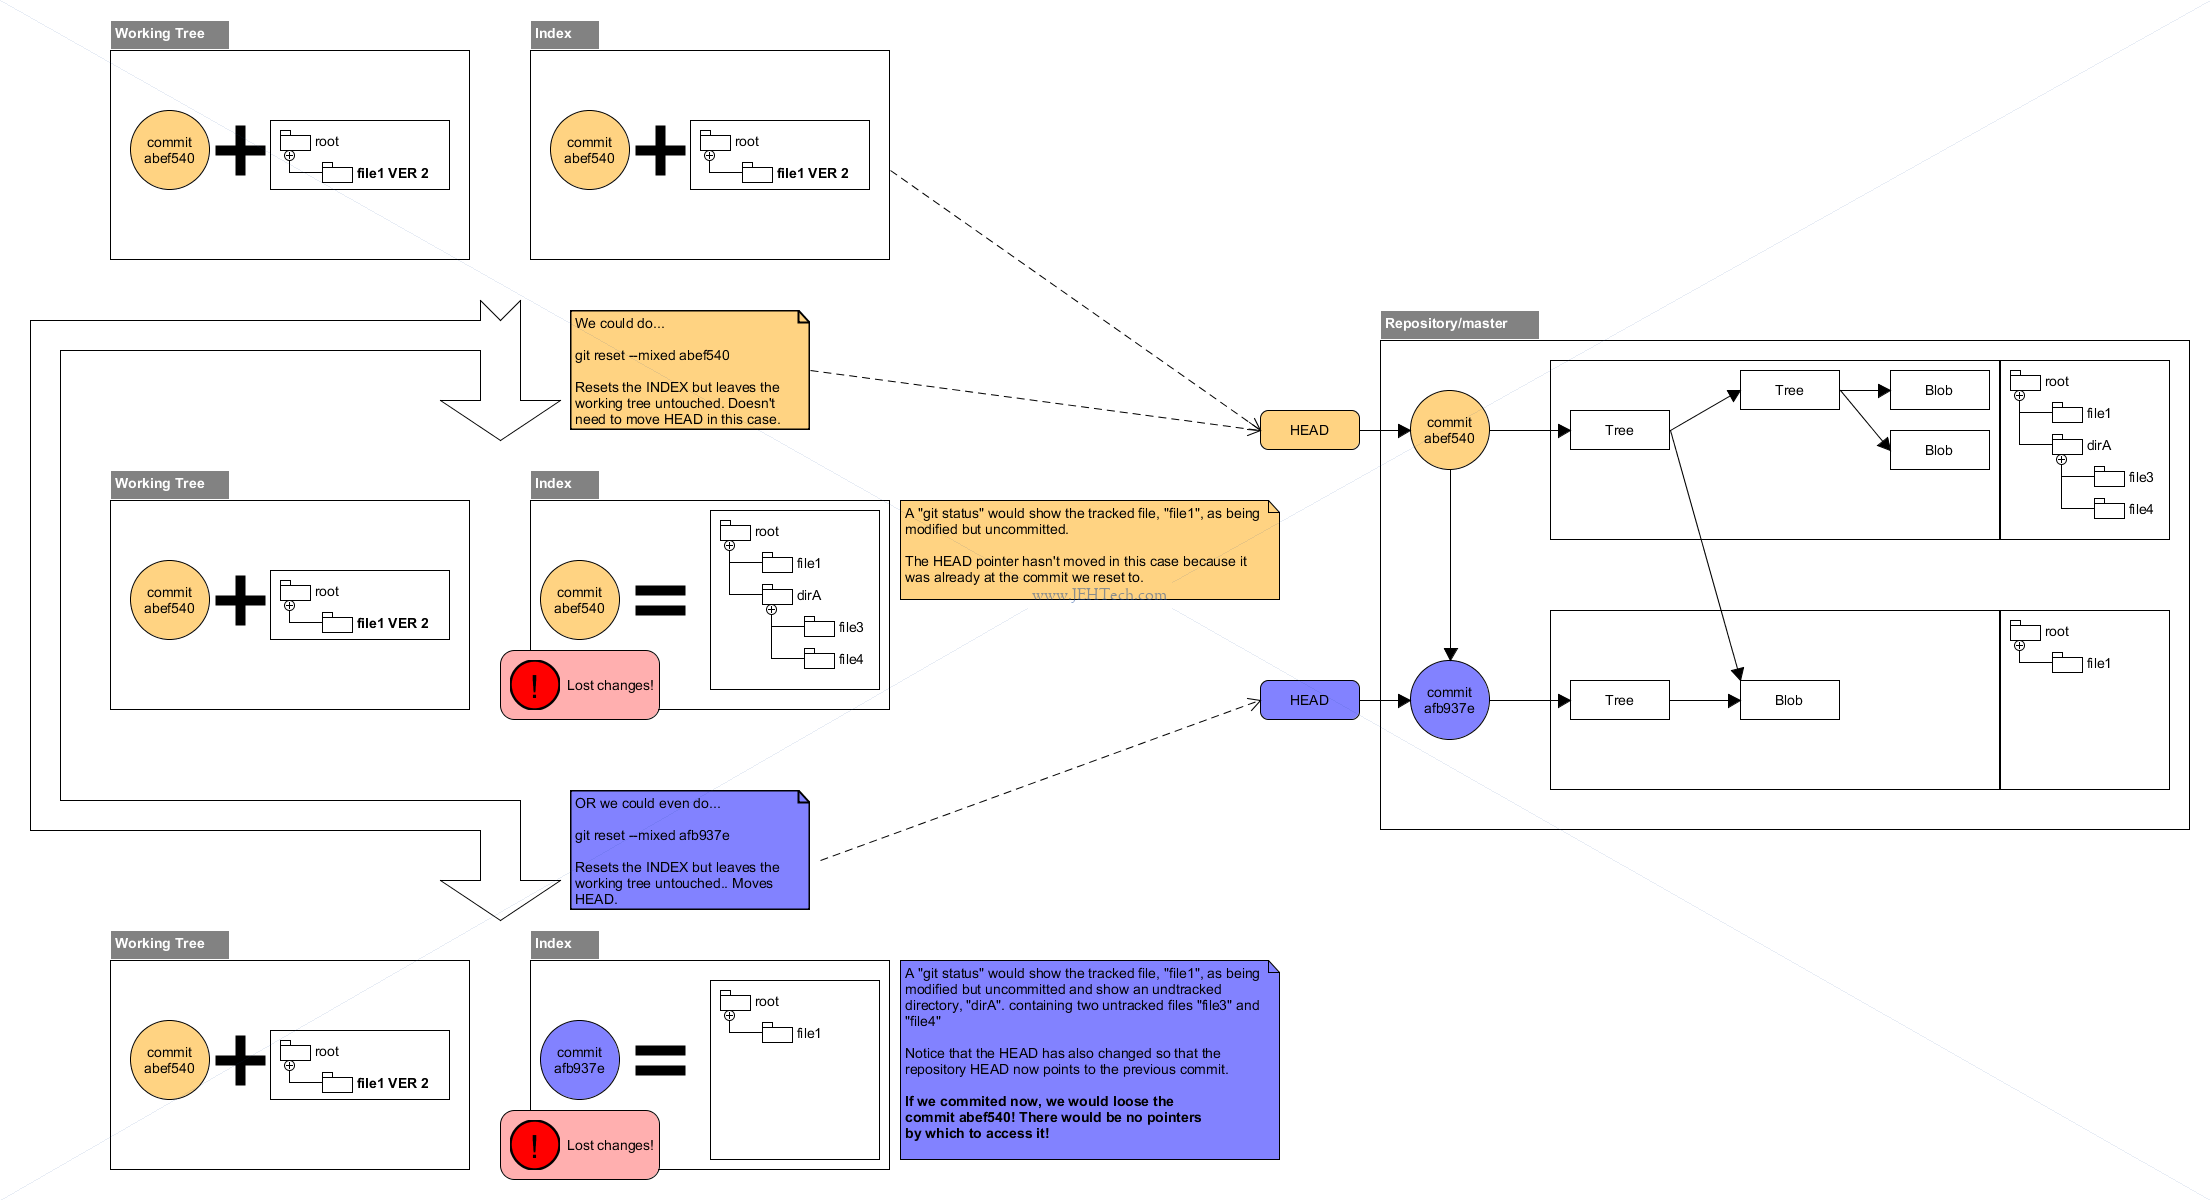
Hard Reset: Move HEAD, Touch The Index And The Working Tree
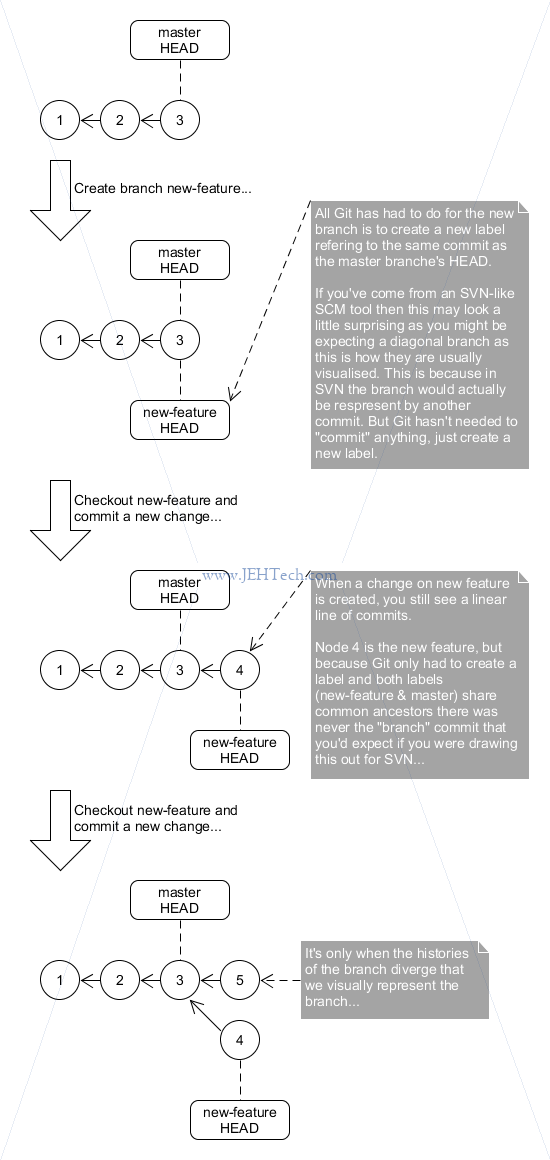
Branches And Commits (v.s. SVN-like SCMs)
Add & Commit A Subset Of Changes: Hunks
I enjoyed learning about this because it is quite often that I find I've fixed two bugs or more in the same file. This can be because the two bugs are so tightly coupled that fixing one depended on another, or it was a quick fix for something I noticed on the fly and was so simple it wasn't worth creating a branch just for this fix. Either way, I end up with a file that contains changes that address multiple bugs/tickets.
Note: you can also accomplish the same thing using an interactive rebase.
Lets test it out. Create a new repo and add a test file...
$ git init learngit
Initialized empty Git repository in C:/Users/jh/Documents/Sandbox/learngit/.git/

$ cd learngit

$ echo "#include <stdio.h>
        return 0;
>
> int main(int argc)
> {
>         return 0;
> }
> " > test.c

$ git commit -m "Create a test file.

Create a test file so that in a future commit I can test patch adds"
[master (root-commit) f573b91] Create a test file.
 1 file changed, 6 insertions(+)
 create mode 100644 test.c
We've created a little git repository and added one file called test/c to it.
Very very simple. Now let's spoof making two bug fixes by adding the following comments
just above the return 0 statement:
/* This line fixes bug A*/
/* This line fixes bug B*/
/* This line fixes bug A*/
Okay, now I want to make two seperate commits as I'd like to have one commit that deals soley with the changes I've made to fix bug A, and another commit that deals soley with the changes I've made to fix bug B. This way, any one looking back through the logs will be able to easily understand which changes fix which bug.
To do this I use the following command:
git add -p test.c
This launches an interactive command line utility:
$git add -p test.c<
diff --git a/test.c b/test.c
index 312d3cd..36da841 100644
--- a/test.c
+++ b/test.c
@@ -2,5 +2,8 @@

 int main(int argc)
 {
+       /* This line fixes bug A*/
+       /* This line fixes bug B*/
+       /* This line fixes bug A*/
        return 0;
 }
Stage this hunk [y,n,q,a,d,/,e,?]? e
The GIT command line askes me whether I want to stage this hunk. What is a "hunk"? A hunk is just a set of changes. Currently, we can see above that all the changes in the file are grouped together because they app have a plus sign next to them, indicating that they will be added in one group.
I don't want the line for bug B to be added in this group. So I must split the current hunk into smaller hunks. I do this by entering "e", as shown. This will start the configured text editor.
To avoid committing the lines associated with bug B, I relpace the + symbol
at the line start, with a # symbol as so (partial file in editor shown):
int main(int argc)
 {
+       /* This line fixes bug A*/
#       /* This line fixes bug B*/
+       /* This line fixes bug A*/
        return 0;
 }
Save and exit from the editor. The command ends. Now if I look at the GIT status, I see the following:
$ git status
On branch master
Changes to be committed:
  (use "git reset HEAD <file>..." to unstage)

        modified:   test.c

Changes not staged for commit:
  (use "git add >file>..." to update what will be committed)
  (use "git checkout -- <file>..." to discard changes in working directory)

        modified:   test.c
Oh la la! My file is both staged and unstaged. So have we staged only the changes for bug A? Lets find out by looking at what will go into the next commit:
$ git diff --staged
diff --git a/test.c b/test.c
index 312d3cd..67cc02e 100644
--- a/test.c
+++ b/test.c
@@ -2,5 +2,7 @@

 int main(int argc)
 {
+       /* This line fixes bug A*/
+       /* This line fixes bug A*/
        return 0;
 }
Sweet! So now I can commit these changes, then add the remaining bug B changes and commit them in a seperate commit... happy days!
BUT before I do this, I should really make sure that the changes that I have staged are good: they produce a compilable set of changes that don't break the build and the changes do in fact do what the commit message associated with them says. To do this I would like to save my unstaged changes and take them out of the workspace, whilst leaving the staged changes in the workspace:
$ git stash --keep-index
Now I can review/test etc the staged changes in isolation. Once I'm happy I can run
a git commit, and then to restore the remaining unstaged stuff I can run:
$ git stash pop
I can now repeat these steps for the bug B changes and so one...
Integrating
Fast forward
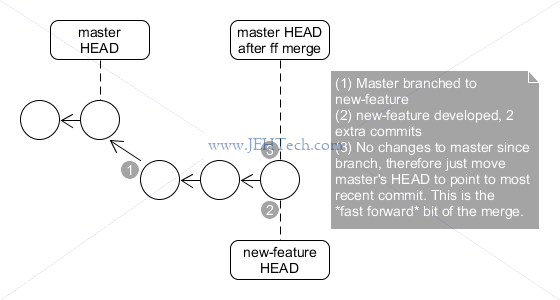
From the master directory you would merge in the new feature. But because the history has not divereged Git can just fast forward the master's HEAD to point to the latest commit.
Would be done using something like this:
# create a new branch of master
git checkout master
git checkout -b new_feature

# do some development in the new branch and then commit
git commit -m "Some new development, a fix, whatever"

# Go back to master and merge in the "new_feature" branch...
git checkout master
git merge new_feature

# Cleanup feature branch
git branch -d new_feature
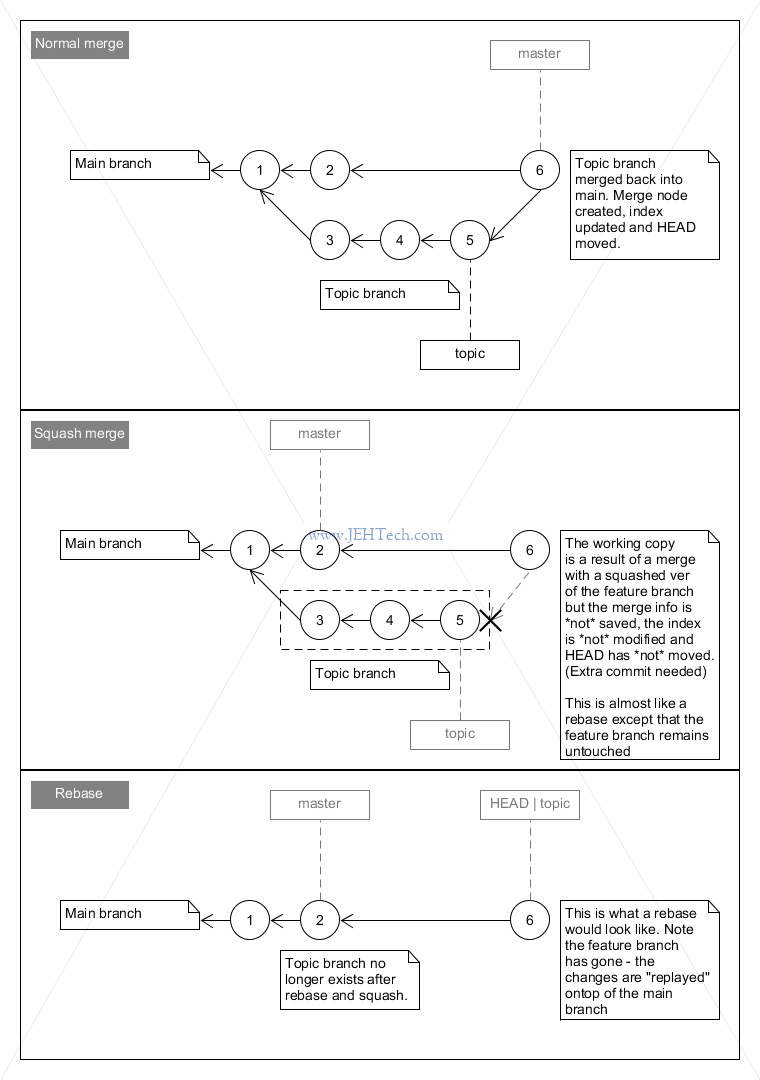
Merging
Git will do 3-way merge using the common ancestor. In this case, because the history between the master and feature branches has diverged, a simple fast-forward integration can not be performed. Instead a new commit in the master branch is created that exists soley to identify that a merge has taken place.
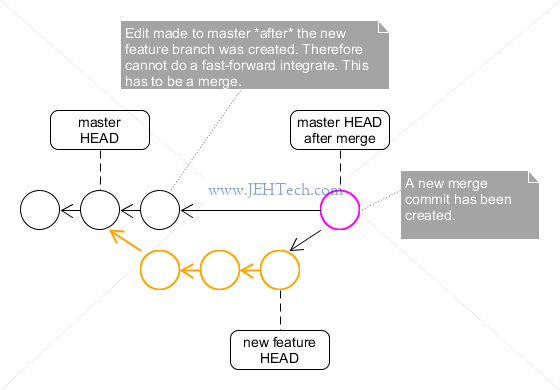
Would be done using something like this:
# create a new branch of master
git checkout master
git checkout -b new_feature

# do some development in the new branch and then commit
git commit -m "Some new development, a fix, whatever"

# !! Meanwhile someone else creates extra commits on the master branch !!

# Go back to master and merge in the "new_feature" branch...
git checkout master
git merge new_feature

# Cleanup feature branch
git branch -d new_feature
A lot of people (including me) like these kinds of integration. Its the typical way merging is done in other revision control systems like SVN, for example. All the history is preserved and it is clear that this commit represents a merge.
However, a counter argument is that we might not want to "pollute" our master branch with commits that only represent a merge. The idea is that the master line should show a story where each commit is some extra feature or bug-fix. We shouldn't see a ton of merge-commits (could be a ton in a busy master branch!). We only want to see the story, and that story should course-grained (i.e, for a bug fix only one extra commit rather than the many commits that may have been made in the development branch). This is why a lot of Git users prefer rebasing (see below).
Merging With A Squash
The git merge command has an option --squash.
You can see code that tests this out here - test_git_squash_merge.sh.
One can see that the squash-merge is a little bit like a rebase, except that the original branch is left alone. This has the advantage of not destorying your branch, in case you want to continue using it, or have done something wrong (and a rebase would have been harder to undo). Its basically a kinda-safer shortcut to rebasing and squashing your development branch onto the master.
Rebasing
The Git world offers something that CVS, SVN, Perforce etc users won't be as familiar with... rebasing. It gives you a cleaner (no merge commits polluting the project history) and a more linear project history by taking changes you made in your development branch, possibly combining several dev changes into one single commit on the fly, and "appending" them to another branch as-if the changes we made on that branch.
The Vanilla Rebase
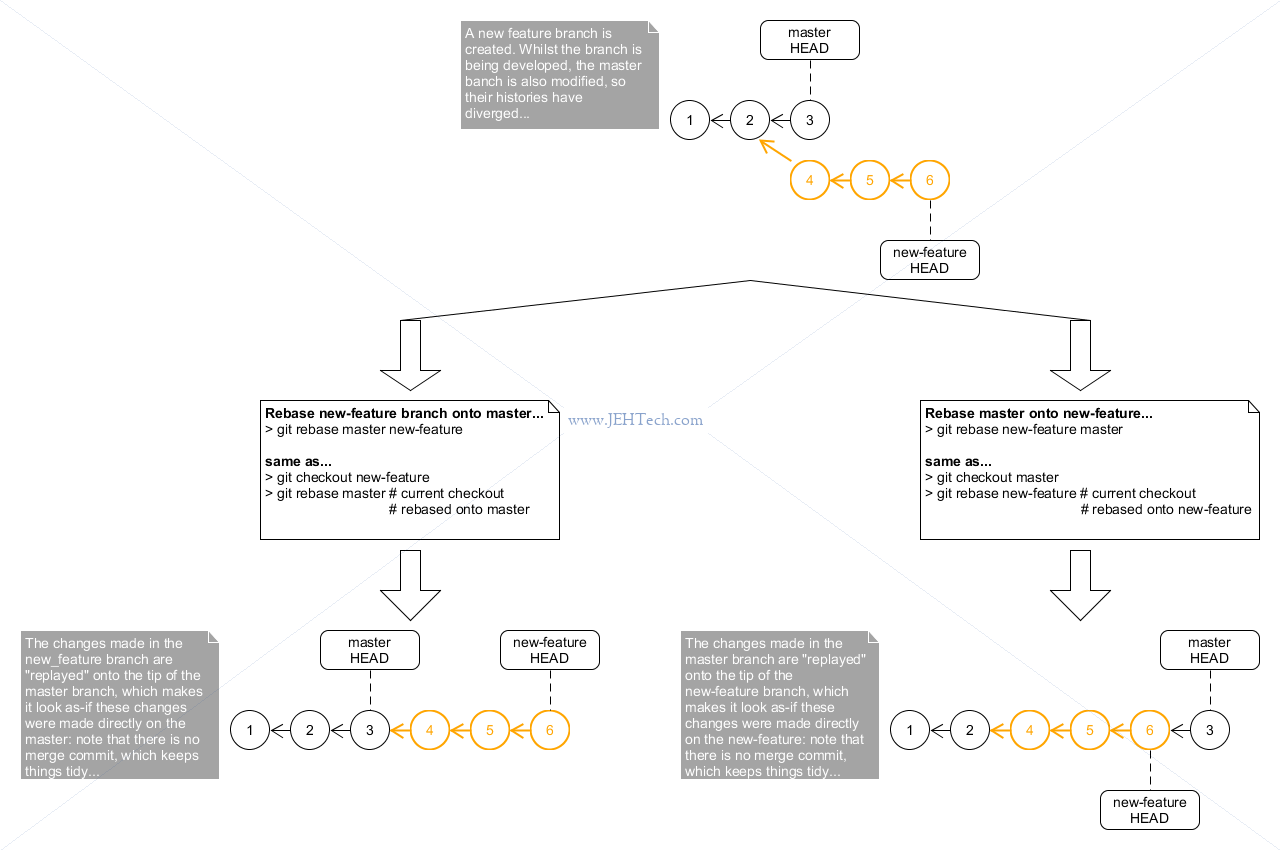
We have used the following syntax:
git rebase <target-branch> <src-branch>
Which is equivalent to doing...
git checkout <src-branch> && \
git rebase <target-branch>
I like the first variant because it makes sure you have the correct branch checked out before you do the rebase. When you use rebase with only the "target-branch" branch, you are rebasing currently checked-out branch onto the target.
Use git rebase <target-branch> to rebased the current branch onto "target-branch".
Use git rebase <target-branch> <src-branch> to rebase the "src-branch" onto the "target-branch" by checking out "src-branch" first and then doing the rebase.
Can investigate this using this simple little shell script
that tries to replicate the above. It has two command line uses: either "test_vanilla_rebase.sh master onto new"
or "test_vanilla_rebase.sh new onto master".
Interative Rebasing: Squashing Commits
The following notes should be used with a ton of caution! You might even consider making temporary backups before starting this work!
The notes in this section cover commands that can completely obliterate files from your repository. Use with absolute caution! Make backups first!
In the example above where the new feature is rebased onto the master branch, 3 commits are added to the master for the one new feature. We might like to tidy this up a little and only have one new commit in the master branch that is the aggregation of all of the commits done during development. This way, the master branch is kept even neater with only one change (as we probaly don't care to much about the intermediate development steps - the detail - in the main master branch story... it just wants to capture that a new feature was added, not the nitty gritty detail of its development stages).
Ideally we would do this:

And this is what we can achieve using interactive rebasing in Git! Whoop whoop...
We can do the interactive rebase using:
git rebase -i master new
Which, remember, is the same as doing:
git checkout new
git rebase master
When we do this Git will launch an editor that will allow you to pick the commits from new that are going to be replaying on top of master. If we take our simple little shell script and add a "-i" to the rebase command and rebase new onto master interactively we will get the following in a text editor:
pick <hash> First new feature
pick <hash> 2 new feature
pick <hash> 3 new feature
pick <hash> 4 new feature
If we want to combine everything into one commit, simply change the text to the following and save and exit:
pick <hash> First new feature
squash <hash> 2 new feature
squash <hash> 3 new feature
squash <hash> 4 new feature
Or lets say, for example if we want to combine the commits "First new feature" and "2 new feature" as a single commit but leave the others alone we would do:
pick <hash> First new feature
squash <hash> 2 new feature
pick <hash> 3 new feature
pick <hash> 4 new feature
Basically the "squash" command will combine the commit on that line with every commit above it, until it hits a "pick" line.
If you delete a line from the rebase listing its contents is lost forever... eek!
Interative Rebasing: Editing Commits
The following notes should be used with a ton of caution! You might even consider making temporary backups before starting this work!
The notes in this section cover commands that can completely obliterate files from your repository. Use with absolute caution! Make backups first!
Lets say we run this script to setup a sandbox repo in which to have a little play. We would end up with the following commit log:
de5fcb1 Third commit about something
466318b Second commit about something, with an error... oops
fca8f1a First commit about something
We have traced our problem to the second commit and now we want to ammend it. Maybe it was something simple like changing the commit message or the author. But maybe it is something more complicated like a code change that will be required. Either was it doesn't matter. We can rebase our own branch like so:
git rebase -i HEAD~2
              ^^^^^^
              Rebase starting after the second commit before HEAD.
              In this case it is that same as typinh
                 git rebase -i fca8f1a
Note that with this command we cannot change the first commit. If we
wanted to do that we could use the option --root, but I'm
leaving that one out as I can't see myself ever using it.
So let's rebase. Git will launch our editor and give us the following:
pick 466318b Second commit about something, with an error... oops
pick de5fcb1 Third commit about something
Change the first "pick" to "edit", and exit the editor saving changes. Observe the Git message:
warning: stopped at 466318b... Second commit about something, with an error... oops
Git is replaying the history of our branch. It's as-if it rewound the branch to its state at commit fca8f1a (the first commit) and then applied the changes made in commit 466318b (the second commit), but before commiting those changes, it is giving us a chance to make further changes. Any changes we make will be written as part of this commit, as-if we had actually made them back in time when we actually did the second commit!
We're now in a kind-of "temporary world" where we can edit this commit before it is applied. If we cat the file we see:
First line
Second line with an error
So we know that the change for the commit we are "paused" on has been applied.
If we look at the log, we also see our log message:
$ git log --oneline
466318b Second commit about something, with an error... oops
fca8f1a First commit about something
So, we can see Git has "paused" the rebase on this commit. Although the commit message is in the log, it hasn't actually "gone through" yet! We have this time to modify the file or the log message as we see fit.
Let's edit the file to remove our error and change the second line
from "Second line with an error" to just
"Second line". To do this you must git add the
file and then do a git commit --amend as follows:
git add file.txt
git commit --amend
Git launches our text editor. In the editor we see our commit message which we can now change to just "Second correct commit" and save.
Now you must remember to do git rebase --continue to
make the changes permanent.
UH OH! We get a conflict:
First line
<<<<<<< HEAD
Second line
=======
Second line with an error
Third line
>>>>>>> de5fcb1... Third commit about something
Ah, the change we made conflicts with the change made in the final commit on our branch. At this point the rebase has again "paused", but this time the branch is in the state it would be when the third commit had been done. But as we have seen, Git cannot replay this commit automatically for us because a conflict has been introduced.
This is quite easy to fix. We just edit the file so it looks like this and save:
First line
Second line
Third line
Having resolved the conflict we need to git add file.txt,
commit it and then
remember to run git rebase --continue.
At this point we are told that our rebase has been successfull. If we cat our file we see the contents are as we have modified them to be and the log reflects this:
caeb871 Third commit about something
2867a5a Second CORRECT commit
fca8f1a First commit about something
You'll notice that the second and third commits now have diffent commit hashes. This is to be expected as the file contents have changed. Any files that we had been branched from any of the changed files, will be updated correctly to "point" back to the equivalent modified file.
Undoing A Rebase
So, here's a mistake I made doing a rebase to squash some commits on my branch. It's a nice example
of using git reset --hard and git reflog. I had the following set of commits,
which I've labeled #44 through #49. I wanted to keep commit #45 and squash #46 to #49:
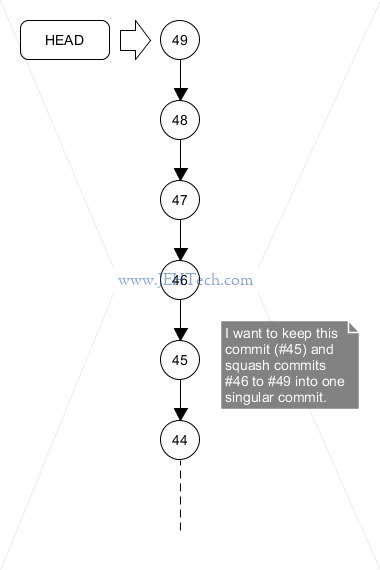
I.e., I wanted to end up with the following:
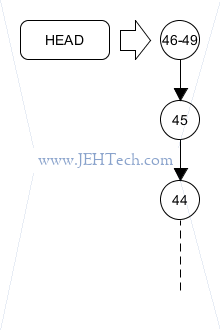
But, I was a little careless with my rebase, and ended up with this:
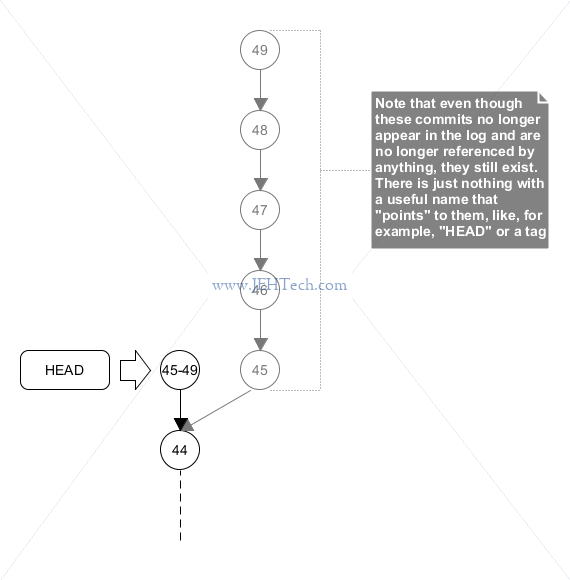
Instead of doing a git rebase -i 45 I had done a git rebase -i 44, thus including commit 45 in my squash. As the figure above shows, HEAD now points to my newly created commit that squashes up commits 45 through 49. If I look at the log, I can no longer see individual commits 45 through 49. So, where have they gone and can I get them back?
The answer is yes. As long as I have not executed a git prune command, the individual commit chain still exists and is shown above by the grayed out commit nodes. These nodes still exist in the Git repo, its just that there is no "handle" or "named pointer", if you will, that we can use to refer to them by. So, how the, can we refer to them in order to tell Git that we want them back? Answer: git reflog.
"Reflog" is short for "reference log" and it records when the tips of branches were updated in the local repository
[Ref]. Great, so this log should contain the history that describes when our branch HEAD moved from commit 49 to commit 45-49. This means we can do a hard reset to make both our working tree, index and HEAD pointer "go back" to commit 49 with all the commit history associated with it, as shown below.
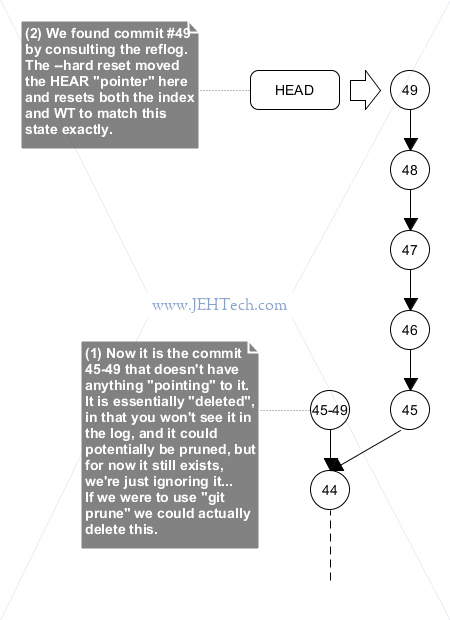
Now our repository looks exactly as it did before we started messing around with rebasing. From here I could continue to do the correct rebase... all is well. Phew!
Using Rebase To Edit A Commit
Let's create a silly little repository:
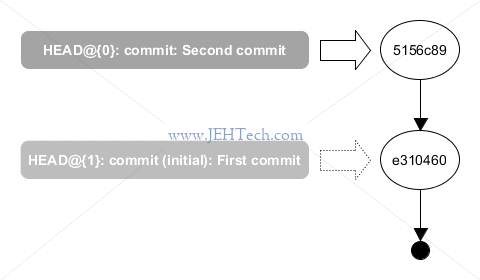
> mkdir deleteme
> cd deleteme
> git init
> echo "First commit line" > test.txt
> git add -A
> git commit -m "First commit"
> echo "First line of second" >gt; test.txt
> echo "Second line of second" >gt; test.txt
> git add -u
> git commit -m "Second commit"
> git log --oneline
5156c89 Second commit
e310460 First commit
Great, so we have two commits. The reflog looks like this:
> git reflog
5156c89 HEAD@{0}: commit: Second commit
e310460 HEAD@{1}: commit (initial): First commit
So, when we made our first commit, HEAD was set to point to it. When we made our second commit, HEAD was moved to point to that. What we'd expect...
Let's edit the second commit. We do this by starting a rebase from e310460.
git rebase -i e310460
The editor will pop up and allow us to change "pick" to "edit" for commit 5156c89. When we save and exit the rebase starts:
> git rebase -i e310460
warning: Stopped at 5156c89... Second commit
The reflog now looks like this:
> git reflog
5156c89 HEAD@{0}: rebase -i: fast-forward
e310460 HEAD@{1}: rebase -i (start): checkout e310460
5156c89 HEAD@{2}: commit: Second commit
e310460 HEAD@{3}: commit (initial): First commit
The log looks like this:
> git log --oneline
5156c89 Second commit
e310460 First commit
Okay, so we are now on the second commit. It appears in the log, but we are editing this commit. We can see what the rebase has tried to do by looking at the reflog, where we can see it intially checked out out the first commit
Git Filter Branch
The following notes should be used with a ton of caution! You might even consider making temporary backups before starting this work!
The notes in this section cover commands that can completely obliterate files from your repository. Use with absolute caution! Make backups first!
http://schacon.github.io/git/git-filter-branch.html
Eek! This little fella lets you do a batch modification of many commits!
Cherry Picking
Single Commit
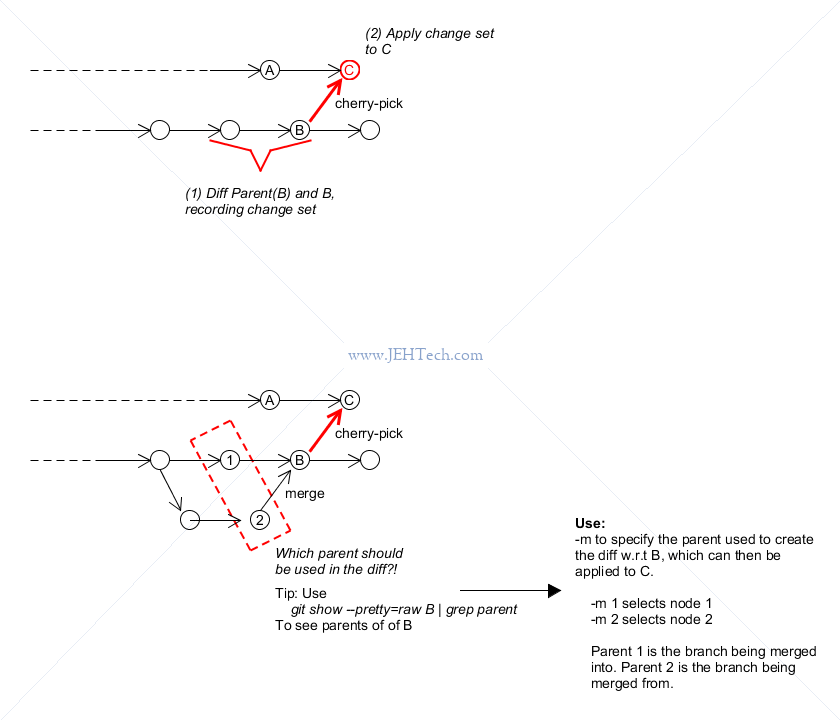
When you want to take a single commit from one branch and apply it to another. Note, this is different from merging or rebasing because you are taking one specific commit and not a range of commits. Notice also that because this isn't a merge you will loose the ability to track where these changes came from as it will look like you just made these edits yourself!
In essance, git cherry-pick A does this:
- Note change set between A and its parent.
- Apply change set to HEAD and commit result with A's commit message.
git checkout branch-to-apply-commit-to
git cherry-pick [-e] [-x] <commit-ish>
Note: this does the commit for you!
Use the -e flag to edit the commit message prior to
comitting.
The -x flag can be useful, because as said, you loose
the ability to track where these changes came from: This flag
will append a line that says "(cherry picked from commit ...)"
to your commit message.
Range Of Commits
To cherry pick a range that is inclusive, i.e. [A, B] use the following [Ref]:
git cherry-pick A^..B
The usual syntax does not include the oldest commit, so is (A,B]. This would be specified as:
git cherry-pick A..B
Merge Commits
If a cherry-picked revision is a merge commit, then Git needs to know which parent to take the diff against to apply to HEAD.
Hunting Down Bugs: Git Bisect
The following notes should be used with a ton of caution! You might even consider making temporary backups before starting this work!
The notes in this section cover commands that can completely obliterate files from your repository. Use with absolute caution! Make backups first!
TODO
Patches
Generating Patch Files
A patch file represents one single commit diff. Create using:
git format-patch (branch-name|since) -o dir_to_store_patches
This will create a set of files in the directory "dir-to-store-patches" with the following naming convention:
xxx-commit_msg.patch
^^^ ^^^^^^^^^^
^^^ The commit message for the commit that this patch represents
^^^ withs spaces replaced by underscores.
^^^
The commit number
If you substitute you branch name in the format-patch command line it will generate patches for every commit since the start of the branch.
If you specifiy a commit number in the format-patch command line, instead of a branch name, you will get the patches for every single commit in the current branch since that commit.
Applying Patch Files
To apply a patch to the currently checked out branch use:
git am < patch-file
This will create a new commit from the patch file.
Git Tips and Tricks
Many thanks to my colleague Kris Dunning for these. I've added a few over time but he kicked it off...
Checking for white-space
To check for white-space alone:
git diff --check
To check for white-space and tabs in indents:
git -c core.whitespace=tab-in-indent diff --check
Adding or Removing an Alias
This can be useful when you want to make a shorthand command for something you do frequently, or for long commands that are hard to remember.
For instance, the white-space and tabs in indent check above can be reduced to:
git whitespace
By adding the alias:
git config --global alias.whitespace 'git -c core.whitespace=tab-in-indent diff --check'
To remove an alias use:
git config --global --unset alias.the-name-of-the-alias
Listing Available Aliases
git config --get-regexp "^alias\."
git config --global alias.alias "config --get-regexp ^alias\." # Add an alias to check aliases :)
Useful Aliases
Whitespace Check: "git whitespace"As above:
git config --global alias.whitespace 'git -c core.whitespace=tab-in-indent diff --check'Status short cut: "git st"
git config --global alias.st statusGitk Visualisation Window: "git visual"
git config --global alias.visual '!gitk --all HEAD &'Git log with graph: "git lg"
git config --global alias.lg "log --graph --oneline --decorate"
With colour [Ref]...
git config --global alias.lg "log --color --graph --pretty=format:'%Cred%h%Creset -%C(yellow)%d%Creset %s %Cgreen(%cr) %C(bold blue)<%an>%Creset' --abbrev-commit"
Custom Commands
When an alias isn't goot enough you can create an executable script called git-command-name and put
it on your PATH. Then you can use the command git command-name to execute that script
[Ref].
Note that on Windows, when using Git bash, changing the file's permissions to make it executable doesn't
seem to work. Instead, make sure there is a #!/bin/bash at the start of the file, then it
will be considered executable [Ref].
Get The Repo Root Directory
git rev-parse --show-toplevel
Logs
To see all the commits that have been for a specific branch that was branched off "parent-branch-name":
# From the branch that was branched from "parent-branch-name"
git log --no-merges parent-branch-name..
                                      ^^
                                      These 2 dots are important!
The flag --no-merges tells Git not to print commits
with more than one parent and will make the log stop at the point the
branch is merged back to the parent branch.
Get The Root Repository Directory
git rev-parse --show-toplevel
Get The Branch Name For the Current Repository
git rev-parse --abbrev-ref HEAD
Get The Last Commit ID
git log --oneline -1 | cut -f1 -d" "
Stashes
Useful reads here and here on SO.
https://stackoverflow.com/questions/1108853/recovering-added-file-after-doing-git-reset-hard-head/1109433#1109433
https://stackoverflow.com/questions/89332/how-to-recover-a-dropped-stash-in-git
Stashes are for when you don't want to commit your current work, want to get on with something else, but don't, obviously, want to loose the current work in progress.
A stash is basically a snapshot of your uncommitted changes. This is different to a patch, which is a snapshot of you committed changes. Also, unlike a patch, you can not push a stash to a remote.
To stash uncommitted changes do git stash save [stash-name]. If you do not
supply the optional stash name it gets an auto generated one. Even with a stash name you
can only subsequently apply it using its index.

Interestingly you can do more than one stash and then re-apply them
seperately - the stash command creates a stack of stashes.
Use stash list to see a list of stashes. To
apply a specific stash use something like git stash apply stash@{1},
which would re-apply the penultimate stash (the smaller the number
the more recent the stash).
It is better to prefer apply over pop.
The reason for this is that git stash apply leaves the
stash in-place. So, if you did something wrong the stash still
exists. You can later, once you're happy, manually remove the stash using
git stash drop. If you use git stash pop to apply
your stashes it will apply the stash and automatically drop it, so if something
was wrong, you don't have the stash to fall back on!
Although you can't push a stash to a remote, you can carry it over to
another branch using git stash branch-name. This will
switch you to "branch-name" and apply the stash to that
branch. Sweet!
Hooks
Hooks are actions that Git will automatically perform at perticular points. For example,
a pre-commit hook, is an action that will be executed with you git commit some
changes and will determine whether the commit should, in fact, be accepted or not.
Client Side Hooks
Look at the .sample files in the repo's "hooks"
directory in the repo root. Rename a sample without the .sample
extensions to "activate" it.
Could use this as a way to auto-backup you git repo to a shared server, for example, or run pre-commit checks like syntax checking, linting etc.
For example, in my repo dir under .git/hooks I see the following
files:
-rwxr-xr-x 1 jh 1049089  478 Jul 28 10:27 applypatch-msg.sample*
-rwxr-xr-x 1 jh 1049089  896 Jul 28 10:27 commit-msg.sample*
-rwxr-xr-x 1 jh 1049089  189 Jul 28 10:27 post-update.sample*
-rwxr-xr-x 1 jh 1049089  424 Jul 28 10:27 pre-applypatch.sample*
-rwxr-xr-x 1 jh 1049089 1642 Jul 28 10:27 pre-commit.sample*
-rwxr-xr-x 1 jh 1049089 1348 Jul 28 10:27 pre-push.sample*
-rwxr-xr-x 1 jh 1049089 4951 Jul 28 10:27 pre-rebase.sample*
-rwxr-xr-x 1 jh 1049089  544 Jul 28 10:27 pre-receive.sample*
-rwxr-xr-x 1 jh 1049089 1239 Jul 28 10:27 prepare-commit-msg.sample*
-rwxr-xr-x 1 jh 1049089 3610 Jul 28 10:27 update.sample*
If we look at pre-commit.sample we can read that
it is an example hook script to verify what is about to be
comitted
. We could, if we wanted to, run a linting tool or
style checked from this script and deny the commit if it didn't meet
our coding standards.
Pre-Commit Hooks
This hook can be super useful - eg auto-run a sanity checker like a linter or make sure the commit message is formatted correctly etc.
If you want to skip any pre-commit tests you implement use --no-verify.
For example my (sanitised-for-public-web-page) pre-commit hook looks like this:
##
## Use Git boiler plate from sample pre-commit hook to figure out what to diff against
if git rev-parse --verify HEAD >/dev/null 2>&1
then
   against=HEAD
else
   against=$(git hash-object -t tree /dev/null) # Initial commit: diff against an empty tree object
fi

##
## Check all the changed files that have not been deleted for things...
changed_files=$(git diff --name-only "$against")
for file in $changed_files
do
   if [ -e "$file" ] # Cope with deleted files - obv must not check these...
   then
      if ! python my-script-name.py
      then
         echo -e "###\n### Could not do stuff \"$file\" has some kind of error \n###"
         exit 1
      fi
   fi
done
Adding Git Branch To Linux Prompt
Dealing With Conflicts
REF: http://tedfelix.com/software/git-conflict-resolution.html
##  Note that this is backwards from what you might expect,
## "theirs" is the one we are currently on!!
##
## From the man page:
##
## Note that during git rebase and git pull --rebase, ours and theirs may appear swapped;
## --ours gives the version from the branch the changes are rebased onto, while --theirs
## gives the version from the branch that holds your work that is being rebased.
##
## This is because rebase is used in a workflow that treats the history at the remote as
## the shared canonical one, and treats the work done on the branch you are rebasing as the
## third-party work to be integrated, and you are temporarily assuming the role of the keeper
## of the canonical history during the rebase. As the keeper of the canonical history, you
## need to view the history from the remote as ours (i.e. "our shared canonical history"),
## while what you did on your side branch as theirs (i.e. "one contributor’s work on top of it").

git checkout --(theirs|ours) mergetool.txt
When Git Auto-Complete Shows Deleted Branches
Found the answer on this SO thread.
If, when using Git auto-complete, Git displays branches that you have deleted
it is likely that they are remote branches, i.e., origin/xxx. Use git branch -a
to see if they exist. To get rid of ones that have been deleted on the
remote use git fetch --prune origin.
Git and Line Endings
https://help.github.com/articles/dealing-with-line-endings/
https://adaptivepatchwork.com/2012/03/01/mind-the-end-of-your-line/ ## << Really good!
Submodules
References:
- The official "Git Tools - Submodules".
- Understanding Git Submodules, Fraser Speirs.
- Git Submodules, Atlassian
- Git submodules: core concept, workflows, and tips, Nicola Paolucci
The Git docs say the following:
Submodules allow you to keep a Git repository as a subdirectory of another Git repository. This lets you clone another repository into your project and keep your commits separate.
However...
Git submodules are locked to a specific revision and don't automatically track the external project's HEAD.
The Atliassian page on the subject says it nicely:
Git submodules allow you to keep a git repository as a subdirectory of another git repository. Git submodules are simply a reference to another repository at a particular snapshot in time. ...
... A git submodule is a record within a host git repository that points to a specific commit in another external repository. Submodules are very static and only track specific commits. Submodules do not track git refs or branches and are not automatically updated when the host repository is updated ...
Add A Git Submodule To Your Project
From directory in your project into which you want to add the submodule:
git submodule add [-b BRANCH_NAME] GIT-URL
This adds the file .gitmodules and your-submodule-name into your
repo. Note that the new directory is seen as a file by Git, even though on your local
machine it is realy a directory. Commit your changes to add these two files.
To track a specific branch use the -b option.
Or, to retrospecitively track a different branch, edit the .gitmodules file
in your repository base directory and add a branch key like so:
[submodule my-sub-module"]
    path = path/relative/to/repo/base/where/submodule/is/cloned
    url = https://git@bitbucket.org/my.repository.git
    branch = my/branch
Or, probably better, use:
git config -f .gitmodules submodule.my-sub-module.branch branch-name
Clone a Git Project With Submodules
To clone a project with submodules do:
git clone https://the-project
git submodule init   # You only get submodule directories but not code so run
git submodule update [--recursive] [--remote] # these to get the data!
Or...
git clone --recurse-submodules https://the-project
As the submodule is a repository-in-a-repository you can check out any branch of the submodule independently of the branch of you main repository that is checked out.
To merge or rebase in remote changes to the submodule do:
git submodule update --remote (--merge|--rebase)
When pushing from a repository with submodules be sure to use:
git push --recurse-submodules=check # Or...
git push --recurse-submodules=on-demand
Working On Git Submodules
To checkout a branch or revision of the submodules:
cd you-submodule-directory
git checkout [-b] some-branch
#            ^^^^
#            Only if you are creating a new branch, rather than checking out an existing one.

# ... make some changes ...

git add -u
git commit -m "..."

cd submodule-parent-directory
git add -u
git commit -m "updated the submodule reference"
If you have checked out a repo and want to recursively update the submodules:
git submodule update --init --recursive
When Git Modules Go Out Of Sync
For whatever reason the submodule config is duplicated between .git/config and .gitmodules. If you are having
problems initialising a submodule and the link looks wrong etc., try git submodule sync!.
Super Error Recovery
If you have deleted something you shouldn't have or even lost a stash, this SO thread has the answers! This beauty let me recover a stash that I had popped (note: should always prefer apply!) and then reverted - wow :)
I have replicated the answer here with a little scripting added around it:
while read filename
do
    echo -e "\n#########################################################\n$filename\n";
    git cat-file -p $filename;
done <<< $(find .git/objects -newermt $(date +%Y-%m-%d -d '4 hours ago') \
                -type f -exec ls -hal {} \; |
           cut -d" " -f 9 |
           sed -e 's/.git\/objects\///g' |
           sed -e 's/\///g') > out.txt
Then you can edit the file out.txt to possibly find what you lost :D
Remotes
Push To Remote With Different Name
git push origin local-name:remote-name
Syncing GitHub Forks
Read the docs!
git remote add upstream https://github.com/ORIG_OWNER/ORIG_REPO.git # Specify a new remote upstream repository that will be synced with the fork.
git fetch upstream        # Get the upstream fork
git checkout master       # Checkout the branch you want to merge the upstream into
git merge upstream/master # Merge locally
git push                  # Push back to your remote
Git Large File Systems (Git LFS)
Ref: https://git-lfs.github.com/: Git Large File Storage (LFS) replaces large files such as audio samples, videos, datasets, and graphics with text pointers inside Git, while storing the file contents on a remote server...
.
Git LFS can store large files as "pointers" to separate binary storage in your repo. The repo can thus be smaller.
To install on Ubuntu:
sudo apt-get update
sudo apt-get -y install git-lfs
In your repository directory, to start using LFS type:
git lfs install
To get the large objects associated with the repo type:
git lfs pull
For general help:
git lfs help
To send a file to git lfs, it must be tracked. To track a file use:
git lfs track "<file of interest>"
Note that you must commit and push the .gitattribute before pushing large files!. Always verify with git lfs ls-files!
Encountered X file(s) that should have been pointers, but weren't:
Bah! Encountered this on occasion. This can happen when you do a checkout that contains files which should have been been tracked by LFS as specified in .gitattributes but somehow they've been committed directly instead! Or there is, in fact, a genuine conflict where on one branch the file is raw binary and on another it is Git LFS managed.
See the Git LFS status:
git lfs status
List the files that are under LFS control:
git lfs ls-files
See the files that match the LFS filters:
git ls-files ':(attr:filter=lfs)'
Another way to programmatically test if a file is managed by LFS [Ref] is to compare the file size of the file on disk with the block size in Git. The Git blob size should be about 130 bytes and the file on disk should be significantly bigger:
git ls-tree HEAD -rl | grep some-file-name-pattern
The following can also help [Ref]:
git lfs uninstall
git reset --hard
git lfs install
git lfs pull
And if that doesn't work you can try:
git rm --cached -r .
git reset --hard
git rm .gitattributes
git reset .
git checkout .
It is also possible to migrate files to LFS [Ref]:
git lfs migrate import --no-rewrite "broken file.jpg" "another broken file.png" ...
# This "migrates" files to git lfs which should be in lfs as per .gitattributes, but aren't
# at the moment (which is the reason for your error message).
#
# --no-rewrite prevents git from applying this to older commits, it creates a single new
# commit instead.