Linux (Scripting)
Page Contents
References
- BASH Shell: Change The Color of My Shell Prompt, Vivek Gite, October 2006
- Eval command in Bash and its typical uses.
- How do I split a string on a delimiter in Bash?
- Linux User Identifier, Wikipedia.
- StackOverflow: Capturing Groups From a Grep RegEx.
- Bash Manual Page.
- Parse script parameters.
- Parameter Substitution - The Linux Docimentation Project.
- Manipulating Strings - The Linux Docimentation Project.
- Bash Internal Variables.
- Why Setting A Variable Before A Command Is Legal In Bash, StackOverflow Q&A,
- When A Temporary IFS Can Be Used For Field Splitting, StackOverflow Q&A,
- How To Split A String On Any Delimiter In Bash, StackOverflow Q&A.
To Read
- https://magcius.github.io/xplain/article/index.html
- http://byobu.co/about.html
- http://stackoverflow.com/questions/16045139/redirector-in-ubuntu
- To reference: https://www.gnu.org/software/bash/manual/bashref.html
- http://www.learnshell.org/
- Systemd vs Init.rc: https://www.redhat.com/archives/rh-community-de-nrw/2014-July/pdfC1TTlawaxB.pdf
https://www.linux.com/learn/understanding-and-using-systemd - http://tldp.org/LDP/abs/html/colorizing.html
Get An Explanation Of Complex Shell Commands
.bashrc
export PATH=$PATH:/home/$(whoami)/bin

# https://stackoverflow.com/questions/2314643/how-can-i-get-find-to-ignore-svn-directories
grp(){
    find . \( -path \*/.svn -o -path \*/.git \) -prune \
           -o \
           \( -name .\#\* -o -name \*.o -o -name \*\~ -o -name \*.bin -o -name \*.lbin \
                -o -name \*.so -o -name \*.a -o -name \*.ln -o -name \*.map \
                -o -name \*.class -o -name \*.lib -o -name \*.mem \
                -o -name \*.pyc -o -name \*.pyo -o -name GTAGS \
           \) -prune \
           -o \
           -type f \
           -exec grep --color=auto -i -nH -e $@ {} \;
}

cgrp(){
    find . \( -path \*/.svn -o -path \*/.git \) -prune \
           -o \
           \( -name .\#\* -o -name \*.o -o -name \*\~ -o -name \*.bin -o -name \*.lbin \
                -o -name \*.so -o -name \*.a -o -name \*.ln -name -o -name \*.map \
                -o -name \*.class -o -name \*.lib -o -name \*.mem \
                -o -name \*.pyc -o -name \*.pyo -o -name GTAGS \
           \) -prune \
           -o \
           \( -name \*.cpp -o -name \*.c -o -name \*.h -o -name \*.hpp \) \
           -type f \
           -exec grep --color=auto -i -nH -e $@ {} \;
}

parse_git_branch() {
   git branch 2> /dev/null | sed -e '/^[^*]/d' -e 's/* \(.*\)/ (\1)/' | sed -e 's/^\s*//g'
}

parse_svn_branch() {
   svn info 2> /dev/null | grep "Relative URL" | sed -e "s/Relative URL:\s*//g"
}

parse_repo() {
   git_branch="$(parse_git_branch)"
   if [ ! -z "$git_branch" ]
   then
      echo -e "\nGIT: $git_branch"
   fi

   svn_branch="$(parse_svn_branch)"
   if [ ! -z "$svn_branch" ]
   then
      echo -e "\nSVN: ($svn_branch)"
   fi

   echo ""
}

## COMMAND: strip_ws
strip_ws() {
   sed -i 's/[[:space:]]*$//' $@
}

## COMMAND: svnmods
alias svnmods='svn status | grep "^\s*[MAD]"'

## COMMAND: svnfindexernaldirs
alias svnfindexernaldirs='find . -type d -a -not -path \*/.svn\* -print | while read f;do svn propget svn:externals "$f" >.svnproptmp 2>&1 && echo "$f" && cat -b .svnproptmp && rm .svnproptmp; done'

## COMMAND: gap
alias gap='printf "\n%.0s" {1..100}'

## Custom Prompt
PS1="\[\e[0;33m\]\$(parse_repo)\[\e[0m\]\n[\w]\n\u@\h\$ "
Writing UDev Rules
http://www.reactivated.net/writing_udev_rules.html
Running Ubuntu On VirtualBox
Installing Ubuntu Guest Additions
The guest additions are needed because
they consist of device drivers and system applications that optimize
the guest operating system for better performance and usability
.
They allow the system to do things like get the screen to scale
correctly in full screen mode, enable mouse pointer integration,
share clipboard and folders between host and guest and so on. See
the link for full details.
You can normally just install them from the VirtualBox menu as shown below:

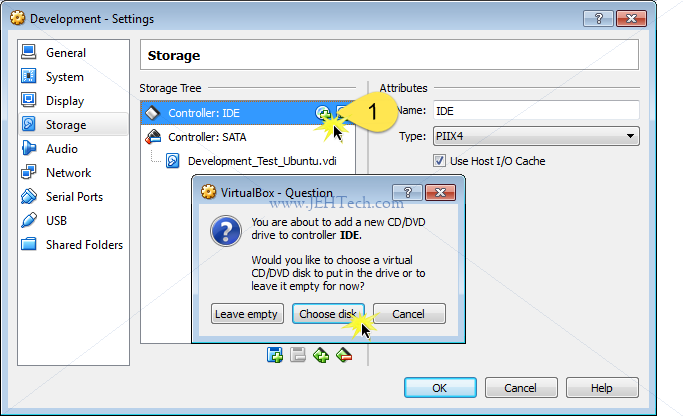
If that fails for whatever reason you can install and download the latest guest additions ISO from the VirtualBox webstite. You can then add the CD to the VM's media as shown below (whilst the VM is powered off).
Now power up the VM. It will be
mounted on /media/<user name>/VBOXADDITIONS_x.x.x_xxxxx.
Change dir into that folder and sudo sh VBoxLinuxAdditions.run.
Reboot.
Adding A Shared Directory Between Host and Guest
Whilst the VM is powered off, do the following to share a directory from the host (in my case Windows 7) and the guest (in my case Ubuntu 16).
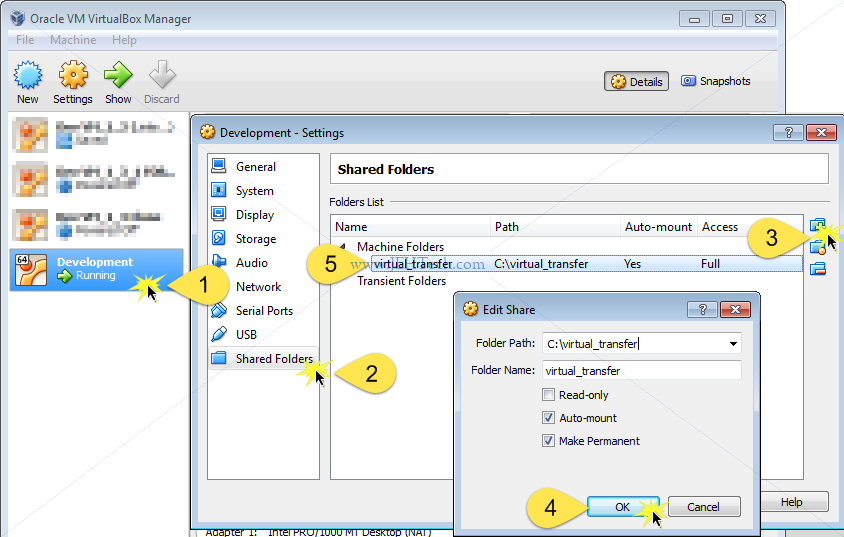
Once you have created this share and select the auto-mount option,
you may still not be able to access it. If you get a permission denied
error then it is probably because your user account is not part
of the vboxsf group and does not have permissions to access
shared folders.
To fix, open a terminal window and type "sudo usermod -G vboxsf -a <user name>".
Then log off, log on again. Now you should be able to acccess the
shared directory, found under /media/sf_<share dir name>,
which from the above example would be /media/s_virtual_transfer.
Install Ubuntu MATE On Lenovo G510
Installing from a USB stick is sorta easy. Set the BIOS to boot use UEFI:
... UEFI ... allows booting from hard disks as large as 9.4 ZB ...
UEFI allows more boot options, doesn’t prescribe particular file systems,
and has excellent network booting abilities. OS boot loaders can also serve
as extensions to the UEFI, which itself can function as a proper boot loader...
[ref]
To do this reboot your laptop and press F2 continually until the BIOS config
opens.
Then the next challenge is to get the wireless working. You need to install the broadcom drivers. To do this you must disable [ref] secure booting [ref] in your BIOS settings. If you don't do this you will find that the next steps [ref] give you an error along the lines of "ERROR: could not insert 'wl': Required key not available".
Boot Ubuntu and load a console window. Type the following:
sudo apt-get update
sudo update-pciids
sudo apt-get install bcmwl-kernel-source
Reboot. This should get your wireless up and running.
Python 2 on newer Ubuntus
# From https://ubuntuforums.org/showthread.php?t=2486174
wget https://www.python.org/ftp/python/2.7.9/Python-2.7.9.tgz
sudo tar xzf Python-2.7.9.tgz
cd Python-2.7.9
sudo ./configure --enable-optimizations
sudo make altinstall

sudo ln -sfn '/usr/local/bin/python2.7' '/usr/bin/python2'
sudo update-alternatives --install /usr/bin/python python /usr/bin/python2 1
sudo update-alternatives --install /usr/bin/python python /usr/bin/python3 2


sudo update-alternatives --config python
Running XServer On Windows
Xming with putty worked out-of-the-box for me on my Windows 10 machine. Download and install Xming. Once installed, from the start menu, run Xming > XLaunch. From there select "Multiple windows". If you're only going to have the one XServer running, just leave the display number as zero.
Next start a Putty session with X11 forwarding enabled:
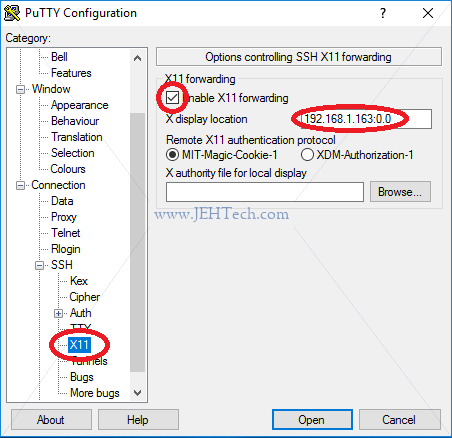
From your SSH session, if you launch a GUI application should now magically appear on your desktop :)
If, for some reason, it does not, check the XMing log. If you see
that your IP has been rejected with a message like "AUDIT: Thu Mar 15 15:28:10 2018: 7452 C:\Program Files (x86)\Xming\Xming.exe: client 4 rejected from IP 192.168.1.208", add your client IP to the file X0.hosts in the XMing installation directory.
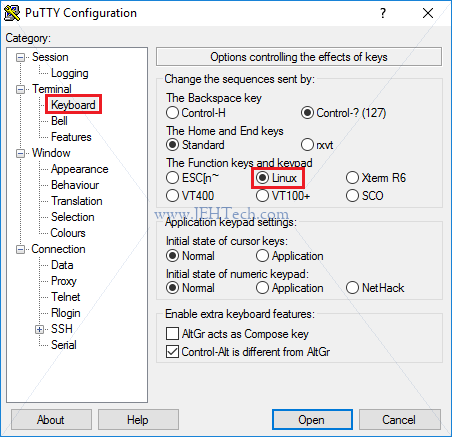
Fix Putty Linux Terminal Session Function Keys And Keypad
Pressing the HOME key normally doesn't work in my Putty sessions when loggin onto a Linux box. This is because the Putty terminal type needs setting up:
Install Packages Offline
Needed to do this for a computer without an internet connection. SO to the rescue again:
In summary, to download a package and all of its dependencies, without installing them, to a directory of your choosing use the following commands:
MYBASE=/a/directory/of/your/choosing
mkdir -p $MYBASE/archives/partial
apt-get -d -o dir::cache=$MYBASE -o Debug::NoLocking=1 install package
The -d option tells apt-get not to install, just download (although
you still need to use the install command in the command line string).
The -o dir::cache=$MYBASE option means use the specified directory as the location to cache all the
.deb files required.
Then all yoy need to do is to copy your directory to your other machine with no internet (tar up the cache directory to transfer) and run the following:
MYBASE=/where/you/copied/the/cache/to
apt-get dir::cache=$MYBASE install package
GRUB - A Bootloader
Access From Bootup
Hold down shift on bootup.
Access from Linux
Config file is /boot/GRUB/GRUB.cfg - do not edit this directly. It is
a generated file.
Instead edit /etc/default/GRUB and regenerate the above CFG using sudo update-GRUB.
Static Shell Script Analysis With ShellCheck
Visit the ShellCheck website and paste in your script to get a detailed analysis. You can learn a ton of reaslly useful bash information using this really quickly. For example, two common errors I used to make were:
Simple Commands and Their Execution
Often in bash scripts you see variable assignments on the same line as a command that is being executed, for example:
JEHTECH=1234 some-command
What is this doing and why is it possible? References 10 through 13 are really good starters, but in the end, however, it is all available in the bash man page :) It says:
...A simple command is a sequence of optional variable assignments followed by blank-separated words and redirections, and terminated by a control operator...
Ignoring redirections and the control character ("||", "&", "&&", ";", ";;", "(", ")", "|", "|&", "<newline>"), this means that a simple command is:
[VAR1=value VAR2=value ...] COMMAND PARAM1 PARM2 ...
The command can result from the expansion of a variable, or be a literal. It also does not have to be present (ie., you just have a variable assignment on its own). The bash man page proceeds to say later on...
...When a simple command is executed, the shell performs the following expansions, assignments, and redirections, from left to right.
- The words that the parser has marked as variable assignments (those preceding the command name) and redirections are saved for later processing.
- The words that are not variable assignments or redirections are expanded. If any words remain after expansion, the first word is taken to be the name of the command and the remaining words are the arguments.
- Redirections are performed ...
- The text after the = in each variable assignment undergoes tilde expansion, parameter expansion, command substitution, arithmetic expansion, and quote removal before being assigned to the variable.
If no command name results, the variable assignments affect the current shell environment. Otherwise, the variables are added to the environment of the executed command and do not affect the current shell environment...
Therefore when you write commands such as "JEHTECH=1234 some-command" the
enironment variable "JEHTECH" would be set only in the sub-shell that
the command is executed in and won't affect the existing shell (unless
the command is a built-in or function, then it will!).
You'll also notice from the above that ...words that are not variable assignments or redirections are expanded...
before the command is executed.
This means that in the following section of code "HELLO" is printed out instead of "BYE BYE"...
$ JAMES="HELLO"
~$ JAMES="BYE BYE" echo "$JAMES"
HELLO
This puzzled me for a bit, but because ...words that are not variable assignments or redirections are expanded...
before the command is executed, the following is happening.
- The variable assignment
JAMES="BYE BYE"is saved. So the line being processed is now justecho "$JAMES" - Now variable expansion occurs. The value of
$JAMESis still "HELLO" because that is the value of the variable in the current shell. The new assignment that happens as part of our simple command has not taken effect yet! The command to be executed is therefore nowecho HELLO. - To execute this command a new subshell is created in which it. As part of that new subshell, the
variable assignment
JAMES="BYE BYE"is added to the new sub shell. But the command being executed in the subshell isecho HELLO, and that's why we see the output we do.
Word Splitting
The bash shell variable $IFS is a list of delimeters that
the shell will use to split words on. I like to think of it as
the delimeter list I'd supply to the C function strtok().
Once a word has been tokenized the shell does not see it as one "block"
but as many seperate tokens/parameters.
The shell will word split in 3 instances [ref]:
- Parameter expansion,
- Command substitution,
- Arithmetic expansion.
References 10 through 13 are really good starters that I have used to help myself understand what is going on. The bash man page is also increadibly useful and arguably the most authorative.
Lets look at some examples... to begin with we'll export one variable for us to play with:
~$ export JEHTECH="a b c d e#f"
We can immediately see word splitting occuring if we do the following:
~$ echo $JEHTECH
a b c d e#f
Our original string had many spaces between the "d" and "e" but
the echo output does not. What has happened here is that parmeter expansion
occured (this occurs before the entire command line is evaluated).
The bash shell had to substitute the value of $JEHTECH and when
it does this is splits or tokenises the resulting expansion based on the
delimeters in $IFS. The default value for $IFS is <space><tab><newline>,
so any of the characters in any consecutive order are "deleted" and used as a
seperator between words. The result is that bash finds the tokens
"a", "b", "c", "d", and "e#f".
Notice the difference when we enclose the variable $JEHTECH in
quotes:
~$ echo "$JEHTECH"
a b c d     e#f
In the above example, although parameter expansion has taken place, no word splitting has been performed. The reason is, is that bash will not perform word splitting when the expansion (be it parmeter, arithemetic or command substitution) occurs in quotes.
Bash will not perform word splitting when the expansion (be it parmeter, arithemetic or command substitution) occurs in quotes.
It is for this reason that tools like ShellCheck will always recommend that double quotes should be used to avoid word splitting. This is because the effects of word splitting are often not wanted. For example, if you received a variable from the user in one of your scripts, and lets say it is a directory from which you need to work from. If you do the following, and the directory name contains a space, the parameter substitution will create two tokens when only one was meant - the directory name that unluckily contained a space. Try the following:
~$ mkdir "jeh tech"
~$ ll -d jeh\ tech/
drwxr-xr-x 2 jehtech jehtech 4096 Aug 12 10:36 jeh tech//

~$ export MYDIR="jeh tech"
~$ ll -d $MYDIR
ls: cannot access jeh: No such file or directory
ls: cannot access tech: No such file or directory

~$ ll -d "$MYDIR"
drwxr-xr-x 2 jehtech jehtech 4096 Aug 12 10:36 jeh tech/

~$ rmdir jeh\ tech/
Note how the command ll -d $MYDIR fails, but
ll -d "$MYDIR" does what is expected!
We can play with the value of $IFS to further split the
characters in our example variable $JEHTECH on the "#"
character too:
Parse Version Strings: Splitting Strings On A Delimeter
I wanted to be able to check the IPython version in a shell script to
let the user know if it needed upgrading and to offer to do the upgrade
automatically. I knew I could spit the string onto multiple lines
using tr and then parse it in a for loop, but a quick
bit of googling and StackOverflow came to the rescue again
[3].
IFS="." read -a pyVerInfo <<< "$pyVer"
if [ ${pyVerInfo[0]} -ne 3 ]; then
   #error
fi
This cool little snippet splits the string up using a full-stop as the
delimeter and saves it as an array to the variable pyVerInfo.
Ensure A Script Runs As Root
If you know that your shell script will require root permissions
and must be run with sudo, you can cause the script to
output a useful error message and abort if it isn't run as such,
rather than a bunch of commands just failing. To do this you can
check the user's effective user ID
[4], which will be zero if s/he has
root privileges...
if [ "$(id -u)" -ne 0 ]
then
   echo "### ERROR: You must run this script as root"
   exit 1
fi
Instead of $(id -u) you could also use $EUID and
you can be more consise using:
[ "$(id -u)" -ne 0 ] && { echo "### ERROR: You must run this script as root"; exit 1; }
Where the {...} braces group the commands but executes them
in the current shell context. If you used (...) braces then
the group commands would be executed in a sub-shell.
Modifying The Linux Shell's Command Prompt
Adding Colour To The Linux Prompt
To set prompt to be yellow:
PS1='\[\e[0;33m\]\u@\h:\w\$ \[\e[0m\]'
Note that the "\[" and "\]"
surrounding the "\e..." constructs
are very important as otherwise the size of the prompt is
miscalculated and when cycling through command history the display
messes up
[1].
Add this to your ~/.bashrc file to make it permanent.
Collapsing The Path Displayed In The Linux Prompt
I really dislike it when the cwd printed in the prompt begins
to get too long and take up most of the terminal line. What I
wanted was for the cwd to collapse a little when this happended.
To do this I set my PS1 environment variable as follows
and used the (hacky) Python script, also shown below.
Set PS1 as follows:
PS1="\[\e[0;33m\]\$(python ~/ps1.py)\$ \[\e[m\]"
NOTE the backslash in front of $(python ...). This
prevents the python script from being run and the output evaluated
immediately: you want the script to be run each time PS1 is itself
evaluated, not just one when setting the value of PS1.
Then created the file ps1.py in my home directory:
import os

pref = os.path.sep
home = os.path.expanduser("~").split(os.sep)
home.remove('')

l = os.getcwd().split(os.sep)
l.remove('')

if l[0:len(home)] == home:
   l = l[len(home):]
   l.insert(0, "~")
   pref = ""

if len(l) > 4:
   ll = [l[0], l[1], l[2], "...", l[-1]]
   print pref + os.path.join(*ll)
else:
   print pref + os.path.join(*l)
Adding Current Git Banch To The Linux Prompt
References:
- Add git branch name to bash prompt, Eranga Bandara.
- What are some informative and useful shell prompts? Stack Overflow.
Slight mod from Bandara's example to strip starting whitespace, add some colour, and detevt SVN repos too...
parse_git_branch() {
   git branch 2> /dev/null | sed -e '/^[^*]/d' -e 's/* \(.*\)/ (\1)/' | sed -e 's/^\s*//g'
}

parse_svn_branch() {
   svn info 2> /dev/null | grep "Relative URL" | sed -e "s/Relative URL:\s*//g"
}

parse_repo() {
   git_branch="$(parse_git_branch)"
   if [ ! -z "$git_branch" ]
   then
      echo -e "\nGIT: $git_branch"
   fi

   svn_branch="$(parse_svn_branch)"
   if [ ! -z "$svn_branch" ]
   then
      echo -e "\nSVN: ($svn_branch)"
   fi

   echo ""
}

PS1="\[\e[0;33m\]\$(parse_repo)\[\e[0m\]\n[\w]\n\u@\h\$ "
Modify Any PATH-like Variable And Variable Dereferencing
Modifying a PATH-like variable (eg. PATH,
LD_LIBRARY_PATH, PYTHONPATH etc is obviously easy.
What I found was I often wanted to script it and only modify a path
if what I wanted to add wasn't already listed. Also, sometimes I
wanted to remove a path from a PATH-like variable.
Accomplishing this required the use of functions and the eval
statement to dereference a variable twice, i.e. to use one variable
as a "reference" to another. There are also the little
corner cases when adding to a path... if it's empty then don't
add a colon and when removing a path don't leave a trailing colon.
Dereference Variable Name
The first method I learnt to dereference a variable was this:
$ jtRef=JEH_TECH
$ JEH_TECH="This is JEH-Tech.com"
$ eval echo \$$jtRef
This is JEH-Tech.com
Works quite well. eval's parameters are evaluated by the
shell and passed to eval. Thus, echo \$$jtRef gets parsed
by the shell as echo $JEH_TECH, which is passed to eval.
Eval then re-evalulates this string which echoes the value
of the variable JEH_TECH. Thus we have essentially
dereferenced jtRef. Note however that eval is a potentially massive security whole!!
However, in Bash, there is a much easier syntax [2]. We could just write the following.
$ echo ${!jtRef}
This is JEH-Tech.com
In Bash, the variable expansion mechanism
${!varName} does the dereferencing much more
elegantly for us...
Splitting up PATH-like Variable Using Sed and Tr
To split up the path variable, i.e, do the equivalent of a
split() function in bash, I used a combination of
tr and sed.
Why do the split? Two reasons. Firstly, grep would match
the first occurrence of a string. So if PATH=/aaa/bbb
and I wish to add /aaa, greping for it before
adding it to the path (so I don't clutter it with duplicates)
won't work: I can't use word boundaries in the regexp because the
/ appears to count as a word boundary and grepping for
possible colons becomes tedious. Secondly, sed works on a line by
line basis.
So, my solution is this... use tr to break the path
string across many lines, one line per path element, and then
use sed to blank out the matching path, and then use
tr to re-collapse it all back into one string (removing
the duplicate newline resulting from the blank line created by
sed
For example, removing a path element has the following script snuippet
echo -e "${!varname}" | tr ":" "\n" | sed -e "s@^$path_2_del\$@@g" | tr -s "\n" ":" | sed -e 's/:$//'
The snipped works as follows...
echo -e "${!varname}"echoes the value of the variable referenced byvarnameto stdout, which is piped intotr.tr ":" "\n"replaces all colons in the path string with newlines so that sed can work line by linesed -e "s@^$path_2_del\$@@g"blanks out the line (deletes the line but not the trailing newline) that matches the entire path and no more. The use of the@is because if we used a forward slash we'd have to go to the trouble of escapre the path seperators.tr -s "\n" ":" | sed -e 's/:$//'staples the lines back into one string and removes any trailing colon that may have been left.
Or... the following sed script would have done the same...
s/\(:\{0,1\}\)PATH_TO_DELETE\(:\{0,1\}\)/\1\2/g
s/::*/:/g
s/^://g
s/:$//g
Resulting Script To Add/Remove Path Elements From PATH-like Variables
I made the following script to accomplish addition and removal of
elements from PATH-like variables. Quite possibly could be
more elegant so any suggestions welcome :) Above each use of the
${!varName} syntax is a commented-out equivalent
using eval.
#
# Expects 2 arguments. The name of the variable to have a path element
# added to it and the path element.
# eg. add_to_path LD_LIBRARY_LATH /my/special/directory
function add_to_path() {
   if [ $# != 2 ]; then
      >&2 echo "### ERROR: Bad number of params! Expected varname and path"
      return 1
   fi

   varname=$1
   path_2_add=$(readlink -f $2)
   if [ -z "$path_2_add" ]; then
      >&2 echo "### ERROR: Could find the directory!"
      return 2
   fi

   if [ -d "$path_2_add" ]; then
      #found=$(eval echo -e "\$$varname" | tr ":" "\n" | grep -c "^$path_2_add\$")
      found=$(echo -e "${!varname}" | tr ":" "\n" | grep -c "^$path_2_add\$")
      echo "FOUND=$found"
      if [ "$found" == "0" ]; then
         #if [ -z "$(eval echo \$$varname)" ]; then
         if [ -z "${!varname}" ]; then
            export $varname=$path_2_add
         else
            #export $varname=$(eval echo \$$varname:$path_2_add)
            export $varname=${!varname}:$path_2_add
         fi
      fi
   else
      >&2 echo "### ERROR: The directory $path_2_add does not exist!"
      return 3
   fi

   return 0
}

#
# Expects 2 arguments. The name of the variable to have a path element
# added to it and the path element.
# eg. remove_from_path LD_LIBRARY_LATH /my/special/directory
function remove_from_path() {
   if [ $# != 2 ]; then
      >&2 echo "### ERROR: Bad number of params! Expected varname and path"
      return 1
   fi

   varname=$1
   path_2_del=$2

   #export $varname=$(eval echo -e "\$$varname" | tr ":" "\n" | sed -e "s@^$path_2_del\$@@g" | tr -s "\n" ":" | sed -e 's/:$//')
   export $varname=$(echo -e "${!varname}" | tr ":" "\n" | sed -e "s@^$path_2_del\$@@g" | tr -s "\n" ":" | sed -e 's/:$//')
New Bash Test [[...]] & Regular Expressions
Recently I had a problem where I wanted to recurse through a set of files, get their names to pass to a program but also parse the file name to get another bit of information which had to be used to construct another parameter that was to be passed to the same program.
Regular expressions and group captures spring to mind and as it turns out
that Bash (and some other more modern shells) can so this using the
new test built-in: [[...]].
Thanks to the following references:
Combining this with the info from section "Find --exec alternative when you want to exec a script function" the following worked quite well. This would work for files of the format "part1_part2.txt"
dir="/A/path/to/the/root/folder"
regex="^([^_]*)_([^_]*)\.txt"
find $dir -name '*.txt' -print |
while read fname
do
   [[ $fname =~ $regex ]]
   group1="${BASH_REMATCH[1]}"
   group2="${BASH_REMATCH[2]}"
   echo "First group is $group1 and second is $group2"
done
From the Bash manual: ... parenthesized subexpressions ... are
saved in the array variable
BASH_REMATCH ... index 0 is
[the match of] the entire regular expression ... index n is the
[match of] the nth parenthesized subexpression.
User Limits
Display the current hard limit of your machine:
ulimit -aH
To increase the file descriptor limit:
- Add extra lines to
/etc/security/limits.conf:<username> soft nofile 1024 <username> hard nofile 4000 #< Use what you like
(Use a '*' for the username if you want to match all users). - Make sure
session required /lib/security/pam_limits.soappears in/etc/pam.d/login. - Reboot your system.
- Use the command
ulimit -n unlimited, to use the hard limit you wrote to/etc/security/limits.conf.
Misc Script Stuff
Rediection Tutorials
Illustrated Redirection Tutorial.
A Detailed Introduction to I/O and I/O Redirection.
Pretty Print Script Status Output
SO thread: Bash, echo something to right end of window (right aligned)
SO thread: How to write a bash script like the ones used in init.d?
Get My Ubuntu Version
lsb_release -a
Ping A Range Of Addresses
nmap -sP 192.168.0.0-255
Use the timeout option -T to make the scan quicker
if you wish...
Rename A Set Of Files
I had a set of files where part of the filename identified a test sample. The samples had been labelled wrongly, but consistently so, so all that was needed was exhanging one sample name for another...
N=new_samp &&
O=old_samp &&
find -name "*$O*" |
  while read oldf
  do
    newf=$(echo $oldf | sed "s/$O/${N}_corrected/")
    cp o=$oldf n=$newf
done
The "_corrected" suffix was added to stop the situation where sample A is renamed to B, but there are existing B's that must also be renamed.
Halt script if variable NOT set
set -u
Find --exec alternative when you want to exec a script function
For when you want to do an operation on a set of files but can't
use "find ... -exec ..." because you want to
call a script function, for example...
find path ..options.. -print |
while read variable_name
do
   my_function "$variable_name"
done
Read
Piping Output To Read
The builtin
read
is very useful for
reading in user input,
or for reading and processing the output of a command like find line by line. For example:
for dir in "list of dirs ":
do
   echo "LOOKING IN DIR '$dir'"
   find "$dir" -name '*.csv' -print |
   while read fname
   do
      echo "$fname"
   done
done
One thing that might catch you out is that variables inside the
while loop
disappear after the loop terminates. The
summary is that the while loop is executed in a
sub shell, so will have a new variable and context.
This is further explained in this SO thread -
the problem is that in a pipeline ( command1 | command2 | command3 ... ) the commands are run in subshells
.
Reading Files Line By Line
Another useful example is when you want to read a file line by line in your bash script. This was answered perfectly in SO thread.
I found it really useful to take a summary of SVN diffs, delete the stuff I wasn't interested in and then only diff the remaining. The script is on the SVN page.
Useful builtins
- readlink. options like --canonicalize (-f is synonym)
- Variable substitution.
- getopts.
Kill Script On First Error
If you would like your bash script to fail on the first command that returns a non zero error code use:
set -e # On its own may not be enough - see below...
set -o pipefail # Make sure errors propogate through pipes!!
You can cancel it by using +e
Echo Each Command Before Execution
set -x
Debug .so Loading Using LD_DEBUG
If a program is complaining that it cannot find a library you can always try setting export LD_DEBUG=libs
before running that program (or export LD_DEBUG=help to get help). You'll get debug output describing libraries being searched for and
loaded. You can also set export LD_DEBUG=all for an absolute shed-load of debug info, which might be too much, but at least
you'll be able to see where the loader is searching for libraries and what, if anything, it finds. To clear the
loader debug output just set export LD_DEBUG=.
Annoyingly on QNX (I know it's POSIX-like and not Linux) it appears
you need to set DL_DEBUG (Note "DL",
not "LD")...
Network Emulation With Netem
Bash History Expansion
Notes based on this article.
"Basic" execution of commands from the shell history:
!4              # Display and execute the fourth commnd in the history table
!-2             # Display and execute command type 2 commands back
!!              # Display and execute previous command  } These two are ...
!-1             # Display and execute previous command  } ... equivalent
!word           # Search backwards through command history for first command
                # that starts with "word". If found,
                # display and execute command
!?word          # Search backwards through command history for first command
                # that contains "word". If found,
                # display and execute command
^str1^str2^     # Change the first occurence of str1 in previous command
                # to str2
!!:s/str1/str2  # Same as previous
!!:gs/str1/str2 # Change ALL occurences of str1 in previous command to str2
!!:n            # Get the nth argument of the previous command
!!:$            # Get last argument or the previous command
!$              # Shorthand for above
Systemd & D-bus
http://mirror.linux.org.au/pub/linux.conf.au/2014/Friday/104-D-Bus_in_the_kernel_-_Lennart_Poettering.mp4

d-bus - IPC system for Linux
  Better than pipes etc...
    Method Call Transactions - call method on another service and get an answer
    Signals - Send messages to notify rest of system
    Properties - Can notify others about changes in properties. makes it language -like OO
    Broadcasting
    Discovery - which services, what's available
    Introspection - can look at the service and find its signals, properties etc.
    Policy - security
    Activation - System runs with minimal resource usage. At boot up you don't have to start all the services - delay until they're needed
    Synchronisation - Discovery via names, and names can be used as mutexes
    Time-safe Marshalling - FIFOs make no requirement as to what's transferred but d-bus is more strict - must define a binary presentation of your objects you're sending.
    Security - you can query the identity of everyone on the system
    Monitoring
    Exposes APIs not streams
    File Descriptor Passing - pass resources across security boundaries
    Language agnostic
    High-level error concept

Limitations
  Can send huge amounts of data. So can use it for control but not payload (e.g. sound server control but not audio)
  A little inefficient.
  Credentials on can send/recv are limited
  No implicit time-stamping
  Only available in late boot

kdbus - Like a re-implementation of d-bus that solves:
    Suitable for large data, zero-copy, optionally reusable
    More efficient that classic d-bus
    Better, more comprehensive credentials - uid pid, gid, selinux etc etc
    Implicit time-stamping
    Always available from earliest boot to latest shut down
    Race-free exit-on-idle for bus activated services

  Character bus in /dev
  You can memory map the file descriptor to set up a memory arena where kernel drops messages


http://0pointer.net/blog/the-new-sd-bus-api-of-systemd.html
https://www.linux.com/learn/here-we-go-again-another-linux-init-intro-systemd
https://www.linux.com/learn/understanding-and-using-systemd
https://www.linux.com/blog/learn/intro-to-linux/2018/5/writing-systemd-services-fun-and-profit
https://learn.adafruit.com/running-programs-automatically-on-your-tiny-computer/systemd-writing-and-enabling-a-service
Setup/Install SSH Daemon for SSH access
$sudo apt update
$ sudo apt install openssh-server   # Instal the server
$ sudo systemctl status ssh         # Make sure its running

# Root login and password based authentication enabled by default
# Security practice is to disable both and require users to provide keys.

$ sudo vi /etc/ssh/sshd_config
# Change ChallengeResponseAuthentication to "no"
#        PasswordAuthentication to "no"
#        UsePAM to "no"
#        PermitRootLogin to "no"
#        PermitRootLogin to "prohibit-password"

$ sudo /etc/init.d/ssh reload
# OR
$ sudo systemctl reload ssh
Sed
Intro
Sed applies each command to line 1, then each command to line 2 and so on. Each line of input is held in the pattern space, a small temporary buffer where commands are applied. The basic command flow is shown below but it does not account for commands that can alter flow control etc.

So if there is a file with the following contents:
jeh-tech
And we use the following script:
s/jeh/JEH/
s/jeh/DOH/
The output would be
JEH-tech
This is because the line jeh-tech is read into the pattern buffer. The first
replace command changes the string to JEH-tech, which means that the second
command does not match so no replacement is made.
Sed will apply commands to every line. To stop this behaviour Sed must be told which lines to match by suppling zero through two addresses (which can be regular expressions or line numbers etc).
The general syntax is:
[address[, address]]command
Or...
[address[, address]] {
command
command
...
command
} # << Ending brace must be on it's own line.
The above applies multiple commands to each line matching the main address (and possibly sub addresses).
Addresses always require a slash (/) as a delimeter.
- No address = command applied to each line,
- One address = applied to any line matching,
-
Two comma seperated address = command applied to first line matching first address and all lines until (including) line matching second address. For example, using the following script:
/^START/,/^END/ {
   s/jeh/JEH/
}
Applied to the following file:
jeh-tech
START
jeh-tech
jehtest
END
jeh-tech
Sed would output the following:
jeh-tech
START
JEH-tech
JEHtest
END
jeh-tech
Note how the text subsitution that capitalised the letters
jehis only applied to lines betweenSTARTandEND. - Address suffixed by ! = command applied to lines not matching.
Substitution
The substituion command looks like this:
[address]s/search_pat/replace/flags
Command delimeter can be any character, you don't have to use slash (/). Note, you have to use slashes for addresses, however.
The following meta-characters can be used in the replacement string:
| & | Replaced by the string matched by the regular expression. |
| \n | Matches nth substring match by "\(" and "\)". |
| \ | Escapre char |
Flags can include:
| n | Number from 1 to 512: Replacement made for nth occurence of search_pat. |
| g | Change all occurrences in pattern space, not just first (default behaviour) |
| p | Print contents of pattern space |
| w file | Write pattern space to file |
For example, to apply a substitution command to the second occurence of a search pattern to only those lines containing the word "test", one could use the following
/test/s/jeh/JEH/2
^^^^^ ^^^^^^^^^ ^
^^^^^ ^^^^^^^^^ 2nd occurence
^^^^^ command
^^^^^
address
If we applied the above to the following lines:
jeh-tech-jeh
jehtest
jehtestjeh
We would get the following output:
jeh-tech-jeh # Second occurence not replaced - no address "test"
jehtest      # The address "test" is present but no 2nd occurence of "jeh"
jehtestJEH   # Address "test" found and second occurence of "jeh" replaced
Deletion
/address/d
Deletes the entire line (contents of pattern space really) matched by address. A new line of input is then read and the script starts from the top again.
Append, Insert, Change
These are multi-line commands...
Append
# Append text after current line in pattern space
[line-address]a\
text1\ #< To insert multiple lines use more backslashes
text2
For example, operating on the following file:
jeh-tech-jeh
jehtest
Using the insert command:
/test/a\
Text to be inserted
Will give the following output:
jeh-tech-jeh
jehtest
Text to be inserted
Insert
# Insert text before current line in pattern space
[line-address]i\
text
On the same file, replacing the append with an insert would give the following:
jeh-tech-jeh
Text to be inserted
jehtest
Change
# Change contents of pattern space
[address]c\
text
Transform
[address]y/abc/xyz/
Printing
p
Normally just on its own. It prints the contents of the pattern buffer.
[address]=
The above will print the line number of the match.
Multiple Lines
Joining Lines
To append a new line (with new line character) to the pattern space use the N
command. Meta character "^" matches the start of the first line.
The meta character "$" matches the very last end-of-line missing all intermediate
new lines.
To find the string "See chapter eight for more details", and replace "eight" with, say, "nine" we may have to use a multi-line match if the string could be split across two lines. To find it you need to use this:
s/See chapter eight for more details/See chapter nine for more details/g
/See/ {
   $!N  # Use $! to make 'N' more 'friendly'
   s/ *\n//g
   s/See chapter eight for more details/See chapter nine for more details/g
}
The above could be refined quite a bit because it will mess up the output line splitting a little, but beyond the amount of time I want to spend on this.
The command N will cause Sed to quit if there is no next line. The current line
won't even be printed out. To get around this use $!N... it's a more
friendly behaviour.
The Hold Space
The hold space is a little side buffer that can have the contents of the pattern space copied into it and vice versa.
| h or H | Copy or append pattern space into hold space |
| g or G | Copy or append hold space into pattern space |
| x | Exchange pattern space contents with hold space |
Analysis Of Some One Liners
Eric Pement has made a compilation of some useful Sed one liners. I thought we could use the above notes to try and understand some of them...
# insert a blank line above and below every line which matches "regex"
sed '/regex/{x;p;x;G;}'
The line in the pattern buffer matches regex. It is placed onto the hold space using the "x" command (the hold space is empty). Then contents of pattern space, which is now empty, is printed, so a blank line gets output. Exchange back and append the contents of the hold space (blank) into pattern space, effectively appending a blank line. So a blank line gets inserted before and after the line matching regex! Clever Eric :)
# number each line of a file (simple left alignment).
sed = filename | sed 'N;s/\n/\t/'
The first sed command prints the line number of the match (and every line is matched), then a newline, then the contents of the matched line. This is piped into a new sed which then re-joins these lines and replaces the embeddewd new line created with a tab.
# join pairs of lines side-by-side (like "paste")
sed '$!N;s/\n/ /'
This one is interesting because it does pairs of lines. It doesn't just join every single line. The reason is the way the command "N" functions. First line read into pattern space. Second line appended into pattern space. Then embedded newline replaced by a space. Then next line from file (now the third line) is then read into the pattern space and the process continues. Hence paris of lines being joined.
 # print only lines which match regular expression (emulates "grep")
 sed -n '/regexp/p'           # method 1
 sed '/regexp/!d'             # method 2
The command sed -n stops the automatic printing of the pattern space.
Screen Sessions
When SSH'ing into you Linux machine, if you leave the terminal alone for too long it will disconnect, which could kill a long-running application you've set up. Soloution is to use the screen utility [Ref].
Cheat Sheet
screen # Start screen session
       # Ctrl+a, c   - Create new screen.
       # Ctrl+a, n   - Switches to next screen.
       # Ctrl+a, p   - Switches to previous screen.
       # Ctrl+a, d   - Detaches a screen session (session keeps running in bg).
       # Ctrl+a, ESC - Allows you to move cursor around screen - copy/scrollback mode.
                       Can use vim-like search syntax...
                       When in copy mode these keys are useful...
                          - B|b, E|e       - move the cursor WORD by WORD
                          - Ctrl+b, Crel+f - scroll the display up/down a full screen.
                       Press ESC to exit this mode.
       # Ctrl+a, r   -   Toggle the current window's line-wrap setting.
       # Ctrl+a, *   - List users connected to your screen session.
       # Ctrl+a, w   - List all windows.
       # Ctrl+a, :   - Enter command mode.
Name Your Session
By default screen just assigns your session a name that is rather non-descriptive.
To give it a more meaningful name, use the -S option:
> screen -S jehtech
> screen -ls
9240.jehtech    (07/21/17 08:35:01)     (Attached)
View Available Screens
If you detach a screen session you can see a list of available sessions using:
screen -ls
Reconnect To A Screen
Reconnect to one of them using:
screen -r xxxx
Are You On A Screen Or A Real Terminal
To find out if you are running in a screen or a real terminal type:
echo $STY
If the result is an empty string then you're on a real terminal.
To find out who else is connected to your screen session you can either use
ctrl+a, * or the lsof command that displays information about
files opened by processes.
Detatch A Screen
To detach an attached screen, enter:
screen -D [screenName]
Barrier - Software KWM
Configure the SLL certificates on both client and server using this:
         See https://stackoverflow.com/a/67343805
         mkdir -p Fingerprints
         openssl req -x509 -nodes -days 365 -subj /CN=barrier -newkey rsa:4096 -keyout Barrier.pem -out Barrier.pem
         openssl x509 -fingerprint -sha1 -noout -in Barrier.pem > Fingerprints/Local.txt
         sed -e "s/.*=//" -i Fingerprints/Local.txt
The configure server with exact name of client to allow client to connect.
Note, at the time of writing, Dec 2022, Barrier does not support the Wayland display server. To use it you must use Ubuntu with X11.