Docker
Page Contents
To Read
See https://docs.docker.com/get-started/
https://docs.docker.com/docker-for-windows/wsl-tech-preview/

https://www.redhat.com/en/topics/containers/whats-a-linux-container
https://en.wikipedia.org/wiki/Chroot
https://www.freebsd.org/doc/handbook/jails.html
https://www.redhat.com/cms/managed-files/rh-history-of-containers-infographic-201609-en.pdf7
https://www.freebsd.org/doc/en_US.ISO8859-1/books/arch-handbook/jail.html
http://opentodo.net/2012/11/implementation-of-freebsd-jails-part-i/
https://en.wikipedia.org/wiki/Cgroups
https://en.wikipedia.org/wiki/Linux_namespaces
https://lwn.net/Articles/531114/#series_index
https://stackoverflow.com/questions/41550727/how-does-docker-for-windows-run-linux-containers
https://en.wikipedia.org/wiki/Hyper-V
https://www.flexiant.com/2014/02/05/what-does-a-hypervisor-do/
https://blackberry.qnx.com/content/dam/qnx/whitepapers/2017/what-is-a-hypervisor-and-how-does-it-work-pt1.pdf ### REALLY GOOD
https://community.atlassian.com/t5/Bitbucket-questions/Caching-a-public-Docker-Hub-image/qaq-p/1045777
https://confluence.atlassian.com/bitbucket/configure-bitbucket-pipelines-yml-792298910.html#Configurebitbucket-pipelines.yml-ci_cachescaches


>> USEFUL QA - https://sudo-bmitch.github.io/presentations/dc2018/faq-stackoverflow-lightning.html

>> INVESTIGATE LAYER SPACE USAGE - https://github.com/wagoodman/dive
Introduction
*** get.docker.com ***

Both virtualisation and containerisation decouple workloads from underlying hardware.
	Virtual machines MIMIC A HARDWARE ENVIRONMENT.
	Containers are OS LEVEL virtualisation.

Containers are lighter-weight. They add an additional layer of abstraction ontop of the host OS.
The still allow sandboxing applications and resource allocation and control etc.

Run apps on one machine in a way where they won't "meddle" with other apps on the same machine.
Eg. N projects, each with its own set of dependencies! Docker images help "sandbox" each project so
you can keep them all on the same machine without getting cross-interference.

More resource efficient than full VMs. Docker shares common ground between projects. Runs on Linux.
On windows its just a VM!

Portability across machines and environments - e.g. dependency version mismatch.

Docker container is not a VM on Linux. On Windows it can be, but depends on your windows version
and method of Docker-install - Docker Toolbox v.s. Docker for Windows. The former uses VirtualBox
(type 2 hypervisor) and can only be accessed from the Docker Quickstart Terminal. The latter uses
the Windows hypervisor (type 1 hypervisor) and can be accessed from any terminal you like. There is
currently the restriction with the latter that you cannot run both the type1 hypervisor and
VirtualBox at the same time :( Toolbox access the daemon at 192.168.99.100 and have to use the
Docker terminal. On the latter you can use local host.

VM - isolate system
Docket - isolate application
Install Docker On Linux
# Add Docker's official GPG key:
sudo apt-get update
sudo apt-get install ca-certificates curl
sudo install -m 0755 -d /etc/apt/keyrings
sudo curl -fsSL https://download.docker.com/linux/ubuntu/gpg -o /etc/apt/keyrings/docker.asc
sudo chmod a+r /etc/apt/keyrings/docker.asc

# Add the repository to Apt sources:
echo \
  "deb [arch=$(dpkg --print-architecture) signed-by=/etc/apt/keyrings/docker.asc] https://download.docker.com/linux/ubuntu \
  $(. /etc/os-release && echo "$VERSION_CODENAME") stable" | \
  sudo tee /etc/apt/sources.list.d/docker.list > /dev/null
sudo apt-get update
sudo apt-get install docker-ce docker-ce-cli containerd.io docker-buildx-plugin docker-compose-plugin
sudo groupadd docker
sudo usermod -aG docker $USER

newgrp docker

sudo systemctl enable docker
sudo systemctl start docker
Docker and WSL
First Way I Tried
!!! CAUTION - THIS IS NOW OUT OF DATE. NEW VERSIONS OF DOCKER DESKTOP HAVE BETTER SUPPORT - SEE !!!
!!! NEXT SECTION                                                                                !!!

Taken from here: https://nickjanetakis.com/blog/setting-up-docker-for-windows-and-wsl-to-work-flawlessly#ensure-volume-mounts-work
Replicated verbatim:

	Install Docker
	==============

	# Update the apt package list.
	sudo apt-get update -y

	# Install Docker's package dependencies.
	sudo apt-get install -y \
	    apt-transport-https \
	    ca-certificates \
	    curl \
	    software-properties-common

	# Download and add Docker's official public PGP key.
	curl -fsSL https://download.docker.com/linux/ubuntu/gpg | sudo apt-key add -

	# Verify the fingerprint.
	sudo apt-key fingerprint 0EBFCD88

	# Add the `stable` channel's Docker upstream repository.
	#
	# If you want to live on the edge, you can change "stable" below to "test" or
	# "nightly". I highly recommend sticking with stable!
	sudo add-apt-repository \
	   "deb [arch=amd64] https://download.docker.com/linux/ubuntu \
	   $(lsb_release -cs) \
	   stable"

	# Update the apt package list (for the new apt repo).
	sudo apt-get update -y

	# Install the latest version of Docker CE.
	sudo apt-get install -y docker-ce

	# Allow your user to access the Docker CLI without needing root access.
	sudo usermod -aG docker $USER

  # If still permission denied use
  sudo chmod 666 /var/run/docker.sock


	Connect to a remote Docker daemon with this 1 liner:
	====================================================
	echo "export DOCKER_HOST=tcp://localhost:2375" >> ~/.bashrc && source ~/.bashrc
	# ALSO make sure in your Docker-for-windows settings that you have enabled the
	# "Expose daemon on tcp://localhost:2375 without TLS" option.


	Ensure Volume Mounts Work
	=========================
	When using WSL, Docker for Windows expects you to supply your volume paths in a format that matches this: /c/Users/nick/dev/myapp.
	But, WSL doesn't work like that. Instead, it uses the /mnt/c/Users/nick/dev/myapp format.

		Running Windows 10 18.03+ or Newer?
		-----------------------------------
		sudo nano /etc/wsl.conf

		# Now make it look like this and save the file when you're done:
		[automount]
		root = /
		options = "metadata"

		# Now reboot your windows device.

		Running Windows 10 17.09?
		-------------------------
		udo mkdir /c
		sudo mount --bind /mnt/c /c
A Better, Newer Way
https://docs.docker.com/docker-for-windows/wsl/
^^
Looks like Docker Desktop support for WSL 2 backend got a lot better :)
Slow Internet in Docker Container Running on WSL2
Run this from a `cmd` prompt:
netsh winsock reset
Docker's Architecture
Docker daemon, provides REST API, and the docker CLI client, which uses the REST API.

Docker container is a running instance of a docker image

Image - file system and parmeters - like a package containing everything you need to run your application
      - can download, build and run.
      - images are stored inside a registry. it's similar to a code repository, but holds Docker
        images.
      - lightwight executable packages that contain everything required in them, software, app
        code, dependencies etc etc.
      - Considered a read only artifact.
           !! NOTE this means that anything created in the Docker container that is not mapped to !!
           !! an external resource on the host is lost when the container is shutdown             !!
      - Created using Docker files - these detail how the Docker image should be built.
            - docker build

Container == running instance of a Docker image - like instance of a class
          Is immutable so any changes made whilst running them are lost on exit
          The container only has access to the resources provided in the Docker image unless
            external resources are mapped into the container.

Docker has 3 main components
	1. Docker daemon
		Install on host - "brain" of docker - performs/actons commands from the CLI and setup/run
		Docker containers.
	2. Docker CLI
		Way to interact with Docker - issue commands.
	3. Image registry
		Makes it possible for docker daemon to download and run an image


##-- alpine is only about 3MB so much better to download than ubuntu which could be seveal hundred MB.
##-- althernative is "slim"
docker run -it --rm --name alpine alpine sh
           ^^^ ^^^^ ^^^^^^
           ^^^ ^^^^ Custom unique name or handle to refer to instance by
           ^^^ Completely remove container when stopped
           be interactive and terminal (handle ctrl-c and colours etc)

The difference between `docker run` and `docker exec` is that `docker exec` executes a command on a running container whereas
`docker run` creates a temporary container, executes the command in it and stops the container when it is done.

docker stop alpine # to shut down the container

docker hub as auatomated build hooks - so if i push a change to my GitHub the docker registery can rebuild my image for me automatgiclaly.
The Docker Build Process
Ref: https://docs.docker.com/engine/reference/builder/#cmd

1. Run docker container, modify then do "docker commit"
2. Docker file - blueprint or recipe for what you want your docker image to be - the best way (apparently)
	Docker ignore file - Docker looks for a file named .dockerignore in the root directory of build. If this file exists,
	the build excludes files and directories that match patterns in it.

Docker images are layers, which are kinda like self-contained files and the docker image is the result of stacking up these layers.

First non-comment in docker file must be the "FROM" instruction (instruction names in caps) - import a base image to build on.
 	# FROM tag:version
 	FROM python:2.7-alpine
 	FROM ruby:2.4-alpine ## etc etc

FROM - The base image this new Docker image will be based on
     - It will be the very first instruction in any Docker file.
     - For example
           FROM python:2.7-alpine
                ^^^^^^ ^^^^^^^^^^
                Image  Verion of image.
                name   (If left out, Docker assumes you want latest)


RUN - To run a command(s)
    - It will execute whatever commands you define in a shell
	# RUN -any script you can run in your base OS without Docker-
	RUN mkdir /app
	WORKDIR /app # change working directory for subsequent RUN commands
	COPY requirements.txt # You can use relative paths but cannot copy in files above the dockerfile.
	LABEL value="something" # Attach arbitrary metadata to an image (must use quotes for value)
	CMD - default command to  instance run.
		note RUN - build of image
		CMD - run when instance of image starts up]
      By default this is run as an argument to '/bin/sh -c'.
      The CMD instruction is being passed in as an argument to and ENTRYPOINT script (see later)

      CMD output probably doesnt go to docker logs: https://stackoverflow.com/a/55444575
          use >> /proc/1/fd/1


EXPOSE - Expose a port on which the container can access the outside world on
         e.g. EXPOSE 8080 # Expose this port for the webapp.


ENTRYPOINT - Lets you define what script or command to run when the container starts up
             E.g. ENTRYPOINT [ "python" ]
             Generally ENTRYPOINT ["executable", "param1", "param2", ...]

             From https://goinbigdata.com/docker-run-vs-cmd-vs-entrypoint/:
                ENTRYPOINT instruction allows you to configure a container that will run as an executable.
                It looks similar to CMD, because it also allows you to specify a command with parameters.
                The difference is ENTRYPOINT command and parameters are not ignored when Docker container
                runs with command line parameters.

CMD - Execute commands at runtime, difference to ENTRYPOINT is that you can provide default values
      which can be overriden at runtime. Entrypoint can be overridden.
      E.g. CMD [ "app.py" ]
      Generally CMD ["executable", "param1", "param2", ...]

      From https://goinbigdata.com/docker-run-vs-cmd-vs-entrypoint/:
        * CMD instruction allows you to set a default command, which will be executed only when you run
          container without specifying a command.
        * Docker container runs with a command, the default command will be ignored. If Dockerfile has
          more than one CMD instruction, all but last CMD instructions are ignored.

Example
--------
FROM python:2.7-alpine

RUN mkdir /app
WORKDIR /app

COPY requirements.txt requirements.txt # goes to /app/requirements.txt
RUN pip install -r requirements.txt
COPY . . #again /app - copies everything from local machine relative to dockerfile into our docker image.
LABEL maintainer="James James <james.james@james.com>" \
      version="1.0"
CMD flask run --host=0.0.0.0 --port=5000


Union File Systems and Copy on Write
-------------------------------------
VERY IMPORTANT HOW YOU ORDER THINGS! Each command/instruction will be a cached-layer so make sure
that more static large layers come first so that if something changes Docker won't have to redo a
lot of stuff (because cached layers below the layer that change stay the same but layers above it
must be redone).

Chain commands together where possible to avoid creating unecessary additional layers.

Layers can be cached across multiple Docker images for memory usage efficiency.

To see what layers the image has use the `Docker inspect IMG_ID` command.

To achieve this layer Docker uses a UNION FILE SYSTEM. Many lays of filesystems appears to the
image as one single FS.
	If higher layer mods file in lower layer, copy is made in higher layer and modified then used.
	If it didn't do this every Docker image sharing the lower layer would see the change and this
	is not what is wanted! Called COPY-ON-WRITE strategy.

	Sharing layers helps reduce image size.

Docker adds one writable layer on top of your image so you can modify the FS, store things etc.
BUT TAKE CARE - this is not persistent by default and any data stored/chaged etc is lost when the
container is shutdown.


Cleanup / File System Size Easy Wins
------------------------------------
1. Purge any apps you installed to setup but won't need for the image to run:
       apt-get purge -y
2. Do a general house clean:
       apt-get autoremove -y
       apt-get clean -y
       rm -rf /var/lib/apt/lists/*
       rm -rf /var/cache/apt/archives
       rm -fr /var/cache/debconf/*
 3. Get rid of man pages
       rm -rf /usr/share/doc/
       rm -rf /usr/share/man/
       rm -rf /usr/share/locale/
Multi-Stage Builds
The Docker docs have the following to say: With multi-stage builds, you use
multiple
FROM statements in your Dockerfile. Each FROM instruction can use a
different base, and each of them begins a new stage of the build. You can selectively copy
artifacts from one stage to another, leaving behind everything you don't want in the final image.
  FROM <base-image-a> as <build-stage-name>
  ...
  Do something that generates an artefact that you want to copy to the next build stage
  ...

  FROM <base-image-b>
  COPY --from=<build-stage-name> <src> <dest>
To mount a filesystem from a previous build stage into the current build stage:
RUN --mount=type=bind,target=<target-dir-in-this-stage>,source=<source-dir-in-previous-stage>,from=<build-stage-name> \
    ... access <target-dir-in-this-stage> as required ...
    ...
You don't have to mount directories either... you can mount specific files from the host, which saves you having to COPY them into the image!
Usefully there is also a tmpfs mount, which can be useful!
Example of mounting external file system and tmpfs in a Dockerfile:
RUN --mount=type=tmpfs,target=/build_temp \
    --mount=type=bind,source=.,target=/build \
       apt-get update --fix-missing \
    && apt-get -y upgrade \
    && apt-get install -y --no-install-recommends make \
    && DEBIAN_FRONTEND=noninteractive make -C build -f Dockerfile.Makefile TEMP_DIR=/build_temp all
Misc Bits
Access Host Server From Within WSL
Use host.docker.internal on Windows.
Or, you can use the host IP address, which is usually `172.17.0.1` and can be determined using `ip addr show docker0`.
Stop TK install asking for timezone
RUN DEBIAN_FRONTEND=noninteractive apt-get install -y -q package
Use Bash, not Sh, as default shell
SHELL ["/bin/bash", "-c"]
Use Host's XServer
With modern WSL 2 this isnt necessary anymore.
  xhost +"local:docker@"                          # if DISPLAY does not exist in your environment `export DISPLAY=":0"`
  docker container run \
      --rm -it \
      --env="DISPLAY" \
      --volume="$HOME/.Xauthority:/root/.Xauthority:rw" \
      --volume="/tmp/.X11-unix:/tmp/.X11-unix" \
      <image-name>
Pass USB devices to container
--device=/dev/usbtmc0
Run container with same UID/GUI as host user
--user $(id -u):$(id -g)
This tells the container to run with the current user id and group id so that any files it creates will have the correct user and group set (otherwise you get root root).
Docker Events - See What's Going On
To see Docker daemon events (containers getting fired up, killed etc), run:
docker events
The docker events command itself does not display the specific commands that containers are asked to run. Combine with docker inspect,
wrapped in a script to see these:
#!/bin/bash

# Path to store Docker events log
EVENT_LOG="my_docker_event_log.txt"

# Start capturing Docker events
docker events > "$EVENT_LOG" &

# Function to get the command run by the container
get_container_command() {
    CONTAINER_ID=$1
    docker inspect --format '{{.Config.Cmd}}' "$CONTAINER_ID"
    # Or for a ton of info use --format 'json'
}

# Monitor the event log for new start events
tail -f "$EVENT_LOG" | while read -r line; do
    # Check if the event is a start event
    if echo "$line" | grep -q ' container start '; then
        # Extract the container ID
        CONTAINER_ID=$(echo "$line" | awk '{print $4}')

        # Get the command run by the container
        COMMAND=$(get_container_command "$CONTAINER_ID")

        # Print the container ID and command
        echo "Container ID: $CONTAINER_ID"
        echo "Command: $COMMAND"
    fi
done
To see system events:
sudo journalctl -u docker.service
Debug/Monitor Docker Events
Observe Docker Desktop container actions/lifespans using the docker events command.
Unfortunately, what docker events does not tell us is, when a container is started, what command is being run. To find this out a little script has to be used (courtesy ChatGPT btw):
#!/bin/bash

    # Path to store Docker events log
    EVENT_LOG="/path/to/event_log.txt"

    # Start capturing Docker events
    docker events --filter 'event=start' --filter 'event=stop' > "$EVENT_LOG" &

    # Function to get the command run by the container
    get_container_command() {
        CONTAINER_ID=$1
        docker inspect --format '{{.Config.Cmd}}' "$CONTAINER_ID"
    }

    # Monitor the event log for new start events
    tail -f "$EVENT_LOG" | while read -r line; do
        # Check if the event is a start event
        if echo "$line" | grep -q ' container start '; then
            # Extract the container ID
            CONTAINER_ID=$(echo "$line" | awk '{print $4}')

            # Get the command run by the container
            COMMAND=$(get_container_command "$CONTAINER_ID")

            # Print the container ID and command
            echo "Container ID: $CONTAINER_ID"
            echo "Command: $COMMAND"
        fi
    done
Docker CLI Command Cheat Sheet
# Build Docker Images from CLI
$ docker image build -t web1:1.0 .
                     ^^     ^^^
                     ^^     the tag version
                     tag the image so that we dont have to use its random hash

$ docker image inspect web1

$docker image ls [-a]
$docker image rm <tag:version>|<hash (image ID)>

# Run/stop Docker Instances
$ docker container ls  [-a] # List running docker images (akak containers)
$ docker container run web1
$ docker container stop web1 or container-ID

# Ports
$ docker container run -p bind-port-on-host:bind-port-in-container

# Env var
$ docker container run -e SOME_VAR=some-value

# Logs and stats
$ docker container logs [-f] container-ID-or-name
$ docker container stats

# Auto restart
use docker run ... --restart on-failure ...

# Run as daemon and get logs
use '-d' flag
Then docker logs CONTAINER-ID

# Windows
https://blog.docker.com/2016/09/build-your-first-docker-windows-server-container/
https://docs.docker.com/docker-for-windows/#switch-between-windows-and-linux-containers
Volumes
Avoid the Kill-build-reload cycle every time you change your code. I.e. you change it, kill the
docker instance, rebuild the image, and re-run it... sigh!

Mount source code from main operating system straight into the running container. To do this use the
'-v' option.

   docker container run ... -v abs-path-on-host:path-to-mount-in-target

To specify a path on C:\ in windows do -v //c/path/to/wherever
Dynamically Connect To Container And Run Commands
Here you are connecting to an _already running_ container

$ docker container exec [--user] "$(id -u):$(id -g)"] -it the-name (bash|sh|cmd)
                        ^^^^^^^^
                        When running on linux host so that files created in docker are not owned
                        by root, but by you.

or to run a command once without an interactive shell
$ docker container exec "echo james" alpine
Link Docker Containers Over A Network
https://docs.docker.com/network/bridge/
https://docs.docker.com/network/overlay/
https://docs.docker.com/config/containers/container-networking/
https://docs.docker.com/network/network-tutorial-standalone

$docker network ls

Docker will have installed a virtual network adaptor. On windows I see it as:

   Ethernet adapter vEthernet (DockerNAT):

      Connection-specific DNS Suffix  . :
      IPv4 Address. . . . . . . . . . . : 10.0.75.1
      Subnet Mask . . . . . . . . . . . : 255.255.255.0
      Default Gateway . . . . . . . . . :


On Linux I see it as:

   TODO

See the docker networks using
$ docker network ls
NETWORK ID          NAME                DRIVER              SCOPE
5c6e2a9ca9b2        bridge              bridge              local << This is the virtual network adapter created oh your host as seen above (DockerNAT)
0aa3a20ed51a        host                host                local
bb9b8f0ffcd6        none                null                local

The bridge network is used by default.
  In terms of Docker, a bridge network uses a software bridge which allows containers connected to
  the same bridge network to communicate, while providing isolation from containers which are not
  connected to that bridge network.

Inspect it using:
$ docker network inspect bridge

NOTE: Conatiners are, by default, added to the bridge network unless you specify otherwise


To get DNS "out of the box" you need to configure your own network.
   docker metwork create --driver bridge mynetworkmame

With new network supply "--net mynetworkname" to the "docker conatiner run..." command line.

Once this is done each container can be accessed using its name, rather than the IP address. Docker has
a little DNS server running for us that maps the container name to the IP address Docker assigned it :)
Data Volumes a.k.a. Named Volumes
Allow you to persist data.

Create using "docker volume create my_volume_name"
Use "docker volume inspect my_volume_name" to see things like its mountpoint in the container.

In stead of doing -v /local/path:/path/on/conatiner do my_volume_name:/path/on/container
                                                       ^^^^^^^^^^^^^^
                                                        Name if volume created in prev step

See https://docs.docker.com/storage/volumes/:

> Volumes are the preferred mechanism for persisting data generated by and used by
> Docker containers. While bind mounts are dependent on the directory structure and
> OS of the host machine, volumes are completely managed by Docker.
>
> Start a service with volumes
> When you start a service and define a volume, each service container uses its own
> local volume. None of the containers can share this data if you use the local
> volume driver, but some volume drivers do support shared storage.
Entrypoints
A command in the Docker file that auto-runs a script after the container has started

   ENTRYPOINT['/path/to/some/executable/script']

From some dynamic config you can create an environment variable tha the script can read to
change its execution directly

   Use -e ENV_VAR_NAME=value on the command line to the "docker container run" command.

Last line of your script must read
   exec "$@"
This is because, in your docker file, the CMD instruction is being passed in as an
argument to your ENTRYPOINT script, so you must take care to run it, otherwise whatever was
in the CMD line in the docker file will not get run!
Managing Docker
docker system info
docker system df [-v] #< See disk usage
docker system prune [-a] [-f] (Caution when using -a!!)
docker image ls #< See images: images with <none> and dangling and can be killed
docker container stop $(docker container ls -a -q) #< Stop all running containers
BuildKit and Multi Stage Builds
See:
	https://docs.docker.com/develop/develop-images/multistage-build/
      With multi-stage builds, you use multiple FROM statements in your Dockerfile. Each FROM
      instruction can use a different base, and each of them begins a new stage of the build.
      You can selectively copy artifacts from one stage to another, leaving behind everything
      you don't want in the final image.

Multi-stage builds = smaller containers, better caching, smaller security footprint.
	E.g. build container and production container where production container only contains build artefact not tools for build.


See:
  https://www.docker.com/blog/advanced-dockerfiles-faster-builds-and-smaller-images-using-buildkit-and-multistage-builds/
The latest Docker versions come with new opt-in builder backend BuildKit.

Enable using  DOCKER_BUILDKIT=1 docker build .
Docker Tid Bits
Bash Command Line Completion
Bash completion doesn't appear to be there by default on some base images. To enabled this, in the docker file...
RUN apt-install -y bash-completion
Git Command Line Completion
Also not always "just there". Enable bash-completion (see above) and then use...
RUN curl -o /etc/bash_completion.d/git-completion.bash https://raw.githubusercontent.com/git/git/master/contrib/completion/git-completion.bash
Connect To Server On Host From Within Container
Use the `--add-host host.docker.internal:host-gateway` option on Linux (Docker for Linux v20.10+). Dont need to use any option on Windows Docker 18+. Then connect using, for example, `telnet host.docker.internal <port>`.
Docker Compose
See also the Awesome Compose Project, which provides a curated list of Docker Compose samples. These samples provide a starting point for how to integrate different services using a Compose file and to manage their deployment with Docker Compose.
GOOD YAML TUT - https://medium.com/@kinghuang/docker-compose-anchors-aliases-extensions-a1e4105d70b
Compose files doc: https://docs.docker.com/compose/compose-file/compose-file-v3/

version: '3'

services:
    redis:
        image: 'redis:3.2-alpine'    # The docker hub image to download
        ports:                       # Port mapping list
            - '6379:6378'
            - ...
        volumes:                     # Volumes list
            - 'redis:/data'          # This is a data volume
            - ...

    web:
        build: '.'                   # Rather than download, build the image from the current dir
        depends_on:                  # Container will be started after all these
            - 'redis'
            - ...
        environment:                 # Environment variables as key value pairs
            FLASK_DEBUG: 'true'
            PYTHONBUFFERED=true      # So we can see python output when run thu docker compose.
            ...
        env_file:                    # Alternatively provide the key/value pairs from a file
            - '.env'                 # Loads from top to bottom, latter override earlier settings
            - ...                    # Use COMOSE_PROJECT_NAME=... to set the name to prefix image/container/etc names.
        ports:                       # Port mapping list
            - '5000:5000'
        volumes:                     # Volumes list
            - '.:/app'               # Mapped volume - can use '.' for CWD :)

# Because a data volume was used for redis an extra bit of config needs
# to be done here.
volumes:
    redis: {}


A note about volumes (https://docs.docker.com/engine/reference/commandline/service_create/):
  docker service create \
      --name my-service \
      --replicas 3 \
      --mount type=volume,source=my-volume,destination=/path/in/container,volume-label="color=red",volume-label="shape=round" \
      nginx:alpine
For each replica of the service, the engine requests a volume named "my-volume" from the default ("local") volume driver
where the task is deployed. If the volume does not exist, the engine creates a new volume and applies the labels.
When the task is started, the volume is mounted on /path/in/container/ inside the container.

The volume specified will create a *local* volume for each service container. See https://docs.docker.com/storage/volumes/.


From Overriding Dockerfile image defaults

Overriding Dockerfile image defaults:
    https://docs.docker.com/engine/reference/run/#overriding-dockerfile-image-defaults
    When a developer builds an image from a Dockerfile or when she commits it, the developer can set a number of default
    parameters that take effect when the image starts up as a container. Four of the Dockerfile commands cannot be overridden
    at runtime: FROM, MAINTAINER, RUN, and ADD. Everything else has a corresponding override in docker run.
docker-compose build will go through the YAML file and build any services with a build property.
docker-compose pull will go through the YAML file and download any services with an image property.
docker-compose up [--build] [-d] will start the project. --build combines the build step into this command and -d makes it run in the background.
docker-compose ps
docker-compose logs [-f] [container-name] displays all the logs and -f will tail the output.
docker-compose restart [container-name] restarts all the containers. Container name optional.
docker-compose exec container-name CMD runs command in container. If use shell to have interactive session don't need -it flags because these are added auto.
docker-compose stop
Docker Swarm
Intro
Like: https://gabrieltanner.org/blog/docker-swarm

* Docker swarm is a clustering solution built inside Docker.
    * Clusters we care less about individual nodes. We don't name them - just throw requirements at
      swarm and swarm does the machanics of distributing round the swarm.
* Deploy & maintain many containers across many instances and automate the container lifecyle!
* A single service can have multiple tasks.

* Swarm not active by default. Use `docker info` to see swarm status.
    * Use `docker swarm init [--advertise-addr IP_ADDR] [--listen-addr IP_ADDR]` to enable.
        * Use --advertise-addr to give a public address to advertise the swarm service on - must
          be accessible from other servers you want in the swarm.
        * Use "--listen-addr" when machine has multiple network interfaces and you want to bind to a specific one.
    * Creates root signing certficate created for the swarm, issued for first Manager node
    * Join tokens created - can be used on other nodes to join swarm
    * Create RAFT consensus DB
    * Creates the "leader" node.
        * docker node ls
          ID                            HOSTNAME         STATUS    AVAILABILITY   MANAGER STATUS   ENGINE VERSION
          v6neb2hympfaejcdgjxqp92pu *   docker-desktop   Ready     Active         Leader           20.10.11

* Language:
    * A __node__ is an instance of the Docker engine participating in the swarm. Can run >= 1 node on a computer.
    * A __manager__ node dispatches units of work called tasks to worker nodes and perform the orchestration
      and cluster management.
        * Deploy swarm by submitting service definition to manager.
    * __Worker__ nodes receive and execute tasks dispatched from manager nodes
    * A __service__ is the definition of the tasks to execute on the manager or worker nodes.

* Ports
    You need the following ports open between your swarm nodes:

    2377/tcp: Swarm mode api
    7946/both: Overlay networking control
    4789/udp: Overlay networking data
    protocol 50 for ipsec (secure option) of overlay networking

* Create service:
    * $ docker service create alpine ping 8.8.8.8
      mmib56y49ixo0v38xc8vqq24u                      # This is the SERVICE ID, not the container ID

    * $ docker service ls
      ID             NAME            MODE         REPLICAS   IMAGE           PORTS
      mmib56y49ixo   laughing_bohr   replicated   1/1        alpine:latest

    * To see the task allocated to this service:
      $ docker service ps laughing_bohr
      ID             NAME              IMAGE           NODE             DESIRED STATE   CURRENT STATE           ERROR     PORTS
      m1328c1z8s92   laughing_bohr.1   alpine:latest   docker-desktop   Running         Running 2 minutes ago
                                                       ^^^^^^^^^^^^^^
                                                       The service that this task is running on

    * Scale it up using
      $ docker service update mmib56y49ixo --replicas 3

      Which now means there are three tasks:
      $ docker service ps laughing_bohr
      ID             NAME              IMAGE           NODE             DESIRED STATE   CURRENT STATE            ERROR     PORTS
      m1328c1z8s92   laughing_bohr.1   alpine:latest   docker-desktop   Running         Running 5 minutes ago
      qsrs5ntvv9qm   laughing_bohr.2   alpine:latest   docker-desktop   Running         Running 21 seconds ago
      6jjw41tdp9w9   laughing_bohr.3   alpine:latest   docker-desktop   Running         Running 22 seconds ago

      IF YOU KILL A TASK, IT WILL BE RESTARTED AUTOMATICALLY BY SWARM!!


* Newer modern alternative to the now deprecated docker-machine is https://multipass.run/.

* Docker swarm ports for firewall:
    https://www.bretfisher.com/docker-swarm-firewall-ports/
MultiPass
Multipass lets you control multiple VM instances from one command line interface and has a docker image that comes with Docker pre-installed - usefull for messing around with swarm.
# Launch an instance (by default you get the current Ubuntu LTS)
multipass launch --name foo [--cloud-init cloud-config.yaml] [image]
                             ^^^^^^                           ^^^^^
                             ^^^^^^                           Image to launch. Ommitted => default Ubuntu used
                             Pass a cloud-init metadata file

# Run commands in that instance
multipass exec foo -- command-goes-here

# Open a shell prompt on an instance
mulutipass shell foo

# See all instances
multipass list

#Stop and start instances
multipass stop foo bar
multipass start foo

# Clean up
multipass delete bar
multipass purge

# Find alternate images to launch with multipass
multipass find

# Use VirtualBox (https://multipass.run/docs/using-virtualbox-in-multipass-windows)
multipass set local.driver=virtualbox

# Share data via Mounts
multipass [u]mount $HOME foo
Onto Network Overlays and Meshes...
A small bit of revision....
From https://docs.docker.com/engine/swarm/how-swarm-mode-works/nodes/
and https://docs.docker.com/engine/swarm/admin_guide/:
A swarm consists of one or more nodes: physical or virtual machines running Docker Engine 1.12 or later in
swarm mode. There are two types of nodes: managers and workers.
Manager nodes handle cluster management tasks:
* maintaining cluster state
* scheduling services
* serving swarm mode HTTP API endpoints
* When you run a swarm of Docker Engines, manager nodes are the key components for managing the swarm and
storing the swarm state.
* Raft requires a majority of managers, also called the quorum, to agree on proposed updates to the swarm,
such as node additions or removals ... If the swarm loses the quorum of managers, the swarm cannot perform
management tasks ... Even if a swarm loses the quorum of managers, swarm tasks on existing worker nodes
continue to run. However, swarm nodes cannot be added, updated, or removed, and new or existing tasks
cannot be started, stopped, moved, or updated.
Using a Raft implementation, the managers maintain a consistent internal state of the entire
swarm and all the services running on it.
When you have multiple managers you can recover from the failure of a manager node without downtime.
An N manager cluster tolerates the loss of at most (N-1)/2 managers.
Worker nodes are also instances of Docker Engine whose sole purpose is to execute containers. Worker nodes don't
participate in the Raft distributed state, make scheduling decisions, or serve the swarm mode HTTP API.
By default, all managers are also workers
See https://docs.docker.com/engine/swarm/how-swarm-mode-works/services/
https://docs.docker.com/engine/swarm/how-swarm-mode-works/pki/
Like: https://sebiwi.github.io/blog/how-does-it-work-docker-3/
Back to course...
In the turorial create 3 VMs with docker installed.
On node 1:
docker swarm init --advertise-addr 142.93.44.156
# ^^ This should print out a join command that the other nodes can use.
# For example, the above printed out the following:
On the other nodes:
docker swarm join --token SWMTKN-1-428pmulqy030ktqjwogyjw0nv49i45ytgc3pmw1q25xi6u3dkk-d282u6s5s0eb67tp9pts2pioj 142.93.44.156:2377
Workers cannot use swarm commands - priviledge limitation
To make a worker a manager Use
docker node update --role manager nodeX
To add a node as a manager by default need to get the manager token:
docker swarm join-token manager
You can change these tokens if you need to for security reasons.
They are stored encrypted on disk.
To see all the nodes do:
docker node ls [--filter role=(worker|manager)]
Now, a service, replcated across our three nodes can be created:
docker service create --replicas 3 alpine ping 8.8.8.8
# ^^^^^^ ^^^^
# ^^^^^^ Command to execute - i.e. the service function
# The image to use on the nodes to run the service
To see the service do:
docker service ls
To see the gory details of/for a service:
docker service inspect [--pretty] SERVICE_NAME
To see the service instance running on the various nodes do:
docker service ps affectionate_ellis
# ^^
# Name docker assigned the service
On each node you can see the service instance that is running:
docker node ps [node-name]
# ^^
# If omitted then current Node
Most tasks can now be orchestrated from node 1 - no need to exec commands in the
other nodes directly.
Network Overlays: Multi-Host networking
----------------------------------------
See for networking in swarm: https://docs.docker.com/network/overlay/
The overlay network driver creates a distributed network among multiple Docker daemon hosts.
This network sits on top of (overlays) the host-specific networks, allowing containers
connected to it (including swarm service containers) to communicate securely when encryption
is enabled. Docker transparently handles routing of each packet to and from the correct Docker
daemon host and the correct destination container.
All swarm service management traffic is encrypted by default, using the AES algorithm in GCM
mode. Manager nodes in the swarm rotate the key used to encrypt gossip data every 12 hours.
To encrypt application data as well, add --opt encrypted when creating the overlay network
* Use docker `network create ... --driver overlay [--opt encrypted] ...` when creating network
* For intra-container comms only inside a single swarm
* They can access eachother as-if on a VLAN
* Can enable full network encryption (IPSec (AES))
* Off by default (perforamce reasons)
* Services can be connected to multiple networks.
Create:
docker network create --driver overlay OVERLAY_NAME
See:
docker network ls
In course example, create a drupal network
docker service create \
--name psql \
--network mydrupal \
-e POSTGRES_PASSWORD=mypass postgres
This will create the service on the current node (?). Can do, to see the service:
[watch] docker service ls
And to see what's running in the service
docker service ps psql
Can see logs
docker service logs psql
You can get it directly from the container, but the container name may have stuff suffixed onto it
so do a `docker container ls` to find out its name. For me, for ex is was:
docker container logs psql.1.qhv53a8qrka1wz31u7rm1bsku
Now create another service for drupal itself:
docker service create --name mydrupal --network drupal -p 80:80 drupal
This gives us two services on two *different* nodes.
So, how can they talk: A: Use the SERVICE NAMES!! So when you configure the hostname for the DB in drupal setup
you can just use "psql" rather than needing to know an IP address!
There is some magic! I can access drupal on the IP of any of the nodes - the magic has to do with the ROUTING git_merge_squash
Routing Mesh
------------
* Routes ingress packets for a service to the tasks for that service which spans all the nodes...
* Spans all nodes in swarm
* Uses IP Virtual Server (IPVS) from Linux kernel
* IPVS is the linux load balancer
* Random ref: https://debugged.it/blog/ipvs-the-linux-load-balancer/
* Load balances Swarm services across their Tasks.
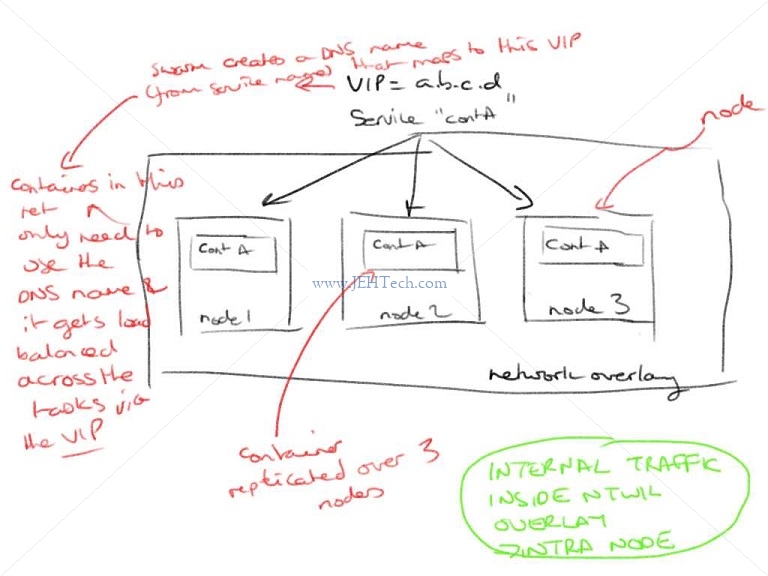
* Two ways of working:
* Container-to-container in an overlay network
* E.g. is FE talking the BE - if DB is duplicated the FE does not use DB real IP - instead uses
a virtual IP (VIP), which the IPVS can then forward to any of the duplicated DBs.
Swarm PUTS THIS VIP IN FRONT OF ALL SERVICES.
Ensures load is distributed across all tasks in the service.
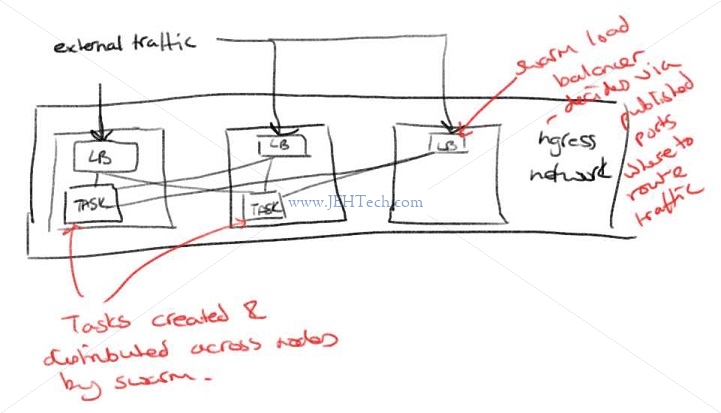
* External traffic incoming to published ports:
* All nodes listen to all published ports and can re-route traffic the the appropriate container.
* This means that when deploying containers in a swarm you do not have to care what particular server it is on.
* E.g. If container fails it could be re-incarnated on another node.
* Possible issues:
* Issues
* <= 17.03 Routing mesh and load balancing are STATELESS - has impact on apps expectin sessions!
* If you use session cookies or clients expect to talk with same container consistently across requests
then need to add this functionality.
* Layer 3 (IP) load balancer, not layer 4 (DNS)
* Some solutions
* NGINX or HAProxy
* Use Docker Enterprise - comes with built-in L4 web proxy
Tutorial continues:

  docker service create --name search --replicas 3 -p 9200:9200 elasticsearch:2
  docker service ps search
  # Shows three instance running
  # Doing CuRL localhost:9200 several times returns a different name and the reason is that the
  # load balancer is sending our queries to different instances each time, as it should :)
  curl localhost:9200 # (I had to use curl node1:9200)


Dockers Distributed Voting App
-------------------------------
Use this for playing around and teaching yourself docker and docker swarm.
https://github.com/bretfisher/udemy-docker-mastery
Use swarm-app-1 directory in course repository

    # Create the networks for this excercise
    docker network create --driver overlay frontend
    docker network create --driver overlay backend

    # Create the volume for the DB
    docker volume create db_volume

    # Create the vote service
    docker service create --name vote_app -p 80:80 --network frontend --replicas 2 bretfisher/examplevotingapp_vote

    # Create the redis service
    docker service create --name redis --network frontend redis:3.2

    # Create worker service
    docker service create --name worker_app --network backend --network frontend bretfisher/examplevotingapp_worker

    # Create postgres service
    docker service create --name postgres --network backend \
        --mount type=volume,source=db_volume,destination=/var/lib/postgresql/data \
        -e POSTGRES_HOST_AUTH_METHOD=trust postgres:9.4

    # Create result service
    docker service create --name service --network backend -p 5001:80 bretfisher/examplevotingapp_result


Swarm Stacks and Production Grade components
---------------------------------------------
* Extra layer of abstraction to Swarm called Stacks
* Stacks accept compose files as defn for services, networks, Volumes
     docker stack deploy # Rather than docer service create
* docker-compose cli not needed on swarm server
    * Not designed as a production tool anyway - just dev / syadm tool
* A stack is for only one swarm

From https://www.ronaldjamesgroup.com/article/docker-stack#:~:text=Docker%20Stack%20sits%20at%20a,grouped%20together%2C%20essentially%20pooling%20resources.:
How does Docker Stack help?
    Docker Stack sits at a higher level than Docker containers and helps to manage the
    orchestration of multiple containers across several machines. Docker Stack is run
    across a Docker Swarm, which is essentially a group of machines running the Docker
    daemon, which are grouped together, essentially pooling resources.

    Stacks allow for multiple services, which are containers distributed across a swarm,
    to be deployed and grouped logically. The services run in a Stack can be configured
    to run several replicas, which are clones of the underlying container. This number
    will be maintained as long as the service is running. Adding or removing replicas
    of a service is simple. This makes Docker Services ideal for running stateless
    processing applications.

Main docs: https://docs.docker.com/engine/reference/commandline/stack/
           https://docs.docker.com/engine/swarm/stack-deploy/

$ docker stack deploy -c compose-file.yml
#                     ^^
#                     Tell it to use a compose file

The course example compise file is
{{{
    version: "3"
    services:

        redis:
            image: redis:alpine
            ports:
                - "6379"
            networks:
                - frontend
            deploy:
                replicas: 2
                update_config:
                    # vv The number of containers to update at a time
                    parallelism: 2
                    delay: 10s
                # vv Configures if and how to restart containers when they exi
                restart_policy:
                    condition: on-failure

        db:
            image: postgres:9.4
            volumes:
                - db-data:/var/lib/postgressql/data
            networks
                - backend
            deploy:
                placement:
                    # vv Specify placement of constraints and preferences
                    constraints: [node.role == manager]
                    # vv Number of containers that should be running at any given time
                    replicas: 2
                    # vv Limit number of replicas of a replicated-mode service that can
                    # vv run on one node.
                    max_replicas_per_node: 1

        ...
}}}

docker stack ls

The stacks create APPs and each app has one or more SERVICES associated with it
    docker stack services APP_NAME  # Like a service ls
    docker stack ps APP_NAME        # Shows tasks not containers

In the stack compose file it is the deploy keywork that is unique to swarm:
    https://docs.docker.com/compose/compose-file/compose-file-v3/#deploy
    Specify configuration related to the deployment and running of services. This only
    takes effect when deploying to a swarm with docker stack deploy, and is ignored by
    docker-compose up and docker-compose run.

For CONSTRAINTS see: https://docs.docker.com/engine/reference/commandline/service_create/#specify-service-constraints---constraint

Secret Storage & Usage In Swarm
--------------------------------
Secrets storage:
    * Built in to swarm
    * Easiest "secure" solution for storing secrets in Swarm
    * Docker >- 1.13 Raft DB encrypted on disk
        * Only stored on disk on manager nodes
        * Manager and works "control plane" is TLS + auth (key delivery)
        * Workers keep keys secure in memory only (RAMFS)

Pass secret using file (not so good if file stored on host):
    * docker secret create psql_user psql_user.txt
                           ^^^^
                           Secret Name
Or send it on STDIN
    * echo "password-bad-unless-hidden-from-bash-history" | docker secret create psql_user -

Neither of the above good for production!!

docker secret inspect NAME

These secrets will map to...
    /run/secrets/NAME
...for any node in a service which has the secret added to it

To create a service with a secret do
    docker secive create --name foo --secret SECRET_NAME --secret ANOTHER_SECRET_NAME ....
To tell processes how to use secrets things like environment variables set to their paths
can be given using the `-e ENV_VAR_NAME=/run/secrets/SNAME` option.

To use SECRETS IN STACKS you need >= version 3.1 in the YAML file. Pass in the secrets in much
the same way
{{
  version: "3.1"
  services:
      psql:
        ...
        secrets:
            - psql_user
            - psql_password
        ...

  secrets:
      psql_user:
          file: ./my_secrets_file.txt
          psql_password:
          file: ./my_secrets_other_file.txt
}}
Swarm App Lifecyle
Overriding Settings To Use Multiple Compose Files
-------------------------------------------------
1. Use a default compose file for the common settings across all environments (local, dev, prod etc)
   `docker-compose.yml`
2. Then use override file `docker-compose.override.yml`.
   This is a special filename that docker compose will automatically "include"

OR

Specify using `-f` where the command line order is the order that the YAML files are overlaid. E.g.:
    docker-compose -f docker-compose.yml -f docker-compose.my-environment.yml up -d

The result of "smooshing" these files together can be output as well:
    docker  -f docker-compose.yml -f docker-compose.my-environment.yml config > output.yml
                                                                       ^^^^^^
                                                                       Note the config command

There is also an EXTENDS option - does this work yet in Stacks?


Service Updates
---------------
* Provides rolling replacement of tasks/containers in a service
* There are also scale, rollback and healthcare options
    e.g. SCALE: docker service scale service_name=4
         ROLLBACK: docker service rollback service_name
* A stack deploy to an existing stack IS an update. Thats how you do an UPDATE.
* UPDATE IMAGE E.g. if image was prev 1.2.0:
    docker service update --image myapp:1.2.1 service-name
* ADD ENV
    docker service update d --env-add BLAH=BLAH
* ADD/DELETE PORT
    docker service update --publish-(add|rm) 8080


When you scale swarm doesn't move resource around so nodes could be unbalanced.
Urg
  https://docs.docker.com/engine/swarm/admin_guide/
Raft requires a majority of managers, also called the quorum, to agree on proposed updates to the swarm, such as node additions or removals. Membership operations are subject to the same constraints as state replication.

If the swarm loses the quorum of managers, the swarm cannot perform management tasks. If your swarm has multiple managers, always have more than two

Raft tolerates up to (N-1)/2 failures and requires a majority or quorum of (N/2)+1 members to agree on values proposed to the cluster. This means that in a cluster of 5 Managers running Raft, if 3 nodes are unavailable, the system cannot process any more requests to schedule additional tasks. The existing tasks keep running but the scheduler cannot rebalance tasks to cope with failures if the manager set is not healthy.


https://docs.mongodb.com/manual/replication/
Really good blogg post about it: https://www.openmymind.net/Does-My-Replica-Set-Need-An-Arbiter/
Votes: https://stackoverflow.com/questions/26167440/mongodb-replica-set-and-preventing-primary-from-becoming-a-secondary
       https://stackoverflow.com/q/20857306

A replica set in MongoDB is a group of mongod processes that maintain the same data set. Replica sets provide redundancy and high availability, and are the basis for all production deployments.

Your application connection logic should include tolerance for automatic failovers and the subsequent elections. Starting in MongoDB 3.6, MongoDB drivers can detect the loss of the primary and automatically retry certain write operations a single time, providing additional built-in handling of automatic failovers and elections

The primary is the only member in the replica set that receives write operations. MongoDB applies write operations on the primary and then records the operations on the primary's oplog. Secondary members replicate this log and apply the operations to their data sets.

Replica sets should always have an odd number of members. This ensures that elections will proceed smoothly.
THis confirms it: https://dba.stackexchange.com/q/148855

See: https://docs.mongodb.com/manual/tutorial/deploy-replica-set/


https://medium.com/@kalahari/running-a-mongodb-replica-set-on-docker-1-12-swarm-mode-step-by-step-a5f3ba07d06e

It is important to specify the “ — listen-addr” parameter when using docker-machine and VirtualBox, as the VMs are assigned multiple network interfaces.
docker@manager1:~$ docker swarm init --listen-addr 192.168.99.100:2377 --advertise-addr 192.168.99.100:2377

LIKE IT: https://flowygo.com/en/blog/mongodb-and-docker-how-to-create-and-configure-a-replica-set/


docker node update --label-add mongo.replica=2 $(docker node ls -q -f name=worker1)

$ docker node ls -q -f name=docker-desktop
v6neb2hympfaejcdgjxqp92pu


$ docker service create --replicas 1 --network mongo --mount type=volume,source=mongodata1,target=/data/db --mount type=volume,source=mongoconfig1,target=/data/configdb --constraint 'node.labels.mongo.replica == 1' --name mongo1 mongo:3.2 mongod --replSet example
b29ftmx77l75owmhm


$docker exec \
   -it $(docker ps -qf label=com.docker.swarm.service.name=mongo1) \
   mongo \
   --eval 'rs.initiate({
               _id: "example",
                members: [
                    { _id: 1, host: "mongo1:27017" },
                    { _id: 2, host: "mongo2:27017" },
                    { _id: 3, host: "mongo3:27017" }
                ],
                settings: {
                    getLastErrorDefaults: {
                        w: "majority",
                        wtimeout: 30000
                    }
                 }
             })'


Useful reading about High Availability (HA) Clusters
----------------------------------------------------
https://en.wikipedia.org/wiki/Split-brain_(computing)
    It indicates data or availability inconsistencies originating from the maintenance of two separate data
    sets with overlap in scope, either because of servers in a network design, or a failure condition based
    on servers not communicating and synchronizing their data to each other. This last case is also commonly
    referred to as a network partition.

    Modern commercial general-purpose HA clusters typically use a combination of heartbeat network connections
    between cluster hosts, and quorum witness storage. The challenge with two-node clusters is that adding a
    witness device adds cost and complexity (even if implemented in the cloud), but without it, if heartbeat
    fails, cluster members cannot determine which should be active. In such clusters (without quorum), if a
    member fails, even if the members normally assign primary and secondary statuses to the hosts, there is
    at least a 50% probability that a 2-node HA cluster will totally fail until human intervention is provided,
    to prevent multiple members becoming active independently and either directly conflicting or corrupting data.

https://en.wikipedia.org/wiki/Heartbeat_(computing)#Heartbeat_network
    Heartbeat network is a private network which is shared only by the nodes in the cluster, and is not
    accessible from outside the cluster. It is used by cluster nodes in order to monitor each node's status
    and communicate with each other messages necessary for maintaining the operation of the cluster.
Kubernetes
* USEFUL: https://www.nginx.com/c/microservices-march-2022-kubernetes-networking/
* USEFUL: https://learnk8s.io/
* Short form of name is k8s
* Tool for running many different Docker containers
* Infrastructure as code to setup multiple containers and networking between them
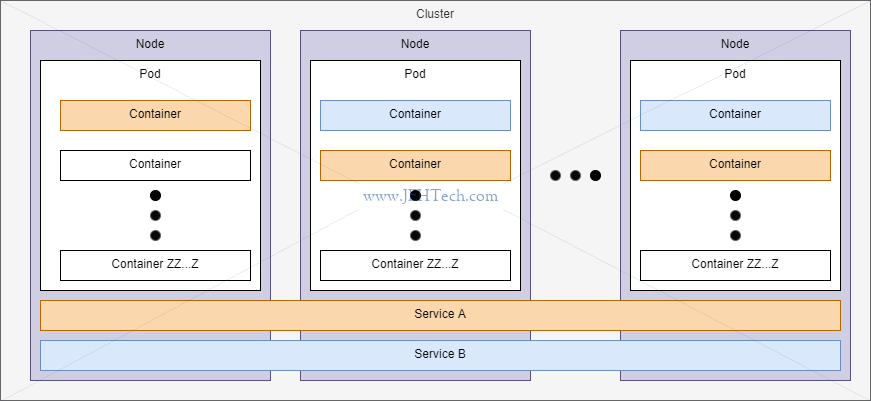
* Creates clusters. One cluster is a set of virtual machines, all managed by one master process.
* Each VM runs one or more "pods" and each pod manages one or more containers
+-----------------------------------------------------------------------...
| +=======================+ +=======================+
| | Node | | Node |
| | +-----------------+ | | +-----------------+ |
| | | Pod | | | | Pod | |
| | | +-----------+ | | | | +-----------+ | |
| | | | Container | | | | | | Container | | | ...
| | | +-----------+ | | | | +-----------+ | |
| | | ... | | | | ... | |
| | +-----------------+ | | +-----------------+ |
| | ... | | ... |
| +==========^^^==========+===+==========^^^==========+==== ...
| | SERVICE (abstacts networking between pods away - makes simpler...)
| +======================================================== ....
|
| +--------------------------------------------------------------------...
| | MASTER
| +----------------------------------------------------------------^---...
| +----------------------------------------------------------------|---...
| | DEPLOYMENT FOR PODS (one function is re-incarnation server) |
| +-------------------------------------------------------------^--|---...
+----------------------------------------------------------------|--|---...
| |
\ /
\/
Config file
Cluster = Collection of nodes + master to manage them
Node = VM to run pods
Pod = Contains one or more containers. When only one container its more-or-less a container
Deployment = Object intended to Monitor and manage pod sets and re-incarnates them if they crash
and to update pods (creates new pods, switches to them, deletes old pods.)
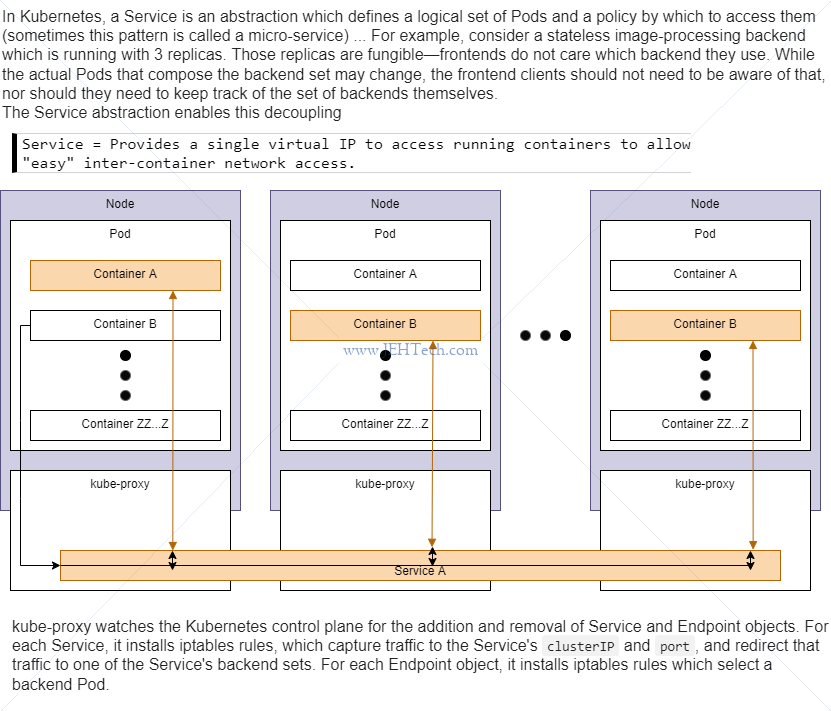
Service = Provides URL to access running containers to allow "easy" inter-container network access
* If running on Linux need minikube tool installed.
* Config files:
    * Describes different deployments, pods and services (aka objects) to Create
    * YAML
    * Infrastructure as code - stored in source control
    * Basic pod config (DONT create this way - usually use a deployment):
      ```
        apiVersion: v1
        kind: Pod                              } Type of object to create
        metadata:                              } Options to pod being created
            name: some name for your Pod
        spec:
            containers:
            - name: name for this container     } A spec for one container in this pod.
              images: name-of-docker-image:ver  } default ver, if not specified, is "latest"
      ```
      Run: `kubectl apply -f name-of-yaml-file.yaml
           `kubectl get pods`
* Common kubectl commands:
    * kubectl get pods                       } Like docker container ps
    * kubectl exec -it [pod name] [cmd]      } Like docker container exec
    * kubectl logs [pod name]                } Like docker container logs
    * kubectl delete pod [pod name]
    * kubectl apply -f [config file name]
    * kubectl describe pod [pod name]
    * kubectl get pods | deployments | services
    * kubectl rollout restart deployment [name]
* K8s about running containers together. Docker about running single or few containers.
* Deployment example YAML - super minimal:
  ```
    apiVersion: apps/v1
    kind: Deployment
    metadata:
        name: deploymentName-depl
    spec:
        replicas: 1                   - number of pods to create for running an image.
        selector:                     } Selector tells deployment which pods to manage.
            matchLabels:              }    matchLabels are key/value pairs - name of key/value can be anything.
                app: pod-name         }
        template:                     - Spec config of pod deployment should create.
            metadata:
                labels:               } All pods in this deployment will be assigned a label of app = posts
                    app: app-label    }
            spec:
                containers:
                    - name: container Name
                      image: docker image name

  ```

* Services
  * See also "[Kubernetes Ingress for Beginners, by Nick Ramirez](https://thenewstack.io/kubernetes-ingress-for-beginners/)"
  * 4 types:
    1. Cluster IP
        Sets up user-friendly URLs to access pods. Only exposes pods in cluster.
        Good for setting up communications between pods in a cluster.

        +--------------------+       +--------------------+
        | Pod                |       | Pod                | Containers access containers in other pods
        |   +-----------+    |       |   +-----------+    | via the cluster IP service for that pod.
        |   | Container |    |       |   | Container |    |
        |   +---------|-+    |       |   +-|---------+    |
        |        ...  |      |       |     |  ...         |
        +----^--------|------+       +-----|--------^-----+
             |        \                    /        |
             |         \-----------\      /         |
             |              --------\----/          |
             |              |        |              |
        +----|--------------v+       v--------------|-----+
        | Cluster IP Service |       | Cluster IP Service |  < The address to use to access
        +--------------------+       +--------------------+       the Pod, via the cluster IP service is
                                                                  *name* of the ClusterIP service as defined
                                                                  in the deployment YAML (see below). E.g. if
                                                                  the service is called snafu-srv then the
                                                                  address is http://snafu-srv/...

        YAML may look something like this:
          apiVersion: v1
          kind: Service
          metadata:
              name: a name for this service
          spec:
              selector:
                  app: name-of-deployment/pod/app-to-add-ip-service-too
              type: ClusterIP
              ports:
                  - name: a Name
                    protocol: TCP
                    port: xxxx         } See diagram below for meaning of port
                    targetPort: xxxx   } v.s. targetPort


    2. Node port
        Makes pod accessable outside the cluster. Usually only needed for dev.

                                           +-----------------------------------------------------------------+
                                           | Node                                     +------------------+   |
                                           |                                          | Pod              |   |
                                           |             +-------------+              | +-------------+  |   |
                      +------------+       |  +----------|-+ Node port |    +---------|--+            |  |   |
        Browser ----> | port 3xxxx | -------->| port 4000  | service   |--->| port 4000  |  Container |  |   |
                      +------------+       |  +----------|-+           |    +---------|--+            |  |   |
                                           |             +-------------+              | +-------------+  |   |
                                           |                                          +------------------+   |
                                           +-----------------------------------------------------------------+
                      ^^^^^^^^^^^^^^          ^^^^^^^^^^^^^^                ^^^^^^^^^^^^^^
                      node port               port                          target port

        From "Kubernetes for beginners article":
            > Services with a NodePort type are easy. They essentially announce that they'd like the Kubernetes API
            > to assign to them a random TCP port and expose it outside the cluster. What makes this convenient is
            > that a client can target any node in the cluster using that port and their messages will be relayed to
            > the right place. It's like saying you can call any phone in the United States and whoever picks up will
            > make sure you get forwarded to the right person.
            >
            > The downside is that the port's value must fall between 30000 and 32767, a range safely out of the way
            > of well-known ports, but also conspicuously non-standard compared to the familiar ports 80 for HTTP and
            > 443 for HTTPS. The randomness itself is also a hurdle, since it means that you don't know what the value
            > will be beforehand, which makes configuring NAT, firewall rules, etc. just a bit more challenging
            > ...
            > Defining many NodePort services creates a tangle of random ports.

    3. Load balancer
        Makes pods accessable outside the cluster. **Preferred** way to expose pod to the world.
        +--------------------------------------------------- ... --------------------------+
        | Cluster                                                                          |
        |   +--------------------+   +--------------------+  ...  +--------------------+   |
        |   | Pod                |   | Pod                |  ...  | Pod                |   |
        |   |   +-----------+    |   |   +-----------+    |  ...  |   +-----------+    |   |
        |   |   | Container |    |   |   | Container |    |  ...  |   | Container |    |   |
        |   |   +-----------+    |   |   +-----------+    |  ...  |   +-----------+    |   |
        |   |        ...         |   |        ...         |  ...  |        ...         |   |
        |   +--------------------+   +--------------------+  ...  +--------------------+   |
        |   | Cluster IP Service |   | Cluster IP Service |  ...  | Cluster IP Service |   |
        |   +--------^-----------+   +---------^----------+  ...  +---------^----------+   |
        |            |_________________________|____________________________|              |
        |                                      |                                           |
        |                              INGRESS CONTROLLER                                  |
        |                                      |                                           |
        |                        +-------------^-------------... -+                        |
        +------------------------|           Load                 |------------------------+
                                 |      Balancer Service          |
                                 +-------------^------------ ... -+
                                               |
                                            Client
        The Load Balancer Service tells kunernetes to "reach out" to its provider and provision
        a load balancer. Gets traffic to a SINGLE pod. "Provider" means the cloud service etc,
        for example, AWS or Azure, that kubernetes is running on. The LB exists *outside* of any
        cluster we create - it is provisioned by the infrastructure that KB is running on.

        The Ingress or Ingress Controler is a pod with a set of routing rules to distribute traffic
        to other services. The LB does not know how to route specific URLs to the correct pod. It is
        a general load balancing mechanism. It is the Ingress Controller that is responsible for
        routing certain URLs to certain pods.

        From "Kubernetes for beginners article":
          > ... this comes with some prerequisites. It only works if you are operating in a cloud-hosted
          > environment like ... Amazon's EKS and if you are okay with using that cloud vendor's load
          > balancer technology, since it is chosen and configured automatically. The most costly
          > disadvantage is that a hosted load balancer is spun up for every service with this type,
          > along with a new public IP address, which has additional costs.
          > ...
          > Defining many Load Balancer services leads to paying for more cloud resources than desired.

        - Automatic provisioning
        - Cloud provider only
        - Layer 4 (TCP/UDP)

    4. External name
        Redirects in-cluster requests to a CNAME url.

    5 **Ingress Routing**
        Not actually a service! From the K8S docs: You can also use Ingress to expose your Service.
        Ingress is not a Service type, but it acts as the entry point for your cluster. It lets you
        consolidate your routing rules into a single resource as it can expose multiple services under
        the same IP address.
          -- https://kubernetes.io/docs/concepts/services-networking/ingress/

        From "Kubernetes for beginners article":
            > ... perhaps it could be reduced, contained, so that you would only need to allocate one
            > random port or one load balancer to expose many internal services? The platform needed a
            > new layer of abstraction, one that could consolidate many services behind a single
            > entrypoint...
            >
            > ...you write an Ingress manifest that declares how you would like clients to be routed
            > to a service. The manifest doesn't actually do anything on its own; you must deploy an
            > Ingress Controller into your cluster...
            >
            > ... Ingress controllers are pods, just like any other application, so they're part of
            > the cluster and can see other pods. They're built using reverse proxies that have been
            > active in the market for years ... NGINX Ingress Controller, and so on. The underlying
            > proxy gives it Layer 7 routing and load balancing capabilities...
            >
            > ...Being inside the cluster themselves, Ingress Controllers are susceptible to the
            > same walled-in jail as other Kubernetes pods. You need to expose them to the outside
            > via a Service with a type of either NodePort or LoadBalancer. However, now you have a
            > single entrypoint that all traffic goes through: one Service connected to one Ingress
            > Controller, which, in turn, is connected to many internal pods.

* Updating an image used by a deployment
    * Steps
        1. Deployment uses 'latest' tag in pod Spec
        2. Make update to code
        3. Build Docker image
        4. Push image to docker hub
        5. kubectl rollout restart deployment [depl_name]
    * Above is quite a hassle - intro SKAFFOLD to help!
      SKAFFOLD (skaffold.dev):
        * Automates many tasks in Kubernetes dev environment.
        * Makes it easy to update code in a running pod.
        * Makes easy to create/de;ete all objects tied to a project in on go