ReactJS Notes
Page Contents
Course Notes
These are notes from the Udemy course React - The Complete Guide by Maximilian Schwarzmüller. It's a great course, give it a go!
Intro
react
react-dom

babel - translate next gen javascript to browser compatible javascript


react component is just a function that has to return the code to render to the dom
	JSX - needs babel as the preprocessor that converts JSX to normal javascript code
	JSX - requires one root div!

function Person(props) { // React auto gives me the props parameter - the component properties.
	return (
		<div className="person"> // NOTE: use of className not class! This is JSX thing - class is a reserved word in JS so cant be used.
			<h1>{props.name}</h1>
			<p>Some stuff: {stuff}</p>
		</div>
	);
}
ReactDOM.render(<Person name="John" stuff="Whatever"/>, document.querySelector('#p1')); - render a javascript function as a component to the real dom inside div with id "p1"


Could also do
	app = (
		<div>
			<Person name="John" stuff="blah"/>
			<Person name="Peter" stuff="blah"/>
		</div>
	);
	ReactDOM.render(app, document.querySelector('#app')); # A single page application

React focusus on the what not the how - focus on what you want to see rather than managing individual UI state and keeping track of it all.
Todo / To Read / Good Reads
https://blog.bitsrc.io/understanding-react-render-props-and-hoc-b37a9576e196
https://kentcdodds.com/blog/application-state-management-with-react
https://www.youtube.com/watch?v=3XaXKiXtNjw&ab_channel=ReactTraining
https://kentcdodds.com/blog/prop-drilling
https://kentcdodds.com/blog/state-colocation-will-make-your-react-app-faster
https://kentcdodds.com/blog/how-to-use-react-context-effectively
https://pagepro.co/blog/how-to-use-memoization-in-js-and-react/#:~:text=First%20things%20first%2C%20Memoization%20in,same%20arguments%20are%20supplied%20again.
https://reactjs.org/blog/2016/07/13/mixins-considered-harmful.html
https://indepth.dev/posts/1501/exploring-how-virtual-dom-is-implemented-in-react
https://vaadin.com/learn/tutorials/using-web-components-in-react
https://felixgerschau.com/react-component-composition/
https://codewithnico.com/production-ready-react-apps/
https://github.com/chaoming/fireact
Some Resources
create-react-app: https://github.com/facebookincubator/create-react-app
Introducing JSX: https://reactjs.org/docs/introducing-jsx.html
Rendering Elements: https://reactjs.org/docs/rendering-elements.html
Components & Props: https://reactjs.org/docs/components-and-props.html
Listenable Events: https://reactjs.org/docs/events.html
Setup Local React Project
Build a workflow - optimize code, lint, make code cross-browser compatible using babel and jsx etc.
Need - dependency management tool, e.g. npm
       bundler - put all our JS modules into one file - use webpack
       compiler - next-gen JS to older-JS = babel + presets
       dev server to test on
^^^^
There is a react-team supported tool that does all this for us! -- `npm install -g create-react-app` -
only using nodeJS for the package manager and the dev server
	Use command create-react-app react-complete-guide --scripts-version 1.1.5
		Creates a folder called `react-complete-guide` in the CWD

CD into `react-complete-guide` and type `npm start` to start the development server. It server
watches your files so if you change code it will auto-reload it for you!
	Inside that directory, you can run several commands:
	  npm start
	    Starts the development server.

	  npm run build
	    Bundles the app into static files for production.

	  npm test
	    Starts the test runner.

	  npm run eject
	    Removes this tool and copies build dependencies, configuration files
	    and scripts into the app directory. If you do this, you can’t go back!

			tip: Try out `Rescripts`, which is used to modify create-react-app's webpack configuration,
			without ejecting the app... woop woop! (https://github.com/harrysolovay/rescripts)
React Component Basics
Every component needs a `render()` method - it returns an object that react can use to render
content to the HTML DOM.

> Components are the core building block of React apps. Actually, React
> really is just a library for creating components in its core.
> A typical React app therefore could be depicted as a component tree -
> having one root component ("App") and then an potentially infinite amount
> of nested child components.
> Each component needs to return/ render some JSX code - it defines
> which HTML code React should render to the real DOM in the end.


JSX v.s. React
--------------
JSX is a syntactic sugar that needs to be translated into javascript code.

For example "<div></div>" would be translated into
	React.createElement('div', props-object, child1 [,child2[,...]]),
where the children are also created using React.createElement(...).

JSX restrictions
1. Cannot use JS reserved keywords
2. Must have ONE root element, normally a DIV.
	- The way round this is to use a HOC that just returns its children.
	- In react > 16.2 you dont have to create this HOC yourself - its is provided and is called
	  "React.Fragment".


Creating Basic Components
-------------------------
Directory and file(s) in that directory for each component with same name as componenet, normally
using capitalised first letter.
In file
  - import React from 'react.js';
  - const component_name = (...) => { return SOME-REACT-ELMENTS-VIA-JSX; }
  - export default component_name;

In root component file:
  - import Component_name from './Comonent_name/Component_name.js' <- Name must have upper-case
    character because elements starting lower case are reserved for HTML reserved node names
  - then use <Component_name>...</Componeent_name>

To get JSX code to execute and use the output of a JS function (can only use one-line expressions),
wrap the code in curley braces - {}

	Props
	-----
	Allow us to pass attributes (and children) specified in the JSX/HTML code to the JS component so
	that it can display content dynamically. Note the props object passed to the componenet should
	*NOT* be modified by the component.

	If component is constructed using a function, the function gets one parameter - the props obejct.
		const componenet_name = (props) => {
			return <div>
				<p>I am {props.age} years old.</p>
				<p>I live in the country {props.country}</p>
			</div>;
		};
	If componeent is constructed using a class then in the render() method use `this.props.age` for
	example. The props are passed automatically made available as `this.props` for you.

	To access children, e.g. <Component_name>Some text in the middle</Component_name>, use `props.children`,
	which is created by react for us. It will contain all elements between the opening and closing
	tags of the component, plain text, or an element tree...

	You can pass METHODS as props so that other componenets can access methods, from say, the main app,
	for example. This could allow a child componenet to change data in the parent component. It is a
	useful pattern.

	!!!! Whether you declare a component as a function or a class, it must never modify its own props. !!!!

	State
	-----
	Only for classes exending `Component` (and see also React hooks for function based components) PRE React 16.8.
		Function based components can, since React 16.8, use the useState() hook
	Create a class variable named `state`, which should be a JS oject with keys, as you want to define
	them, mapping to values of interest. The variable is SPECIAL because if it changes it will triger
	React to re-render the DOM with the updated data BUT ONLY IF YOU USE `this.setState()`.

	!! NOTE you must use `this.setState()` to TRIGGER RE-RENDERING OF DOM !! Do not modify the state variable directly !!
		setState() takes an object as argument and merges it with the class state object for us.

	!! NOTE THE FOLLOWING !!
	!!
	!!	It does not immediately trigger the render, it merely schedules a render, so the state won't be
	!!	updated until React determines it is a "good time" to do that.
	!!
	!!	Because of this, "this.state" in "setState()" is NOT GUARANTEED TO BE THE LASTEST/NEWEST
	!!	STATE OF THE OBJECT!!!! It could be an older state. This is because React may batch multiple
	!!	setState() calls into a single update for performance.
	!!
	!!  See: https://reactjs.org/docs/state-and-lifecycle.html
	!!  See rationale for async setState: https://github.com/facebook/react/issues/11527#issuecomment-360199710
	!!
	!!	This means using setState like this can sometimes cause problems:
	!!		someFunc = () => {
	!!			setState({something: this.state.something + 1});
	!!			//                  ^^^^^^^^^^
	!!			//                  WARNING - this could be a STALE STATE
	!!		};
	!!
	!! The correct way to do this is as follows:
	!!		someFunc = () => {
	!!			setState((prevState, props) => {
	!!				return {
	!!					something: prevState.something + 1;
	!!				};
	!!			});
	!!		};
	!!
	!! This uses the alternative setState syntax which accepts a function that receives the previous
	!! state and the component's props. React can then call this function when it is ready to set
	!! a new state. Then prevState that is passed to this function is GUARANTEED BY REACT TO BE THE
	!! MOST RECENT STATE THAT YOU WOULD NORMALLY EXPECT.


	Generally on PROPS and STATE cause react to re-render the DOM.

	Anything using state is a statefull componenet. Otherwise it is stateless. Design to have few as
	possible statefull and as many as possible stateless (presentation) components.

	!!!! YOU SHOULD NEVER MUTATE THE STATE VARIABLE - ALWAYS TAKE COPIES, ESP FOR ARRAYS ETC, AND THE CALL setState() !!!!
		It is MUCH BETTER TO TAKE A **COPY** of the arrayMember, mutate it, and then setState()!
		Instead use slice() with no params to copy array:
			const arrayMemberRef = this.state.arrayMember.slice(); // Now arrayMemberRef references a COPY of the reactJs-managed state variable
		OR use ES6 spread operator:
			const arrayMemberRef = [...this.state.arrayMember]; // Now arrayMemberRef references a COPY of the reactJs-managed state variable

		The same is true if the member is an object - you'd get a reference, not a copy of the object.
		Take a copy using:
			const objectmemberRef  = {...this.state.objectReference };
		OR old-school using Object.assign().
Events & Handlers
All HTML attributes like onclick become onClick in JSX.
See https://reactjs.org/docs/events.html#supported-events

In a class that extends `Component`, define arrow function for eventHandler (use arrow function to
correctly capture "this"). Then do , for e.g., <button onClick='this.eventHandler'>...</button>. When
the button is clicked it will call the function `eventHandler()` of your class, which if it then
modifies the class state, will cause the component to be re-rendered into the DOM.

To pass data to a handler use the bind() method.
	<button onClick={this.myHandler.bind(this, param1, param2, ...)>
If you've used arrow functions the binding to this isn't necessary - the arrow function will have
captured it, but because we want to bind other parameters, we now have to have this as the first
parameter to bind(). This is why with arrow functions we don't have to use bind() if there is no
extra data to pass into the handler.

The other way to accomplish this is to use an arrow function, and it looks a little nicer IMO, BUT BUT
apparently it can be less efficient and bind() is therefore preferred.
	<button onClick={() => this.myHandler(param1, param2, ...)}>


Handling Events
---------------
https://reactjs.org/docs/events.html
https://reactjs.org/docs/handling-events.html

* React events are named using camelCase, rather than lowercase.
* React event handlers are passed instances of SyntheticEvent, a cross-browser wrapper around the
  browser's native event. Same interface as the browser’s native event.
    * 'nativeEvent' attribute to get underlying browser event object.
* SyntheticEvents are pooled.
* With JSX you pass a function as the event handler, rather than a string.
* Cannot return false to prevent default behavior in React. You must call preventDefault explicitly.

From https://stackoverflow.com/a/53500357:
	Wrapping native event instances can cause performance issues since every synthetic event wrapper
	that's created will also need to be garbage collected at some point, which can be expensive in
	terms of CPU time.

	React deals with this problem by allocating a synthetic instance pool. Whenever an event is triggered,
	it takes an instance from the pool and populates its properties and reuses it. When the event
	handler has finished running, all properties will be nullified and the synthetic event instance is
	released back into the pool. Hence, increasing the performance.
Hooks
All React hooks are called "useXXX".
	import React, {useXXX, useYYY, ...} from 'react';

useState() hook
---------------
So, now instead of using class `state` variable, in function-based componenet do:
	const app = (props) => {
		const [ theCurrentState, theSetStateFunction ] = useState({... state object defn ...});
Now, where you would use `this.state` use `theCurrentState` and where you would use `setState()`
use `theSetStateFunction()`.

And in your handler functions, just put them inside the component defn function and reference the
function in the JSX returned. NOTE - the handler must be an arrow function so that it is lexically
scoped and captures `theCurrentState` and `theSetStateFunction` in the enclosing compononent def func.

		const app = (props) => {
			const [ theCurrentState, theSetStateFunction ] = useState({... state object defn ...});
			const myHandler = () => {
				theSetStateFunction({...});
			}
			return JSX-which-has-myHandler-as-an-onXXX-function;
		};

	!!!!BUT CAUTION!!!! theSetStateFunction() does **NOT** do a merge like setState() does.
	You must do the merge yourself manually! But you can get around this with many useSate() calls - state "slices".

This is a new way - the class based method is still seemingly the standard.
Css
Import into your JS files so that WebPack is aware of its existance. Put CSS for component in
component's dir and use class name same as component's name.

For things like "box-shadow" it converts this CSS property to the difference browser variables for
us like "-webkit-box-shadow" and "box-shadow" for us so our CSS can be more brief and generic.

	Inline styles
	-------------

	The style can be modified in the JS using inline styles. The CSS code ports almost directly to a JS
	object definition except REPLACE "-" WITH CAMEL CASE
		e.g.
		render() {
			const style = {
				backgoundColor:'white',
				border:'1px solid blue',
				...
			};

			return ( <div style={style}>.....</div> );
		}


	CSS Modules
	-----------
	See https://github.com/css-modules/css-modules
	See https://css-tricks.com/css-modules-part-1-need/
	See https://create-react-app.dev/docs/adding-a-css-modules-stylesheet/

	A CSS Module is a CSS file in which all class names and animation names are scoped locally by default.
	It does this by automatically creating a unique classname of the format [filename]_[classname]__[hash].
	This automatically creates CSS names that would look a lot like the names you might create if you are
	using the BEM CSS naming in a non-react project where you need to name you classes to identify the
	blocks they refer to etc.

	Use CSS module like this:
		import styles from './Button.module.css'; // Import css modules stylesheet as styles
		...
		class Button extends Component {
			render() {
				// reference as a js object
				return <button className={styles.Error}>Error Button</button>;
				//                        ^^^^^^^
				//                        Gets locally scoped error CSS from sytems imported above.
				//                        So CSS has a def `.error: {...}`
			}
		}

	Can also specify an array for `className` to apply many classes to an object, using the normal
	string with spaces, by joining elements of an array. E.g.:
		<button className={[styles.Error, styles.Big].join(" ")}>...</button>

	Can specify which style dynamically by using `styles['Big']`, e.g.:
		<button className={[styles.Error, styles[props.btnSize]].join(" ")}>...</button>

	NOTE: react-scripts >= 2.0 you do NOT have to eject and CSS modules must be  `*.module.css`.

	For react -scripts < 2.0, to enable CSS modules (required for react-scripts < 2.0).
		1. npn run eject
			From https://github.com/facebook/create-react-app/blob/master/packages/cra-template/template/README.md:
				Note: this is a one-way operation. Once you eject, you can’t go back!

				If you aren’t satisfied with the build tool and configuration choices, you can eject
				at any time. This command will remove the single build dependency from your project.

				Instead, it will copy all the configuration files and the transitive dependencies
				(webpack, Babel, ESLint, etc) right into your project so you have full control over them.
				All of the commands except eject will still work, but they will point to the copied scripts
				so you can tweak them. At this point you’re on your own.

			The eject command will have created a new top level directory, called "config" for you,
			which has received the above mentioned script copies. The "package.json" file will now
			also be A LOT larger. You can now see _all_ of your dependencies in detail.

		2. Goto "ROOT/config/webpack.config.dev.js"
			Search "css-loader". You should see:
				{
					test: /\.css$/,
					use: [
						require.resolve('style-loader'),
						{
							loader: require.resolve('css-loader'),
							options: {
								importLoaders: 1,
							},
						},
						...

			Add the following options, under "importLoaders":
							options: {
								importLoaders: 1,
								modules: true,
								localIdentName: '[name]__[local]__[hash:base64:5]',
							},

			Copy these two options into the production build file too!

		This is all that is required. CSS modules should now be good to go!

	Using Web Fonts
	---------------
	You can add includes of web fonts to "ROOT/Public/index.html".
	Goto fonts.google.com, select and customise the font that you like, get the CDN link and shove
	it into index.html above the title tag.
Conditional Rendering
In JSX we can execute simple JS expressions in {...}. This means that we could render based on the
ternary operator "cond ? true-path : false-path". Note cannot use if-else as this is
too complicated. Could we use a function and immediately evaluate it though? Not sure - need to try.
E.g.,
	return (
		<div>
			{
				this.state.someCondition ?
					<div>
						... some tags ...
					</div> : null // "null" means nothing is rendered
			}
			...
		</div>
	);

^^^
This gets MESSY fast, especially when multiple conditions are nested. It is BETTER to do the FOLLOWING:

	let myElements = null;
	if(this.state.someCondition)
	{
		myElements = (
			<div>
				... some tags ...
			</div>
		);
	}

	...

	return (
		<div>
			{myElements}
		</div>
	);
^^^
This is EASIER TO READ AND MAINTAIN! Keeps our core JSX template CLEAN!
Rendering Lists
If the state, or whatever other variable has a list of attributes for a list of like-tags we can do this:
	return (
		<div>
			{this.state.listMember.map((member, index) => {
				return <TheElement
					somehandler={someHandlerFunction.bind(this, index)}
					prop1={member.prop1}
					prop2={member.anotherProp}
					key={index} /> // You SHOULD ALWAYS PROVIDE A KEY!!
			})}
		</div>
	);

The map() funciton returns an array - JSX knowns how to render a list of ReactElement objects so this works okay.

NOTE -	arrays are references to an array - so
		const arrayMemberRef = this.state.arrayMember; // Gets a reference to the state.arraymember!!
		arrayMemberRef[0] = 123; // !!!!WARNING!!!! This mutates the reactJs managed state object which can produce UNDERIABLE BEHAVIOUR
		this.setState({arrayMember : arrayMemberRef});
	It is MUCH BETTER TO TAKE A **COPY** of the arrayMember, mutate it, and then setState()! Instead use slice() with no params to copy array:
		const arrayMemberRef = this.state.arrayMember.slice(); // Now arrayMemberRef references a COPY of the reactJs-managed state variable
	OR use ES6 spread operator:
		const arrayMemberRef = [...this.state.arrayMember]; // Now arrayMemberRef references a COPY of the reactJs-managed state variable


NOTE -	When rendering lists of data ALWAYS USE THE KEY PROP. It helps react know what changed in the list more efficiently.
Use Pseudo Selectors In Javascript
Requires package called "Radium"
	From your project directory: npn install --save radium
	Radium lets pseudo selectors and media queries be used from the JS
	> import Radium from 'radium';

	Then
		> export default Radium(App)
		To create a higher order componenet. Radium wraps you App. It can wrap both classes and
		function-based componenets.

With radium installed you can add the following to your style objects in JS code:
	const style = {
		color: 'white',
		...,
		':hover': {
			... set of styles for the hover state ...
		},
		':another-pseudo-selector' : {
			... another set of styles ...
		},
	};

You can also do media queries in the same way, EXCEPT you will have to use <StyleRoot> around your App:
In any componenet(s) you like:
	const style = {
		...
		'@media (min-width: 500px)': {
			...
		},
		...
	};
Then in your app:
	import Radium, { StyleRoot } from 'radium';
	...
	class App extends Component {
		...
		render() {
			return (
				<StyleRoot>
					... your original app content JSX ...
				</StyleRoot>
			);
		}
	}
Styled Componenets
styled-components.com
Tries to make styling components easy.
Do:
	npn install --save styled-componenets

Use:
	import styled from 'styled-componenets.js';

	const StyledButton = styled.button`
		../ write regular CSS within the back ticks ...
	`;

	const StyleDiv = styled.div`
		../ write regular CSS within the back ticks ...
		&:hover { // <<<< Special way to add pseudo element styles using styled componenets
		}

		color: ${props => props.altColour}; //<<< Note use of ${...} to access props
	`;

	...

	class ....
	{
		...
		render() {
			...
			return(
				<!-- Note how props can be passed to styledComponents for dynamic CSSS -->
				<StyledDiv altColor={this.state.my_colour_variable}>
					<StyledButton onClick={...}/>
					...
				</SyledDiv>
			);
		}
		...
	}

People seem to like this because you get scoped styles - I.e., they apply only to the component not
to the entire application.

BUT - you are now mixing markup with code, which was the entire point of CSS/HTML seperation in the first place!
BETTER? - Use CSS Modules - Haven't written notes on this...
Error Boundaries
See: https://reactjs.org/docs/error-boundaries.html
Only availabele in ReactJS >= 16
Allow us to catch errors (exceptions) and handle them gracefully.
They are a form of Higher Order Component (HOC) they wrap the componenet that may throw an error. Notes on this later.
	class ErrorBoundary extends Componenet {
		state = {
			hasError: false,
			errorMsg: '',
		}

		// this is a special method that react knows to call if any of the children
		// throw an exception
		componenetDidCatch(error, info) {
			this.setState({hasError: true, errorMsg: error});
		}

		render() {
			if (this.state.hasError) {
				// If there was an error render something usful
				return <h1>{this.state.errorMsg}</h1>;
			}
			else {
				// Otherwise just display the components this component wraps
				return this.props.children;
			}
		}
	}

Then in your App render or whatever, just wrap any elements that may have failures that are _not_ under
your control (i.e. dont wrap everything - you want to catch errors that are under your control and
make sure thay cannot happen) with <ErrorBoundary>....</ErrorBoundary> (class name just an example -
you can choose).
Class Based V.S. Functional Components
Class based
	Access to state
	Lifecycle Hooks

Functional based
	ReactJS <16 _no_ access to state, but .+ 16 has access to state via useState()
	_No_ access to lifecycle hooks
Class Component Lifecyle
See also https://reactjs.org/docs/state-and-lifecycle.html
         https://reactjs.org/docs/react-component.html
         https://www.w3schools.com/react/react_lifecycle.asp
         https://www.freecodecamp.org/news/how-to-understand-a-components-lifecycle-methods-in-reactjs-e1a609840630/
         https://blog.carbonfive.com/replacing-component-lifecycle-methods-with-react-hooks/
         >> Good diagram >> http://projects.wojtekmaj.pl/react-lifecycle-methods-diagram/

Functional component have an equivalent but this is for class based components only.
ReatcJS components have the following LIFE CYCLE HOOKS methods:
	- constructor(props) (default ES6 class feature, unlike the rest which are React specific)
	- static getDerivedStateFromProps(props, state)
              should return updated state
	- getSnapshotBeforeUpdate(prevProps, prevState)
	- componenetDidCatch()
	- componentWillMount() [might be deprecated]
	- componentWillUnmount()
		This can be used to do cleanup work like de-register event handlers etc.
	- shouldComponentUpdate(nextProps, nextState)
	- componentDidUpdate(prevProps, prevState, snapshot)
             After the update finished. The one that is most used is this method, e.g., to fetch
             new data from server.
	- componentDidMount()
	- render()

Note: Life-cycle hooks are not, and have nothing to do with, React Hooks.


Creation life cycle hooks execute in this sequence:
CREATION --> constructor(props) [must call super(props). Set state. Must have NO side-effects]
                constructor(props) {
                    super(props);
                    ... do other init stuf ...
                    // Can init state here - but dont call setState() as there is nothing to merge with yet
                    this.state = { ... };
                }
         --> getDerivedStateFromProps(props, state) [Sync state when props changed - niche. Must have NO side-effects]
         --> render() [Prepare and structure JSX code. Nothing that blocks!]
             --> render all child components and run their life cycle hooks...
         --> componentDidMount() [Do NOT update state (synchronously), but DO cause side effects, eg, HTTP requirets]


Component update (when props or state change) life cycle hooks execute in this sequence:
UPDATE --> getDerivedStateFromProps(props, state) [rarely needed]
       --> shouldComponentUpdate(nextState, nextProps)
           [Allows us to CANCEL the update process for optimisation. Do NOT cause side effects]
               Must return either True (do the update) or false (cancel the update)
       --> render() [constructs virtual DOM for merge into the real DOM]
           --> render all child components and run their life cycle hooks...
       --> getSnapshotBeforeUpdate(prevProps, prevState)
               Must return either null or an object, which will be received in componenetDidUpdate
               Example might be getting current scroll position so it can be restored in next step.
       --> componentDidUpdate(prevProps, prevState, snapshot)
           [NO (synchonous) state update but can cause side effects]


shouldComponentUpdate() is the one you will use for OPTIMISATION!

	Optimising using shouldComponentUpdate()
	----------------------------------------

	If a parent component updates, but the specific child has not updated (another child or the main
	element might have), then it can use shouldComponentUpdate() to stop itself needlessly being rendered
	into the ReactJS virtual DOM.

	For example,
		shouldComponentUpdate(nextProps, nextState) {
			// Bit note - be careful - this compares references, so if the references dont change
			// but the contents does, then this wont work! This is a SHALLOW comparison!
			return nextProps.propsOfInterest !=  this.props.propsOfInterest;
		}
Functional Hooks
See: https://reactjs.org/docs/hooks-effect.html
     https://medium.com/swlh/react-lifecycle-hooks-71547ef4e7a8
     https://blog.carbonfive.com/replacing-component-lifecycle-methods-with-react-hooks/

	> By using this Hook, you tell React that your component needs to do something after render.
	> React will remember the function you passed (we’ll refer to it as our “effect”), and call it
	> later after performing the DOM updates.

Use the "useEffect()" hook.
	import React, { useEffect } from 'react';

useEffect() is the second most important reactJS hook next to the useState() hook.
It combines all of the class hooks above into one function. It is _not_ a lifecycle hook, however,
it is a react hook!

useEffect() takes a function as an argument that is called for each render cycle.

Can be used for all the stuff that would be done in "componentDidUpdate()", e.g., a HTTP req. It
also does "componentDidMount()" (called for the first render).

You can use "useEffect()" as many times as you like.

	useEffect( () =>  {
		... do stuff ...
	}, [list-of-data])
	   ^^^^^^^^^^^^^^
	   Secnd argument to useEffect()
	   It is a list of references to all of the data used in the function. The function will only
	      run when a data item in this list changes.
	      So, if we use "props.member", it would only be called when the props change.

	      If you have different effect that depends on different data just use the function more
	      than once.

	      To make the "useEffect()" run only once, when it is created, just pass a second argument
	      that is an empty list - []. As there are no dependencies for the func, therefore, it will
	      never be re-run because a dependency change. But, it will run once at creation.

	> You can tell React to skip applying an effect if certain values haven’t changed between
	> re-renders. To do so, pass an array as an optional second argument to useEffect

If "useEffect()" returns a function, this function is run after the render cycle. Thus, you can
return a function if you want to do some cleanup.

	useEffect( () => {
		... do stuff ...
		return () = > {... do cleanup work ...};
	}, []) // The empty list only renders this when the component is created, not on every render cycle


	Optimisation
	------------

	Use React.memo() to wrap your functional component to memo-ise it!
When To Optimise
Not always is the answer! If child always updates with parent then no need to optimise and using
either shouldComponenetUpdate or react.memo() is actually inefficient as they will always find that
the component changes - so its extra work for no reason.

If you care checking ALL proprties for change, you don't need to override shouldComponentUpdate().
You can, instead, extend PureComponent. This is just a component that a component that
implements shouldComponentUpdate() and checks for any change in props.
How Reactjs Updates The Dom
See: https://reactjs.org/docs/faq-internals.html
See: https://reactjs.org/docs/reconciliation.html

ReactJS render() method does _not_ render to the DOM. It edits a ReactJS internal DOM. React compares
the old vidtual DOM to the new virtual DOM and diffs them. The virtual DOM is used because it is
_faster_ than the real DOM. Acessing the deal DOM is s-l-o-w!!

If the diff of the VDOMs shows a difference, only then does React reach
out to the real DOM and updates it - and _only_ in the places where it updated, it does _not_ re-write
the entire DOM.

million.js.org has a good explanation of a VDOM:
	The virtual DOM is a tree of virtual nodes that represents what the DOM looks like. virtual nodes
	are light, stateless, and are strings or JavaScript objects that only contain necessary fields.
	Virtual nodes can be assembled into trees, and "diffed" to make pinpoint changes to the DOM.

	The reasoning behind this is because modification and access of DOM nodes is computationally
	expensive. A diff between virtual nodes, accessing the DOM only for modification, is the premise
	of virtual DOM. It avoids the DOM as much as possible, favoring plain JavaScript objects instead,
	making reading and writing much cheaper.

react docs, of course, also gave good explanation:
	The virtual DOM (VDOM) is a programming concept where an ideal, or "virtual", representation of
	a UI is kept in memory and synced with the "real" DOM by a library such as ReactDOM. This
	process is called reconciliation.

	This approach enables the declarative API of React: You tell React what state you want the UI
	to be in, and it makes sure the DOM matches that state. This abstracts out the attribute
	manipulation, event handling, and manual DOM updating that you would otherwise have to use
	to build your app.

	Since "virtual DOM" is more of a pattern than a specific technology, people sometimes say
	it to mean different things. In React world, the term “virtual DOM” is usually associated with
	React elements (elements are the smallest building blocks of React app and describe what you
	want to see on the screen. eg. const el = <b>Me</b>) since they are the objects representing the
	user interface. React, however, also uses internal objects called "fibers" to hold additional
	information about the component tree. They may also be considered a part of "virtual DOM"
	implementation in React.

	Fiber is the new reconciliation engine in React 16. Its main goal is to enable incremental
	rendering of the virtual DOM.
Higher Order Components (Hocs)
A HOC wraps another component, possibly adding some logic to it etc. For e.g., error handling.
Convention is to name Hocs with a "With" at the beginning. e.g. "WithExtraInfo".

Create HOC method #1:
---------------------
	Use for HOCs that modify the HTML of the component in some way - so you can place it inside
	your JSX.
	Do:
		import React from 'react';
		const withBlah = props => (
			<div className="blah">
				... what ever extra components you want ...
				{props.children} <!-- <<<< This is what we're wrapping -->
				... what ever extra components you want ...
			</div>
		);
		export default withBlah;

	Then you use it in another component:
		import withBlah from 'react';
		...
		<WithBlah>
			...
		</WithBlah>

Create HOC method #2:
---------------------
	Use for HOCs that add behind the scenes logic like error handling.
	Do:
		import React from 'react';
		// Normal JS function
		const withBlah = (WrappedComponent, param1, param2, ...) = {
		               // ^
		               // Must start with a capital
			// From the normal JSX function, return the React component function.
			return props => (
				<div className="blah">
					<WrappedComponent {...props}/>
					<!-- NOTE: You cannot use props={props} because the Wrapped component would
					     receive this as props.props, an child of its props component. Hence
					     you have to use the spread operator as shown -->
				</div>
			);
		};

	Then you use it to wrap a component in an export:
		...
		export default withBlah(App, param1, param2, ...);
Prop Types
See https://reactjs.org/docs/typechecking-with-proptypes.html

Allows to specify which props the component accepts and their props.
	npm install --save prop-types
It is provided by the react team/community. It is not in react core hence you have to npm install it.
Then:
	import PropTypes from 'prop-types';
Then, after your component definition, whether functional or class based, add another property.
	class MyComponent {
		...
	};

	// React will look for "propTypes" when in development mode and spit out warnings if the prop
	// types are violated.
	MyComponent.propTypes = { // Lower case "p" for "propTypes" is important
		// In here define the props that are used by your component and their types...
		// The keys will be your prop names and their values the types
		click: PropTypes.func, // You can even specify the function prototype!
		prop1: PropTypes.string,
		prop2: PropTypes.number,
		...
	};

Can chain conditions. E.g.
	prop1: PropTypes.string.isRequired

Can also be applied to function components in exactly the same way.

Component children, i.e., `props.children` shold also be put into the propTypes spec.
	static propTypes = {
			children: PropTypes.oneOfType([
					PropTypes.arrayOf(PropTypes.node),
					PropTypes.node
			]).isRequired
	}
(See https://stackoverflow.com/a/42122662/1517244)


Arrays of shapes:
	MyComponent.propTypes = {
		items: PropTypes.arrayOf(
			PropTypes.shape({
				code: PropTypes.string,
				id: PropTypes.number,
			})
		),
	};

Directly from the docs:
	import PropTypes from 'prop-types';

	MyComponent.propTypes = {
		// You can declare that a prop is a specific JS type. By default, these
		// are all optional.
		optionalArray: PropTypes.array,
		optionalBool: PropTypes.bool,
		optionalFunc: PropTypes.func,
		optionalNumber: PropTypes.number,
		optionalObject: PropTypes.object,
		optionalString: PropTypes.string,
		optionalSymbol: PropTypes.symbol,

		// Anything that can be rendered: numbers, strings, elements or an array
		// (or fragment) containing these types.
		optionalNode: PropTypes.node,

		// A React element.
		optionalElement: PropTypes.element,

		// A React element type (ie. MyComponent).
		optionalElementType: PropTypes.elementType,

		// You can also declare that a prop is an instance of a class. This uses
		// JS's instanceof operator.
		optionalMessage: PropTypes.instanceOf(Message),

		// You can ensure that your prop is limited to specific values by treating
		// it as an enum.
		optionalEnum: PropTypes.oneOf(['News', 'Photos']),

		// An object that could be one of many types
		optionalUnion: PropTypes.oneOfType([
			PropTypes.string,
			PropTypes.number,
			PropTypes.instanceOf(Message)
		]),

		// An array of a certain type
		optionalArrayOf: PropTypes.arrayOf(PropTypes.number),

		// An object with property values of a certain type
		optionalObjectOf: PropTypes.objectOf(PropTypes.number),

		// An object taking on a particular shape
		optionalObjectWithShape: PropTypes.shape({
			color: PropTypes.string,
			fontSize: PropTypes.number
		}),

		// An object with warnings on extra properties
		optionalObjectWithStrictShape: PropTypes.exact({
			name: PropTypes.string,
			quantity: PropTypes.number
		}),

		// You can chain any of the above with `isRequired` to make sure a warning
		// is shown if the prop isn't provided.
		requiredFunc: PropTypes.func.isRequired,

		// A value of any data type
		requiredAny: PropTypes.any.isRequired,

		// You can also specify a custom validator. It should return an Error
		// object if the validation fails. Don't `console.warn` or throw, as this
		// won't work inside `oneOfType`.
		customProp: function(props, propName, componentName) {
			if (!/matchme/.test(props[propName])) {
				return new Error(
					'Invalid prop `' + propName + '` supplied to' +
					' `' + componentName + '`. Validation failed.'
				);
			}
		},

		// You can also supply a custom validator to `arrayOf` and `objectOf`.
		// It should return an Error object if the validation fails. The validator
		// will be called for each key in the array or object. The first two
		// arguments of the validator are the array or object itself, and the
		// current item's key.
		customArrayProp: PropTypes.arrayOf(function(propValue, key, componentName, location, propFullName) {
			if (!/matchme/.test(propValue[key])) {
				return new Error(
					'Invalid prop `' + propFullName + '` supplied to' +
					' `' + componentName + '`. Validation failed.'
				);
			}
		})
	};

It seems one can kinda use PropTypes with contexts: Ref: https://codesandbox.io/s/1z1oxpx02j:
const TestingContext = React.createContext("light");

	TestingContext.Provider.propTypes = {
		value: PropTypes.oneOf(["light", "dark"])
	};

	const Testing = () => (
		<TestingContext.Consumer>{value => <h1>{value}</h1>}</TestingContext.Consumer>
	);

	const App = () => (
		<div>
			<TestingContext.Provider value="light">
				<Testing />
			</TestingContext.Provider>
			<TestingContext.Provider value="dark">
				<Testing />
			</TestingContext.Provider>

			{/* PropTypes warning since value 'asdf' doesn't match propTypes rule */}
			<TestingContext.Provider value="asdf">
				<Testing />
			</TestingContext.Provider>

			{/* default value used since it's not wrapped in a Provider */}
			<Testing />
		</div>
	);
Using React References
References give us access to our DOM elements.

	IN CLASS BASED COMPONENTS
	-------------------------

	Can add a "ref" keyword to any components, including your own defined components.
	It gives you the ability to access an element in the DOM without having
	to use DOM selectors to find it in the DOM. React magically ties your component class with the
	object in the DOM. You can use this to call DOM specific stuff like "setFocus()" for example.

	Lets say you have a component:
		class MyComponent extends Component {
			constructor() {
				super(); // Must always capp super()!!
				this.inputReference = React.createRef();
			}

			componentDidMount() {
				this.inputReference.current.focus();
				//                  ^^^^^^^ ^^^^^
				//                  ^^^^^^^ We can access the DOM function :)
				//                  ^^^^^^^
				//                  Must use the "current" property to get the current reference.
			}

			render() {
				<div>
					...
					<input
						ref={this.inputReference}
						...
					/>
					...
				</div>
			}
		};

	IN FUNCTIONAL COMPONENTS
	------------------------
	const myFuncComponent = props => {
		const elementRef = React.useRef(null);
		//    ^^^^
		//    elementRef will only be linked to the html_element when the return statement is
		//    executed. Therefore it can only be accessed after this. To do this, the useEffect()
		//    hook must be used, as this runs _after_ the compoment JSX has been rendered for the
		//    first time.

		useEffect( () => {
			elementRef.someDOMFunction(...);
			return () => {
				// This function is run to do cleanup work in useEffect()
			};
		}, []);
		// ^^
		// RECALL: the empty list means this only runs once when first rendered and _not_ on each
		//         render!

		return (
			<div>
				<html_element ref={elementRef}>...</html_element>
			</div>
		);
	};
Context Api & Prop Chains
Good reads:
   - https://www.jackfranklin.co.uk/blog/context-in-reactjs-applications/

Note - if you see stuff with "childContextTypes" in it, it is the LEGACY API!

Take care
---------
Although the docs say that "Context is designed to share data that can be considered 'global' for
a tree of React components ...", note that the 'global' data being shared is relatively STATIC,
generally, as far as the child component is concerned - it won't update that data and cannot decide
whether it should render based on changes in the context. This is why, for example, lifecyle
methods haven't been expanded to see the previous context in the same way that one can see the
previous props in functions like shouldComponenetUpdate() - i.e., the context doesn't appear to be
designed to hold volatile state - obvs it might not be totally static, but just be aware. It's also
NOT A GREAT WAY TO RESOLVE PROP DRILLING, for the same reson: when deciding when to re-render the
context consumer cannot see the prevous context.

The docs have this to say:

    "If you only want to avoid passing some props through many levels, component composition is
     often a simpler solution than context."

VERY MUCH WORTH TAKING NOTE OF https://reactjs.org/docs/context.html#before-you-use-context


Class Based Components
-----------------------

Prop chains are where a prop is passed down from component A to grand-...-grand-child component X
via all the intermediate children, some or all of which may not care about the prop.

React offers "contexts" to help tidy what might be a messy load of prop chains.

You can create a context module. The course example is an authentication context. It is created
in a folder named "context" in a file named "AuthContext".
	import React from 'react';

	// The context is like a globally available JS object, just hidden inside the react "scope".
	// const authContext = React.createContext(...default-init-value...)
	//                                           ^^^^^^^^^^^^^^^^^^
	//                                           Normally an object but can be a number, string etc

	const authContext = React.createContext({
		authenticated: false,  // Default values dont really matter, but makes IDE auto complete better
		login: () => {}
	});

	export default authContext;


So, now in your application or the most parentish component that will "own" the context:

	import 'AuthContext' from '../context/auth-context';
	// AuthContext is used as a component that MUST WRAP ALL COMPONENTS THAT REQUIRED ACCESS TO IT.

	class App extends Component {

		render() {
			return
				<!--
				 -- NOTE here the AuthContext.Provider takes a value prop. That is why the defaults, generally,
				 -- dont matter.            Outer curlies to enter dynamic content
				                            v
				                            vInner curlies define the JS object
				                            vv  -->
				<AuthContext.Provider value={{authenticated: this.state.authenticated}}>
					<div>
						... All components that need access to the auth context ...
					</div>
				</AuthContext.Provider>;
		}
	}

NOTE how the state is still managed by, in this case, the App component, not in the Authentication
context. The reason for this is that React will only update when a state or prop changes, therefore,
updating it in the context object would _not_ cause a re-render. Hence it is managed and updated
by the app and just passed as a value to the context object.


Then in components that want to use the authentication context we do the following. These components
can be anywhere in the component hierachy and thats how we skip having to pass down props in trains.

	import AuthContext from '../../context/auth-context';

	class SomeComponent extends Component {
		render() {
			return
				<AuthContext.Consumer>
				<!--  Return a function which the AuthContext can then call with the context as
				      a parameter to said function.
				      vvvvvvv
				-->
					{(context) => {
						return ... your componenet code ...;
					}}
				<!-- ^^^^
				     You dont have to wrap every component. You could wrap a subset of the
				     components rendered if only they need the context -->
				</AuthContext.Consumer>
		}
	}

The AuthContext.Consumer is quite clunky and only gives you access to the context in the JSX code
and nowhere else. The alternative for class based components is this (React >= 16.6):

	class SomeComponent extends Component {
		static contextType = AuthContext;
		//^^^  ^^^^
		//^^^  Must be spelt exactly like this!
		//Must be a static property
		//
		// Allows React to connect your component with this context behind the scenes

		componentDidMount() {
			this.context.login; //< Access the context with "this.context" which ReactJS creates for us
		}

		render() {
			return .. your JSX code {this.context.login ? <p>Logged in</p> : <p>Log in</p> } ...
			//                       ^^^^^^^^^^^^
			//                       Can access it here too, without the wrapping consumer element.
		}
	}

Functional Based Componenets
----------------------------
React hooks can do the same thing for us. Import the "useContext" hook.

PropTypes For Contexts
----------------------
See the PropTypes section for an example of how this can be done. It seems okay but if the context
is dynamic it is still hard to test it on a per-component basis.
Planning A React Up
Steps:
  1. Component Tree / Component structure
  2. Application State (data)
  3. Components vs Containers
        Recall: components are "dumb" - just presentational and containers are statefull. Advise
        separate high-level directories for componenets and containers with subdirectories for
        each component/container.
        Recall: component/container subfolders with a Capital first letter.
Http & Ajax
Fake online REST API for Testing and Prototyping: https://jsonplaceholder.typicode.com/

	XMLHttpRequestObject
	--------------------
	Oldest and best supported but I'm gonna ignore it. If browser doesn' support newer Fetch API I
	assume Axios is the best drop in replacement.

	FETCH
	-----
	This is the newer version of XMLHttpRequestObject that is much easier to use and works with
	promises and asynchronous functions:
	    fetch(URL).next( result => {
	        console.log(result);
	        return result.json(); // Returns a promise that should resolve to the JS object created
	                              // from the JSON string returned by the API.
	    }).next( jsonObj => {
	        // Do something with the returned data which is now represented as a JS object for us.
	    }).catch ( error => {
	        console.log(`It failed due to ${error}`);
	    });

	Or... use await:
	    async function load_pr_stuff() {
	        const result = await fetch(URL);
	        const data = await result.json();
	        return data; // < Returns a promise!
	    }

	    load_pr_stuff.then( data => console.log("The final data is " + data) );
	    // ^^^
	    // Remember this is the way to get the final promise returned by the async function

	Given the workflow of CreateReactApp, the JS should be transliterated into JS that is also
	compatible with older browsers - I hope!

	AXIOS
	-----
	3rd party JavaScript library promise based HTTP client
	Given the workflow of CreateReactApp, the Axios JS will be transliterated into JS that is also
	compatible with older browsers! Happy days!

		npm install axios --save
		                  ^^^^^^
		                  Makes it store an entry in the package.json file

		In a new component file "my-first-axios.js":
			import axios from 'axios';

			const instance = axios.create({
				baseURL: 'https://my/api/end/point/base/address'
			});

		In existing component that wants to use AJAX:
			import axios from '../path/to/my-first-axios';
			...

			some_handler = () => {
				... probably set some "I am loading state" ...
				axios.post(
					'/endpoint relative to baseURL',
					javascript-object-repr-json
				).then( response => {
					... probably cancel "I am loading state" and update some components ...
				}).catch( error => {
					... probably cancel "I am loading state" and update some components ...
				});
			}

		Handle GET requests similarly using axios.get().


    REST Generally
    --------------
    resource - nouns - separate API into resources
    resource based URLS
    HTTP methods are the verbs that act on resources
    SATELESS
    /addNewTour --> POST /tours
    /getTour    --> GET /tours/7
    /updateTour --> PUT /touts/7
                    PATCH /touts/7
    /deleteTour --> DELETE /touts/7
Multi Page In Single Page App (Routing)
React core does not implement routing. A third party defacto-standary package called react-router
is can be used.

Routing - show different pages to user based on path in URL. User JS to render different pages based
          on which path the user has navigated to.

Router package helps parse the path to figure out where user wants to go to. We then link these up
to where we want to point the user.

Server side, the same file is returned no matter what the path is - so has to be setup to do this.
The paths are only significant on the CLIENT SIDE.

INSTALLATION:
	npm install --save react-router react-router-dom

	Technically, only react-router-dom  is required for web development. It wraps react-router
	and therefore uses it as a dependency.

ENABLE:
	Do in index.js or App.js. In App.js wrap the App div inside "BrowserRouter". All children of
	the <BrowserRouter> tag will be able to access its routing functionalities:

		import React, {Component} from 'react';
		import {BrowserRouter, Route, Link} from 'react-router-dom'; // << INCLUDE THIS

		class App extends Component {
			render() {
				return (
					<BrowserRouter                      <!-- << USE IT LIKE THIS -->
						[basename="/first-app"]     <!-- << If served from server.com/first-app, otherwise optional -->
					>
						<div className="App">
							<!-- The app contents -->
						</div>
					</BrowserRouter>
				);
			}
		}

USE:
	In components/containers:

		Render small things
		-------------------
		import {Route} from 'react-router-dom';

		...
			render() {
				<!-- Note how Route tag is self closing -->
				<Route
					path="path for which this path should become active"
					render={some function to render for this path}
				/>

				<!-- For example: -->
				<Route
					path="/"
					exact   <!-- << NOTE means final slash is necessary to match - means "is my
					                complete path like this?" vs "does my path start with this?" -->
					render={() => <div>A test</div>}
				/>

				<!-- Route more-or-less replaces itself with the content defined in render.
				     You can even use multiple route's for the same path -->
			}


		Render components
		-----------------
		But if you want to RENDER A COMPONENT,  use the component property like so:
			<Route
				path="..."
				[exact]
				component={Ref to function or class to use}
			/>

		I think in router v6 (https://stackoverflow.com/a/70008235) it needs to be a JSX
		element.
			<Route path="..." component={<MyElement/>} />

		Also in v6 activeClassName also no longer works: https://stackoverflow.com/a/70008545

		SEE: https://reactrouter.com/docs/en/v6

	Prevent reloads on link navigation:
	-----------------------------------
		Reloading a page KILLS THE CURRENT APP STATE!! WE DO NOT WANT THIS

		To prevent links always re-rendering pages, i.e., reloading them, the links must be changed
		to look like this:

		Don't use <a>, use <Link>!
		The <a> tag...
			<a href="...">...</a>
		... is replaced with a <Link> tag:
			<Link to="...">...</Link>
		... or, more completely but with more complexity:
			<Link to={{
			   pathname: '/something' <!-- NOTE: This is always treated as an ABSOLUTE path... -->
			   hash:     '#something' <!-- ...wether or not it has a prefix of '/' -->
			   search:   '?arg=param'
			}}>...</Link>

		This allows react to intercept the link click and instead of the page being loaded from
		fresh, it can just render what changes are needed WITHOUT having to reload the page.

		Note that the link pathname is always treated as an absolute path, so if you want to use
		a relative path you have to build it up into an absolute one by using the page you are
		currently on, given by "this.props.match.url", and appending the target:
			e.g., pathname: this.props.match.url + "/relative/path";

		If you want to add some styling to the active and non-active links it is bettery to use
		<NavLink>. This adds an "active" class to the active link for you. Note there can be
		many "active" links if more than one Link path matches. The reason for this is that the
		link path is TREATED AS A PREFIX (just like in Router). So to match exact use the exact
		attribute.

			<NavLink to={{
			   pathname: '/something'        <!-- << This is always treated as an ABSOLUTE ... -->
			   [exact]                       <!-- ... path whether or not it has a prefix of '/' -->
			   [activeClassName="my_active"] <!-- << Override the default active classname -->
			   [activeStyle={{...}}]         <!-- << Dynamically specify style for active -->
			   hash:     '#something'
			   search:   '?arg=param'
			}}>...</Link>


	Extra Props We Get From React Router
	------------------------------------

	Components rendered via a <Route> get some extra attributes that are automatically added
	to "props" for us.
		1. history
		2. location
		3. match
	HOWEVER, these props ARE NOT PASSED DOWN THE COMPONENT TREE. To pass these down one would have
	to explicity pass them down to a child using {...this.props} as an attribute to a child node
	from the parent node that is being displayed because of a <Route>.

	Another way is to use the HOC withRouter. Use it to wrap the child components you want to have
	access to the <Route> attributes:
		import { withRouter } from 'react-router-dom';
		...
		export default withRouter(my_component);


	Routing Parameters
	------------------

	If we want to visit links such as "/1", /2" etc routing parameters are rquired:
		<Route path="/something" /> <!-- << NOTE that routes are used in the order they are defined
		                                    to, "/something" will match before :id, but rember
		                                    ALL ROUTES ARE RENDERED IF THEY MATCH THE PATH  -->
		<Route
		   path="/:id"
		   exact
		   component={...}/>

	To pass route parameters via our links just do something like
		<Link to={'/path/' + this.props.id}> ... child elements or text ... </Link>

	Can restrict values of :id using https://stackoverflow.com/a/54113392:
		{/* It's possible to use regular expressions to control what param values should be matched.
		  * "/order/asc"  - matched
		  * "/order/desc" - matched
		  * "/order/foo"  - not matched*/}
		<Route
			path="/blah/:id(asc|desc)"
			component={ComponentWithRegex}
		/>
		-- anything https://github.com/pillarjs/path-to-regexp/tree/v1.7.0 can understand!!
	But, apparently v5 supports this but v6 does not - see the discussion in their faq
	here - https://reactrouter.com/docs/en/v6/getting-started/faq#what-happened-to-regexp-routes-paths

	To get the value of "id" in the component we need to access the magic props attributes that
	Router added for us:
		match.params['id'] // It is called "id" as that was the name in the Route:path definition
	Can also use
		match.params.id

	Remember the ALL the Routes that match the path will be rendered. If you want only ONE match
	to be rendered (the one that is seen first btw), the use <Switch> to wrap the <Route> tags:
		<Switch>
			<Route .../>
			...
			<Route .../>
		</Switch>


	Search Parameters
	-----------------
	These are not the route parameters which come from that _path_ in the URL. These are the
	query parameters that occur at the end of the URL after a "?". For example:
		www.jeh-tech/my_page?my_value=123

	Pass in links using
		<Link to="www.jeh-tech/my_page?my_value=123"/>
	Or
		<link to="www.jeh-tech/my_page" search="?my_value=123"/>

	Can the access using
		props.location.search

	To parse search string easily use:
		const query = new URLSearchParams(this.props.location.search);
		for (let param of query.entries()) {
			console.log(param);
		}

	URLSearchParams  is a built-in object, shipping with vanilla JavaScript


	Natigating Programatically
	--------------------------
	To navigate to a page:
		props.history.push({pathname: "/my/link/path"});
	or 	props.history.push("/my/link/path");


	Nested Routing
	--------------
	Load a component inside another component which is also loaded via routing - you can use the
	<Route> component wherever you want, as long as the page is a child, grandchild etc of the
	<BrowserRouter> component.

	WARNING: that nested <Route>s do not resolve relative to their parent route. For example, if
	the parent was "/pull-requests" and the URL was "/pull-requests/1/" and the child route is
	"/:id", this does not resolve to "/pull-requests/:id"!

	To solve this in nested routes, get the current path DYNAMICALLY:
		<Route path={this.props.match.url + '/:id'} />

	WARNING: React router does not always _replace_ the component so it won't always re-render the
	component. The lifecycle hook componentDidMount() won't get called. But what will be called is
	componentDidUpdate() so this will also need to be implemented. But be careful - the decision
	as to wether to re-render must avoid infinite loops!


	Redirecting Requests
	--------------------
	Rather than having multiple paths to render the same content, you can use special Redirect
	component from react-router-dom:
		<Switch>
			...
			<Redirect from="/" to="/pull-requests"/> <!-- Can only use "from" inside a Switch -->
		</Switch>

	Redirect doesn't render content - it redirects the URL which can then be caught by another
	route and then rendered by the actual route. So as soon as it is "rendered" the page URL will
	be changed, regardless of any other components that would otherwise have been rendered after it.
	E.g.,
		<Redirect to="/pull-requests"/> <!-- No "from" allowed outside of a <Switch> -->
		<p>Some text</p>                <!-- Will not be rendered because of redirect -->

	Such redirects can be used conditionally using normal JS. E.g.:
		const redirect = some-condition ? <Redirect to="..."/> : null;
		<div>
			{redirect}
			... some content ...
			}
		</div>

	Sometimes, if you want to push a new page onto the history stack (redirect _replaces_ the top
	of the stack) to maintain navigability use `props.history.push(url)` instead.


	Guards
	------
	Ways to stop pages being navigated to if they should not be accessilbe - e.g. because they
	require the user to have authenticated (logged in).

	Just use Javascript!
		{this.state.auth ? <Route ... /> : null}
		                                   ^^^^^
		                                   If definition isn't rendered then this route does not
		                                   exist.


	Handle Unknown Routs - 404
	--------------------------
	Make the _last_ Route in your Switch
		<Route render={() => <h1>Not Found</h1>} />


	Lazy Loading
	------------
	NOTE: requires react-router >= 4 & create-react-app (Webpack config required)

	For big apps don't want to down load *all* the app code... only code that will be needed. So,
	for pages etc that are seldomly likely to be visited or components seldomly used, we only want
	to download their code on demand, not "up front".  loading, a.k.a "code splitting", is the way
	to address this.

	To do this you need to create a HOC "asyncComponent" - left this for now... come back to it if
	I ever need it.

	BUT - if React >= 16.6 you can use React Suspense to do this for you :D React Suspense adds a
	new method to the Component object that you can use to do lazy loading!
Form Validation
For inputs when adding an "onChange" event handler remember two way binding! You have to modify
your state so that the changes made will be rendered.

The submit button does not need to have its "onClick" property used. The form JSX tag has an
"onSubmit" property which can be used to supply a validator function reference that guards
form submission. This is part of the basic functionality of forms in HTML

In submission event handler remember to use
	event.preventDefault();
IMPORTANT - Use event.preventDefault() otherwise form submission reloads the page! This is the
default form behavior.

submitHandler = (event) => {
	event.preventDefault();
}

<form onSubmit={submitHandler}>
</form>

There are two ways to validate the form. At the end, when the form is submitted, or whilst values
in the form elements change.

To validate on final submission one way is to useRef()

    const myFormThing = (props) => {
        const myEl = useRef();
        ...
        const myhandler = (event) => {
            event.preventDefault();
            const elData = myEl.current.value; //< Use of REF
            ...
        }
        ...
        <form onSubmit={myhandler}>
            ...
            <input ref={myEl} .../>
            ...
        </form>
    }

However, if you intend to set the value of any of the inputs then classic setState style and not
refs will be preferable as to manipulate the DOM you should really use state and not modify refs
directly. React should be the only thing manipulate the DOM!

When validating on the fly the usual onChange etc two way binding can be used. onBlur() and
on key press can also be used in combination to set errors when an input looses focus and to
clear the error as soon as it is rectified.

Useful **custom hook** pattern:

import {useState } from'react';

const useInput = (validateValue) => {
	const [enteredValue, setEnteredValue] = useState('');
	const [isTouched, setisTouched] = useState(false);

	const valueIsValid = validateValue(enteredValue);
	const hasError = isTouched && !valueIsValid;

	const valueChangeHandler = (event) => {
		setEnteredValue(event.target.value);
	}

	const inputBlurHandler = (event) => {
		setIsTouched(true);
	}

	const reset = () => {
		setEnteredValue('');
		setIsTouched(false);
	}

	return {
		value: enteredValue,
		hasError,
		valueChangeHandler,
		inputBlurHandler,
		reset
	}
};


This can then be used in the form component:
const myForm = (props) => {
	const {
		value: value1,
		hasError: hasError1,
		valueChangedHandler: valueChangeHandler1,
		inputBlurHandler: inputBlurHandler1
	} = useInput((value) => some-predicate);

	...

	return (
		<form>
			<input onChange={valueChangeHandler1} onBlur={valueBlurHandler1} value={value1}/>
		</form>
	);
}
Redux
See: https://redux.js.org/introduction/getting-started
     https://redux.js.org/introduction/core-concepts
     https://redux.js.org/basics/actions
     https://redux.js.org/basics/reducers
		 https://redux.js.org/advanced/middleware/
		 https://github.com/gaearon/redux-thunk
		 https://redux.js.org/advanced/async-actions

Redux - 3rd party library. Most often associated with React but not part of React. It is independent.

One of the benefits of Redux is that it makes state changes predictable and transparent. Every time
an action is dispatched, the new state is computed and saved. The state cannot change by itself,
it can only change as a consequence of a specific action.
  -- From redux online docs

It provides a _clearly defined process_ on how the _state in some central store_ can change. It provides
a GLOBAL STATE across the entire app, that ALL components/containers can access in a well defined
way.

Why not just globals: From this post (https://www.reddit.com/r/reactjs/comments/b4p87h/redux_is_just_money_laundering_for_global/):
	It's important to remember why we consider global variables bad: because anything can change
	them at any time and you won't know why during debugging ... Redux solves the visibility problem
	really well by introducing an event driven paradigm to state.
	...
	...
	the restriction of sending typed actions and then doing work explicitly designed with reducers
	(instead of having business logic scattered all over the place inside components)
	...
	...
	Use redux for what's really global and for every thing else I would keep state as close as
	possible to where they are used.

Why not just global, from this post (https://news.ycombinator.com/item?id=13332914)
	Lots of reasons:
	- Isolation of "write logic" means you know where to look to see what code is updating a given
	  chunk of state
	- Consistent state handling means it's a lot easier to think about what's going on in the
	  application
	- The DevTools show you a log of dispatched actions, and enable you to step back and forth
	  between states to see what the UI looked like at each point
	- Middleware lets you centralize app-wide logic, such as consistent transformations for AJAX
	  responses
	- Redux's constraints (such as wanting state to be serializable) enable a number of other use
	  cases, such as persisting state across page reloads and synchronizing multiple stores remotely.
	- There's a rapidly growing ecosystem of addons and utilities for specific use cases
	  (see https://github.com/markerikson/redux-ecosystem-links )
	-  I use time-travel debugging on a daily basis, and it's a _huge_ time-saver for me.


                                    +---> Reducer -----+
                                    :                  :
                                    :                  :
                                    +---> Reducer -----+-----> ROOT reducer
                                    |                  |           |
  Action ------> MiddleWare --------+---> Reducer------+           |
    ^                                                              |
    |                                                              | [Updates]
    | [Dispatches]                                                 |
    |                                                              v
Component                                                    Central Store
    ^                                                              |
    | [Passes updated state]                                       | [Triggers]
    |                                                              |
    +------------ Subscription <------------------------------------+


Redux provides a central store, which is the ENTIRE APPLICATION STATE. Most often this will be things
like the authenticated state of the user, for example.

Actions are a way for a component to tell Redux "I'd like to change the state... here is the plan on
how to do that". They are just a pre-defined informational package, optional payload, that tells
Redux about the plan. This is the PUBLISH a.k.a DISPATCHING AN ACTION.

Reducers receive actions and handle the update of the central store. THe reducers must be completley
SYNCHRONOUS ans have NO SIDE EFFECTS. If there are multiple reducers, they are, in the end, merged
into one single reducer, which is what gets to modify the central store.

Once the central store is updated it informs all its SUBSCRIBERS of the state change, passing
the updated state, as props, to its subscribers.

Install Redux in the usual manner:
	npm install --save redux


REDUCER:
	Gets: State, Action.
	Returns: Updated state. But original state must NOT be mutated! Just like it setState() func.
	         NEVER mutate any data!

		const rootReducer = (surrentState = intialSate, action) => {
			//                              ^^^^^^^^^^^^
			//                              Useful because when reducer created it wont be passed a state
			if (action.type == ...) {
				... do something for this type
			}
			else if (action.type == ...) {
				...
			}
			// and so on...

			return new_state; // new_state must COPY from state. state must NOT be mutated
		}

STORE:
	Created with a root reducer.
		createStore = redux.createStore;
		const store = createStore(rootReducer);
		let currentState = store.getState();

ACTION:
	Just access store and call dispatch(). Func takes action as arg - a JS object that MUST have
	a "type" property so that we know what type of action was dispatched and what should be done in
	the reducer.

		store.dispatch({
			type: 'CONVENTION_IS_SHORT_UPPER_CASE_DESCRIPTION'
			value-name-of-choice: value-data,
			more-values: more-data,
			...
			...
		});

SUBSCRIPTION:
	Inform us when something changed and we need to re-get the state.
	Use: store.subscribe(function-executed-whenever-state-updates);

		store.subscribe( () => { // Subscribe func gets NO args
			... store.getState(); ...
		});


Using Redux With React
----------------------
Must install react-redux to "hook up" redux stores to react application:
	npm install --save react-redux

The Redux store should be created before or when our App or when it starts - use `index.js`!

	import { createStore } from 'redux';
	import { Provider } from 'react-redux'; //NOTE:  Must WRAP the app with <Provider>

	import reducer from './store/reducer'; // Generally may have many complex Reducers
	                                       // so these will be stored in their own files in their
	                                       // own folders in our app. Perhaps a "store" folder next
	                                       // to the containers and components files.

	const store = createStore(reducer); // Define in separate file, reducer.js

	// NOTE: Must WRAP the app with <Provider>
	ReactDOM.render(<Provider store={store}><App /></Provider>, ...);
	//              ^^^^^^^^^^^^^^^^^^^^^^^
	//              Wrap app with Provider, which provids our store. "injects" our store into the
	//              reactor components in the app.

	registerServiceWorker();


In reducer.js
- - - - - - -
	const initialSate = {
		...
	};

	const reducer = (state = inialState, action) => {
		// your actions here or just return state if nothing should change.
		if (action == 'ACTION_TYPE')
		{
			return {
				// Immutably created new state
			};
		}
		...
		...
		return state; // LAST RETURN handles unrecognised actions and returns state unchanged.

		// Or use switch (action.type) { case 'BLAH': break/return; ... default: return state; }
	};

	export default reducer;

In the reducer you can replace the if-else blocks with a switch statement:
   switch(action.type) {
      case 'SOME_TYPE_1':
         return {
            new_state_member: new_value,
            ...
         }
      case 'SOME_TYPE_2::
         return { ... }
      ...
   }

WARNING WARNING WARNING: The state returned from the reducer is, unlike in react, NOT merged with
the existing state. It just becomes the state. This means YOU HAVE TO DO THE MERGE YOURSELF by
DEEP copying th existing state (current state is IMMUTABLE) and modifying the copy as appropriate.


In components that required access to the store:
- - - - - - - - - - - - - - - - - - - - - - - - -
	import { connect } from 'react-redux';

	class MyComponent ... {
		...
		render() {
			...
			<!-- Here can access redux state mapped to our props as defined below -->
			<eg_element clicked={this.props.onSomeEvent}>{this.props.a_props_attribute}</eg_element>
			//                        ^^^^^ ^^^^^^^^^^^              ^^^^^^^^^^^^^^^^^
			//                        ^^^^^  ^^^^^^^^^^^              From mapStateToProps
			//                        ^^^^^ From mapDispatchToProps
			//                        ^^^^^
			//                        NOTE HOW WHAT WAS THE STATE IS NOW ACCESSED AS PROPS!
			...
		}
	}

	// How state, managed by redux, should be mapped to props that can be accessed in this component
	// The state parameter is the state as setup in reducedr.js so it will have those propertues.
	const mapStateToProps = state => { // Func that expects the state, stored in redux and returns a map
		return {
			a_props_attribute: state.some_state_var
			//                 ^^^^^
			//                 The state passed into the function which is the state provided by redux!
			...
			...
		};
	}

	// Which actions the container will DISPATCH
	const mapDispatchToProps = dispatch => {
		return {
			onSomeEvent: (param1) => dispatch({type: 'ACTION_TYPE', actionParam1: param1, ...}),
			...
		};
	};

	// `connect` returns a new function that accepts the component to wrap:
	// Either
	export default connect(mapStateToProps)(MyComponent); // Connect is func that _returns_ a HOC

	// Or
	export default connect(mapStateToProps, mapDispatchToProps)(MyComponent); // Connect is func that _returns_ a HOC


Updating state IMMUTABLY
------------------------

The state object passed into a reducer MUST NOT BE MODIFIED.
So doing the following is WRONG
	let newState = state;
	newState.something += 101; // WARNING - just MUTATED the state!
	return newState;

Instead MUST COPY THEN MODIFY COPY of state:
	let newState = Object.assign({}, state); // SHALLOW clones object
OR
	let newState = {...state, something: state.something + 101 }; // Still a SHALLOW clone!

CAUTION: With SHALLOW copies you cannot update any reference types in the copy.

SEE SEE SEE: https://redux.js.org/recipes/structuring-reducers/immutable-update-patterns/


Updating Arrays IMMUTABLY
-------------------------
I was doing it by deep copying the array with object and then doing a splice().

Another method is to use the Array.filter() method as filter returns a NEW array.

Eg, to delete a particular index in an array in a react state, as we need to copy the array before
modifying it, rather than doing it manually, can do it using filter:

newArrayWithDeletedItem = state.member.filter(
	(arrayItem, itemIndexInArray) => itemIndexInArray != itemIndexToDelete
);

SEE SEE SEE: https://redux.js.org/recipes/structuring-reducers/immutable-update-patterns/


Using Mulltiple Reducers
------------------------
In `index.js`:

   ...
	 import { createStore, combineReducers } from 'redux';
	 //                    ^^^^^^^^^^^^^^^
	 //                    Need this extra new import; Combines the state all all sub-reducers into
	 //                    ONE state... therefore sub-reducers can still access state from other
	 //                    subreducers, as there is really only one root reducers with the one state
	 //                    that combines the sub-states of all the sub-reducers.
   ...
   import myFirstReducer from '...';
	 import mySecondReducer from '...';
	 ...
	 ...
	 // Construct the root reducer
	 const rootReducer = combineReducers({
	    appAreaName1 : myFirstReducer,
	    appAreaName2 : mySecondReducer,
	  // ^^^^^^^^^^^
		// There names gives us access to the substates in our app. In our app, to access these sub states
		// must do const
		// mapStateToProps = state => {
		//     return {
		//     	a_props_attribute: state.appAreaName1.some_state_var
		//                               ^^^^^^^^^^^^
		//                               NOTE extra layer of nesting in state
		//     	...
		//     };
	  // }
	    ...
	 });
	 const store = createStore(rootReducer);
	 //                        ^^^^^^^^^^^
	 //                        NOTE: Now the ROOT reducer is passed in as in Redux there is really
	 //                              only ONE reducer.
   ...
	 ReactDOM.render(<Provider store={store}><App/></Provider>);

BUT WARNING WARNING WARNING
	The sub-reducers can NO LONGER ACCESS THE GLOBAL REDUCER STATE!!! They cannot "see" the state
	in the other sub-reducers. Thus, if they need state from another reducer they SHOULD RECEIVE IT
	AS PART OF THE ACTION PAYLOAD INSTEAD.


You CAN MIX Redux With Local React State
----------------------------------------
You CAN use redux and still have local state in component and use reacts.setState(). For example,
local UI state, like whether a modal should be displayed etc, is usually more appropriately stored
as local state and NOT in redux.

Local state, can then be passed to Redux actions if they are required by other parts of the app.


Middleware
----------
SEE: https://redux.js.org/advanced/middleware
		Middlware provides a third-party extension point between dispatching an action, and the moment
		it reaches the reducer.

// This whole set of nested functions (function tree) IS a middleware!
//             Redux will call this middleware function and pass it the store!
//             vvvvv
const myMiddleWare = store => {
   // Middleware function returns a function. This function lets the action continue on its
   // journey to a reducer. This function will also, eventualy, be executed by redux.
   return next => {
     // Return yet another function that received the action that was dispatched as its parameter
     return action => {
       // Here can access store, next and action. This code is run inbetween the action and the
       // reducer.
       const result = next(action); //<<< Lets action continue to the reducer
       ...
       return result;
     };
   };
};

To use the middleware must import applyMiddleware from Redux:

		import { createStore, combineReducers, applyMiddleware } from 'redux';
		//                                     ^^^^^^^^^^^^^^^

		...

		const store = createStore(rootReducer, applyMiddleware(myMiddleWare, ...));
		//                                     ^^^^^^^^^^^^^^^^^^^^^^^^^^^^^
		//                                     NEW second argument here applys an "enhancer" to the
		//                                     store, which in this case is our middleware.
		//                                     The function applyMiddleware accepts a list of middlewares
		//                                     that will get executed in order.


Redux DevTools
---------------
Help debug the store!


Asynchronous Code and Redux Using Redux-Thunk
---------------------------------------------

RECALL: REDUCERS CAN **NOT** RUN ASYNCHRONOUS CODE! This is because the reducer returns immediately,
so what ever state modification are dependent on the async code can't be comminucated back to react
via this reducer - the reducer would finish before the async result was ready!

USE ACTION CREATORS to overcome this problem. Action creators can be good for both sync and async
code. For sync code they make the action object creation centralised into one function that accepts
arguments rather than having the action object potentially created in many places.

eg:
  // This is a SYNC action creator
	export const MY_ACTION = "MY_ACTION";
	export const myAction = (payload) => {
		return {
			type: MY_ACTION,
			payload: payload,
			...
		};
	};

	// And we use it in our Redux compoent's mapDispatchToProps like so.
	const mapDispatchToProps = dispatch => {
		return {
			// onSomeEvent is NO LONGER LIKE BELOW
			// onSomeEvent: (param1) => dispatch({type: 'ACTION_TYPE', actionParam1: param1, ...}),
			//
			// It is now written like
			onSomeEvent: (param1) => dispatch(myAction()),
			//                                ^^^^^^^^^^
			//                                Action creator function returns, synchronously, the action
			//                                rather than creating the object in each instance the
			//                                action is created - more DRY!
			...
		};
	};

Thunk allows the action creators to, instead of returning an action object, return a function that
will eventually dispatch an action. The "eventually dispatch" means that this ENABLE ASNC CODE.

DO:
	npm install --save redux-thunk

In your app you now add:

	import { createStore, combineReducers, applyMiddleware, compose } from 'redux';
	// NEW vvvvv
	import thunk from 'redux-thunk';

	...

	const store = createStore(rootReducer, applyMiddleware(myMiddleWare, thunk));
	//                                                                   ^^^^^
	//                   Thunk added to the list of middleware added to our app's store.


Then create the ASYNC action creator as follows:
In action creaters, no longer return action, but RETURN A FUNCTION that will EVENTUALLY DISPATCHING AN ACTION!

Eg, with the myAction action creator from above:

	export const myAction = (payload) => {
		return {
			type: MY_ACTION,
			payload: payload,
			...
		};
	};

BECOMES

	export const myActionSync = (payload) => {
		return {
			type: MY_ACTION,
			payload: payload,
			...
		};
	};

	export const myActionAsync = (payload) => {
		//                         Can pass getState - but it is optional... we don't have to use it.
		//                         It can be called to retrieve the current state, if we need to use it.
		//                         This is the state PRIOR to us re-dispatching the action.
		//                         vvvvvvvv
		return function(dispatch[, getState]) {
			setTimeout( () => {
				dispatch(myActionSync(payload))
				//       ^^^^^^^^^^^^
				//       NOTE must call sync action, not async version, otherwise create infinite loop!
			}, 2000);
		};
	};

This works because in our React component we have:
	const mapDispatchToProps = dispatch => {
		return {
			onSomeEvent: (param1) => dispatch(myActionAsync()),
			//                               ^^^^^^^^^^^^^^
			//                               NOTE action creator is not the async version...
			...

Because the action creator now returns a function, the thunk middleware detects this when the
action is dispatched and DELAYS the action, by calling our function, through which we can do
something asynchronously, and then call the real, non-delayed, Redux dispatch method, which will
make it to the reducer, when we are ready.


Data transformations
--------------------
Action reducers are FREE TO MODIFY AND ADD ANY DATA TO THE ACTION PAYLOAD:

	export const myActionSync = (payload) => {
			const newPayload = someTransform(payload);
			return {
				type: MY_ACTION,
				payload: newPayload,
				...
			};
		};

You can also do this in the reducer itself. Better to do in action as its more flexible - different
transformations for different actions that modify the same data item in the store. (my opinion)

Remember: Reducers run SYNCHRONOUS CODE only, but part of core redux,
          Action creators CAN RUN AYSCHONOUS CODE as well as synchronous code, require thunk add on.


Some utility functions:
-----------------------
const updateObject = (oldObject, updatedValues) => {
	return {
		...oldObject,
		...updateValues
	};
};
Authentication
Typically, rather than a session, get a TOKEN, in a SPA as the server is generally a stateless
REST API. Token is stored in local browser storage.

User local browser storage:
	localStorage.getItem("string key")
	localStorage.setItem("string key", "sting value")

Not browser local storage is not super secure. It could be accessed using XSS attacks, but otherwise
should only be accessable by code served in your domain (single origin policy).
Testing
Could use Selenium but can also use NodeJS packages which will simulate the browser, which could
make for faster unit tests.

Jest - Populare JS testing tool often used with ReactJS

Also need a way of emulating React components without having to render an entire DOM. We still need
some kind of fake DOM but don't want everything. React Test Utils can do this, or use Enzyme as
developed by Air Bnb - also recommended by React team.

	npm install --save enzyme react-test-renderer enzyme-adapter-react-16
	                                              ^^^^^^^^^^^^^^^^^^^^^^^
	                                              This one has to be specific to your react version

See: https://jestjs.io/docs/en/expect
     https://jestjs.io/docs/en/jest-object#mock-modules << Good for mocking AJAX calls for e.g.
     https://enzymejs.github.io/enzyme/

When naming a test for a component, put it in the same directory as the component. If the component
file name is MyComp.js then the TEST MUST BE NAMED MyComp.test.js, as this will then be
AUTOMATICALLY picked up and included in the testing.

To run the tests just use
	npm run test

Enzyme vs React Test Utils vs react-testing-library
--------------------------------------------------
	FROM https://stackoverflow.com/a/54152893/1517244:
	ReactTestUtils gives you the bare minimum to test a React component. I haven't seen it being
	used for big applications.

	Enzyme and react-testing-library are both good libraries that give you all the tools you need to
	test your application. They have two different philosophies though.

	Enzyme allows you to access the internal workings of your components. You can read and set the
	state, and you can mock children to make tests run faster.

	On the other hand, react-testing-library doesn't give you any access to the implementation
	details. It renders the components and provides utility methods to interact with them. The idea
	is that you should communicate with your application in the same way a user would. So rather than
	set the state of a component you reproduce the actions a user would do to reach that state.

	In my experience Enzyme is easier to grasp but in the long run, it's harder to maintain.
	react-testing-library forces you to write tests that are a bit more complex on average but it
	rewards you with higher confidence in your code.

	FROM https://stackoverflow.com/a/54153026/1517244:
	Enzyme is intended for unit/integration testing. Its API was designed to test the implementation.
	It offers custom renderer that doesn't require DOM (for shallow rendering), behaves differently
	from React renderer and allows things that are important for unit testing but aren't possible or
	straightforward with default renderer, like synchronous state updates, shallow rendering,
	disabling lifecycle methods, etc.

	react-testing-library is intended for blackbox integration/e2e tests. It uses React renderer and
	ReactTestUtils internally, requires real DOM because it's component's output that is asserted in
	tests, not internals. It doesn't provide facilities for isolated unit tests but it's possible to
	do this by mocking modules that contain component that need to be spied, mocked or stubbed by
	other means, notably jest.mock.

	react-dom/test-utils and react-test-renderer contain a subset of functionality, Enzyme and
	react-testing-library were built upon them. API is scarce and requires to write boilerplate code
	or custom utility functions for full-grown testing. React officially promotes Enzyme and
	react-testing-library as better alternatives.


Testing Components
-----------------
	In the MyComp.test.js file you do not need to import the test specific libraries - they will be
	made available automatically by the test command.

		MyComp.test.js
		--------------
			import React from 'react';
			import { configure, shallow } from 'enzyme';
			//                  ^^^^^^^
			//                  Does a shallow rendering of the component under test - it will produce
			//                  kind-of "stubs" for the immediate children and thus PREVENTS rendering
			//                  an entire subtree - efficient!
			import Adapter from 'enzyme-adapter-react-16';
			import MyComp from './MyComp';
			imoprt OtherComp from '...';

			configure({adpater : new Adapter()}); // Connect Enzyme to our React version

			describe(
				'Description of thest bundle file holds - just str for console',
				() => {
					//
					// DEFINE setup and teardown for this group of tests
					beforeAll( () => { ... } );
					afterAll( () => { ... } );

					//
					//
					// DEFINE setup and teardown for each test
					//
					let wrapper;
					beforeEach( () => { wrapper =  shallow(<MyComp/>); } );
					afterEach( () => { ... } );

					//
					// DO each test
					//
					it(
						'Should ... describe on individual test - just str for console',
						() => {
							// Create instance of component as it would be rendered into the DOM, (without
							// creating the entire DOM!) and then inspect it. Enzyme allows component to
							// be "rendered" stand-alone, i.e., without rest of DOM.
							//
							// If wrapper wasn't defined in the setup for each test we'd do
							//   const wrapper = shallow(<MyComp/>);
							//
							// But it is so...

							expect(wrapper.find(OtherComp)).toHaveLength(2);
							//                  ^^^^^^^^^
							//                  Note this is the JS function, NOT JSX!

						}
					);

					it(
						'Should do something else when another property is set',
						() = {
							// If wrapper wasn't defined in the setup for each test we'd do
							//   const wrapper = shallow(<MyComp myAttr=Something/>);
							//
							// But it is so...

							wrapper.setProps({myAttr : Something});
							expect(wrapper.find(...))...();
						}
					);
				}
			)


Testing Containers
------------------
React Hooks (React >= 16.8)
Do not confuse with life-cycle hooks like didComponentMount() which are associaed soley with class
based components.

React hooks allow functional components to be used *everywhere*. React-hooks do for functional
components what state and the lifecycle hooks do for class based components. I.e., HOOKS REPLACE
CLASS-ONLY FUNCTIONALITY.
	- Add state
	- Share logic across components
	- Implement functional lifecycle-like functionality.
	- Can build custom hooks

React hooks are just JS functions that can only be used inside a functional component or other hooks
(you can write your own).

All hooks are called useXXX(). Eg useState() etc.

See https://reactjs.org/docs/hooks-intro.html for motivation for hooks. From that page:
		It’s hard to reuse stateful logic between components
		React doesn’t offer a way to "attach" reusable behavior to a component (for example, connecting
		it to a store). If you’ve worked with React for a while, you may be familiar with patterns like
		render props and higher-order components that try to solve this. But these patterns require you
		to restructure your components when you use them, which can be cumbersome and make code harder
		to follow. If you look at a typical React application in React DevTools, you will likely find a
		"wrapper hell" of components surrounded by layers of providers, consumers, higher-order
		components, render props, and other abstractions. While we could filter them out in DevTools,
		this points to a deeper underlying problem: React needs a better primitive for sharing stateful logic.

		With Hooks, you can extract stateful logic from a component so it can be tested independently and
		reused. Hooks allow you to reuse stateful logic without changing your component hierarchy.
		This makes it easy to share Hooks among many components or with the community.


Important Rules
===============
See: https://reactjs.org/docs/hooks-rules.html

RULE 1: Only Call Hooks at the Top Level
*** Don’t call Hooks inside loops, conditions, or nested functions. ***
Instead, always use Hooks at the top level of your React function. By following this rule, you
ensure that Hooks are called in the same order each time a component renders. That’s what allows
React to correctly preserve the state of Hooks between multiple useState and useEffect calls.
This is because React relies on the order in which Hooks are called to know which state corresponds
to which useState call

By "calling hook" it means the functions useState(), useEffect() etc. It does NOT refer to using
the state and state-setting-function they return! These can be used as per normal!

RULE 2: Only Call Hooks from React Functions
You can only call Hooks from React function components and from custom Hooks.


USE eslint-plugin-react-hooks to help you enforce these rules.
    npm install eslint-plugin-react-hooks --save-dev

Read also: https://stackoverflow.com/questions/53845595/wrong-react-hooks-behaviour-with-event-listener


useState()
==========
See: https://reactjs.org/docs/hooks-state.html

import React, { useState } from 'react';
...
const defaultState = ...; // Any value - unlike class state does not have to be an object
...
const MyFunctionalComponent = (props) => {
   // The state will survive re-renders
   // Returns an array with *2* elements
   // 0: the current state snapshot
   // 1:function to use to update the current state
   const [myState, mySetState] = useState(defaultState);
   ...
   // Use myState exactly as you would have used this.state in class component
   // Use mySetState like you would have used this.setState() in class component BUT WARNING, it
	 //   does NOT MERGE STATE FOR YOU!!!
   ...
   return (...);
};


WARNING WARNING WARNING WARNING WARNING WARNING WARNING WARNING WARNING WARNING WARNING WARNING
vvvvvvvvvvvvvvvvvvvvvvvvvvvvvvvvvvvvvvvvvvvvvvvvvvvvvvvvvvvvvvvvvvvvvvvvvvvvvvvvvvvvvvvvvvvvvvv
WARNING - useState's setState-like function DOES NOT MERGE STATE, IT **REPLACES** THE CURRENT
          STATE WITH THE ONE YOU GIVE IT!
^^^^^^^^^^^^^^^^^^^^^^^^^^^^^^^^^^^^^^^^^^^^^^^^^^^^^^^^^^^^^^^^^^^^^^^^^^^^^^^^^^^^^^^^^^^^^^^
WARNING WARNING WARNING WARNING WARNING WARNING WARNING WARNING WARNING WARNING WARNING WARNING

Just like setState(), the useState()'s update function accepts a function instead of an object when
you need to update state based on previous state, except that it obv doesn't receive any props.

e.g.
    onChange = {
        (event) => mySetState(
            (prevMyState) => (
                {newVal: prevMyState.val + X}
            )
        )
    }


WARNING - BE CAREFUL NOT TO CAPTURE PARAMETERS IN CLOSURE

    onChange = {
        (event) => mySetState(
            (prevMyState) => (
                {
                    something: event.target.value, // <<<< ERROR. See description below code.
                    newVal: prevMyState.val + X
                }
            )
        )
    }

Problem is this:
1. First onChange event fires and the onChange handler is called. It is passed a React synthetic
   event object, which is POOLED. The handler returns a function, which closes over the outer
   scope's environment, capturing the instance of event from the event pool. It is this inner function
	 that is the "problem" and creates the closure over the pooled synthetic event.
2. The second onChange event fires and executes the handler, passing in a different synthetic event
   object, which too gets captured in the closure created.
3. At some point React will deal with these events, but it can do so when it chooses. React may
   re-use the event object that we have closed over in a previous handler
	 that is yet to be called and when it is it will see the new event state, not the one it is
	 supposed to see. There is no way to "release" event Reacts synthetic event objects, so it has
	 no way to know if we are "holding" on to one in this way.

The solution is:
In the outer function, create const variables that copy the pertinant event data and use these in
the inner function. This way the event can be safely re-used by react.


Overcoming complexities of setting state
----------------------------------------
Remember that useState::setState function DOES NOT MERGE THE STATE OBJECT FOR YOU. Each time you
must set the ENTIRE state.

You can make life simpler by registering multiple state objects.
Just do
	const [state1, state1SetFunc] = useState('');
	....
	const [stateN, stateNSetFunc] = useState('');

This prevents having to use one big state object - you can have many little state objects.
Another way would be to write your own merge function for state update, but this would be
harder to do.


State Update Batching
- - - - - - - - - - - -
React will batch calls to setState hook functions to avoid unnecessary render cycles.

All state updates from one SYNCRHONOUS event handler are BATCHED TOGETHER.

Thus, after setting state, a lot like in class components, you can't immediately use the state
to get the new value.

Also it means the same applies for state that depends on previous state.
	const [counter, setCounter] = useState(0);
	...
	setCount(counter + 1); //< BAD BAD BAD BAD
	setCounter( prevCounter => prevCounter + 1); // Way better


Lazy Eval and Gotcha When Storing Functions As State
- - - - - - - - - - - - - - - - - - - - - - - - - - -
If the initial value is expensive to calculate it can be provided as a function that will only
be executed on the *first render* to setup the state.

This has the impact that if you use a state variable to store a callback function it wont work
as expected (although this might be an anti-pattern?!).

	// In the parent...
	[callback, setCallback] = useState(()=>{});

	// Then a child component might
	setCallback(() => someFunction(...));

	// Then back in the parent
	callback(); //<<< Error callback is whatever someFunction(...) returns or undefined if its a method!

To overcome this use

	setCallback(() => () => someFunction(...))
	//          ^^^^^
	//          Note the extra indirection. Needed because the passed in function is called by
	//          react to calculate the state, and as this returns a function the inner function can
	//          then be the state


useEffect()
===========
SEE: https://reactjs.org/docs/hooks-effect.html
also https://sebhastian.com/react-hooks-useeffect/

An "effect" or "side effect" is anything that lies outside React's responsibilities of rendering
the app, responding to user events and re-rendering. I.e. they are tasks that happen outside of the
normal component evaluation and render cycle. So, for example, an AJAX query is something
that happens outside of React's purview. Or, storing something in browser storage etc.

import React, {useState, useEffect} from 'react';

Use effect allows one to manage side effects:

	The Effect Hook lets you perform side effects in function components.
	...
	Data fetching, setting up a subscription, and manually changing the DOM in React components are
	all examples of side effects
	...
	 you can think of useEffect Hook as componentDidMount, componentDidUpdate, and
	 componentWillUnmount combined.

Side effects = Logs that runs and does effect the application but not in the current render cycle,
i.e., a future cycle.

useEffect() gets used AFTER EVERY render cycle.

You need useEffect() for exactly the same reason you dont trigger side effects in a class based
render function - you enter an infinite loop where each time you render you create a side effect
that modifies the state and triggers a re-render and so on...

Use it like this:
	useEffect(FUNCTION, DEPENDENCIES-OF-FUNCTION);

So, your function is only run when the dependencies are modified. This is how you can get it to
act like componentDidMount or componenetDidUpdate etc. The default, is, as mentioned for every
render cycle, but using dependencies, you can change this...

Dependencies are variables you use outside of useEffect in your function. React hook functions
used in useEffect do not have to be considered external dependencies.

If you ommit DEPENDENCIES-OF-FUNCTION then it runs FOR EVERY render cycle.

If you make it an empty list then it only runs for the very FIRST render - i.e., like
componentDidMount().
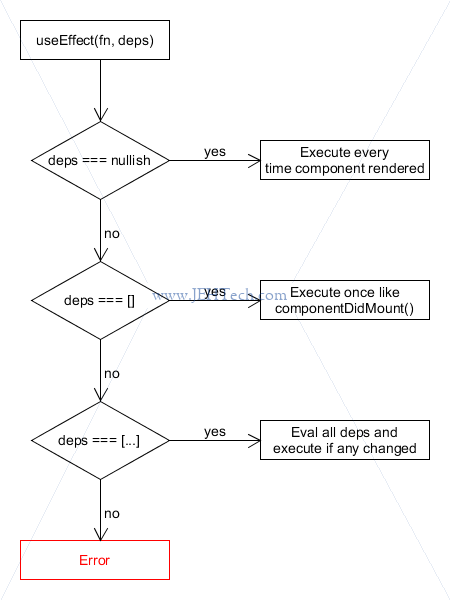
You can have multiple useEffect() calls, just like you do with useState().

To use dependencies:

	let [myState, setMyState] = useState(myDefaultState);

	...

	useEffect( ()=> {...}, [myState] ); //<<< This only executes when myState is changed.

This can allow us to split logic more elegantly. For example, if we fetch data based on whether
a checkbox is selected, our onChange event function can just manage the checked state and we can
split out the fetch logic into a useEffect() call with a dependency on the checkbox state.

If you rely on props in an effect then declare them as a dependency - PROPS ARE ALSO DEPENDENCIES
if you use them.

	This effect is called whn ANY prop changes:
		useEffect( () => {...}, [..., props]);

	This effect will be called only when a certain key in the props changes:
		const { keyName } = props;
		...
		useEffect( () => {...}, [..., keyValue]);

If you don't use the deps parameter properly you can get a "closure trap of a hook": see https://betterprogramming.pub/understanding-the-closure-trap-of-react-hooks-6c560c408cde.

This is also a *really* super read with a React hooks closure trap problem: https://betterprogramming.pub/a-react-hooks-challenge-for-senior-react-developers-f1190e1939ec

	A really important knuget of knowledge from the above article is this:

		In `const [myList, setMyList] = useState([])` the list returned by each call to
		useState is calculated based on the following formula:
			base state + update1 + update2 + … = current state
		... So, the list returned by multiple calls to useState are different objects with different
		addresses in memory.

	It also makes it very clear as to why when setting state based on prev state, one should use
	`setMyList( prevList => prevList.concat(...))`

	For a good explanation of closures see: https://betterprogramming.pub/10-javascript-closure-challenges-explained-with-diagrams-c964110805e7


Clean Up With useEffect():
- - - - - - - - - - - - - -
useEffect() can return a FUNCTION. A return value is not required, but if provided MUST be a func!
The function returned is a CLEANUP function that will run before the next time useEffect() runs. Note,
this is NOT after the useEffect() runs, but BEFORE the next useEffect() is run.

If useEffect() has [] as its dependency, and therefore only runs once when the component is first
rendered then the returned function is equivalent to componentWillUnmount()!


useCallback()
=============
SEE: https://reactjs.org/docs/hooks-reference.html#usecallback

	Pass an inline callback and an array of dependencies. useCallback will return a memoized version
	of the callback that only changes if one of the dependencies has changed. This is useful when
	passing callbacks to optimized child components that rely on reference equality to prevent
	unnecessary renders (e.g. shouldComponentUpdate).

Save a function so that it is not re-created.

This can be very useful to get out of entering infinite loops in render cycles. The course example
was where a parent passes a callback function, X, to a child that uses an effect that depends on XMLHttpRequestObject
and calls X, which modidifies the parent state. Because, when the parent re-renders, the callback function
is redefined, the child will trigger its effect again creating this infinite loop. The way to stop this is
to preserve the callback function across render cycles, so that it doesn't change due to a render and
therefore the child won't call X because of the prop callback function change.

Often used in combination with React.memo() and vice versa, when a function being passed to a child
as a callback would otherwise change, making the memoisation unable to see the props as unchanged.


useMemo()
=========

Save a value so that it is not continually recreated.

For example, a component has a list of values. It is re-rendered, but not because of a change to
the list. Thus, do not want to re-create the components that result from the list. Save the
generated components using `useMemo()`.

	const someComponentList = useMemo( () => {
		return <MyComponentList .../>
	}, [...dependencies...]);


useRef()
========
Allows use of references as you might do in class components.
	const myRef = useRef();
	...
	<SomeElement ref={myRef}/ ...>

Remember to add the ref as a DEPENDENCY if you use it in an effect!


useReducer()
============
SEE: https://reactjs.org/docs/hooks-reference.html#usereducer
     const [state, dispatch] = useReducer(reducer, initialArg, init);
     An alternative to useState. Accepts a reducer of type (state, action) => newState, and returns
		 the current state paired with a dispatch method. (If you’re familiar with Redux, you already
		 know how this works, altough NOT related to Redux otherwise).

The reducer functions that you define are a lot like Redux reducers because they accept the
current state and an action. Based on the action and current state, the reducer must return the
new state.

	const myReducerForSomeThing = (currentThingState, action) => {
		switch(action.type) { // << The action is whatever we dispatched - its type isd't predefined
			case 'SOME ACTION:
				return newStateBasedOnCurrentThingStateForSomeAction;
			...
			default:
				throw new Error("Should never happen - all actions should be handled");
		}
	};

	...

	const MyElement = () => {
		const [myThingState, dispatch	] = useReducer(myReducerForSomeThing, initial-state);

		const someHandler = () => {
			dispatch({type: "SOME ACTION", ...});
		}
	}

React will re-render the component WHENEVER YOUR REDUCER RETURNS NEW STATE.

Reducers can make things cleaner as all of the update logic is located in one place. Makes a
clearer flow of data.

For HTTP requrests
	Sending the request is an action. Action = SEND. (But update state dont do the actual send)
	Handling the reply. Action = RESPONSE.
	Handling any errors. Action = ERROR.

Reducers must be PURE FUNCTIONS:
	A pure function is a function which:
		Given the same input, will always return the same output.
		Produces no side effects.
	A dead giveaway that a function is impure is if it makes sense to call it without using its
	return value. For pure functions, that’s a noop.
	A pure function produces no side effects, which means that it can’t alter any external state.
	Therefore, you can't do AJAX requests from a reducer. Instead use ACTION CREATORS.


useContext()
============
Is the equivalent hook to the class context setup using the member variable `static contextType = ...;`
You build the provider as per normal

Instead, now do:

	import { MyContext } from ...;

	const SomeComponent = props => {
		const myContext = useContent(MyContext);
	};


CUSTOM HOOKS
============
SEE: https://reactjs.org/docs/hooks-custom.html

	Hooks are a new addition in React 16.8. They let you use state and other React features without
	writing a class.

* Share logic that influences component state across many different components.
* Custom hooks should always be named `useXXXX`.
* Inside hook functions you can use stateful features like useState() or useEffect(), for example.
  The stateful logic is reusable but the data it manipulates is specific to the component using
  the custom hook :)
Deploying To The Web
1. Remeber to add the basename attribute to <BrowserRouter/> if app is not being served from the root
of the domain it is hosted on. So if serving from www.jeh-tech.com, no need, but if serving from
www.jeh-tech.com/apps/app1, the need <BrowserRouter basename="/apps/app1/">....<.BrowserRouter>.
2. Build and optimise the site using
npm run build (in your project directory)
3. Server must *always* serve the index.html file, even for 404 cases! Server gets the paths before
the react app gets the path and server won't know the app paths!!
4. Upload build artifacts from step 2 to a static server (Firebase, GitHub pages, AWS S3 etc etc).
I.e., the content of the build folder!
Remove " Download the React DevTool..." Message
------------------------------------------------------
See: https://stackoverflow.com/a/42196820/1517244
__REACT_DEVTOOLS_GLOBAL_HOOK__ = {
supportsFiber: true,
inject: function() {},
onCommitFiberRoot: function() {},
onCommitFiberUnmount: function() {},
};
Webpack
A bundler, a file optimizer, file transformer and transpiler (ES modern to legacy for eg). Takes
multiple HTML, JS, image etc etc resources and bundles them together with optimization etc.

1. Create folder to hold project
2. Get NPM to manage dependencies.
   In project folder type:
      npm init
   Creates "package.json".


TODO - Complete sectioN!
Third Party Components
https://react-bootstrap.github.io/ - Really good - lots of pre-styled components
https://minicss.org/               - Build websites on any and all devices, beautiful & load fast. < 10KB.
https://momentjs.com/              - Parse, validate, manipulate and display dates and times in JS
https://bernii.github.io/gauge.js/ -
https://formidable.com/open-source/victory - React.js components for modular charting and data visualization.
https://uber.github.io/react-vis/examples/showcases/plots
React Fiber
Prev (before React 16) reconcillation algorithm was "Stack Reconciler". It was entirely synchronous
and has only one phase.

Reconcillation - The algorithm React uses to diff one tree with another to determine which parts
                 need to be changed.

When state changes, react generates an intermediate virtual DOM and compares it against the previous
virtual DOM before the state change. It uses this diff to update select portions of the browser DOM,
as opposed to updating the whole browser DOM - efficient.

The virtual DOMs are generated from Fiber's INTERNAL INSTANCE TREE, which is a tree of React
component instances and DOM nodes.

React Fibre is the new reconcillation algorithm included since React 16.

Reconcillation saves the developer from the need to keep track of what has changed and change the
browser DOM appropriately. All this "house keeping" is now done for the developer.

Virtual DOM- The tree of IMMUTABLE React elements returned from the render methods

Why the new reconcillation algorithm? Previously, when the rendering process started, it could not
be paused - the whole process had to be done in one go, in the browser main thread. Result can
be laggy user experience.

Unlike previous alg, Fiber has ability to minimize and batch DOM changes to minimise how long the
main thread is held for. It manipulates the main thread to enable async behaviour.

Once a render method returns its sub-tree of react components, they are merged into the tree of
fiber nodes - fiber analyses the components and creates corresponding fiber nodes that it inserts
into its own tree. I.e., every react element has a corresponding fiber node. Unlike React elements,
FIBERS ARE NOT RE-CREATED ON EVERY RENDER! The Fibre data structures, are, unlike the React
components, mutable. They hold component state and DOM state.

Fiber uses a LINKED LIST TREE TRAVERSAL ALGORITHM and an ASYNCHONOUS model that uses this list to
peocess elements that have pending work associated with them.

The Fiber process has TWO TREES:
1. Current tree
   After the very first render, represents state of app used to render to UI
2. Work-in-progress tree
   Built for the current update. Reflects the future app state that should eventually appear in the
	 browser.

It has TWO main PHASES:
1. Reconcile
   Mark fiber nodes with (side) effects asynchronously.
   Build up the WIP tree and the list of changes to be made but do NOT make those changes.
   This can be done asynchronously so that the main browser thread is not held for too long. It
   can be repeated/restarted multiple times as updates come in.

   It relies on a new browser API called `requestIdCallback`, which queues a function to be called
   during a browser's idle periods. It enables developers to perform background and low priority work
   on the main event loop, without impacting latency-critical events such as animation and input
   response. See https://developer.mozilla.org/en-US/docs/Web/API/Window/requestIdleCallback

   Of course, IE doesn't support this at the time of writing, but Chrome, Edge, Firefox and Opera do.

   Using this API, React can do the reconcillation phase during the browser's idle period by
	 splitting up its work into chunks and doing a chunk at a time. As it is
   called back, on each callback it can decide what chunk of work it wants to do, a lot like an OS
   scheduler would. The proprities are as follows:
      - synchonous    << HIGH
      - task
      - animation
      - high
      - low
      - offscreen     << LOW

   During this phase lifecycle hooks will be called:
      (UNSAFE_)componentWillMount
      (UNSAFE_)componentWillReceiveProps
      getDerivedStateFromProps
      shouldComponentUndpate
      (UNSAFE_)componentWillUpdated
      render

   Essentially, because, reca;;, JS is a single-threaded processes, using `requestIdCallback` React
   is able to fake a multi-threaded process using COOPERATIVE  MULTITASKING (a.k.a. NON-PREEMTIVE
   MULTITASKING).

   From WikiPedia:
      Cooperative multitasking, also known as non-preemptive multitasking, is a style of computer
      multitasking in which the operating system never initiates a context switch from a running
      process to another process. Instead, processes voluntarily yield control periodically or when
      idle or logically blocked in order to enable multiple applications to be run concurrently.
      This type of multitasking is called "cooperative" because all programs must cooperate for the
      entire scheduling scheme to work. In this scheme, the process scheduler of an operating system
      is known as a cooperative scheduler, having its role reduced down to starting the processes
      and letting them return control back to it voluntarily.

2. Commit
   This phase still has to be done synchronously, BUT the heavy lifting has been done in the prev
   phase, so this minimises the amount of time that the main browser thread is held for.
   This does the changes in the DOM - visible to user

   The following lifecycle hooks will be called:
      getSnapshotBeforeUpdate
      componentDidMount
      componentDidUpdate
      componentWillUnmount


Future?
Improve CPU utilisation using TIME SLICING
   - Rendering is NON BLOCKING - yields to use input
   - Multiple updates at different priorities
   - Pre render so as not to slow visiblecontent
Improve IO using React Suspense.
   - Access async data (e.g. from server) as easily as accessing sync data from member
   - Pause componentrender without blocking siblings
   - Precising control loading states to reduce jitter

React Suspense
--------------
https://reactjs.org/docs/concurrent-mode-suspense.html
    From Website:
		React 16.6 added a <Suspense> component that lets you "wait" for some code to load and
		declaratively specify a loading state (like a spinner) while waiting...
React Native
- Framework reslies on React core
- Supports iOS and Android. Microsoft also supports a version for Windows. Canonical also seem to
  support a version for the Ubuntu Desktop.

RNative
	- Bundles your Javascript
	- Threads for UI layout and JavaScript, which is different to ReacJS web.
		- Threads communicate through a "bridge". E.g. JS thread will request elements to be
		  rendered and the UI thread will render them and so on. This means, unlike in Web React
		  that the JS thread can block but the UI thread will remain responsive.

SEE snack.expo.io
    Its a nice little sandbox to play with react native and see how it renders in a fake phone.

Unfortunately it looks like an extra learning curve on top of learning how react works. I wanted to
try and change a large webapp to react-native but loads of tags need to be re-written. E.g. <div>
tags become <View> tags, <span> -> <Text> and stuff like this... so there would be some rework.
Also the proboperty names change too, like onClock becomes onPress. Seems like a faff.

If developing from scratch might have looked at this further, as it looks pretty powerful, but no
dice here so ending notes on react native.
Electron & React
Electron is a neat way of creating a NodeJS app that includes the Chromium browser to run
web apps on the desktop. It allows one to create CROSS PLATFORM apps.

Resources / References:
-----------------------
https://www.electronjs.org/docs/tutorial/quick-start
https://medium.com/@brockhoff/using-electron-with-react-the-basics-e93f9761f86f
https://www.freecodecamp.org/news/building-an-electron-application-with-create-react-app-97945861647c/
https://github.com/electron/windows-installer/issues/219#issuecomment-448188395
https://msanatan.com/2020/04/19/accessing-nodejs-modules-with-create-react-app-and-electron/


From the Electron docs:
	Electron consists of three main pillars:
		1. Chromium for displaying web content.
		2. Node.js for working with the local filesystem and the operating system.
		3. Custom APIs for working with often-needed OS native functions.
	Developing an application with Electron is like building a Node.js app with a web interface or
	building web pages with seamless Node.js integration.

Example:
--------
Had a little play with Elctron by embedding my little toy epic-planner app
(https://github.com/jameshume/epic_planner) using the the resources referenced above.

1. npm install --save-dev electron
2. add src/electron-main.js as described in the tutorials. including the freeCodeCamp's instructions
   on adding the ability to run from the NPM server for development and packaged build files for
	 release:
       const startUrl = process.env.ELECTRON_START_URL || url.format({
           pathname: path.join(__dirname, '../build/index.html'),
           protocol: 'file:',
           slashes: true
       });
       mainWindow.loadURL(startUrl);
   remember to set nodeIntegration to true in the BrowserWindow's webPreferences option:
      mainWindow = new BrowserWindow({
          ...
          webPreferences: { nodeIntegration: true }
      });
2. add the following additions to the package.json file:
	      ...
	+     "main": "src/electron-main.js",
	+     "homepage": "./",
	+     "author": "James Hume",
	+     "description": "A bare-bones epic planning application",
	      ...
	      "scripts": {
	          ....
	+         "electron": "electron .",
	+         "electron-dev": "set ELECTRON_START_URL=http://localhost:3000 && electron .",
	      }
	2.a The development version of the Electron app can be run by starting the NPM development server:
	    `npm start` and by then running the Electron app: `npm run electron-dev`.
	2.b The production version of the Electron app requires Electron forve... continue...
3. install Electron-Forge: (Needs Git, so on Windows run from Git Bash console)
	     npx @electron-forge/cli import
4. `npm run build` the application in preparation
5. on windows it appears, to get the the build to work correctly the following addition must be
   made to the forge config in the package.json file:
	     "config": {
	         "forge": {
	            "packagerConfig": {
	+               "asar": true
	            },
6. On windows, from Git bash terminal, `npm run make`.
7. Find your app in the "out" folder under the directory containing package.json.

Pretty frikin' awesome!!

Just note, Electron Forge might change the "start" script in your package.json file to
`"start": "electron-forge start",`... just be aware.


If you want to access Node.js modules do the following:
	(https://stackoverflow.com/a/44454923/1517244)
	use `window.require()` instead of `require()`:
	const fs = window.require('fs');


Access full filenames from HTML input element
---------------------------------------------
From https://stackoverflow.com/a/38549837/1517244
	Electron adds a path property to File objects, so you can get the real path from the input
	element using:
		document.getElementById("myFile").files[0].path

	In react just use a ref instead of getElementById!


Using Electron dialogs from React App
-------------------------------------
Typescript & React
Start a new project using:
	create-react-app my-app --template typescript
Add to an existing using:
	npm install --save-dev typescript @types/node @types/react @types/react-dom @types/jest @types/react-router-dom