Android notes
Page Contents
Interesting Reads and References
- Android Is based On Linux, But What Does That Mean?, Chris Hoffman on howtogeek.com.
- The Dalvik Virtual Machine Architecture, David Ehringer, March 2010.
- ART vs Dalvik - Introducing the New Android x86 Runtime, Miao W. (Intel), June 18, 2014.
- What is the Dalvik Virtual Machine?, Bright Sparks Staff.
- Android Interfaces and Architecture, Android Docs.
- Android System Development, Free Electrons.
- The Android Input Architecture, Jonathan Levin, Technologeeks.com.
- Config New Android Device SO Thread.
- https://blog.jayway.com/2012/10/24/a-practical-approach-to-the-aosp-build-system/
- https://software.intel.com/en-us/articles/building-an-android-command-line-application-using-the-ndk-build-tools
- http://www.imajeenyus.com/computer/20130301_android_tablet/android/unpack_repack_recovery_image.html
- http://www.slideshare.net/jserv/android-ipc-mechanism
- http://events.linuxfoundation.org/images/stories/slides/abs2013_gargentas.pdf
- http://rts.lab.asu.edu/web_438/project_final/Talk%208%20AndroidArc_Binder.pdf
- http://newandroidbook.com/files/Andevcon-Binder.pdf
- https://code.tutsplus.com/tutorials/android-essentials-working-with-strings-and-string-arrays--mobile-7838
- https://source.android.com/devices/graphics/architecture.html
- https://www.slideshare.net/chrissimmonds/android-bootslides20
- https://forum.xda-developers.com/showthread.php?t=443994 -- HOWTO: Unpack, Edit, and Repack Boot Images
- http://people.redhat.com/dwalsh/SELinux/Presentations/ManageRHEL5.pdf AWESOME SELINUX INTRO
- http://www.technobuzz.net/root-mi-note-2-and-install-twrp-recovery/
- https://source.android.com/devices/input/key-layout-files
- http://newandroidbook.com/code/android-6.0.0_r1/ndk/docs/Programmers_Guide/html/md_3__key__topics__building__chapter_1-section_8_ndk-build.html
Using ADB: Cheet sheet.
Find SDK And Add ADB To Path
Having downloaded the Android Developer Studio with SDK bundle, I could not find the
adb command. The solution was given in this
SO thread.
The SDK is found in C:\%HOMEPATH%\AppData\Local\Android\sdk. The adb
utility is found under platform-tools\adb.exe. Add this path to your system
PATH.
Run ADB
To list devices detected type:
adb devices -l
To connected to a particular device using a shell interface type:
adb -s xxx shell
Where xxx is identifier for the device you wish to select as seen in the
adb devices -l output.
To wait for a device to become available:
adb [-s xxx] wait-for-usb-device
To switch to root (if you're phone has been rooted):
adb [-s xxx] root
To push a file to your device:
adb [-s xxx] push your.file /data/local/tmp
To remount /system read/write:
adb remount
To view android logs:
adb logcat
To view kernel logs:
adb shell cat /proc/kmsg
To send keyevents:
adb shell input keyevent KEYCODE_BACK
To install an app:
adb install app-name.apk
To reboot [into recovery]:
adb reboot [recovery]
Fastboot & Flash ROMs
adb reboot bootloader
fastboot boot boot.img
fastboot flash boot boot.img
fastboot flash recovery recovery.img
fastboot reboot
Kill Emulators
adb -s emulator-xxxx emu kill
Android Shell Utils Cheet Sheet
To broadcast an event:
am broadcast -a android.intent.action.BOOT_COMPLETED -p com.mypackage.name
Without the -p option to direct the broadcast to your specific
package you might find it reboots your system...
TODO
- http://elinux.org/Android_Build_System
- http://ericdev.blogspot.co.uk/2010/06/cc-closer-look-at-android-project-build.html
- http://www.androidenea.com/2009/08/init-process-and-initrc.html
- http://liuluheng.github.io/wiki/public_html/Mobile/Android/Firmware%20Development.html
- https://www.kingoapp.com/root-tutorials/how-to-root-android-6.0-marshmallow.htm
- http://www.addictivetips.com/mobile/android-partitions-explained-boot-system-recovery-data-cache-misc/
- https://en.wikipedia.org/wiki/Evdev
- https://joeshaw.org/linux-input-ecosystem/
- http://rts.lab.asu.edu/web_438/project_final/Talk%208%20AndroidArc_Binder.pdf
- http://www.toptip.ca/2013/01/unix-domain-socket-with-abstract-socket.html?m=1
and
http://stackoverflow.com/questions/14643571/localsocket-communication-with-unix-domain-in-android-ndk
and
https://developer.android.com/reference/android/net/LocalServerSocket.html
and
https://developer.android.com/reference/android/net/LocalSocket.html - Key Layout Files - how to assign keys your driver passes to android a key code: https://source.android.com/devices/input/key-layout-files and https://developer.android.com/ndk/reference/keycodes_8h.html
Getting Detailed System Information & Backing Up System
Based on the following references:
- The following articles talk about extracting images and device trees and what you can do with
them once you've got them:
- Pull Your Own Stock Android Firmware From Your Device, by Rootjunky.com.
- Dump Stock Rom And Build Flashable Image, XDA Developers thread.
- Unpack And Repack Recover Image Lindsay Wilson, imajeenyus.com.
- How to Extract a Kernel Image With The MKBoot Script, CNXSoft.
- How to Extract a Device Tree File from Android Firmware Files, CNXSoft.
- mkbootimg_tools, xiaolu on GitHub.
- Android_Device_System_Information.zip, BataKang.
- For an interesting look at the Android boot process look here:
- Android Boot Sequence / Init Process, Suresh Achari.
- Timings of Init : Android Ramdisks for the Practical Hacker, Stacy Devino.
- For information Android security and SELinux:
- Security Enhancements (SE) for Android, Stephen Smalley, NSA.
- Android Security Customization with SEAndroid, Code Project.
- Implementing SELinux, Android Docs.
- Android Security Customization with SEAndroid, Liang Zhang (Intel).
- https://wiki.gentoo.org/wiki/SELinux/Tutorials
- http://www.all-things-android.com/content/se-android-commands
- https://boundarydevices.com/android-security-part-3-security-enhanced-linux-in-android/
Batakang.com has a really useful script Android_Device_System_Information.bat, which
you can get
here in a ZIP file.
Download and extract into any directory. you can then use the script to get a ton of useful information about your device.
When I tried running it I was interested in the msm partitions. This line of the script didn't work
out of the box for me but it was pretty easy to explorer the directory structure under
/dev/block/platform to eventually find the by-name directory that
has a load of symbolic links, named by device name, linking to the device on which they reside.
In my case it was /dev/block/platform/soc/624000.ufshc/by-name/.
By looking into this directory I could see where my recovery image resided:
> adb root
> adb shell "ls -la /dev/block/platform/soc/624000.ufshc/by-name"
lrwxrwxrwx root     root              1970-01-12 12:43 aboot -> /dev/block/sde23
lrwxrwxrwx root     root              1970-01-12 12:43 abootbak -> /dev/block/sde24
... <snip> ...
lrwxrwxrwx root     root              1970-01-12 12:43 recovery -> /dev/block/sda13
Using the above listing we can find out which block devices correspond to our boot, system, recovery and userdata images. These can then be extracted to files using the dd comand to copy the device contents to a file:
dd if=/dev/block/sdXXX of=/directory/of/your/name.img
These files can then be pulled off the device using the following:
adb pull /directory/of/your/name.img name.img
For example, from the above I might want to get by boot image. This happened to map to
/dev/block/sde36. The boot image contains the kernel and ramdisk: the critical
stuff needed to load the device. So, I would do...
dd if=/dev/block/sde36 of=/data/local/tmp/boot.img
adb pull /data/local/tmp/boot.img boot.img
Or as i found out later, it is much easier to do
adb pull /dev/block/sde36 boot.img
Note you can only do this with partitions that are not in use, such as the boot or recovery partition. For everything else install a TWRP recover image (see below).
Once you have your boot image you can then use the mkbootimg_tools to unpack your boot image:
./mkboot ../boot.img ../boot-unpacked
See also the tool imgtool, provided by Jonathan Levin on his website.
Then you can edit things on the RAM disk or place new commands on there etc:
vim ../boot-unpacked/ramdisk/service_contexts
You can also do things like checkout the Linux version being used:
zgrep -a 'Linux version' ../boot-unpacked/kernel
Then you can repack this boot image and either fastboot or flash it to you phone:
./mkboot ../boot-unpacked ../boot_new.img
For more information you can see HOWTO: Unpack, Edit, and Re-Pack Boot Images.
If you want to grab other partitions, like system etc, you should download a recovery rom such as a TWRP recovery ROM for your device and use the backup features to back partitions up and save them to your local disk. The TWRP recovery, which you can fastboot (you don't need to flash it) will backup your selected partitions to a folder on your device, which you can mount and copy from.
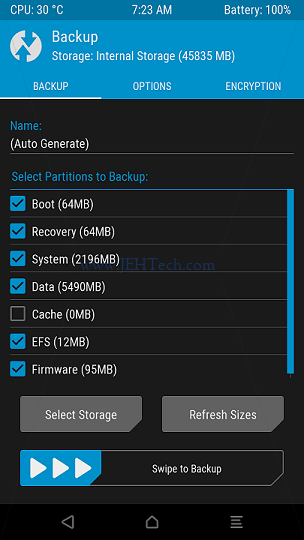
For example, loading a TWRP recovery ROM and clicking "backup" showed the first screen
shown below. Just select what you want to backup. Continuing with the backup then loads a
progress screen (second image below). The screen text will tell you where it is putting the backups on you phone's
storage (note the second image's text shows the text "Backup Folder: /data/media/0/TWRP/BACKUPS/").
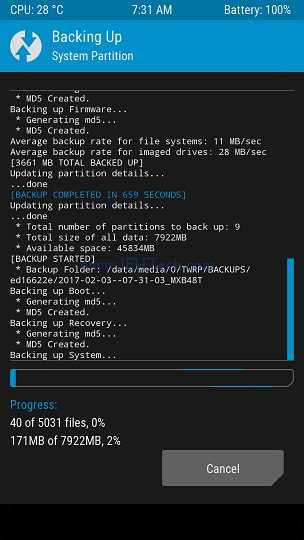
The recovery ROM still lets you access your phone. Mine was mounted on Windows at
This PC\MIX\Internal Storage\TWRP\BACKUPS\ed16622e\2017-02-03--07-04-30_MXB48T.
PS: Used this utility to take the screenshots....
Write To Android Log From C (NDK)
#include <android/log.h>
__android_log_print(ANDROID_LOG_DEBUG, "LOG_TAG", "printf like syntax", ...);
Rooting Your Phone
The following two articles explain how rooting your phone actually works:
- https://seasonofcode.com/posts/how-rooting-works-a-technical-explanation-of-the-android-rooting-process.html
- https://jon.oberheide.org/files/bsides11-dontrootrobots.pdf
- https://www.kingoapp.com/root-tutorials/how-to-root-android-6.0-marshmallow.htm
Rooting a device means to get root access to the Linux system that Android is built on top of. Root access allows you to execute anything. It gives you complete control over your phone. A "normal" phone user executes with certain limited permissions so she cannot execute or do anything they please.
When we say a bootloader is locked, it means that it will not flash/boot updates unless they are digitally signed by its vendor. Warning: unlocking your bootloader completely eliminates your device's security - its like not password protecting your desktop's BIOS!
Bootloader integrity is always verified using a hardware root of trust. For verifying boot and recovery partitions, the bootloader has a fixed OEM key available to it. It always attempts to verify the boot partition using the OEM key first and try other possible keys only if this verification fails.
When a bootload is unlocked, it will let you flash/boot any ROMs of your choosing, signed or not!
So, how can we get root permissions on a device? The following quote explains it nicely:
... if you can hack / trick one of these system processes running in privileged mode to execute your arbitrary code, you have just gained privileged access to the system. This how all one-click-root methods work, including z4root, gingerbreak, and so on ...
-- How Rooting Works, By Chuan Ji, Oct 19, 2011.
Logs
adb shell cat /proc/kmsg # Get the system log
logcat # Get the Android log
Camera Stuff
- http://stackoverflow.com/questions/37434494/android-camera-2-preview-size-and-devices-aspect-ratio
- http://stackoverflow.com/questions/17019588/crop-camera-preview-for-textureview */
Touch Events
http://lxr.free-electrons.com/source/Documentation/input/event-codes.txt
https://www.kernel.org/doc/Documentation/input/multi-touch-protocol.txt
Programmatically Generating And Injecting Events In Android
I needed to be able to generate touch events for a project I was working on. These touch events had to be injected somewhere into the Android event infrastructure so that they would appear to the system as if they were actually from the touchscreen.
References
- http://newandroidbook.com/files/AndroidInput.pdf
- http://www.linuxjournal.com/article/6396 and http://www.linuxjournal.com/article/6429
- https://github.com/jpunz/AndroidEventInjector/blob/master/Injector.java
- http://www.pocketmagic.net/injecting-events-programatically-on-android/
- http://www.pocketmagic.net/programmatically-injecting-events-on-android-part-2/
Using ADB sendevent & getevent
Using ADB there are the
getevent
and sendevent commands which are
usefull while debugging, but I needed to write some kind of service/daemon.
To get a pretty printed list of events comming out of your device use:
getevent -lt /dev/input/eventX
The -l option tells getevent to label event types and names in
plain text. The -t option prints out the timestamps.
For example, a quick tap on my touch screen gives this:
# getevent -lt /dev/input/event4
[    4339.714135] EV_ABS       ABS_MT_TRACKING_ID   00000015
[    4339.714135] EV_ABS       ABS_MT_POSITION_X    0000055c
[    4339.714135] EV_ABS       ABS_MT_POSITION_Y    000001e9
[    4339.714135] EV_ABS       ABS_MT_PRESSURE      00000049
[    4339.714135] EV_ABS       ABS_MT_TOUCH_MAJOR   00000008
[    4339.714135] EV_KEY       BTN_TOUCH            DOWN
[    4339.714135] EV_SYN       SYN_REPORT           00000000
[    4339.720836] EV_ABS       ABS_MT_PRESSURE      00000033
[    4339.720836] EV_ABS       ABS_MT_TOUCH_MAJOR   00000007
[    4339.720836] EV_SYN       SYN_REPORT           00000000
[    4339.738694] EV_ABS       ABS_MT_TRACKING_ID   ffffffff
[    4339.738694] EV_KEY       BTN_TOUCH            UP
[    4339.738694] EV_SYN       SYN_REPORT           00000000
Here we are seeing the Linux input layer messages being sent from the driver into the input layer. Here we are seeing Linux multi-touch messages.
From the above we can see that the device is typ "B". The first message is the
tracking ID (ABS_MT_TRACKING_ID). Because screens are multi-touch, i.e., more than
one finger can be used on the device at any one time, the coordinates sent to the Linux input layer
have to be associated with a finger, or stylus etc. It is the hardware's/driver's responsibility
to keep track of the various active touch points and give them an ID. For example, if I touch
the screen with one finger, as in this case, the first finger is assigned the number 15. If I
then touched the screen with a second finger, it might be assigned the number 16, for example.
The second pair of messages are the x and y coordinates of the pointing device with ID 15. The coordinates are, I believe, in device coordinate units. Either the input layer or users of the input layer convert these to pixels (I think - need to confirm this).
Next we have the pressure and the area of the major touch - see the Linux multi-touch messages doc.
Next to indicate that there is a finger pressed a BTN_TOUCH message is sent with
the finger-down flag set.
Finally to indicate the end of this particular event a SYN_REPORT message is sent.
Next a set of pressure and major-touch messages are sent to indicate a change in the pressure
of my touch. This set of events is ended using another SYN_REPORT. Note, because
we are still talking about the same touch point, no tracking ID needs to be sent.
Finally in the next block of messages we see a tacking ID of -1. This indicates that the current slot (the tracking ID) is no longer being used.
The "input" Command
It is also possible to use the input command line utitlity. For example,
the following will inject an artificial home-button touch event, making it look asif the user
actually pressed the home button [Ref]:
input keyevent 3
The command does appear to be useable without root privileges, which is nice.
Write To The Device's /dev/input/xxx
http://linuxwacom.sourceforge.net/wiki/index.php/Kernel_Input_Event_Overview
Android is based on Linux and uses the Linux Input Subsystem. This means that every input
device has created a node under /dev/input. This device can be written to if you
want to inject event messages into the system and make them appear asif they came from that
device. Downside is, this requires root privileges.
This is essentially, I think, what the send|getevent command line utils are doing,
but this shows how to do it from your program directly without having to fork these commands.
A little example based (heavily) on the rather good pocketmagic articles [Ref][Ref]:
// Copy of struct input_event
struct uinput_event
{
  struct timeval time;
  uint16_t type;
  uint16_t code;
  int32_t value;
};

static void sendInputEvent(int fd, uint16_t type, uint16_t code, int32_t value)
{
  struct uinput_event ev = {
    .type  = type,
    .code  = code,
    .value = value
  };
  gettimeofday(&pev.time, NULL);

  write(fd, &ev, sizeof(ev));
}

... <snip> ...

fd = open("/dev/input/eventX", O_RDWR); // X is an integer number
if (fd < 0) {
  // Handle error
}

// Send a touch event at coordinates 100, 100
sendInputEvent(fd, EV_ABS, ABS_MT_POSITION_X, 100);   // Have to get these values from ...
sendInputEvent(fd, EV_ABS, ABS_MT_POSITION_Y, 100);   // ... input-event-codes.h.
sendInputEvent(fd, EV_KEY, BTN_TOUCH, 1);
sendInputEvent(fd, EV_SYN, SYN_REPORT, 1);
MotionEvents
You can intercept all touch events to your Activity using the following:
public class MainActivity extends AppCompatActivity {

    private static final Map<Integer, String> mMotionEventMap;
    static {
        /* Action event map, not including deprecated values and also not including
         * *_MASK and *_SHIFT constants because these are only needed with getAction() */
        Map<Integer, String> mMEMInitialiser = new HashMap<Integer, String>();
        mMEMInitialiser.put(MotionEvent.ACTION_BUTTON_PRESS,   "ACTION_BUTTON_PRESS");
        mMEMInitialiser.put(MotionEvent.ACTION_BUTTON_RELEASE, "ACTION_BUTTON_RELEASE");
        mMEMInitialiser.put(MotionEvent.ACTION_CANCEL,         "ACTION_CANCEL");
        mMEMInitialiser.put(MotionEvent.ACTION_DOWN,           "ACTION_DOWN");
        mMEMInitialiser.put(MotionEvent.ACTION_HOVER_ENTER,    "ACTION_HOVER_ENTER");
        mMEMInitialiser.put(MotionEvent.ACTION_HOVER_EXIT,     "ACTION_HOVER_EXIT");
        mMEMInitialiser.put(MotionEvent.ACTION_HOVER_MOVE,     "ACTION_HOVER_MOVE");
        mMEMInitialiser.put(MotionEvent.ACTION_MOVE,           "ACTION_MOVE");
        mMEMInitialiser.put(MotionEvent.ACTION_OUTSIDE,        "ACTION_OUTSIDE");
        mMEMInitialiser.put(MotionEvent.ACTION_POINTER_DOWN,   "ACTION_POINTER_DOWN");
        mMEMInitialiser.put(MotionEvent.ACTION_POINTER_UP,     "ACTION_POINTER_UP");
        mMEMInitialiser.put(MotionEvent.ACTION_SCROLL,         "ACTION_SCROLL");
        mMEMInitialiser.put(MotionEvent.ACTION_UP,             "ACTION_UP");
        mMotionEventMap = mMEMInitialiser;
    }

    ... <snip> ...

    @Override
    public boolean onTouchEvent(MotionEvent event) {
        final String DEBUG_TAG = "JEHTECH";
        final int historySize  = event.getHistorySize();
        final int pointerCount = event.getPointerCount();
        final int action       = MotionEventCompat.getActionMasked(event);
        final String actionStr = mMotionEventMap.get(action);

        if (actionStr != null) {
            Log.d(
                DEBUG_TAG,
                "Action was " + actionStr + " (#" + action + "), with " + pointerCount +
                    " pointers and a history size of " + historySize);
            return true;

        }

        Log.d(DEBUG_TAG, "Action was #" + action);
        return super.onTouchEvent(event);
    }

    ... <snip> ...
}
To get information on MotionEvents it appears that the best thing to use is
MotionEventCompat.getActionMasked() because this offers (at the time of writing
Jan 2017) the most cross-device compatible and mult-touch capable interface for interpretting
touch events.
The function getAction() is (almost) deprecated by the looks of things:
You should always use the method
-- [Ref].
getActionMasked() (or better yet, the compatability version
MotionEventCompat.getActionMasked()) to retrieve the action of a MotionEvent. Unlike the
older getAction() method, getActionMasked() is designed to work with multiple pointers.
NDK Applications And PThreads
If you want to use the pthread library in Android, you do not have to link
against an external library: it is baked into the
Bionic C library already. Note, however,
that it does not give a full pthread implementation. Notably things like
pthread_cancel are not supported.
Intent and Broadcast Receiver
// In the sender activity
Intent localIntent = new Intent(MY_INTENT_STR).putExtra(MY_INTENT_STR_EXTRA, item);
LocalBroadcastManager.getInstance(this).sendBroadcast(localIntent);

// In the receiver activity
public class MainActivity extends AppCompatActivity {
    protected MyReceiver mReciever;

    // ... <snip> ...

    @Override
    protected void onCreate(Bundle savedInstanceState) {
        // ... <snip> ...
        mReciever = new MyReceiver();
        LocalBroadcastManager.getInstance(this).registerReceiver(mReciever, new IntentFilter(MY_INTENT_STR));
        // ... <snip> ...
    }

    class MyReceiver extends BroadcastReceiver {
        @Override
        public void onReceive(final Context context, Intent intent) {
            Log.d(DEBUG_TAG, "GOT broadcast: " + intent.getExtras() /* <snip> ... */);
        }
    }
}
Android Build Tree
The top-level view of the android build tree is as follows:
.
|-- abi
|-- art
|-- bionic          - Bionic is Android's libc (standard C library)
|-- bootable
|-- build
|-- cts
|-- dalvik          - The Dalvik virtual machine
|-- developers
|-- development
|-- device          - Product make definitions
|-- docs
|-- external
|-- frameworks      - Android frameworks, e.g. binder support functions etc, native and Java code
|-- hardware
|-- kernel          - The Linux kernel
|-- libcore
|-- libnativehelper
|-- ndk
|-- out
|-- packages
|-- pdk
|-- prebuilts       - Things like compiler chains for various platforms
|-- sdk
|-- system
|-- tools
`-- vendor
The directory bionic contains the code for Android's implementation of the standard
C library. The library also wraps up other well known libraries such as pthreads, so when using
pthreads, you don't need to link against any extra libraries. Note, however, that the Android
implementation does not support the entire POSIX pthread standard. Notably things like
pthread_cancel are not supported.
The directory kernel contains the Linux kernel, on top of which Android is build.
The kernel in the Android build tree contains Android modifications to the Linux kernel. Many
of these have now gone upstream and exist in the master kernel branch as well. Android introduced
concepts such as wavelocks.
The device directory contains data and build scripts relevant to specific devices.
Under device the vendor specific build configs/scripts exist generically as
"./device/<company-name>/<device-name>".
So, for example, the device directory of the build tree from Qualcomm looks like
this:
Devices
References:
device/qcom/
|-- apq8084
|-- common
|-- mpq8064
|-- msm7627a
|-- msm7630_surf
|-- msm8226
<snip>
Under the folder for a particular device the following 3 files are the most significant in terms of defining the build:
Android.mkAndroidBoard.mkAndroidProducts.mk- Seems to have one purpose and that is to "point" to the product definition makefile, named as the device vendor wishes.
BoardConfig.mk- Board specific configuration
vendorsetup.sh- Adds a lunch combo for your device. e.g. by calling
add_lunch_combo <product-name>.
- Adds a lunch combo for your device. e.g. by calling
Build Notes
Intro
This section is just a summary of A closer look at the Android project build system and Android Build System.
- The linux kernel is cross compiled into a standalone library using a gcc cross compiler. Does not depend on anything else.
- All other native apps depend on bionic.
- Everything else uses Java compiler for Android. Java compiler location specified by
$JAVA_HOMEenv variable.
Build using source build/envsetup.sh. The build will define the product, build variant, simulator, and type (release or debug).
Preparation
Install OpenJDK (And Select The Right Version)
If you're building on Ubuntu 16 you will need to install Sun's OpenJDK [Ref]:
sudo add-apt-repository ppa:openjdk-r/ppa
sudo apt-get update
sudo apt-get install openjdk-7-jdk
Note that different versions of Android will require different versions of Java. You can
install multiple versions of Java on your machine using apt-get and it won't
overwrite existing versions.
Different versions of Android require different versions of Java. You can install multiple Java versions, but make sure you have selected the "active" version that is appropriate to your Android version. The compilation will warn you if it isnt.
To see what versions of Java you have available on your system type the following:
jehtech$ sudo update-alternatives --list java
/usr/lib/jvm/java-7-openjdk-amd64/jre/bin/java
/usr/lib/jvm/java-8-openjdk-amd64/jre/bin/java
Above I see on my system I have Java v 7 and 8 installed.
To choose an "active" version use
sudo update-alternatives --config java. It will display a little choice menu
on your console that lists the installed versions (the currenly active version is marked by
a *). Just choose the version you want:
jehtech$ sudo update-alternatives --config java
There are 2 choices for the alternative java (providing /usr/bin/java).

  Selection    Path                                            Priority   Status
------------------------------------------------------------
* 0            /usr/lib/jvm/java-8-openjdk-amd64/jre/bin/java   1081      auto mode
  1            /usr/lib/jvm/java-7-openjdk-amd64/jre/bin/java   1071      manual mode
  2            /usr/lib/jvm/java-8-openjdk-amd64/jre/bin/java   1081      manual mode

Press <enter> to keep the current choice[*], or type selection number:
Install Repo
You will also need to install "Repo", a tool, written in Python, built on top of git that makes it easier to work with Git and Android [Ref]. Download using the following (you can replace ~/bin/repo with a directory of your choice):
curl https://storage.googleapis.com/git-repo-downloads/repo > ~/bin/repo
chmod a+x ~/bin/repo
Configure USB Access
You will also need to configure USB access [Ref] because might not be able to access USB devices by default:
wget -S -O - http://source.android.com/source/51-android.txt | sed "s/<username>/$USER/" | sudo tee >/dev/null /etc/udev/rules.d/51-android.rules; sudo udevadm control --reload-rules
Building for QualComm chipsets
To build Qualcomm BSPs look at https://wiki.codeaurora.org/xwiki/bin/QAEP/release. Seems to have a more comprehensive BSP list than that available by following the Xiaomi Git Wiki link! Checkout using:
repo init \
   -u git://codeaurora.org/platform/manifest.git \
   -b release \
   -m <manifest> \
   –-repo-url=git://codeaurora.org/tools/repo.git \
   --repo-branch=caf-stable \
   [--depth=1]
Replace <manifest> with the manifest that matches the BSP you want to build. For example,
if you want to build for the BSP linux_android_board_support_package_vla.br_.1.2.4-01810-8x16.0-2.zip
you would need to specify the manifest file as LA.BR.1.2.4-01810-8x16.0.xml [Ref].
The repo tool will download the many repositories that make up the entire code base and it is the manifest file that tells to tool which repositories and branches need to be retreived.
The other option you might consider is --depth=1. It
tells repo to create a shallow clone with a history truncated to the last 1 commit, which should
reduce the amount of history you have to download.
Sync Up
Next step, after initialising the repo directory, is to download everything. This is done with the "sync" command:
repo sync -j 4
The -j option allows you to specifiy how many projects should be fetched simulataneously.
The beefier your internet connection and other hardware (like num cores etc) the higher you might
want to push this number. Fetching nultiple projects at a time may help reduce the total
download time.
The first sync will take a-g-e-s, as in many hours! From what I've read there is not a lot
one can do about this (apart from the --depth option discussed above). You could also try
to edit the manifest file (found in the .repo directory) to remove prebuilt toolchains
that do not match your system, which may save about 1GB download [Ref].
Build the Kernel
use the following to build the kernel:
source build/envsetup.sh
Sourcing envsetup.sh gives you these rather useful commands (and more - the list is truncated) to search and navigate
the source tree [Ref]:
croot | change directory to the top of the tree |
cgrep <pattern> | grep on all local C/C++ files |
jgrep <pattern> | grep on all local Java files |
resgrep <pattern> | grep on all local res/*.xml files |
godir <filename> | go to the directory containing a file |
Having sourced the environment setup continue to make the boot image like so:
lunch <product you're building for>
make bootimage
The build should produce at least the following files in out/target/product/<product> [Ref]:
boot.img: Kernel and ramdisk used for normal boot. It is created using themkbootimgtool and contains a compressed kernel, the kernel command line and optionaly a ramdisk.recovery.img: Kernel and ramdisk to boot into recover mode. Created in the same way asboot.imgwith same-ish contents.system.img: File system image for /system, which contains the OS binaries and frameworks. Mounted read only. Contains all the Android and vendor specific binaries, config files and more.userdata.img: The file system image for /data, which contains user data and configuration files. This is where user's personal data resides.cache.img: The file system image for /cache, used for updates and recovery.
Linux Kernel Input And Android Input Components
Useful Links & Reference
A 30,000 Foot View
The route that a device input takes is shown in a very high-level sense below.
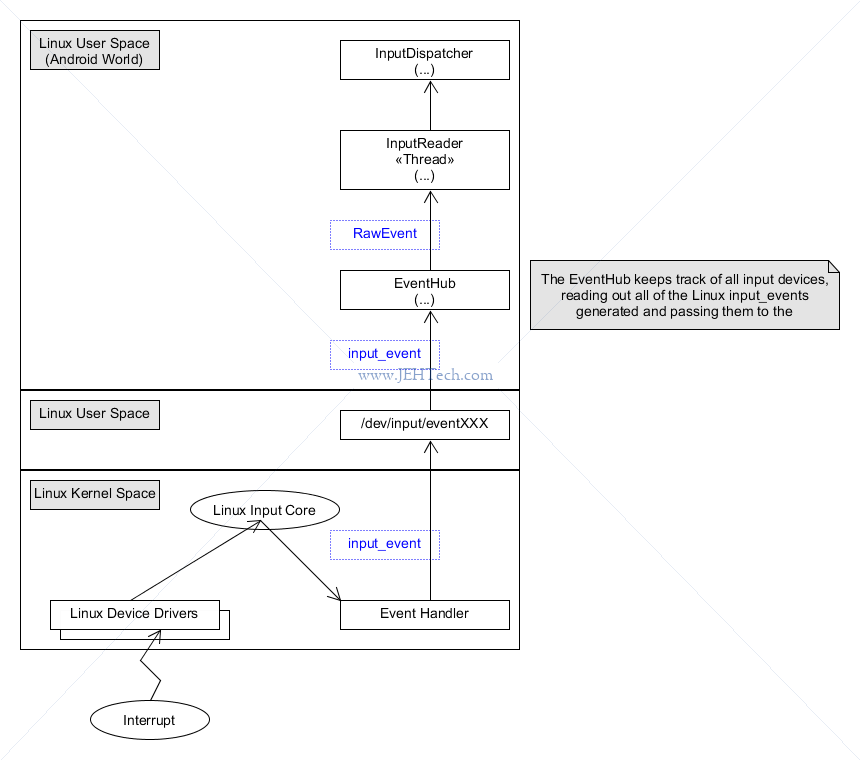
The Android docs summarise this process quite well. I'm interested in touch devices and
the so the section "Touch Device Oeration" was very useful. It basically says that events go from the EventHub to InputReader to InputDispatcher.
The dispatcher then ... uses the
.
WindowManagerPolicy to determine whether the events should be dispatched and whether they should wake the device. Then, the InputDispatcher delivers the events to the appropriate applications ...
Linux Events
See also Using the Input Subsystem, Part I and Using the Input Subsystem, Part II by Brad Hards.
In the Linux Kernel, device drivers register with the linux input core as input devices and advertise the type of input that they provide. The driver will then translate events into types recognised by the input core, which are then published through the evdev device, which is axccessible from user space.
As the Android docs say, The [Linux] input device drivers are responsible for translating device-specific
signals into a standard input event format, by way of the Linux input protocol
.
Getting Information From Pseudo File Systems
We will see that the Linux device drivers will send events up into userspace, to be collected
by the Android EventHub via /dev/input/eventX, where X is a number representing
the event associated with the specific device.
We can get more information about this device from various locations.
We can list all of the devices in our system, and find their pseudo file locations by
using the /proc/bus/input/devices pseudo file, for example:
# cat /proc/bus/input/devices
...
I: Bus=0018 Vendor=0000 Product=0000 Version=0000
N: Name="atmel-maxtouch"
P: Phys=
S: Sysfs=/devices/soc/75ba000.i2c/i2c-12/12-004a/input/input4
U: Uniq=
H: Handlers=mdss_fb event4 kgsl cpufreq
B: PROP=2
B: EV=b
B: KEY=400 0 0 40008800 4000000000 0
B: ABS=661800000000000
...
Here, for example, we have found out about our touch controller. This phone is using the
Atmel MaxTouch chipset. We now know where this devce is located in the sysfs pseudo file system,
namely /sys/devices/soc/75ba000.i2c/i2c-12/12-004a/input/input4 (note how
we prefixed the path with /sys).
The important bit is the trailing /inputX, where in this case X is 4.
We now know that this devices events should be transmitted from Linux kernel space to user space
via the special file /dev/input/event4.
The reported Sysfs location can also be found using the far more friendly
symbolic link /sys/class/input/event4, which "points" to
/sys/devices/soc/75ba000.i2c/i2c-12/12-004a/input/input4 in this case.
Event Hub
... the Android EventHub component reads input events from the kernel by opening the evdev driver associated with each input device ...
In the Android code in the Linux user space the first file to query /dev/input/eventXXX is
the Android Event Hub, which is found in frameworks/base/services/ionput/EventHub.cpp.
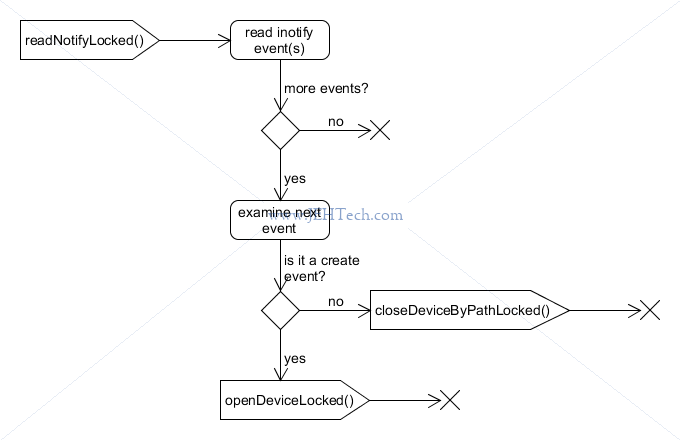
The event hub is compiled using the NDK because it is native C++ code. Compared to the
InputReader it is relatively "simple" and most sets up an epoll
and inotify set to monitor the directory /dev/input to detect additions
and deletions from this directory, and also poll all the files within to receive input events
from the various kernel drivers.
Most of the important work in the event hub happens in the function EventHub::getEvents().
This provides a "container" or "manager", which monitors all the devices, their addition and deletion and
polls for events from them. It stashes all of these events in interal linked lists, as RawEvent
objects, which can then be
emptied into the buffer passed to getEvents(), which is how the InputReader
harvests all the input events from all devices in the system.
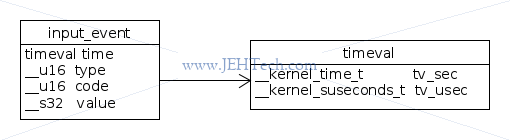
The Android RawEvent objects map to the Linux input_event structure as follows:
RawEvent.type  = input_event.type;
RawEvent.code  = input_event.code;
RawEvent.value = input_event.value;
Other fields that do not correspond to the input_event structure fields are:
deviceId // The device ID
when     // An event time stamp
In earlier versions of Android there where also fields for scanCode and flags
but these have been removed. RawEvent is now, as of Nougat:
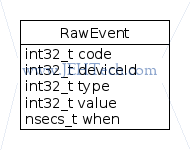
There are 3 special raw event types: DEVICE_ADDED, DEVICE_REMOVED
and FINISHED_DEVICE_SCAN. As the RawEvent type is assigned the
Linux event type, these special types are given values higher than the existing Linux event
types. Values below EventHubInterface::FIRST_SYNTHETIC_EVENT are the Linux event
types and everything else is an Android specific event type (see InputReader::processEventsLocked()).
To keep track of all the devices in the system the event hub maintains three lists as private data members: opening-devices, closing-devices and knwon-devices:
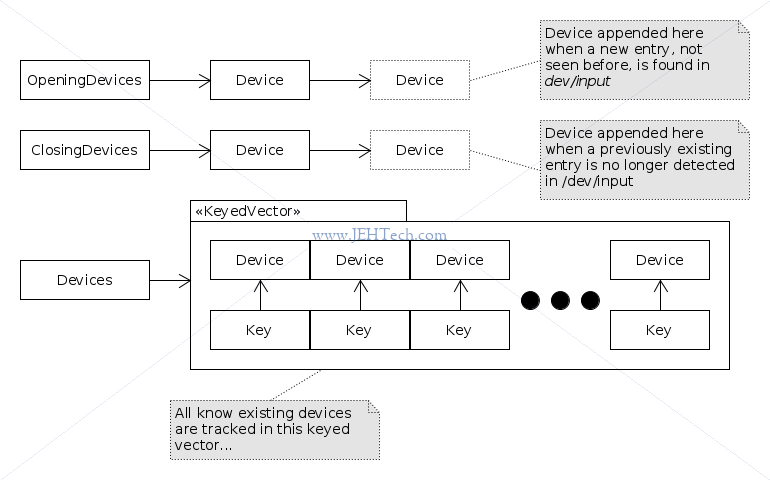
Every time getEvents() is called, as many as possible of the devices in the closing-devices
list are copied into the caller's buffer as raw events and the device deleted from the event hub's closing-devices list.
The same applies to the opening-devices list.
Next the pending events are examined. The events are held in a list (filled in later in the loop) and dequeued one by one until they are all processed or there is no more space in the caller's buffer.
Each event is either a notification that a device has become newly available for read, has been unexpectedly closed or that a "standard" event has occurred.
For standard events, each device, as represented in the event hub's Device structure (keyed vector) is located
via its deviceId.
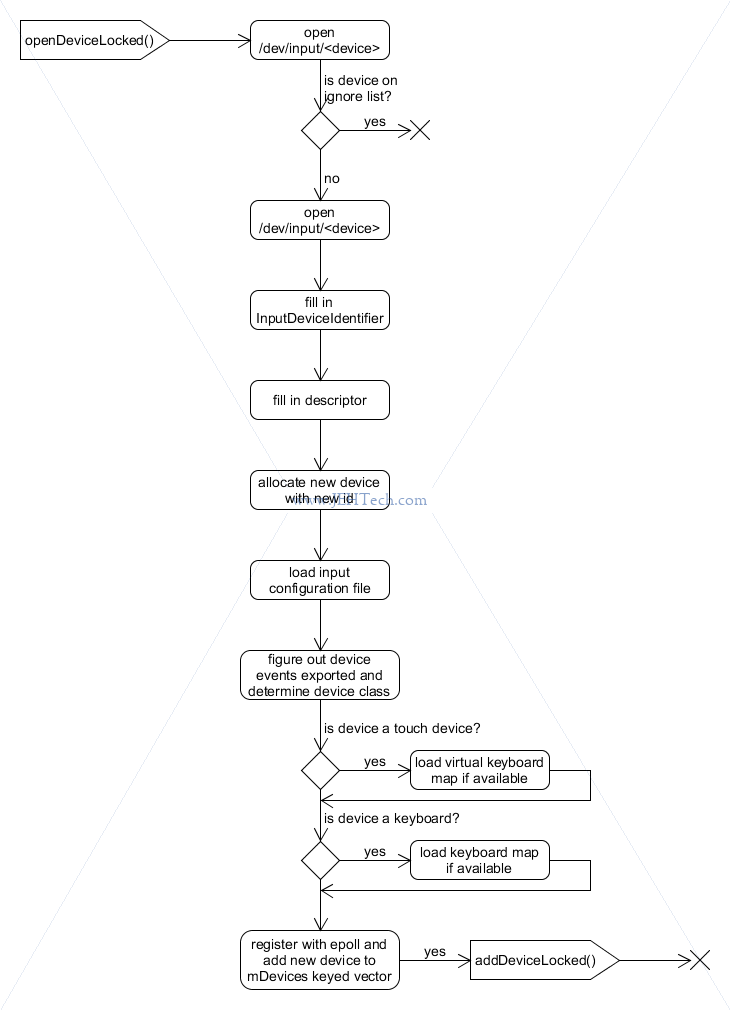
In getEvents() the deviceId is initialised from eventItem.data.u32, when read into the event list,
which was set by the event hub epoll_ctl() command when the device was opened
(see openDeviceLocked()). The deviceId is just a number that is
incremented each time a new device is opened.
Once the device is found, as many as possible of the Linux input_events are read from the device and
each is processed and copied (via conversion from an input_event to a RawEvent)
into the next available space in the caller's input buffer. There is some stuff about overriding the
event's timestamp but I've skipped that detail.
If the device was found but for whatever reason it is no longer available, this is dealt with. This is how the closing-devices list is populated.
Once all events have been processed, if there were any newly available devices detected, these
are dealt with. This is how the opening-devices list is populated (see
openDeviceLocked() via readNotifyLocked).
Otherwise, if the caller's buffer is full, or a device was deleted or added, control is returned, otherwise the function may block waiting for further events. As many events as possible are read into a list which is then, as descibed already, processed on the next loop iteration.
Input Reader
So onto the next component, the InputReader... this is a more complicated class than
the event hub - its almost 6 times larger in terms of LoC! (And the EventHub was complicated enough :-S).
It is here that things like multi-touch events received from the Linux drivers are converted into
MotionEvents etc.
... The Android InputReader component then decodes the input events according to the device class and produces a stream of Android input events. As part of this process, the Linux input protocol event codes are translated into Android event codes according to the input device configuration, keyboard layout files, and various mapping tables ...
The class comments tell us that the ... input reader reads raw event data from the event hub
and processes it into input events that it sends to the input listener ... Most of the work it
does happens on the input reader thread but the InputReader can receive queries from other system
components running on arbitrary threads ...
.
The input reader (also native in C++) starts a thread which continually polls EventHub::getEvents(), which
incidently, will block if there are no events available. The thread works by calling loopOnce().
The loop function is where EventHub::getEvents() is called. It passes in a private buffer which
is filled with as many events (RawEvent objects) from the event hub as possible.
Structure:
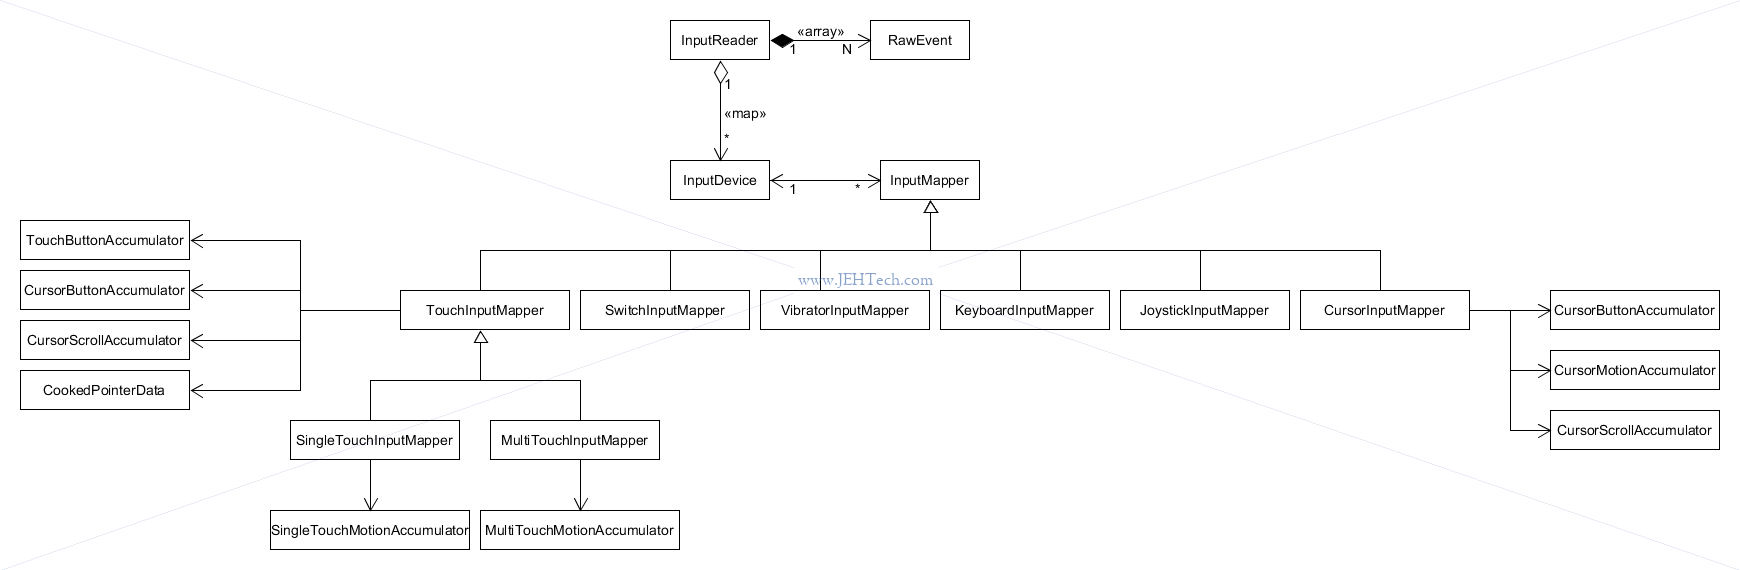
One function of the reader is to aggregate the fine-grained events comming up from Linux. As we saw in the "Using ADB sendevent & getevent" section, just one touch on the mobile devices screen will generate multiple events:
EV_ABS       ABS_MT_TRACKING_ID   00000015
EV_ABS       ABS_MT_POSITION_X    0000055c
EV_ABS       ABS_MT_POSITION_Y    000001e9
EV_ABS       ABS_MT_PRESSURE      00000049
EV_ABS       ABS_MT_TOUCH_MAJOR   00000008
EV_KEY       BTN_TOUCH            DOWN
EV_SYN       SYN_REPORT           00000000
One thing that the InputReader will do is to "accumulate" these events into one event that is then sent on to its listener(s).
Input Dispatcher
... Finally, the InputReader sends input events to the InputDispatcher which forwards them to the appropriate window ...
So, the dispatcher is the guy who sends the events of into the Android input ecosystem. However, the above quote doesn't meantion that there is a policy manager which has first dibs on the events and can instruct the dispatcher as to whether an event should in fact be forwarded. For example, the policy manager may well intercept power button presses.
LocalSocket & LocalServerSocket
Files of interest:
  - frameworks/base/core/java/android/net/LocalServerSocket.java
  - frameworks/base/core/java/android/net/LocalSocket.java
  - frameworks/base/core/java/android/net/LocalSocketAddress.java
  - frameworks/base/core/java/android/net/LocalSocketImpl.java
  - frameworks/base/core/jni/android_net_LocalSocketImpl.cpp
  - libcore/luni/src/main/java/libcore/io/Libcore.java
  - libcore/luni/src/main/java/libcore/io/BlockGuardOs.java
  - system/core/libcutils/socket_local_server.c
  - system/core/libcutils/socket_local_client.c

Both the LocalSocket and LocalServerSocket classes use the LocalSocketImpl to do
their socket operatations.

The LocalSocketImpl class is mostly a wrapper for the JNI cpp module that does the actual linux
API calls. It creates the Input and Output socket stream classes (with some thread saftey gaurantees)
and provides the object methods.

The LocalServerSocket constructor
  - Creates the local socket as a stream socket (done through impl.create)
      - Results in call from impl to Libcore.os.socket(OsConstants.AF_UNIX, osType, 0); This function
        ends up calling os.socket(). What is does is to "tag" the socket created by
        os.socket(). Haven't looked into what this actually means, but the base is a call to
        Java os.socket().
  - Creates a new LocalSocketAddress with the given name
      - This is a thin class that mostly just holds the name as a string
  - Binds the socket to the name (done through impl.bind)
     -  impl.bind() doesn't do much more than call bindLocal() which is a JNI function defined in
        android_net_LocalSocketImpl.cpp (as socket_bind_local()). socket_bind_local() is just
        the JNI code to get the utf8 string from java world into CPP world which is then passed
        to socket_local_server_bind() in socket_local_server.c.
          - This in turn creates the socket using the Linux socket API to create a UNIX domain
            socket (AF_LOCAL) using the abstract name space, which decouples the socket from the
            filesystem. It does this by calling socket_make_sockaddr_un() in socket_local_client.c
            (humph!).
  - Listens on that socket (done through impl.listen)
Security
References
- SELinux concepts, Android docs.
Intro
See the linux section for more details on SELinux.
If you have root access to your phone you can disable SELinux enforcement using the setenforce command.
Kernel Panics
cat /proc/last_kmsg          # device must have CONFIG_ANDROID_RAM enabled in /proc. (newer than deprecated apanic)
cat /proc/last_mcrash             # ???

# The tombstone is simply a file with extra data about the crashed process
cat /data/tombstones/tombstone_01 # replace 01 appropriately.

# enable CONFIG_APANIC and set CONFIG_APANIC_PLABE (oldskool Android)
ls /data/dontpanic                # some devices copy contents of several /proc files here.
/proc/apanic_console              # saved to dontpanic.
/proc/apanic_threads              # saved to dontpanic.

https://stackoverflow.com/questions/18118807/linux-apanic-mechanism-and-difference-from-newer-ram-console-persistent-ram-mech
http://elinux.org/Android_Kernel_Features#RAM_CONSOLE

https://source.android.com/devices/tech/debug/
Firmware
Firmware files will be found in /etc/firmware. When a driver does
a request_firmware() call, the OS will look there for the
filename supplied.
To really see where your system is looking, have a look at system/core/init/devices.c.
In Marshmallow the following snippet is useful:
static const char *firmware_dirs[] = { "/etc/firmware",
                                       "/vendor/firmware",
                                       "/firmware/image" };
So, in actual fact it appears that Android looks in several places... yay.
See the Linux notes for further information on how drivers request firmware files from userspace.