Amazon Web Services (AWS)
Page Contents
Course Notes
These are notes from the Udemy courses AWS Certified Developer - Associate 2020 and AWS Serverless APIs & Apps - A Complete Introduction. They're both great courses, especially Max's one. so give them a go!
Aws Samples
https://github.com/aws-samples
^^
This GitHub page has a load of AWS examples. Really worth a flick through!
	E.g. For deploying PHP, Containers and NGinx:
		https://github.com/aws-samples/eb-docker-nginx-proxy
Iam - Identity Access Management
- See https://d0.awsstatic.com/whitepapers/Security/AWS_Security_Best_Practices.pdf
- For management of users and their access level to AWS console.
- Centralised control of AWS account
- Shared access
- Granular permissions
- Multifactor authentication
- Integrates with AWS services
- Groups - Collection of users with common permission set.
- Roles - Define set of permissions that can be assigned to AWS resources/entities.
Secure way to grant permissions to entities that you trust. Ex, IAM user in another account
or application code running an an EC2 instnace that needs to permorm actions on AWS
resources etc.
E.g.: Give an EC2 instance permissions to write a file to an S3 bucket.
Create role.
Select the service that the role will use - EC2 instance in this example.
Attach the S3 policy of choice, e.g. write access, to the role.
This role can then be applied to any new EC2 instance created.
- Policies - Document that defines >= 1 permissions that can be assigned user, groups, or roles.
For example, a policy could define the read permisison on a dynamoDB table and then read/write
on a specific S3 bucket and so on. Its a collection of permissions of varying specificity.
USERS GROUP POLICY
James --------> Supper Group ----> Eat policy
John -------/ `---> Drink policy
Paul ------/
- In console access under "Security, Identity and Compliance"
- When creating users you will have
- User name
For AWS console login.
- Access key ID
For PROGRAMATIC access. i.e., via CLI, scripts etc.
- Secret Access Key.
For PROGRAMATIC access. i.e., via CLI, scripts etc.
This will only be displayed once. You can download as a CSV if you can keep it securley.
Note, once the secret has been hidden you canNOT access it again. You would have to
generate a new key.
- Password
For AWS console login.
Instance Profiles
-----------------
EC2
---
See https://docs.aws.amazon.com/IAM/latest/UserGuide/id_roles_use_switch-role-ec2_instance-profiles.html
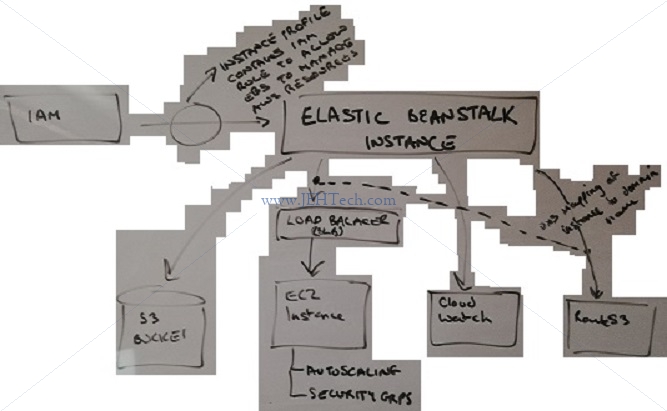
An instance profile is a container for an IAM role that you can use to pass role information to an
EC2 instance when the instance starts ... When you then use the Amazon EC2 console to launch an
instance with an IAM role, you can select a role to associate with the instance.
Elastic Beanstalk
-----------------
See https://docs.aws.amazon.com/elasticbeanstalk/latest/dg/iam-instanceprofile.html
Cognito
--------
USER POOLS: user directories that provide sign-up and sign-in options for your ... app users
... app users can sign in either directly through a user pool, or federate through a
third-party identity provider (IdP) ... After a successful authentication, your ... app
will receive user pool tokens from Amazon Cognito ...
IDENTITY POOLS: provide AWS credentials to grant your users access to other AWS services.
Web Identity Federation
-----------------------
Lets you give your users access to AWS resources after they have successfuly authenticated with a
web-based identity provider like Amazon, FB or Google. After authentication, user gets auth code
from Web ID provider, which they trade for temporary AWS security credentials.
Cognito provides Web Identity Federation with following fetures:
- Sign up and sign in
- Access for guests
- ID broker between app and Web ID providers so no need to write additional code
- Sync user data for multiple devices
Acts as broker handling all interactions with Web ID providers.
E.g. user can login to FB, get an authcode which it exchanges with AWS for a temporary access
credential (which maps to an IAM rolw allowing specific access rights), which it can then use to
access an S3 bucket, for example, or parts of a database or event a website behind an ALB acting as
a reverse authentication proxy.
Cognito User Pools
------------------
- User pools are USER DIRECTORIES used to MANAGE SIGN-UP/IN in functionality for web apps.
- Can sign-in directly to pool or via Web ID provider (FB, Google, Amazon etc).
Successfull auth generates a number of JSON Web Tokens (JWTs)
- Enable creation of unique IDs for users and ability to authenticate users with ID pools.
- APP CLIENT - Is what we use to call the various APIs on our behalf. E.g. API to reg a new
user or sign in an existing etc.
See https://docs.aws.amazon.com/cognito/latest/developerguide/user-pool-settings-client-apps.html
An app is an entity within a user pool that has permission to call unauthenticated APIs
(APIs that do not have an authenticated user), such as APIs to register, sign in, and
handle forgotten passwords. To call these APIs, you need an app client ID and an
optional client secret
In app client settings:
Need to configure an identity provider. Click "Cognito User Pool"
Then configure callback URLs - The URL the user is redirected to after they have
successfull signed in or signed up.
The logout URL will invlidate the access tokens supplied after a successful login.
Cognito JS API
------------------
amazon-cognito-identity-js
SEE: github.com/aws/amazon-cognito-identity-js/
import {CognitoUserPool, CognitoUserAttribute, CognitoUser} from 'amazon-cognito-identity-js';
const POOL_DATA = {
UserPoolId: '...',
ClientId: '...'
};
const userPool = new CognitoUserPool(POOL_DATA);
// On sign up Cognito should be sending the user an email with a confirm-yourself
// code that they can then enter into your site to proove they own that email
// address
signUp(...) {
const user = {
username: ...,
email, ...,
password: ....
};
// Must also add any attributes that were specified in the user pool "attributes"
// section... username and password are default, everything else isnt...
const attrList = [];
const emailAttribute = {
Name: 'email', //< Not I found this needed to be lower case 'e' and NOT 'E'!!
Value: user.email
};
attrList.push(new CognitoUserAttribute(emailAttribute));
userPool.signup(user.username, user.password, attrList, null, (err, result) => {
if (err) { ... }
else { ... }
});
}
confirmUser(username, code) {
...
const userData = {
Username: username,
Pool: userPool, // THe global above
};
const cognitoUser = new CognitoUser(userData);
cognitoUser.confirmRegistration(code, true, (err, result) => {
if (err) { ... }
else { ... }
});
}
signIn(username, password) {
const authData = {
Username: username,
Password: password
};
const authDetails = new AuthenticationDetails(authData);
const userData = {
Username: username,
Pool: userPool
};
const cognitoUser = new CognitoUser(userData);
const that = this;
cognitoUser.authenticateUser(authDetails, ...);
}
To get the authenticated user from the userPool object use
userPool.getCurrentUser();
If no on logged in it returns null. But this is locally authenticated so to reach out
to the back end to check do...
userPool.getCurrentUser()?.getSession((err, session) => {
if(!err && session.isValid()) {
this.http.post(address, data, {
headers: new Headers({'Authorization': session.getIdToken().getJwtToken())
}
)
}
});
To sign out the user do
userPool.getCurrentUser()?.signOut();
Using Tokens:
-------------
SEE: https://docs.aws.amazon.com/cognito/latest/developerguide/amazon-cognito-user-pools-using-tokens-with-identity-providers.html
* The ID token contains claims about the identity of the authenticated user, such as name
and email.
* The Access token contains claims about the authenticated user, a list of the user's groups,
and a list of scopes.
* Use body mapping templates to automatically get the user id from the JWT into your lambda,
for example, rather than trying to decode the JWT in you lambda yourself. I.e., there is no
need to have to use https://github.com/awslabs/aws-support-tools/blob/master/Cognito/decode-verify-jwt/decode-verify-jwt.py.
From https://github.com/aws-amplify/amplify-cli/issues/456
https://stackoverflow.com/a/64341689/1517244
https://stackoverflow.com/a/48544379/1517244
It looks like the ID token should **NOT** be sent to access API end points. Use the access token.
The main reason is that the ID token is not as short lived as the access token and canNOT be
revoked.
Integrating with AWS API Gateway:
---------------------------------
SEE: https://docs.aws.amazon.com/apigateway/latest/developerguide/apigateway-integrate-with-cognito.html
Under your-api > you-end-point > authorizers > Create > Create Cognito User Pool Authorizer
Once authorizer is created can go back to HTTP Method Request part of the API gateway, and change
authorization to your cognito user pool authorizer.
You have to do that for all the other options except the OPTIONS pre-flight request end point.
NOTE: In the body mapping template: you cannot use $context.authorizer.principleId with cognito.
You MUST USE $context.authorizer.claims.sub. This is the userId.
The use poll *has* to be called COGNITO_USER_POOLS for it to appear in Method Request tab.
For Token source, type Authorization as the header name to pass the identity or access token that's
returned by Amazon Cognito when a user signs in successfully.
Lambdas
See https://aws.amazon.com/lambda/faqs

EC2 launced in 2006. At time of writing it is 14 years old! Infrastructure as a service!

Serverless means you don't need to control the server, you don't need to provision the hardware or
worry about the OS its running - its no longer something you need to worry about. Also don't have to
worry about scaling and response to load and keeping them running etc.

Lambda allows you to use your code without any need to provision servers, install software, deploy
containers or worry about any low level details and can parallelize code. All this is taken care of
for you. E.g. Alexa is using Lambdas every time you make an Alexa query.

So, don't need any EC2 instances, and EBS instances etc etc - THERE IS NOTHING TO MANAGE!

Use:
	- Event driven compute service - AWS Lambda runs code in response to events, e.g. changes to
		data in S2 bucket or DynamoDB table.
	- Compute service - run code in response to HTTP requests using Amazon API gateway or API calls
		made using AWS SDKs. This can be massively parallel - many requests launch many Lambdas,
		which all use the same code but represent difference request instances with associated
		data etc.

		Each AWS Lambda function runs in its own isolated environment, with its own resources and
		file system view. AWS Lambda uses the same techniques as Amazon EC2 to provide security and
		separation at the infrastructure and execution levels.

AWS Lambda natively supports Java, Go, PowerShell, Node.js, C#, Python, and Ruby code, and provides
a Runtime API which allows you to use any additional programming languages to author your functions.

Priced on #requires and duration.


Configure A Lambda Function
---------------------------

- Click - Services > Compute > Lambda > Create Lambda Function.
- Create from scratch - Add name and platform. If you've not used Lambda before will need to create
  a new role to give Lambda permission to execute. Use policy "Simple Microservice Permissions".
- Click "Create function" .
- Paste in your Lambda code.
- Add your trigger... can be sooo many things: including but no where near limited to API Gateway,
  CloudFront, S3, DynamoDB, and more...
-
- TODO COMPLETE ME!


Lambda Re-use
--------------
SEE: https://aws.amazon.com/blogs/compute/container-reuse-in-lambda/
Api Gateway
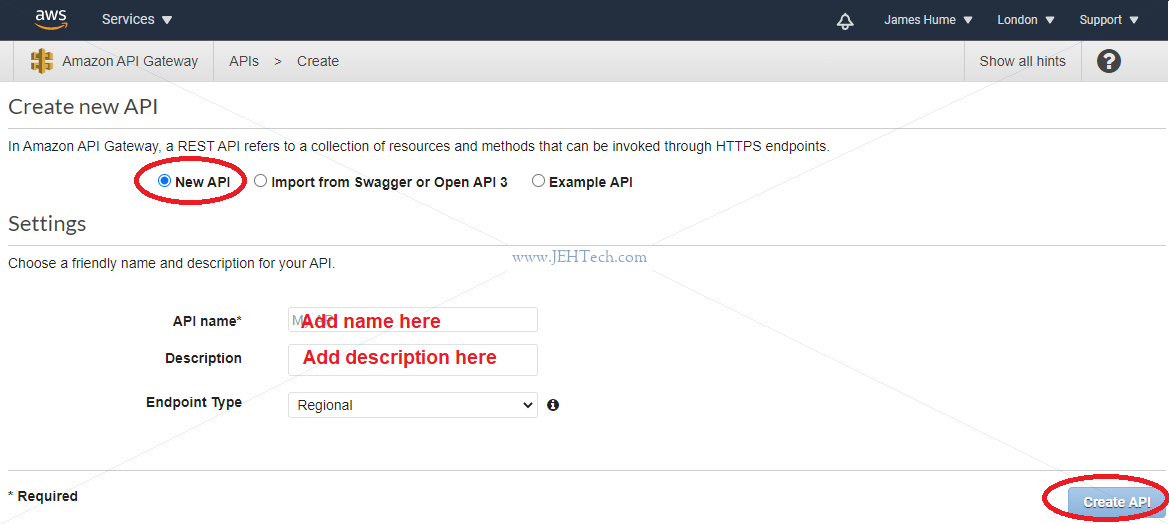
https://docs.aws.amazon.com/apigateway/latest/developerguide/welcome.html

Use API Gateway to create RESTful APIs endpoints. These are services your web app etc need from a
backend server. For example, a login management endpoint. This could be implemented using your
own server, or a server running on an EC2 instance. But why bother managing your own service?! Lets
AWS do that fo you and instead just give you some end point URLs and things that can happen based
on someone accessing them!

So, API Gateway gives you an end point URL to use. You get to say what happends when the end point
is accessed: use another AWS service or run a Lambda.

See:
	https://aws.amazon.com/api-gateway/
	https://aws.amazon.com/documentation/apigateway/

Watch out for costs!!
	https://aws.amazon.com/api-gateway/pricing/
	Free tier (as seen on 03-Oct-2020):
		The Amazon API Gateway free tier includes one million API calls received for REST APIs, one
		million API calls received for HTTP APIs, and one million messages and 750,000 connection
		minutes for WebSocket APIs per month for up to 12 months.

Amazon API Gateway - fully managed service - publish APIs at any scale to act as "front door" for
apps to access data etc from back-end services, such as apps on EC2 instances, code on Lambdas etc.

- Expose HTTPS endpoints to define a RESTful API
	API gateway gives us a HTTPS address to make API calls to, and then configure how the API
	responds to those calls - e.g. get data from a DynamoDB or fire off a Lambda etc etc to
	return the response.
- Lets you serverless-ly connect to services like Lambda & DynamoDB.
- Can send each API endpoint to a different target.
- Run efficiently with low cost & scales effortlessly.
- Can track and control usage with API key.
- Can throttle requests to prevent attacks.
- Can maintain multiple versions of your API

How to configure?
	- Define an API (container)
	- Define Resources and nested Resources (URL paths)
	- For each resource:
		- Select supported HTTP methods, POST, GET etc etc
		- Set security
		- Choose target- EC2 Lambda etc
			- Set resquest & response transformations
	- Deploy API to a Stage
		- Use APU Gateway domain by default but you can use your own to hide the fact its AWS
		- !!!Supports AWS Certificate Manager: free SSL/TLS certs!!! WOO!!!


API Caching In API Gateway: can enable API caching. Caches enpoint's response to reduce # calls to
endpoint for repeated requests. Also improves latency.

Need to be aware of XSS and CORS


Example:
--------
Choose the REST API type.
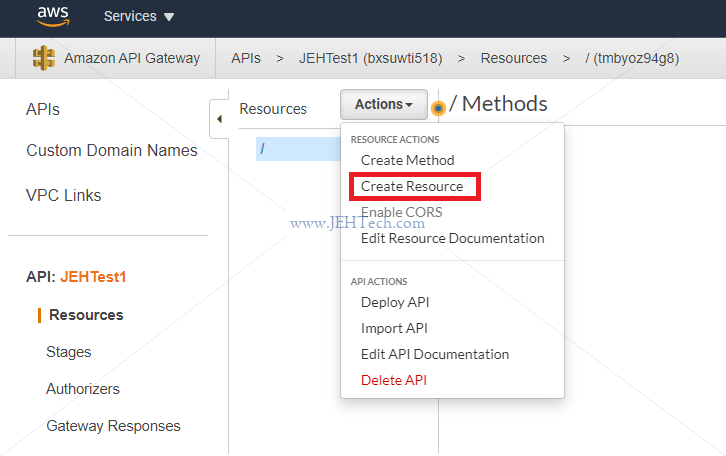
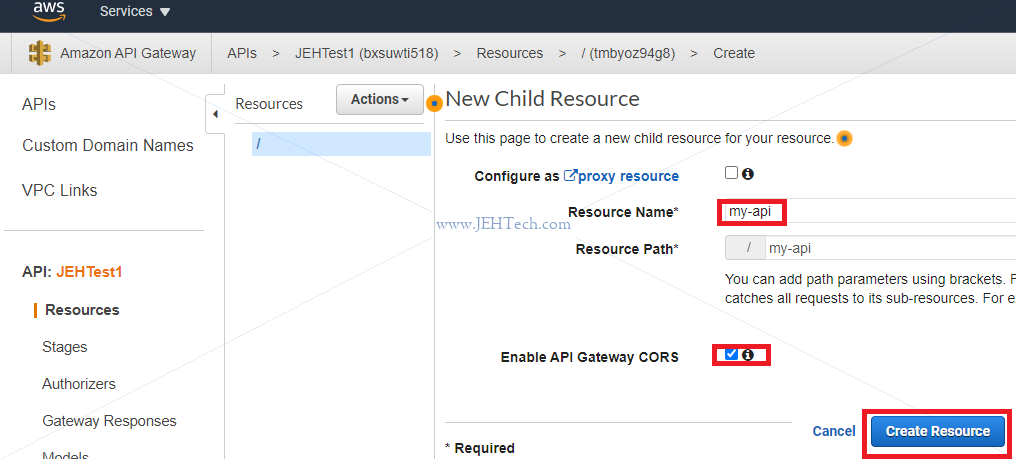
Now you can define the resources you are doing to use and the HTTP methods we want to react to.

Create a resource, which is like a URL SEGMENT, like so:
You can select to enable Cross-Origin Resource Sharing (CORS). CORS is a mechanism that uses additional
HTTP headers to tell browsers to give a web application running at one origin, access to selected
resources from a different origin.
	See: https://developer.mozilla.org/en-US/docs/Web/HTTP/CORS

#
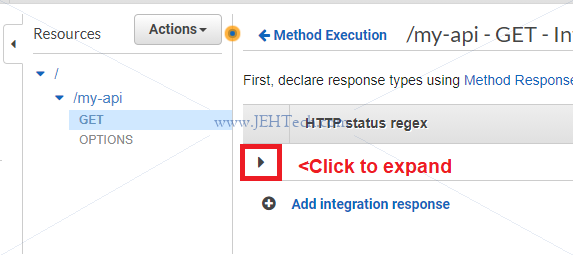
Now we have created a URL segment, which is a resource. It can't be used, however, until the
requests that it should handle are defined. To do this, select the end point resource and then
from the actions menu select "Create Method". Then you can define which HTTP method you want the
resource to respond to (ANY, DELETE, PUT, PUSH, GET etc etc). E.g if a GET method was created:

#
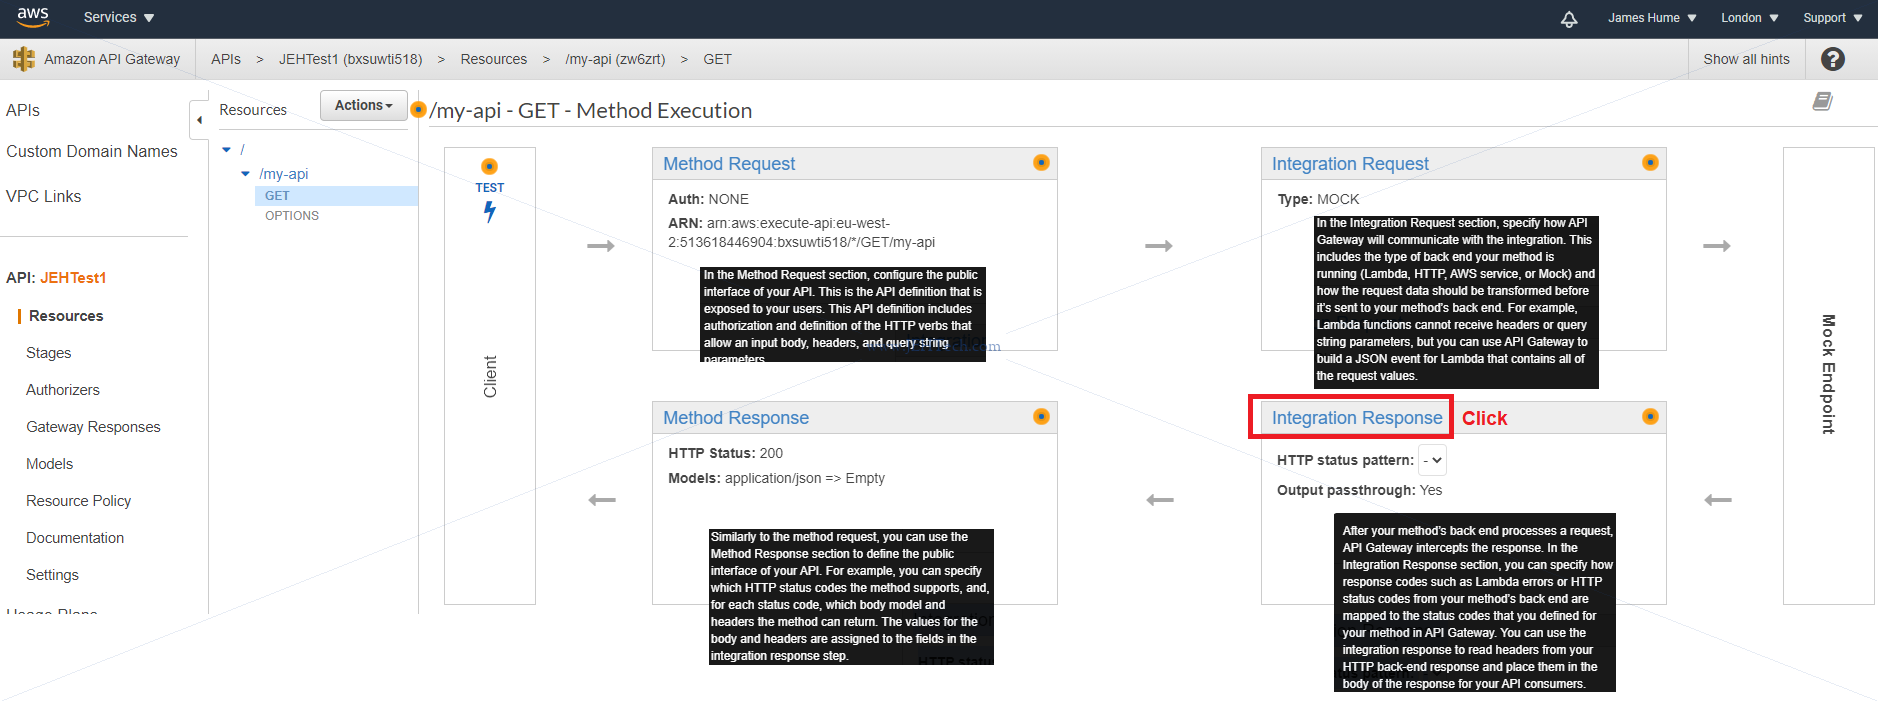
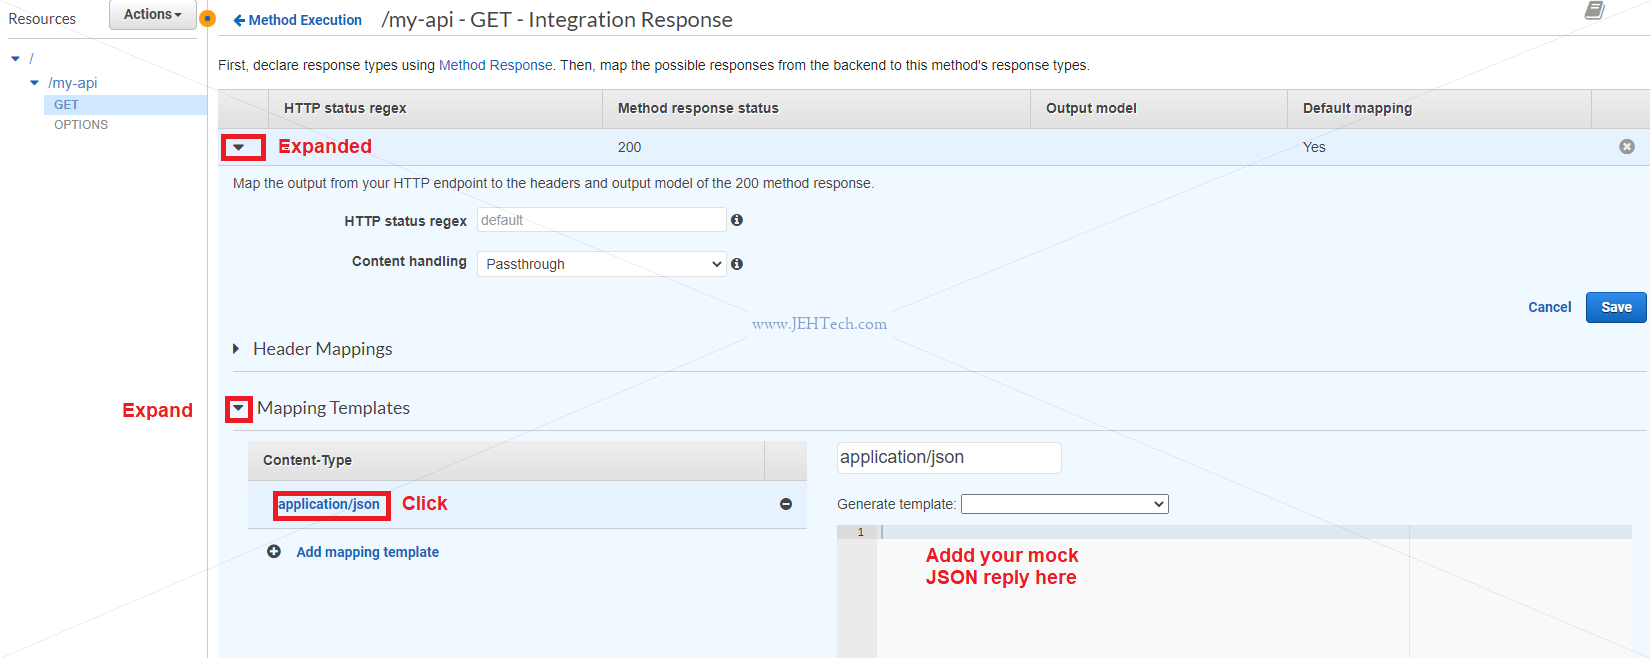
A mock will allow you to create a dummy response.
If you create a mock you can use the integration response to return dummy data.
Add some dummy response data like this:
Next goto ACTIONS > DEPLOY API. It will then ask you to deply your API. You can deploy to an
existing or new stage. Stages allow management of different versions of the API, e.g. dev v.s.
production versions.

Whats in resources isn't live - To make it live you must select "Deploy API"
When deploying must select stage. What is a stage? It is a deployed snapshot of the API.
Authorizers - add guards to the API so only authenticated users can access it
Models - define the shape of the data you work with in your API - its is optional
	define how JSON data you receive should be shaped and validate against it
Binary support - send files to your end points


Request response cycle:
-----------------------
	End-point is resource (the path) and the type of method (GET/POST etc)
	- Method request - *** GATEKEEPER ***
		- How requests reaching the end point should look like.
		- It is a gate keeper. We can reject requests if they don't match a schema
		- E.g. can setup authorization
		- E.g. can validate -do the query parameters match what we expect?
			- Done by adding to "URL Query String Parameters" section with with the "Request Validator"
			  set to "Validate query string parameters and headers".
	- Integration request
		- Optionally map/transform incoming data (headers, meta, body etc) into the
		  shape that we want to use it in the end point it will reach
		- And... trigger the end point
		- When configured as a PROXY it forwards the *entire* request data to the
		  endpoint, so for a Lambda, for ex, the event parameter holds the entire
		  request data - headers body etc, whereas, when not a proxy the event object
		  would hold the request body only.
	- Integration response.
		- Triggered when the end point action is done
		- Optionally map/transfer outgoing data into a shape the client should receive.
		- Can assign values to permitted headers allowed in "Method response"
	- Method response
		- Defines the shape the response should have.
		- E.g. specify the headers a response can have etc.
		- Never blocks a response
		- If headers are not permitted/added in method response they cannot be used
		  in the integration response.


When creating a new resource:
-----------------------------
	- Proxy resource - means it is a catch *all* resource. Catches all other paths and
	  methods.
		- E.g. Run express app on a lambda function and fwd all requests to it and
		 let it do the handling. Full stack app with serverless approach.

	- Enable API Gateway CORS. Configure endpoint to send back correct CORS headers.
	  CORS - Cross Original Resource Sharing. Not allowed to access resources on a
	  server from another server. E..g server our app on A and try to access an API
 	  on B - default CORS means we can't do this. B must send response server to the
	  browser so that the browser doesn't stop this access.
		- Modern browsers send pre-flight requests except for GET to check if the
		  resource is available and *allowed*.
		- This extra request will hit your API of type OPTIONS and you must handle
		  it - you need an OPTION endpoint that will return the correct headers to
		  the browser.
		- Note both the pre-flight OPTIONS and the request, PUT, POST etc must also
		  send the correct CORS headers back to the client.
	- Note tests via the console will not report CORS errors. There must be a fully web
	  based test.
	- Remember to enable CORS for preflight but also to add headers to your normal
	  endpoint methods, for ex:
		Access-Control-Allow-Headers: 'Content-Type,Authorization,X-Amz-Date,X-Api-Key,X-Amz-Security-Token'
		Access-Control-Allow-Methods: 'DELETE,GET,HEAD,OPTIONS,PATCH,POST,PUT'
		Access-Control-Allow-Origin: '*'
	  BUT THE EASIEST WAY IS TO SELECT `ACTIONS > ENABLE CORS` in the console as this
	  will add the headers to all endpoints automatically for us.

	  SECURITY: Generally not the best idea to use '*' if you can avoid it!


Setting up APIs:
----------------
	Lambda proxy integration - move the logic of the integration and method response
		into your lambda function. Normally don't need this.


Body mapping templates:
-----------------------
	Extract data from the request and pass it to lambda in a different representation.
	For ex, take the request body and only pass a subset of it, perhaps extracting only
	a grandchild of a specific node etc and so giving the lambda ONLY THE INFO IT NEEDS
	so that the Lambda doesn't have to care about the specific format of the request
	body - the body mapping template is an ADAPTOR.

	Body mapping template language defined by Amazon, which uses the Apache Velocity Language
		https://docs.aws.amazon.com/apigateway/latest/developerguide/api-gateway-mapping-template-reference.html

	eg. If request body is a JSON object { a: { b: { c: 123 }, d: 123 } }, then to give the
	Lambda an event object of {c : 123} the body mapping template becomes:
		{ "c": $input.json('$.a.b.c') }
	Lambda can now use `event.c` to get the value 123.
		- $input is a reserved variable, provided by AWS which gives you access to the
		  input payload (request body, params, headers) of your request.
		- $ stands for the request body as a whole.
		- Wrap $input.json() in quotes to convert to string

	Even more usefully, the body mapping template can be used to get the user id from a cognito JWT
	from the authorizer and inject it into the event data:
		{
			...
			"userId": "$context.authorizer.claims.sub"
			...
		}
	This will save you having to try to decode JWTs yourself.


Map response data:
------------------
	Does the same as body mapping template but for the response data. Now the variables
	like $input refer to the data the endpoint passed back and $ stands for the body
	of the data.


Validate Requests With Models:
------------------------------
	https://docs.aws.amazon.com/apigateway/latest/developerguide/api-gateway-method-request-validation.html#api-gateway-request-validation-basic-definitions
	API Gateway can perform the basic validation. This enables you, the API developer, to focus on
	app-specific deep validation in the backend. For the basic validation, API Gateway verifies
	either or both of the following conditions:
	- The required request parameters in the URI, query string, and headers of an incoming request
	  are included and non-blank.
	- The applicable request payload adheres to the configured JSON schema request model of the
	  method.

	https://docs.aws.amazon.com/apigateway/latest/developerguide/models-mappings.html
	https://json-schema.org/understanding-json-schema/index.html


Routing Lambda function errors to API Gateway HTTP responses
------------------------------------------------------------
SEE: https://aws.amazon.com/blogs/compute/error-handling-patterns-in-amazon-api-gateway-and-aws-lambda/
SEE: https://docs.aws.amazon.com/apigateway/latest/developerguide/handle-errors-in-lambda-integration.html

- In Lambda, function error messages are always surfaced in the “errorMessage” field in the response.
      def lambda_handler(event, context):
          raise Exception('[BadRequest] Some kind of input validation failure')
  The routing of Lambda function errors to HTTP responses in API Gateway is achieved by pattern
  matching against this “errorMessage” field in the Lambda response. Add the regex as so to the
  integration response:
      Selection pattern: “^\[BadRequest\].*”
- The Lambda function must exit with an error in order for the response pattern to be evaluated.


Variable resource names
-----------------------
	Create a (child) resource as per normal but instead of using a name, enclose the name
	in CURLEY BRACES.
		e.g. create /myapp/{blah}

	In the Lambda we want to know what {blah} represents. E.g. if the user calls
	/myapp/james, we want to know that blah == james.

	To do this must set up a body mapping. (Btw, a GET has no body in the
	request but the body mapping can still create this).
		use $input.params() function
	Out body mapping tempalte would become
		{
			"my_variable_name" : "$input.params("blah")"
		}
	Not enclosed $input.params(...) in quotes to make it a string in this case


Customer Authorizer
-------------------
In the Method request (GATEKEEPER) you can create a customer authorizer, as opposed to using the
more out-of-the-box cognito functionality.

The authorizer is given enough info to decide whether the user is valid and must return a
temporary IAM policy { "Effect": "Allow", "Action": "execute-api" } and a user ID, called a
"Principal user ID". Can also return an optional context object { ...any data you like... }.

To create authorizer: Lambda Console > Create New Function > Blank function (no trigger)

The Lambda receives an *identity token*. The default location of this token is in the header
of the request - in the authorization header.
	From https://developer.mozilla.org/en-US/docs/Web/HTTP/Headers/Authorization)
		The HTTP Authorization request header contains the credentials to authenticate a user agent
		with a server, usually, but not necessarily, after the server has responded with a 401
		Unauthorized status
		...
		Syntax:
			Authorization: <type> <credentials>

See also: https://developer.mozilla.org/en-US/docs/Web/HTTP/Authentication
See also:https://docs.aws.amazon.com/apigateway/latest/developerguide/apigateway-use-lambda-authorizer.html

The security token is found in `event.authorizationToken` and is provided by the API gateway.


Lambdas With API Gateway
- - - - - - - - - - - - -
SEE: https://docs.aws.amazon.com/lambda/latest/dg/services-apigateway.html
SEE: https://docs.aws.amazon.com/lambda/latest/dg/services-apigateway-tutorial.html

A Lambda integration maps a path and HTTP method combination to a Lambda function.


Debug With CloudWatch
- - - - - - - - - - -
SEE: https://aws.amazon.com/premiumsupport/knowledge-center/api-gateway-cloudwatch-logs/


Serverless Framework
--------------------
SEE: https://serverless.com/
     https://serverless.com/framework/docs/providers/aws/guide/quick-start/
     https://serverless.com/framework/docs/providers/aws/guide/credentials/

This framework can simplify setting up an API gateway/Lambda/etc combination. The alternative would
be to write your own AWS cloudformation stuff, or use SAM (see below). It looks like its basically
a slightly easier to user wrapper (might not be a wrapper, just looks like it) around cloudformation...

TEST LOCALLY using https://github.com/dherault/serverless-offline

Serverless Application Models (SAM)
-----------------------------------
SEE: https://github.com/awslabs/serverless-application-model
     https://github.com/awslabs/serverless-application-model/blob/master/HOWTO.md
     http://docs.aws.amazon.com/lambda/latest/dg/deploying-lambda-apps.html

The official AWS answer to the Serverless Framework app talked about above.
Builds upon cloudformation.


LOCAL STACK - Test Locally Before Deploying
-------------------------------------------
See Atlassian's localstack: https://github.com/localstack/localstack
                            https://localstack.cloud/

> LocalStack provides an easy-to-use test/mocking framework for developing Cloud applications. It
> spins up a testing environment on your local machine that provides the same functionality and APIs
> as the real AWS cloud environment.
Simple Serverless Website Using Route53, Api Gateway, Lambda And S3
Domain name in Route53 and bucket name need to be the same. They MUST BE THE SAME (toplevel exluding
the .com).

Must enable static website hosting for bucket.

If you don't want to spend money on AWS domain you can just use the S3 bucket address,

Steps:
1. In the Bucket name list, choose the bucket that you want to use for your static website.
   1.1. Choose Properties.
   1.2. Choose Static website hosting.
   1.3. Choose "Use this bucket to host a website".
   1.4. Note down the end point. E.g. my last endpint was
        Endpoint : http://epicplanner.jehtech.com.s3-website.eu-west-2.amazonaws.com
2. Edit block public access settings
   2.1 Choose the Permissions tab, and edit,
	 2.2 Clear Block all public access, and choose Save -- anyone on the internet can access
	     your bucket!!
3. Add Bucket Policy: To make the objects in your bucket publicly readable, you must write a bucket
   policy that grants everyone s3:GetObject permission.
	 3.1 Choose "Bucket Policy" under "Permissions" tab for your S3 bucket,
	 3.2 Add the following:
	     {
        "Version": "2012-10-17",
        "Statement": [
            {
                "Sid": "PublicReadGetObject",
                "Effect": "Allow",
                "Principal": "*",
                "Action": [
                    "s3:GetObject"
                ],
                "Resource": [
                    "arn:aws:s3:::example.com/*" << PUT YOUR S3 BUCKET ARN HERE
                ]
            }
        ]
       }
4. (Optional) Add Route53 entry for your domain to point to S3 endpoint.
Forward And Reverse Proxies
Ref: https://www.cloudflare.com/learning/cdn/glossary/reverse-proxy/

Forward Proxy
-------------
TL;DR: A forward proxy sits in front of a client/clients and ensures that no origin server ever
communicates directly with that specific client / those clients.

Standard Internet communication: A reaches out directly to computer C, with the client sending
	requests to the origin server and the origin server responding to the client.

With fwd proxy: A sends requests to B (proxy), which forwards the request to C (origin server). C
	will then send a response to B, which will forward the response back to A.

Why?
	- Avoid state or instituational browsing restrictions
		Connect to proxy rather than desired illegal site.
	- Block access to certain content
		Proxy intercepts all traffic so can deny some requests.
	- Protect online identity
		Servers see the proxy's IP, not the clients.


Reverse Proxy
-------------
TL;DR: Sits in front of web server(s), intercepting client requests.

A reverse proxy sits in front of an origin server and ensures that no client ever communicates
directly with that origin server.

With rev proxy: A sends comms to reverse proxy, B. B then sends request to server C, which replies
	to B, which B forwards back on to A.

Why?
	- Load balancing.
		Proxy can forward client requests on to one server from a pool. To client it looks like
		talking to one server, when it could be one of many.
	- Security.
		Server IP is never revelated. Harder to attack it therefore. Reverse proxy generally has
		higher security and better resource to fend off attack.
	- Caching.
		Reverse proxy can cache frequenty requested content.
	- TLS/SSL encryption.
		If origin server is low resouce or doesn't support encryption reverse-proxy can do this on
		the server's behalg.
Elastic Compute Cloud (Ec2)
Stands for Elastic Compute Cloud, abreviated to EC2.
Web service providing resizeable compute capacity in the cloud. Virtual machines in a cloud.
Pay only for capacity you use - don't have to (over) provision your own kit.
Isolate from common failure scenarious.


EC2 Options
-----------
	- On demand - fixed rate per hour/second with no commitment, no upfront payment. Good for app dev
		or apps with short term, spiky, unpredictable workloads that cannot be interrupted.
	- Reserved - capacity reservation - pay up front. Good discounts on hourly charge for an instance.
		One to three year term.
		Apps with steady state or predictable usage.
	- Spot - Allows bidding
		Apps that have very flexible start and end times
		For apps that are only feasible at very low compute prices.
		E.g. use compute during off-peak times for cheaper compute cost.
	- Dedicated hosts - Physical EC2 server for your use only.
		Regulatory requirements that do not alow multi-tenant virtulization
		Licensing which does not support multi-tenancy.


EC2 Instance Types
-------------------
	There are different "families" of instance types that provide optimisations for specific
	requirements like hight speed storage, or memory space, or compute power etc.

	Families include.
		FPGA, High Speed Storage, Graphics Intesive, High Disk Througput, Low Cost,
		Dense Storage, Memory Optimized, General Purpose, Compute optimize, GPU etc.

	You will mostly use - T2 = Lowest cost, general purpose - Web Servers and Small DBs


Elastic Block Store (EBS)
-------------------------
	EBS allows you to create storage volumes and attach them to Amazon EC2 instances.
	Once attched, can create FS on top of these volumes, run DBs etc etc.
	Protect you from failure of single component.

	Types: General Purpose SSD (GP2),  Provisioned OPS SSD(IO1), Throughput Optimized HDD (ST1)
	       Cold HDD (SC1).


Elastic Load Balancer (ELB)
---------------------------
See https://docs.aws.amazon.com/elasticloadbalancing/latest/userguide/load-balancer-getting-started.html

	Types Of Load Balancers
		- Application Load Balancer.
			OSI Layer 7. Can make very clever decisions based on application level logic.
			Application Load Blancers are best suited for load balancing of HTTP and HTTPS
			traffic. They operate at Lyer 7 and are application-aware. They are intelligent,
			and you can create advanced request routing, sending specified requests to
			specific web servers.
			For setup see: https://docs.aws.amazon.com/elasticbeanstalk/latest/dg/environments-cfg-alb.html
			For authentication see: https://aws.amazon.com/blogs/aws/built-in-authentication-in-alb/
		- Network Load Balancer.
			Most expensive option. Works at OSI layer 4 (surely 3?!). Fast performance!
			Best suited for load balancing of TCP traffic where extreme performance is required.
			Operating at the connection level (Layer 4 - which I think is the transport layer
			not the network layer, need to double check that), network Load Balancers are
			capable of halding millioos of requests per secon, while maintaining ultra-low
			latencies. use for EXTREME PERFORANCE.
		- Classic Load Balancer (ELB)
			No longer recommended. Lagacy!
			Legacy Elastic Load Blanacers. Can ballance layer 7 or 4, but layer 7 is not as
			intelligent as application load balancer.
			If your app stops responding ELB returns a 504 error.

	The load balancer is an extra layer that will "hide" the public IP address of the entity accessing
	your server. To get the public IP look in the "X-Forwarded-For" header to see the public IP addr.

	To create a load balancer go back to your EC2 instance and select, in the left hand menu
	pane, LOAD BALANCING > Load Balancers. Then click the "Create Load Balancer Button". Create the
	HTTP(S) balancer.
		Assign a security group.
		Configure Routing.
			Create new target group on HTTP port 80.
			Add /index.html as the health check item.
		Register targets
		Review
		Create

Can config ELB to terminate HTTPS connections and deliver messages to backend of HTTP. ELB will
handle encrypt/decrypt.
	- See https://aws.amazon.com/blogs/aws/elastic-load-balancer-support-for-ssl-termination/
	- Upload certificate to AWS account using the AWS Management Console or the
	  `iam-servercertupload` command, then retrieve the ID of the uploaded certificate.
	- Create new load balancer which includes an HTTPS listener, and supply the certificate ID
	  from prev step.

ELBs can also act as AUTHENTICATING REVERSE PROXIES!
	See https://aws.amazon.com/blogs/aws/built-in-authentication-in-alb/
	ALB can now securely authenticate users as they access applications, letting developers
	eliminate the code they have to write to support authentication and offload the responsibility
	of authentication from the backend

	MUST USE AN APPLICATION LOAD BALANCER. At time of writing when creating a load balancer
	classic seems to be the default option.

	To setup an ALB see:
		https://docs.aws.amazon.com/elasticbeanstalk/latest/dg/environments-cfg-alb.html

	Happy, happy days :D


DNS Refresher
-------------
See: http://social.dnsmadeeasy.com/wp-content/uploads/2016/12/DNS-for-Dummies-ebook-3-min.pdf
     https://ns1.com/resources/cname

Fully Qualified Domain Name (FQDN) - Domain name has both a HOSTNAME AND DOMAINNAME
	For example, accessing a server called bob we might goto "bob.my-buiness-name.com". Bob is
	the hostname and my-buiness-name.com is the domain name.

DNS request:
	1. Contact ROOT NAME SERVERS (see http://www.iana.org/domains/root/servers) and get the address
		of the top level domain (TLD) server. So in the bob example we get the COM TLD server
		address.
	2. Next contact the COM TLD server(s) to get the name server responsible for "my-buiness-name".
	3. Next conatact the name server for the address of the hose "bob".

Two types of DNS servers:
	1. Authoritative
		Do the actual name -> IP address mapping.
	2. Recursive (or Caching):
		Contacted by clients and do the work of the DNS lookup by talking to authoritative servers.
		They recurse throught the DNS name hierachy to resolve the address for the client.

DOMAIN REGISTRAR - service through which you register a domain name and map an IP address to it.
	Domain registrar deals with registry operators who deal with master domain lists - overall
	managed by IANA.

	So, if I register "bob.my-buiness-name.com" the registrar will contact a registry operator,
	which is overseen by IANA, and adds the name "bob.my-buiness-name.com" to the global list of
	all domain names (ensuring, of course, that it isn't already registered!).

	That's all the registrar does.

DNS HOSTING PROVIDER - hosts the servers that authoritatively respond to your domain. So,
	a registrar might have registered "bob.my-buiness-name.com" for me, but it is the DNS hosting
	provider that has a server that when queried will respond with the IP address for my host!

Sometimes a domain registrar will offer DNS hosting and vice versa, but the 2 functions are separate


Your DNS hosting provider has to know, when x.y.z is accessed, what the IP address it should map to
is. For this is uses something called an "A record". If you own x.y.z, you create, in your hosting
providers map of x.z.y an "A record" and fill it with your server's IP address.

You can also setup aliases. If for x.y.z you setuup a "CNAME record", you can specificy that when
x.y.z is resolved by your DHS hosting provider that it should re-direct the querier to another
url instead.
		A Canonical Name (CNAME) Record is used in the Domain Name System (DNS) to create an alias
		from one domain name to another domain name.
		A common example is the www subdomain which is provided as an alias to the root domain
		name - users accessing "www.example.com" are referred to the root domain (or DNS zone apex)
		"example.com".

		For example, to map www.example.com to zone-apex, example.com, the record might look like:
			www.example.com. CNAME example.com.
			example.com. A 192.162.100.100

		DNS Resolution Process for CNAME Records
				- A DNS client (such as a browser or network device) requests the address
				  www.example.com, and a DNS request is created.
				- A DNS resolver receives the request and finds the Authoritative Name Server that
				  holds the DNS Zone file with DNS records for the "example.com" domain.
				- The DNS request is resolved and the CNAME record is returned to the client.
				- The client understands www.example.com is only an alias for the real address,
				  "example.com", and issues a new DNS query for "example.com"
				- The process is repeated and the resolver returns the A record for "example.com",
				  containing the IP address.
				- The DNS client now connects to “example.com” using its IP address.


Route53
-------
	- Amazon's DNS service
	- Allows mapping of domain names to EC2 instances, load balancers and S3 buckets.

	- Log into AWS console, then Services > Network > Route 53
	- Click Domains > Registered domains
		Click "Register Domain". Select a domain and choose a name. Add it to your cart and
		click "Continue"
	- Fill in registrant information
	- Domain registration can take up to 3 days to complete.

	- Click Dashboard > "hosted zones"
		Should see our registers domains.
		Click "Goto record sets" to create our DNS records.
			Create "A" record. Says where you're domain is going to go.
				There are lots of record set type you can choose. An "A" record points to an
				IPv4 address, and "AAAA" record points to an IPv6 address etc.

				Create a type "A" record set. Use the NAKED DOMAIN NAME - that is the name without
				the "www." prefix. This is also sometimes refered to as the "zone apex record". In
				order to do this HAVE TO USE AN ALIAS. You create an alias for the zone apex. Aliases
				are only supported by DNS record types A and AAAA.

				Pick the alias target - it can be for an S3 website, an ELB website, Elastic
				Beanstalk, CloudFront etc.

				This is why we needed to setup the ELB... doesn't seem to support directly using an
				EC2 instance. Thus MUST CREATE ELB THEN PUT AN EC2 INSTANCE BEHIND THE ELB.

				Select your ELB from the target list and hit create :)

		From Wikipedia:
			A Canonical Name record (abbreviated as CNAME record) is a type of resource record in
			the Domain Name System (DNS) which maps one domain name (an alias) to another
			(the canonical name).[1]
			...
			Also referred to as a CNAME record, a record in a DNS database that indicates the true,
			or canonical, host name of a computer that its aliases are associated with.
			...
			When referring to IP addressing, canonical means the authoritative host name stored in
			a DNS database that all of an IP address' aliases resolve to.

		From AWS Certified Solutions Architect Practive Tests Book:
			A zone apex record is a DNA record at the root, or apex, of a DNS zone. So amazon.com
			is an apex record (sometimes called a naked domain record).

		From NS1.com:
			DNS servers create a DNS record to provide important information about a domain or
			hostname, particularly its current IP address. The most common DNS record types are:
				- Address mapping record (A Record) - a.k.a DNS host record, stores hostname and its
				  corresponding IP4 address
				- IP Version 6 Address record (AAAA Record) - stores a hostname and its corresponding
				  IPv6 address.
				- Canonical Name record (CNAME Record) - can be used to alias a hostname to another
				  hostname. When a DNS client requests a record that contains a CNAME, which points
				  to another hostname, the DNS resolution process is repeated with the new hostname.
				- Mail exchanger record (MX Record) - specifies an SMTP email server for the domain,
				  used to route outgoing emails to an email server.
				- Name Server records (NS Record) - specifies that a DNS Zone, such as "example.com"
				  is delegated to a specific Authoritative Name Server, and provides the address of
				  the name server.
				- Reverse-lookup Pointer records (PTR Record) - allows a DNS resolver to provide an
				  IP address and receive a hostname (reverse DNS lookup).
				...
				...


This can prove convenient when running multiple services (like an FTP server and a web server, each
running on different ports) from a single IP address. One can, for example, point ftp.example.com
and www.example.com to the DNS entry for example.com, which in turn has an A record which points to
the IP address. Then, if the IP address ever changes, one only has to record the change in one place
within the network: in the DNS A record for example.com.


Setup Simple Webserver
-----------------------
	- From console goto Services > Compute > EC2
	- Click on "Launch Service" button.
	- This will start us on the journey to launching first instance. instances are created from
	  Amazon Machine Images (AMIs).
	- Select an AMI of your choice and then choose the type of this instance you want. Here you
	  select the family type talked aboute in the section above, "EC2 Instance Types". I will want
	  a T2 instance, probably one eleigable for the free teir.
	- Choose it, eg "T2 micro" and click the NEXT button to go and configure the instance details.
	- Then add tags.
	- Configure security groups. This is like a "virtual firewall" where you can specify what
	  traffic you allow in and out of your instance. So for websever, for e.g. we need to enable port
	  80 for TCP.
		- Create a new security group most porbably and give it a name.
		- Allow SSH to remote adminthe EC2 instance.
		- Allow HTTP access, (and HTTPs access if you need it)
	- Click "Review and Launch" and review details.
	- Click "Launch"
		Need to either add or create a key pair that will allow you to access the instance.
		We store the private key somewhere locally and SECURELY
		The public key is stored by AWS
		NEVER SHARE THE PRIVATE KEY otherwise anyone can access the server!
		Name the key pair and then download it, saving it somewhere safe and secure.
	- Click "Launch Instance"
		Can take a little time for instance state to say "running". Once running it will give
		you your public IP address, which you can then use.

		Go to directory with your downloaded key pair
		Change permissons. needs to be quite locked down to use with EC2:
			chmod 400 MyNewKerPair.pem
			ssh ec2-user@<servier-ip-from-console> -i MyNewKeyPair.pem
				Inside ssh session
					sudo su
					yum update -y #Or use apt depending on server version used

					# install apache
					yum install httpd -y

					# start it
					service httpd start

					# make sure apache auto boots on restart
					chkconfig httpd on

					# See service status
					service httpd status

					# Create stub web page
					echo "<html><body>HELLO</body></html>" > /var/www/html/index.html


How To Install LetsEncrypt SSL Certificate in AWS EC2 Instance Notes
--------------------------------------------------------------------
Ref: https://www.youtube.com/watch?v=odtG8Cjshvo
See: https://letsencrypt.org/getting-started/, https://certbot.eff.org/


How to Setup SSL certificate in CentOS 7 using LetsEncrypt Notes
----------------------------------------------------------------
Ref: https://www.youtube.com/watch?v=qYWhuITSVMc&feature=youtu.be
See: https://letsencrypt.org/getting-started/, https://certbot.eff.org/
S3 (Simple Storage Service)
* Object based storage - secure, scalable, durable. Data spread across multiple device and facilities.
* Files are stored in Buckets (like a folder)
	* Key/Value store (with Version ID optional & Metadata)
* Universal namespace - names must be unique globally!
	From AWS website:
      Buckets and objects are the primary resources, and objects are stored in buckets. Amazon S3 has a
	    flat structure instead of a hierarchy like you would see in a file system.
	    However, for the sake of organizational simplicity, the Amazon S3 console supports the folder
	    concept as a means of grouping objects. Amazon S3 does this by using a shared name prefix for
	    objects (that is, objects have names that begin with a common string). Object names are also
	    referred to as key names.
* Data consistency model
	* PUTS of new objects - read after write consistency. A read after a write is immediately valid
	* Overwrite PUTs and DELETEs - eventual consistency - can take some time to propogate
* Subresources - bucket specific config
	* Bucket polocies, acess control lists)
	* Cross Origin Resource Sharing (CORS) - files located in one bucket can be allowed to access
		files in other buckets
	* Transfer acceleration for multiple uploads
* Guarantee 99.9% availability (i.e., service uptime), 99.999999999% durability!
* Tiered storage available
* Lifecycle management (automatic movement between tiers)
* Versioning
* Encryption
* Max file size 5 TB!!

Storage Tiers:
	* Regular - Stored across multiple devices and facilities. Can sustatin loss of 2 data centers!
	            Guarantee 99.9% availability (i.e., service uptime), 99.999999999% durability!
	* IA (Infrequently Accessed) - Less frequent access but rapid. Charged per retrieval.
	* S3 One Zone IA - Less availablility than IA. Less cost. 20% less.
	* Reduced Redundancy Storage - Durability down to 99.99%. Use for data that can be re-created
		if lost. E.g. thumbnails.
	* Glacier - Very cheap but archival only. Takes 3-5 hours to restore from Glacier!!
	* Intelligent Tiering - Data has unknown or unpredictable access patterns
		Auto moves your data to most cost-effective tier.
		2 tiers - frequency and infrequent access.
		If obj not accessed for 30 consecutive days it goes to infrequent tier. When accessed goes
		back to frequent tier. Same durability and reliability as regular.

Charges
	* Storage per GB.
	* Requests.
	* Storage Management Pricing - e.g. for analytics.
	* Data Management Pricing - moving data OUT of S3.
	* Transfer Acceleration - extra charges for accelleration.


S3 Security
-----------
* Default - new buckets are PRIVATE
	* Can configure public access if required.
* Use
	* Bucket policies - bucket level, JSON
	* Access Control lists - object level
* Can create access logs, written to this/another bucket


S3 Access Policies
-------------------
From AWS S3 console, select bucket, select "Permissions" tab.
Can control public accessibility using ACLs and enable/disable on a file by file basis.

The "Bucket Policy" tab just exposes a policy editor. Below the text box is a link to the
"Policy generator", which can help you build up your bucket policy.
In the generator:
	* Select type of policy - "S3 Bucket Policy"
	* Select effect - "allow" or "deny"
	* Add "Principal" - this is the entity to which you are allowing/denying access to. I.e., who
		this policy applies to. Could be an IAM user, another S3 bucket or other AWS resource.
		If it is a user you must enter the uer's ARN, which you get from the Users section in IAM.
	* AWS service - "Amzon S3"
	* Actions -
	* ARN - Enter as displayed at the top of the editor text box.
	* Hit "Generate policy", and copy and paste the policy code into the editor.


S3 Encryption
-------------
1. In transit - TLS/SSL
2. At rest -
	* S3 managed keys (SSE-S3)
		Each object encrypted using strong multi-factor encryption. Key also encrypted with master
		keys. AES-265 bit encryption.
	* AWS Key Management Service managed keys (SSE-KMS)
		Uses SSE key management service. Get separate permission for "envelope key", which is the
		key that encrypts your key. Also get AUDIT TRAIL.
	* Customer provided keys (SSE-C)
		AWS manage the encryption/decryption but YOU mange the keys, their rotation and lifetime etc
3. Client side
	User enecrypts file herself before upload

Example syncing dir to encrypted folder:
aws s3 sync . s3://your/dir --sse

Install & Configure The CLI
----------------------------
apt install awscli
aws configure set aws_access_key_id <AWS_ACCESS_KEY> [--profile <PROF_NAME>]
aws configure set aws_secret_access_key <AWS_SECRET_KEY> [--profile <PROF_NAME>]
aws configure set region "eu-west-1" [--profile <PROF_NAME>]

The access key and secret access key will have been created previously in the IAM settings.

Then you can do things like:
   aws [--profile <PROF_NAME>] s3 ls s3://SOME/DIR/
                                                  ^
                                                  NOTE: Trailing "/" is important if you want to list
                                                  the directory contents and not just the directory
                                                  itself.
   aws [--profile <PROF_NAME>] s3 mv|cp LOCAL_FILE s3://SOME/DIR/
                                                                ^
                                                                NOTE: Trailing "/" is important!
   aws [--profile <PROF_NAME>] s3 mv|cp s3://SOME/DIR/FILE LOCAL_FILE
Elastic Beanstalk
MUST READ: https://docs.aws.amazon.com/elasticbeanstalk/latest/dg/concepts.html
TUTORIALS: https://docs.aws.amazon.com/elasticbeanstalk/latest/dg/tutorials.html


What Is It?
-----------

Elastic Beanstalk is a service for deploying and scaling web applications developing in many
popular languages: Java, .NET, PHP, Node.js, Python, Ruby, Go and Docker onto widely used
application server platforms like Apache Tomcat, Nginx, Passenger, and IIS.

From AWS:
	Amazon Web Services (AWS) comprises over one hundred services, each of which exposes an area of
	functionality. While the variety of services offers flexibility for how you want to manage your
	AWS infrastructure, it can be challenging to figure out which services to use and how to
	provision them.

	With Elastic Beanstalk, you can quickly deploy and manage applications in the AWS Cloud without
	having to learn about the infrastructure that runs those applications. Elastic Beanstalk
	reduces management complexity without restricting choice or control. You simply upload your
	application, and Elastic Beanstalk automatically handles the details of capacity provisioning,
	load balancing, scaling, and application health monitoring.

[https://adrianhall.github.io/cloud/2019/01/31/which-aws-service-for-hosting/]:
	On the surface, you will find a lot of similarities between Amazon Lightsail and AWS Elastic
	Beanstalk with EC2 instances. They both run exactly the same web application sets ... However,
	AWS Elastic Beanstalk can run within a VPC, which means you can run the web applications in an
	"internal only" configuration (with no connection to the Internet ...). You also get a whole
	host of flexibility in terms of settings that you don’t get with Lightsail.
	...
	Best for: Your most challenging enterprise apps where access to the underlying OS is required.


Developers can focus on writing code and don't need to worry about any of the underlying
infrastructure needed to run the application.

"Throw it some code in a ZIP file and it will figure it out and configure an environment for you".

Upload the code and EB handles deployment, capacity provisioning, load balancing, auto-scaling and
app health.

You retain full control of the underlying AWS resource pwoering your app and you pay only for the
AWS resource required to store and run you app, e.g. the EC2 instances or S3 buckets etc.

In summary:
	- Fastest/simplest way to deply app in AWS.
	- Scales resources up and down for you including web application server platform.
	- EC2 instance type is selectable for opimization.
	- Managed platform updates auto applies to OS and Java/PHP/NodeJS etc etc.

EB v.s. CloudFormation - EB configure environment through a GUI, CF is scripted config.

NOTE: Free tier eligable instances will not have a load balancer
Nomenclature
------------
Application   - Logical collection of Elastic Beanstalk components, including environments,
                versions, and environment configurations.
                Think of it like a CLASS definition.

Environment   - Collection of AWS resources running an application version.
                Each environment runs only 1 app version at a time, however, you can run the same
                app version or different application versions in many environments simultaneously.
                When environment created, EBS provisions resources needed to run the app.
                Think of it as an INSTANCE of a class.

Environment   - Identifies a collection of parameters and settings that define how an environment
config          and its associated resources behave
                Think of it like the PARAMETERS passed to the CLASS CONSTRUCTOR.

Saved         - A template that you can use as a starting point for creating unique environment
config          configurations.

Platform      - Combination of an operating system, programming language runtime, web server,
                application server, and Elastic Beanstalk components.


Beanstalk Update/Deployment Options
-----------------------------------
	Beanstalk supports several options for processing deployments (deployment policies):
	- All at once:
		- Deploys the new version to all instance simultaneously
		- All of your instances are out of service while the deployment takes place.
		- You will experience an outage while the deployment is taking place.
		- If the update fails, you need to roll back the changes by re-deploying the original
		  version to all you instances.

	- Rolling Deployment Policies:
		- Deploys in batches: each batch taken out of service whilst deployment takes places
		- Environment capacity will be reduced by the #instances in a batch while the deployment
		  takes place.
		 - If update fails, need to roll back the changes via rolling update.
		 - Reduced capacity during deplayment but not an outage.

	- Rolling wwith Additional Batch deployment Updates.
		- Maintains full capacity during deployment process.
		- Launches an addition batch of instances before deploying new instances.

	- Immutable Deployment Updates.
		- Deploys new version to a fresh group of instances in new group. On success moved to
		  the existing group, and old instances killed.
		- Perferred option for Mission Critical stuff.


Instance Profiles - "Environment must have instance profile associated with it"
-------------------------------------------------------------------------------
See: https://docs.aws.amazon.com/elasticbeanstalk/latest/dg/iam-instanceprofile.html
See: https://docs.aws.amazon.com/elasticbeanstalk/latest/dg/environments-create-api.html

An instance profile is a container for an AWS Identity and Access Management (IAM) role that you
can use to pass role information to an Amazon EC2 instance when the instance starts. When you launch
an environment using the Elastic Beanstalk console or the EB CLI, Elastic Beanstalk creates a
default instance profile, called `aws-elasticbeanstalk-ec2-role`, and assigns managed policies with
default permissions to it.

If you see the error message, "Environment must have instance profile associated with it", when
trying to create an environment, you may not have sufficient priviladges or could be trying to
create the environment in the wrong region.

It appears you will required permission to use the role `aws-elasticbeanstalk-ec2-role`.


How To Deploy Apps
------------------
	NOTE: You must, generally, specify an Instance Profile for your EC2 instance
		From [https://docs.aws.amazon.com/elasticbeanstalk/latest/dg/iam-instanceprofile.html]:
			An instance profile is a container for an AWS Identity and Access Management (IAM) role
			that you can use to pass role information to an Amazon EC2 instance when the instance
			starts.

	Compute > Elastic Beanstalk
	Click "Get Started"
	Create a web app
		- Spec name and platform and the option "Upload your code" rather than "Sample application",
			which is the default
		- Click "Create application"
		- Select how to load the code
			- Can be a local file (ZIP) or an S3 bucket.
			- If you choose to upload a local file, it will create an S3 bucket automatically for
				you and stash the ZIP there. I was suprised that it doesn't unzip the archive, it
				just stashes it.
		- Once you click "Create Application" an environment will be created for your app.
			By creating an environment, AWS Elastic Beanstalk is allowed to manage AWS resources
			and permissions on your behalf.
			If the app was called HelloWorld then the environment is labeled HelloWorld-env.
			The creation can take up to 5 or 6 minutes so be patient.
		- When the environment reports itself as successfull launched, in the breadcrumb links
			select "Applications" to view a list of all applications. Here you should see your
			new environment, which you can click on to "drill into it".
		- From the application env you should be able to see recent events and a URL to the
			website that was created.
		- From the EBS environment page you can also select from the side menu "Configuration".
			This is how the environment can be configured. From here you can access security,
			instances, configure load balacncers, capacity etc and apply these configurations.

	Further Config/Update
		- Use the breadcrumbs to go back to the "all applications" page and select "application
			versions". It will show you the cuurent source and date it was deployed.
		- Can upload new version by clicking on the "Upload button".
			- If you are using an S3 bucket you can navigate to the S3 bucket management console and
				view the contents. Inside you will see all the code ZIPs you ever uploaded as well
				as a .elasticbeanstalk file and resources directory.
			- The new version becomes visible but HAS NOT BEEN DEPLOYED to an environment.
			- You can change your deployment policy to the ones described in the previous section.
			- Click DEPLOY to deploy you new version.

	Where is the app stored on the EB instance?
		It's in the /tmp/deployment/application folder during deployment and the moved to
		/var/app/current afterward.

Configuring Elastic Beanstalk
-----------------------------
Environment can be customized using config files - spec packages to install, user groups, shell cmds
to run etc etc). Files written in YAML or JSON and have a ".config" suffix and be saved in the
folder `.ebextensions`, which must be included in the top-level directory of the app source code
bundle. Thus, config files can be placed under source control with the rest of the app code.

See also: https://docs.aws.amazon.com/elasticbeanstalk/latest/dg/ebextensions.html
          https://docs.aws.amazon.com/elasticbeanstalk/latest/dg/customize-containers-ec2.html
          https://docs.aws.amazon.com/elasticbeanstalk/latest/dg/environment-resources.html

Examples of commonly used `.ebextensions`:
	https://github.com/awsdocs/elastic-beanstalk-samples/tree/master/configuration-files

AWS "Getting Started" Elastic Beanstalk Tutorial
------------------------------------------------
Ref: https://docs.aws.amazon.com/elasticbeanstalk/latest/dg/GettingStarted.CreateApp.html


Configuring HTTPS & Certbot .ebextensions File
-----------------------------------------------
https://docs.aws.amazon.com/elasticbeanstalk/latest/dg/https-singleinstance-ruby.html
https://docs.aws.amazon.com/elasticbeanstalk/latest/dg/configuring-https.html
https://medium.com/@jameshamann/ssl-certificates-with-rails-aws-elastic-beanstalk-and-lets-encrypt-8b047d527a60
https://docs.aws.amazon.com/acm/latest/userguide/gs-acm-validate-dns.html

Docker multi instance, by default does not have a load balancer. To install one follow this guide:
	https://docs.aws.amazon.com/elasticbeanstalk/latest/dg/using-features-managing-env-types.html#using-features.managing.changetype
	In summary: Goto Envionments > your-ebs-envionment > Condig > Capacity (click Edit).
	            Change environment type to "load balanced", and configure max #instances,
	            Click "Apply"

This Medium.com article works if you are running an Nginx server. In this case running Smashing in
the apline container from github, is just running the "normal" thin server.

This will use DNS VALIDATION - You must have control over your DNS entry so that you can add
a temporary DNS record to, e.g. `_acme-challenge.your.site.address.com` so that the ACME protocol
can verify that you do indeed have control over your domain.


Getting Certificates From AWS Certificate Manager
-------------------------------------------------
https://docs.aws.amazon.com/acm/latest/userguide/gs-acm-validate-dns.html


Deploying Docker Images / Web Apps to AWS Elastic Beanstalk
-----------------------------------------------------------
MUST READ: https://docs.aws.amazon.com/AmazonECS/latest/developerguide/task_definition_parameters.html#standard_container_definition_params

Ref: https://ngeor.com/2017/05/09/how-to-deploy-a-smashing-dashboard-to-aws-elastic-beanstalk-with-docker.html
Ref: https://docs.aws.amazon.com/elasticbeanstalk/latest/dg/single-container-docker-configuration.html
Ref: https://www.youtube.com/watch?v=lBu7Ov3Rt-M

TO ACCESS DOCKER VIA EB SSH SESSION: `sudo usermod -aG docker ${USER} && su -s ${USER}`

Any web application that you deploy to Elastic Beanstalk in a single container Docker environment
must include a Dockerfile or a Dockerrun.aws.json file.

Docker images can be deployed to EBS. EBS will setup the EC2 instance for you and can be configured,
via a Dockerrun.aws.json JSON file, to map volumes from the EC2 instance into the Docker container
as well as mapping EC2 ports too. Thus the web-app can run in the Docker container.

Docker multi instance, by default does not have a load balancer. To install one follow this guide:
	https://docs.aws.amazon.com/elasticbeanstalk/latest/dg/using-features-managing-env-types.html#using-features.managing.changetype

vvvvvvvv CAUTION CAUTION CAUTION CAUTION CAUTION CAUTION vvvvvvvv

There is a difference between V1 and V2 of the Dockerrun.aws.json file/
	V1 = Single container - "AWSEBDockerrunVersion": "1",
	V2 = Multi container - "AWSEBDockerrunVersion": "2",

The examples below are a little confused... because I was confused whilst looking at them. Some are
V1 and some are V2, and the two types are not compatible - i.e., you can't use a V1 Dockerrun file
on a multicontainer (V2) instance and vice vera.

SEE: https://stackoverflow.com/a/61444054/1517244
SEE: https://docs.aws.amazon.com/elasticbeanstalk/latest/dg/create_deploy_docker_v2config.html

The EC2 instances that EBS creates can have environments that only support a single Docker container
per EC2 instance, or multiple containers.

NOTE: STANDARD AND PRECONFIGURED DOCKER PLATFORMS ON EBS SUPPORT ONLY A SINGLE DOCKER CONTAINER PER
      ELASTIC BEANSTALK ENVIRONMENT.

In order to get the most out of Docker, Elastic Beanstalk lets you create an environment where your
Amazon EC2 instances run multiple Docker containers side by side ... Elastic Beanstalk uses Amazon
Elastic Container Service (Amazon ECS) to coordinate container deployments to multicontainer Docker
environments.
	SEE https://docs.aws.amazon.com/elasticbeanstalk/latest/dg/create_deploy_docker_ecs.html#create_deploy_docker_ecs_platform

^^^^^^^^ CAUTION CAUTION CAUTION CAUTION CAUTION CAUTION ^^^^^^^^

* Ports:
To map ports, for example, the JSON configuration would include:
	"portMappings": [
	    {
	        "containerPort": integer,
	        "hostPort": integer
	    }
	    ...
	]
Port mappings allow containers to access ports on the host container instance to send or receive
traffic.
	containerPort:
		- The port number on the container that is bound to the user-specified or
		  automatically assigned host port.
		- If using containers in a task with the Fargate launch type, exposed ports should be
		  specified using containerPort.
		- If using containers in a task with the EC2 launch type and you specify a container port and
		  not a host port, your container automatically receives a host port in the ephemeral port
		  range.
	hostPort:
		- The port number on the container instance to reserve for your container.
		- If using containers in a task with the Fargate launch type, the hostPort can either be
		  left blank or be the same value as containerPort.
		- If using containers in a task with the EC2 launch type, you can specify a non-reserved
		  host port for your container port mapping (this is referred to as static host port
		  mapping), or you can omit the hostPort (or set it to 0) while specifying a containerPort
		  and your container automatically receives a port (this is referred to as dynamic host port
		  mapping) in the ephemeral port range for your container instance operating system and
		  Docker version.

* Volumes:
To map volumes: specify a list of volumes to be passed to the Docker daemon on a container instance.
	{
	  "Volumes": [
	    {
	      "HostDirectory": "/path/inside/host",
	      "ContainerDirectory": "/path/inside/container"
	    }
	  ]
	...
The following are the types of data volumes that can be used:
	1. Docker Volumes: Docker-managed volume that is created under /var/lib/docker/volumes on the
		container instance.
	2. Bind Mounts:    A file or directory on the host machine is mounted into a container. Bind
		mount host volumes are supported when using either the EC2 or Fargate launch types.
		To use bind mount host volumes, specify a host and optional sourcePath value in your task
		definition. E.g.:
			"volumes": [
				{
					"name": "dashboards",
					"host": {
						"sourcePath": "/var/app/current/dashboards"
					}
				},

NOTE: /var/app/current is the directory on the host machine that contains the deployment artifact,
      i.e. the .zip file unzipped.


And so on. See the reference link at the top of the sub-section for details.

- Goto EBS on AWS web console.
- Select "Create New Application"
	- Give the app a name and description
	- Environment tier = Web Server
	  Prodefined config = Docker
	  Environment type = Load balancing, autoscaling
	- Select "Upload Your Own"
		Upload the `Dockerrun.aws.json` file


	Terminating HTTPS on EC2 instances running Docker
	- - - - - - - - - - - - - - - - - - - - - - - - -
	See: https://docs.aws.amazon.com/elasticbeanstalk/latest/dg/https-singleinstance-docker.html
	See: Above section "Configuring Elastic Beanstalk"

	Create a file `.ebextensions/https-instance.config`, to configure the NGINX instance. The config
	will create the following files, which are required by NGINX et al:
		1. /etc/nginx/conf.d/https.conf - Configures the nginx server. This file is loaded when the
			nginx service starts.
		2. /etc/pki/tls/certs/server.crt - Creates the certificate file on the instance.
		3. /etc/pki/tls/certs/server.key - Creates the private key file on the instance

	!! CAUTION !!
		Avoid committing a configuration file that contains your private key to source control.
		After you have tested the configuration and confirmed that it works, store your private key
		in Amazon S3 and modify the configuration to download it during deployment. For
		instructions, see Storing private keys securely in Amazon S3.

	To configure EBS to download the private keys from S3 during deployment you will need to
	create `.ebextensions/privatekey.config`. For example:
		Resources:
		  AWSEBAutoScalingGroup:
		    Metadata:
		      AWS::CloudFormation::Authentication:
		        S3Auth:
		          type: "s3"
		          buckets: ["MY_BUCKET_NAME"]
		          roleName:
		            "Fn::GetOptionSetting":
		              Namespace: "aws:autoscaling:launchconfiguration"
		              OptionName: "IamInstanceProfile"
		              DefaultValue: "aws-elasticbeanstalk-ec2-role"
		files:
		  # Private key
		  "/etc/pki/tls/certs/server.key":
		    mode: "000400"
		    owner: root
		    group: root
		    authentication: "S3Auth"
		    source: MY_BUCKET_URL/server.key

	Private Repositories
	- - - - - - - - - - -
	You don't have to use just DockerHub images. You can configure it to deploy images from your
	own private repos.
	[https://docs.aws.amazon.com/elasticbeanstalk/latest/dg/create_deploy_docker.container.console.html]
		The Docker and Multicontainer Docker platforms for Elastic Beanstalk support the use of Docker
		images stored in a public OR PIRVATE online image repository.
		Specify images by name in Dockerrun.aws.json. Note these conventions:
			- Images in official repositories on Docker Hub use a single name (for example, ubuntu or
				mongo).
			- Images in other repositories on Docker Hub are qualified with an organization name (for
				example, amazon/amazon-ecs-agent).
			- Images in other online repositories are qualified further by a domain name (for example,
				quay.io/assemblyline/ubuntu or account-id.dkr.ecr.us-east-2.amazonaws.com/ubuntu:trusty).
	[https://docs.aws.amazon.com/elasticbeanstalk/latest/dg/single-container-docker-configuration.html]
		Add the information about the Amazon S3 bucket that contains the authentication file in the
		Authentication parameter of the Dockerrun.aws.json file. Make sure that the Authentication
		parameter contains a valid Amazon S3 bucket and key. The Amazon S3 bucket must be hosted in the
		same AWS Region as the environment that is using it.

		For V1 (single Docker container)
		{
			"AWSEBDockerrunVersion": "1",
			...
			"Authentication": {
				"Bucket": "my-bucket",
				"Key": "mydockercfg"
			},
			"Image": {
				"Name": "quay.io/johndoe/private-image",
				"Update": "true"
			},
			...
		}

		For V2 (multi Docker)
			{
				"AWSEBDockerrunVersion": 2,
				...
				"authentication": {
					"bucket": "my-bucket",
					"key": "mydockercfg"
				},
				...
			}
	[https://docs.aws.amazon.com/elasticbeanstalk/latest/dg/create_deploy_docker.container.console.html#docker-images-private]
		To use a Docker image in a private repository hosted by an online registry, you must provide an
		authentication file that contains information required to authenticate with the registry.

		Generate an authentication file with the docker login command. For repositories on Docker Hub,
		run docker login:
			docker login registry-server-url
		Upload a copy named .dockercfg of the authentication file to a secure Amazon S3 bucket.


	Build Docker Image On Deployment
	- - - - - - - - - - - - - - - - -
	You can also get the deployment to BUILD your Docker image for you, rathen than pull it from a
	repository:
	[https://docs.aws.amazon.com/elasticbeanstalk/latest/dg/single-container-docker-configuration.html]
		Create a Dockerfile when you don't already have an existing image hosted in a repository.


Deploying Ruby Applications to AWS Elastic Beanstalk with Git
-------------------------------------------------------------
Ref: https://aws.amazon.com/blogs/developer/deploying-ruby-applications-to-aws-elastic-beanstalk-with-git/
^^^
WARNING/NOTE: I think the aricle is out of date. it meansions using the command `eb start`. I have
	tried this but it does not appear to be a command supported by `eb`:
		eb: error: unrecognized arguments: start
	The `eb` help says...
		To get started type "eb init". Then type "eb create" and "eb open"
	I have followed its advice and replaced the article's second-half with these suggested steps!

WARNING/NOTE: I also found that after successfull setup Puma was having problems. I saw the
	following error message repeated many times in the Puma logs:
		connect() to unix:///var/run/puma/my_app.sock failed

	Nginx, the web-server, is failing to communicate with Puma, the application server. Why do we
	need both?
		See - https://stackoverflow.com/a/50517532/1517244
		See - https://www.justinweiss.com/articles/a-web-server-vs-an-app-server/
			A web server is a program that takes a request to your website from a user and does some
			processing on it. Then, it might give the request to your Rails app. Nginx and Apache
			are the two big web servers you’ll run into.

			An app server is the thing that actually runs your Rails app. Your app server loads your
			code and keeps your app in memory. When your app server gets a request from your web
			server, it tells your Rails app about it. After your app is done handling the request,
			the app server sends the response back to the web server (and eventually to the user).

	It seems routing to app is:
		NGINX ----[pass CGI reg]----> PUMA ----[Query App]---->
			----> APP ----[Use sinatra to build/route REST end points]---->[App API endpoint called]
			---->[Return CGI response]----> PUMA ---->[Return CGI response] ----> NGINX
	The above should help picture what's going on and what the various names like "Puma",
	"Sinatra" etc etc mean.

	See this SO thread for solutions: https://stackoverflow.com/q/30355569/1517244. In short the
	solution seems to be adding the following 2 lines to `config/puma.rb`:
		bind "unix:///var/run/puma/my_app.sock"
		pidfile "/var/run/puma/my_app.sock"
	See also: https://github.com/puma/puma/blob/master/README.md#configuration-file
	Also, the config file may be `${RAILS_ENV}/puma.rb' is RAILS_ENV is defined.

	Where to find the config? The file is stored in side the app's config directory. The app is a
	Gem, so I assume we follow this:
		Use `gem environment` to find out about your gem environment.
		Look for one of the two lines:
			- INSTALLATION DIRECTORY: /var/lib/gems/<version a.b.c>
			- USER INSTALLATION DIRECTORY: /home/<user>/.gem/ruby/<version a.b.c>
		Then under, probably the global installation directory you will find, for example:
			/var/lib/gems/2.5.0/gems/puma-4.3.5

		Can also use `bundle info <gem name>` to see where the GEM is installed.

	To add these you will need to SSH into your EBS instance:
		eb ssh
	URG... FIDDLY AND TIME CONSUMING JUST TO SETUP A DASH... ABANDONING - WILL USE DOCKER IMAGE.


EBS is clever - Gems listed in the Gemfile are AUTOMATICALLY INSTALLED FOR YOU (almost anyway!).

To deploy to EBS must download & install AWS Elastic Beanstalk command line tool. Get the install
scripts from GitHub:
	1. Make sure the following apps are installed:
			sudo apt install -y build-essential zlib1g-dev libssl-dev libncurses-dev libffi-dev \
				libsqlite3-dev libreadline-dev libbz2-dev
	2. Clone https://github.com/aws/aws-elastic-beanstalk-cli-setup
			git clone https://github.com/aws/aws-elastic-beanstalk-cli-setup.git
			sudo ./aws-elastic-beanstalk-cli-setup/scripts/bundled_installer
	   Running the install script takes a-g-e-s to install Python, so be patient. It doesn't give
	   you any indication of progress :/ Go make a cup of tea and come back later!
	3. Follow the "Finishing up" instructions at the end of the EB install to add EB to your PATH!
		echo 'export PATH="/home/jh/.ebcli-virtual-env/executables:$PATH"' >> ~/.bash_profile && source ~/.bash_profile

1. Initialize application with the CLI tool by typing:
       eb init
   You will need your AWS acces key ID and secret access key to login.
   Creates .elasticbeanstalk directory in project root. Add to .gitignore.

   You will also be asked if you want to continue with "CodeCommit". This option will allow you to
   create and manage Git repositories hosted by AWS CodeCommit with the Elastic Beanstalk:
      AWS CodeCommit is a fully-managed source control service that makes it easy ... to host ...
      private Git repositories.
      ...
      Get 5 active users per month for free (within limits), after which you pay $1 per additional
      active user per month.

   This also creates a Git subcommand - `aws.push`. To use this you must have initialised eb to use
   CodeCommit!

   To deploy app can now just type `git aws.push` (but don't use it yet - after the eb start).

   If you don't want to use CodeCommit you can upload the code from your local machine, or S3
   bucket, like you would via the web console by using `eb create` with the `--source` option.
   Type `eb create --help` for further information.

   Try also `eb init --help` for more init options.
   For example you can use `eb init --region eu-west-2` to specify the region on the command line.
   Seems like which application you use is not specifiable from the CLI... need to enter this :/


2. Create a new environment:
      eb create
   Choose the "application" load balancer
   Do not enable "Spot Fleet Requests"

   An example of the command output is useful to look at to see what EBS is doing behind the scenes
   for us in terms of setting up load blancers, EC2 instances, S3 buckets, security groups etc:
      INFO  createEnvironment is starting.
      INFO  Using elasticbeanstalk-XXXX as Amazon S3 storage bucket for environment data.
      INFO  Created target group named: XXXX
      INFO  Created security group named: XXXX
      INFO  Created security group named: XXXX
      INFO  Created Auto Scaling launch configuration named: XXXX
      INFO  Created Auto Scaling group named: XXXX
      INFO  Waiting for EC2 instances to launch. This may take a few minutes.
      INFO  Created Auto Scaling group policy named: XXXX
      INFO  Created Auto Scaling group policy named:  XXXX
      INFO  Created CloudWatch alarm named: XXXX
      INFO  Created CloudWatch alarm named: XXXX
      INFO  Created load balancer named: XXXX
      INFO  Created Load Balancer listener named: XXXX
      INFO  Application available at XXXX.elasticbeanstalk.com.
      INFO  Successfully launched environment: XXXX

   Type `eb create --help` for further information. Some of the available options include:
       --source SOURCE       - source of code to create from directly; example
                               source_location/repo/branch
       --region REGION       - use a specific region
       --profile PROFILE     - use a specific profile from your credential file
       --elb-type ELB_TYPE   - load balancer type
       --instance_profile EP - EC2 Instance profile, if you don't want to use the default.

   By DEFAULT, EBS CLI will AUTOMATICALLY PACKAGE YOUR PROJECT DIRECTORY AS A ZIP FILE AND UPLOAD
   THIS TO A NEW S3 BUCKET THAT IT CREATES ON YOUR BEHALF. I.e. creates an app archive
   from the application source code in the local project directory.

   To DEPLOY AN ARTIFACT INSTEAD OF THE PROJECT FOLDER:
      See https://docs.aws.amazon.com/elasticbeanstalk/latest/dg/eb-cli3-configuration.html#eb-cli3-artifact
      The CLI doesn't by default allow you to use `--source` to specify a local ZIP file.

      You can tell the EB CLI to deploy a ZIP file or WAR file that you generate as part of a
      separate build process by adding the following lines to .elasticbeanstalk/config.yml in your
      project folder.
          deploy:
              artifact: path/to/buildartifact.zip

3. To debug things, under the environment created above, but accessed through the web console you
   can download server logs.


Beanstalk With RDS
------------------

RDS = Relational Database Service, which is a web service that makes it easier to set up, operate,
      and scale a relational database in the AWS Cloud.

Can launch RDS within EBS console
	- Good for development
	- Bad for production
		- DB lifecyle tied to app lifecyle - termination of env terminats DB too.
		- Prefer decouple of RDS instance from EBS env. I.e., launch outseide of EBS.
			- Provides more flexibility.
			- Can then connect multiple environments to same DB.
			- Wide choices of DB types.
			- Can tear down app without interfering with DB.

To connect EBS to outside RDS
	- Req additional Security Group - add to environments Auto Scaling group.
	- Provide connection string config info to app servers (endpoint, pwd etc) using EBS properties.


Configuring HTTPS for your Elastic Beanstalk environment
--------------------------------------------------------

Simplest method = assign a server certificate to your environment's load balancer. Client to load
	balancer secure. Balancer to EC2 instance is not, but is hidden behind balancer so should be
	secure enough? For end-to-end HTTPS in a load balanced environment, can combine instance and
	load balancer termination to encrypt both connections.

With AWS Certificate Manager (ACM), you can create a trusted certificate for your domain names for
free. BUT domain names are pay-to-own.

SEE https://aws.amazon.com/premiumsupport/knowledge-center/elastic-beanstalk-https-configuration/

NOTE - TO TERMINATE AT LOAD BALANCER
	When configurating the load balancer, make sure it listens on port 443 using HTTPS but
	*forwards* traffic to the backend using port 80, HTTP if you whish to terminate the HTTPS
	connection at the load balancer.

	Terminate HTTPS on the load balancer
		1. Open the Elastic Beanstalk console, and then select your environment.
		2. In the navigation pane, choose Configuration.
		3. In the Load balancer category, choose Modify.
		4. To add the listener for port 443, choose one of the following sets of steps based on
		   the type of load balancer that your Elastic Beanstalk environment has.

	To add a listener for a Classic Load Balancer:
		1.  Choose Add Listener.
		2.  For Port, enter the incoming traffic port (typically 443).
		3.  For Protocol, choose HTTPS.
		4.  For Instance Port, enter 80.
		5.  For Instance Protocol, choose HTTP.
		6.  For SSL certificate, choose your certificate, and then choose the SSL policy that you
		    want to use from the drop-down menu.
		7.  Choose Add, and then choose Apply.

	To add a listener for an Application Load Balancer:
		1.  Choose Add Listener.
		2.  For Port, enter the incoming traffic port (typically 443).
		3.  For Protocol, choose HTTPS.
		4.  For SSL certificate, choose your certificate, and then choose the SSL policy that you
		    want to use from the drop-down menu.
		5.  Choose Add, and then choose Apply.
Cloudfront
See: https://aws.amazon.com/cloudfront/#:~:text=Amazon%20CloudFront%20is%20a%20fast,within%20a%20developer%2Dfriendly%20environment.

From AWS Website:
	Amazon CloudFront is a fast content delivery network (CDN) service that securely delivers data,
	videos, applications, and APIs to customers globally with low latency, high transfer speeds,
	all within a developer-friendly environment.

Another AWS page:
	Amazon CloudFront is a web service that speeds up distribution of your static and dynamic web
	content, for example, .html, .css, .php, image, and media files, to end users. CloudFront
	delivers your content through a worldwide network of edge locations. When an end user requests
	content that you're serving with CloudFront, the user is routed to the edge location that
	provides the lowest latency, so content is delivered with the best possible performance. If the
	content is already in that edge location, CloudFront delivers it immediately. If the content is
	not currently in that edge location, CloudFront retrieves it from an Amazon S3 bucket or an
	HTTP server (for example, a web server) that you have identified as the source for the
	definitive version of your content.

[https://adrianhall.github.io/cloud/2019/01/31/which-aws-service-for-hosting/]:
	If your web site is just a collection of HTML, CSS, and JavaScript with no other dependencies,
	and you receive this from a marketing or design firm, you can just drag and drop the files onto
	your S3 bucket and get them deployed easily. This option may be for you. It’s simple to
	understand — you just publish your files to the S3 bucket and CloudFront picks them up and
	distributes them worldwide, also handling things like HTTPS for you.
	...
	Best for: Pre-packaged static sites provided by marketing organizations that are deployed via
	drag and drop.


Cloudfront may allow FREE encryption using TLS via the AWS certificate manager.

- Global content deliver network (CDN)
- Application acceleration and optimization
- Distributed scalable integrated security controls
- Optimised for deliver use cases with intelligent caching.
- On-demand, full user control. Cost effective.
Amplify Framework
From AWS Website:
	Provides a set of libraries and UI components and a command line interface to build mobile
	backends and integrate with your iOS, Android, Web, and React Native apps.

[https://adrianhall.github.io/cloud/2019/01/31/which-aws-service-for-hosting/]:

	an awesome continuous deployment (CD) platform for your web site. It has built in support ...
	for JavaScript single page applications written in a variety of frameworks like React
	...
	Best for: Static site generators, JavaScript based single page applications.
Lightsail
Lightsail is an easy-to-use cloud platform that offers everything needed to build an app or website,
plus a cost-effective, monthly plan. Ideal for simpler workloads, quick deployments, and getting
started on AWS.

The pricing scheme is way simpler, for example, than EBS. It seems to abstract even further away so
that we don't even have to worry about what EC2 cost model and S3 cost model we'd use etc.

[https://adrianhall.github.io/cloud/2019/01/31/which-aws-service-for-hosting/]:
	If your app relies on a web language backend (like Ruby or PHP) or you use a common web site
	platform (like WordPress or Magento), then you might want to choose Amazon Lightsail.
	...
	Best for: Common web stacks like LAMP, MEAN, and PHP, or common web applications like WordPress

SSL/TLS Certificates In LightSail
---------------------------------
Ref: https://lightsail.aws.amazon.com/ls/docs/en_us/articles/understanding-tls-ssl-certificates-in-lightsail-https

Lightsail uses SSL/TLS certificates to handle encrypted web traffic (HTTPS requests). You can create
certificates, verify domain ownership, and then attach the validated certificates to your Lightsail
load balancer.
Dynamo Database
NoSQL databases (aka "not only SQL") are non-tabular, and store data differently than relational
tables. NoSQL databases come in a variety of types based on their data model. The main types are
document, key-value, ... They provide flexible schemas and scale easily with large amounts of data
and high user loads.

Dynamo is a NoSQL database. For apps that need single digit millisecond latency at any scale.
Supports documents (JSON, XML, HTML) and key-value data models.

DOCUMENTS:
	- See https://aws.amazon.com/nosql/document/
	- See https://developer.couchbase.com/documentation/server/3.x/developer/dev-guide-3.0/compare-docs-vs-relational.html

	- Class of non-relational (NoSQL) database.
	- Store data in documents similar to JSON (JavaScript Object Notation) objects
	- Contain pairs of fields & values.
	- Values can be many things: strings, numbers, arrays, objects etc.
	- Structure typically aligns with objects developers work with - think objects serialised to JSON.
	- Powerful query languages.
	- Unlike relational DBs does not need a pre-defined schema and does less data normalisation,
		generally


TABLES:
	Class of non-relational (NoSQL) database.
	Table rows are called ITEMS.
	Rows are broken up into columns called ATTRIBUTES.

	TABLE
	        +--------+---------+-----+---------+
	        |Attrib1 | Attrib2 | ... | AttribN |
	        +--------+---------+-----+---------+
	 Item 1 |        |         |     |         |
	        +--------+---------+-----+---------+
	 Item 2 |        |         |     |         |
	        +--------+---------+-----+---------+
	  ....  |        |         |     |         |
	        +--------+---------+-----+---------+
	 Item M |        |         |     |         |
	        +--------+---------+-----+---------+

	Each item is basically a set of key-value pairs. Think of each item as a JS object with keys
	and values or a JSON spec.

Data is stored/retrieved based on a PRIMARY KEY. Two types of primary keys:
	1. PARTITION KEY
		Unique attribute. Key is hashed , which determines the partion/physical location where data
		is stored. No two items can have same partition key. That's why no two items can have same
		key! It is also advisable to have well distributed keys as the better the disstribution
		the more efficient the retrieval of multple keys can be. For example the primary key
		might be the user ID.

		Must be a number, binary or a string type.

	2. COMPOSITE KEY (PARTITION KEY + SORT KEY)
		E.g. same user posts multiple time to forum. E.g., sort key might be a timestamp

Both types of key are akin to a primary key.

You can 5 global indicies per table. They can make non-primary key based retrieval more
efficient.

Provisioned capacity is your predicted reads/writes PER SECOND and their size. If you exceed
your provisioned capacity IT FAILS - IT DOES NOT AUTO SCALE!
	There is also the ON DEMAND provisioning mode. It is not as cheap as specifcying in demand
	but is useful if you do not know how much capcity you need.
	See http://docs.aws.amazon.com/amazondynamodb/latest/developerguide/HowItWorks.ProvisionedThroughput.html

	Also...
	From https://aws.amazon.com/blogs/aws/amazon-dynamodb-on-demand-no-capacity-planning-and-pay-per-request-pricing/
		 Amazon DynamoDB on-demand, [is] a flexible new billing option for DynamoDB capable of serving
		 thousands of requests per second without capacity planning.

You can only have one Dynamo DB - usage is aggregate across all regions - in one region you can
only have multiple tables.

Tables can have TIME TO LIVE attached to data, which defined how long they should live before they
are deleted. But by default this is disabled so data is persistent for ever.

If you use the SDK then noSQL injection protection is built in :)


IAM Conditions
--------------
By default a service does not have permissions to access otehr resources. Therefore when acccessing
Dynamo, from, for example a Lambda, remember to give the lambda the correct permissions by
attatching a policy to it. Easiest, but more relaxed in terms of security is, the predefined
AWS policy AmazonDynamoDBFullAccess policy.

Other IAM features you can use with Dynamic include CONDITIONS, which are added to an IAM POLICY.
These can be used to restrict a uer's access to only certain items (rows) in a table!

IAM conditions contain the following important keys:
		* "Sid" - STATEMENT IDENTIFIER - A unique identifying name for the policy
		* "Effect" - Are we allowing/denying etc
		* "Action"- The actions that this policy allows/denies (see "effect"). For example
			"dynamodb:GetItem", "dynamodb:PutItem", "dynamodb:UpdateItem"
		* "Resource" - The unique Amazon resource name for your dynamo db table
		* "Condition" - This is where you specify the conditions on which the policy applies, e.g.,
			allowing users to acces only the items where the Parition Key value matches their user
			ID.
				* "ForAllValues:StringEquals"
				* "dynamodb:Attributes"


Consistency Models
------------------
1. Strongly consistent - Any write that occur before read are reflected in the read consistent
	across all locations.
2. Eventuall consistent - Can take up to 1 second for new writes to be reflected in a read across
	all locations.


Using With Lambdas
------------------
- Can be the event source that triggers a lambda
- Can access Dynamo from a lambda as a data repository


Distributed Locking
-----------------
https://aws.amazon.com/blogs/database/building-distributed-locks-with-the-dynamodb-lock-client/
https://blog.revolve.team/2020/09/08/implement-mutex-with-dynamodb/
Amazon Athena
Serverless interactive query service that makes it easy to analyze data in Amazon S3 using standard
SQL. Easy to use: point to your data in Amazon S3, define the schema, and start querying using
standard SQL.

I.e., Query non database data container in things like CSV and JSON with a shim on top to make it
look like a normal database that can be queried with standard SQL.

Why Athena? - challenges customers faced - had to do work to get to S3 data, e.g. complex
transformations etc:
	- Significant amount of work required to analyze data in Amazon S3
	- Users often only have access to aggregated data sets
	- Managing a Hadoop clister or data warehouse requires expertise.

What Athena gives:
	Athena is an INTERACTIVE QUERY SERVICE that makes it EASY to analyse data DIRECTLY FROM
	AWS S3 using STARTARD SQL. Results come back in seconds. It is NOT a database or a data
	warehouse - it is designed to enable you to write fast SQL queries with nothing to manage.
		- No infrastructure or administration
		- Zero spin up time
		- Transparent upgrades

Easy to use
	- Log into console.
	- Create a table:
		- Type in a Hive Data Description Language (DDL) statement.
		- Use console Add Table wizard.
	- Start querying :)
	- Query data in its RAW FORMAT!!
		- Test, CSV, JSON, weblogs, AWS service logs etc.
	- Stream data directly from S3.
	- Query using ANSI SQL - well know language most devs are familiar with

Highly available:
	- Takes afvantage of D3 durability and availability.
	- Service endpoint or log into console.
	- 99.999999999% durability.
	- uses warm compute pools across multiple availability zones.
Codecommit / Code Deploy / Code Pipeline
Code Deploy
-----------
Can deploy to EC2 or on-premises systems!

2 approaches:
	1. IN PLACE
		- The app is stopped on each instance and the new release is installed,
		- AKA ROLLING UPDATE,
		- Capacity is rediced during deployment,
		- Lambda no supported,
		- Roll-back involves a re-deploy,
		- Good for 1st time deployment.
	2. BLUE / GREEN
		- New instance are provisioned and the new release is installed on the new instances.
			BLUE == active deployment
			GREEN == new release
		  The ELB will be configured to route traffic to the green environment, but importantly the
		  blue environment is left in tact. Therefore, rolling back to the previous version is
		  super easy and no down-time on either step is experienced. When green is validated, the
		  blue is just deleted and the green becomes blue,
		- No capcity reduction during deployment,
		- You pay for 2 environments until you terminate the old servers,
		- Safest option!

AppSpec File - CodeDeploy Config
- - - - - - - - - - - - - - - -
The AppSpec file configures the CodeDeploy environment by defining the parameters to be used
during deployment.

The file specifies 4 main topics:
	1. Version (reserved for future use)
	2. OS - Which OS should you run
	3. Files - the location of application files to be copied and where to copy to
	4. HOOKS - Lifecycle event hooks specify scripts that need to be run at set points in the
	   deployment lifecycle. They have a very specific order. Hooks include the following and
	   are used to run scripts. The following shows a few of them in the RUN ORDER.
	   	- BeforeInstall
	   	- After install
	   	- ApplicationStart
	   	- ValidateService

Doing A Deploment
- - - - - - - - -
	#Install CodeDeploy agent on your EC2 instance:
	sudo yum update
	sudo yum install ruby
	sudo yum install wget
	cd /home/ec2-user
	wget https://aws-codedeploy-eu-central-1.s3.amazonaws.com/latest/install
	chmod +x ./install
	sudo ./install auto
	sudo service codedeploy-agent status

	#Create your application.zip and load it into CodeDeploy:
	aws deploy create-application --application-name mywebapp
	aws deploy push --application-name mywebapp --s3-location s3://<MY_BUCKET_NAME>/webapp.zip --ignore-hidden-files
Elastic Container Service (Ecs) / Fargate & Ec2
Lets you run containerised workloads in AWS. Has deep intrgration with AWS services like Route53,
IAM, VPC etc.

ECS can run containers in 3 different configurations:
	1. ECS - Run containers on a cluster of virtual machines.
	2. FARGATE - This is the serverless option - no need to worry about underlying EC2 instances
	3. EC2 - Used for fine grained control - control the installation, config and management of
	         the compute environment.


Elastic Container Registry (ECR)
--------------------------------
Do run Docker services you must create an ECR - Elastic Container Registry.
ECR is just a place where Docker images are stored.
ECS connects to the ECR and uses the images to deploy Docker containers.

Startup:      aws configure
Login:        eval $(aws ecr get-login --no-include-email --region eu-west-2)
Create repo:  aws ecr create-repository --repository-name my-repo-name --region eu-west-2
              Command will return the RESPOSITORY_URL. E.g.:
              jh@jehtech$ aws ecr create-repository --repository-name JEHTech --region eu-west-2
              {
                  "repository": {
                      "repositoryArn": "arn:aws:ecr:eu-west-2:300012345678:repository/JEHTech",
                      "registryId": "300012345678",
                      "repositoryName": "JEHTech",
                      "repositoryUri": "300012345678.dkr.ecr.eu-west-2.amazonaws.com/JEHTech", << THIS IS REPOSITORY_URL
                      "createdAt": 1593780814.0,
                      "imageTagMutability": "MUTABLE",
                      "imageScanningConfiguration": {
                          "scanOnPush": false
                      }
                  }
              }
Upload:       docker tag image-i-want-to-upload:version-tag RESPOSITORY_URL/image-i-want-to-upload:version-tag
              docker push RESPOSITORY_URL/image-i-want-to-upload:version-tag

See
---
https://docs.aws.amazon.com/AmazonECS/latest/developerguide/docker-basics.html
https://docs.aws.amazon.com/elasticbeanstalk/latest/dg/single-container-docker-configuration.html


Example Using Smashing Docker Image On ECS
------------------------------------------
https://ngeor.com/2017/05/09/how-to-deploy-a-smashing-dashboard-to-aws-elastic-beanstalk-with-docker.html


Micro Services
--------------
Monolothic apps - many distinct parts of an application on one server make it hard to scale because
	the demands on that one server increase rapidly and the application either has to be duplicated
	on another server or split up into components which can expand on their own servers. All of this
	is hard with a monolithic app. You have to SCALE THE ENTIRE APPLICATION.

	E.g. User profile data, photo uploading an editing, thumbnails, photo viewe etc in one app on
		one server.

	Failures in any one compnent of the app would probably bring down the whole application.

With microservices you ONLY HAVE TO SCALE THE PARTS THAT NEED IT.
	Serperates the jobs of an independent server into INDEPENDENT SMALLER services.
	Gives ability to use smaller resources to handle large tasks. Each service does just its workload.

	So, now in e.g. requests for auth goto the auth micro service, Photo uploads processes by the
	upload micro service, the editing by the edit service and so on.

	Containers are an excellent way to serve micro services.


Far Gate
--------

Running containers on EC2 is good. But need to keep track of all the pieces you needto manage.
You have to manage:
	1. The EC2 instances (your cluster) on which the containers sit
		For example you might have to commision several EC2 instances, have them in different
		subnets and then connect the subnets together in a Virtual Private Cloud (VPC)
		- Have to contunaly patch/update the instances and evaluate secutiry robustness
		- Have to setup autoscaling
		- Have to have Docker installed on each instance
		- You will interact with the DOcker instances using ECS - Elastic Continer Service.


	2. The containers themselves
		Each EC2 will have multiple Docker containers running in it.

Fargate answers the question HOW CAN YOU RUN CONTAINERS WITHOUT HAVING TO WORRY ABOUT SETTING UP
ALL THIS INFRASTRUCTURE??
	AWS Fargate is a serverless computing engine and hosting option for container based workloads.

Fargate abstracts away the infrastructure management issue. You no longer have to "see" the EC"
instance details. You just see fargate clusters and ECS.

You only pay when your containers are running.
Kinesis
Which Aws Service To Publish A Website?
Ref: https://adrianhall.github.io/cloud/2019/01/31/which-aws-service-for-hosting/
Brilliant article that quotes have been made from in above sections. Summary here:

Options include:
- Amazon S3 + Amazon Cloudfront
	Best for: Pre-packaged static sites provided by marketing organizations that are deployed via
	drag and drop.
- AWS Amplify Console
	Best for: Static site generators, JavaScript based single page applications.
- Amazon Lightsail
	Best for: Common web stacks like LAMP, MEAN, and PHP, or common web applications like WordPress,
	MediaWiki, and Magento.
- AWS Elastic Beanstalk
	Best for: Your most challenging enterprise apps where access to the underlying OS is required.
- AWS EC2 - Do-it-yourself compute / storage / network stack
	Best for: Your most challenging enterprise apps where you can use a variety of AWS services to
	augment your service offering.