SLL/TLS & Digital Cerficiates
Page Contents
References & Resources
There is a ton of resource available on this. Here are some of the most useful pages that I've found, the Zytrax pages being of particular note.
- [1] The book "Network Security with OpenSSL" by Pravir Chandraet al.
- [2] Zytrax's "Survival Guide - TLS/SSL and SSL(X.509) Certificates". [Last accessed: 13-Jan-2015]
- [3] Zytrax's "Survival Guide - Encryption, Authentication" . [Last accessed: 13-Jan-2015]
- [4] Command Line Fanatic's "OpenSSL tips and tricks" [Last accessed: 13-Jan-2015]
- [5] PS | Enable's "A Brief Primer on Diginal Certificates and File Types" [Last accessed: 13-Jan-2015]
- [6] Crypto++'s Keys and Formats Guide [Last accessed: 28-Apr-15]
- [7] A Layman's Guide To A Subset Of ASN.1, BER, and DER, by Luca Deri. [Last accessed: 28-Apr-15]
Please note, I'm not an expert with SSL/TLS, just learning myself. A lot of the examples below are creating toy, or test, CAs, certificates, keys etc and would have to be considerably reviewed if you were going to actually run your own CA! The above links are the most informative I found whilst trying to learn about the subject...
What Is SSL/TLS and Why Use It?
The 30,000 Foot View
SSL/TLS is a security protocol that allows two communicating parties to authenticate (verify) each other and then talk privately. This means that if Alice is talking with Bob, she can be sure that she is actually talking to Bob and not some imposter pretending to be him. Likewise Bob can be sure he is talking to the real Alice. As well as allowing them to verify each other it also allows them to talk without being "overheard" by any one else.
When Alice talks to Bob, she will ask Bob for his certificate. She can then verify Bob's certificate by checking if it has been signed by someone she already trusts (usually a "Certificate Authority"). Bob can ask the same of Alice (refered to as "Client Authentication").
The reason to use SSL/TLS is therefore quite clear. For example, when I log onto my bank's server I can be sure that I'm talking to my real bank, not some fraudster, and that the transactions and information I send to and receive from the bank are private and viewable only by me.
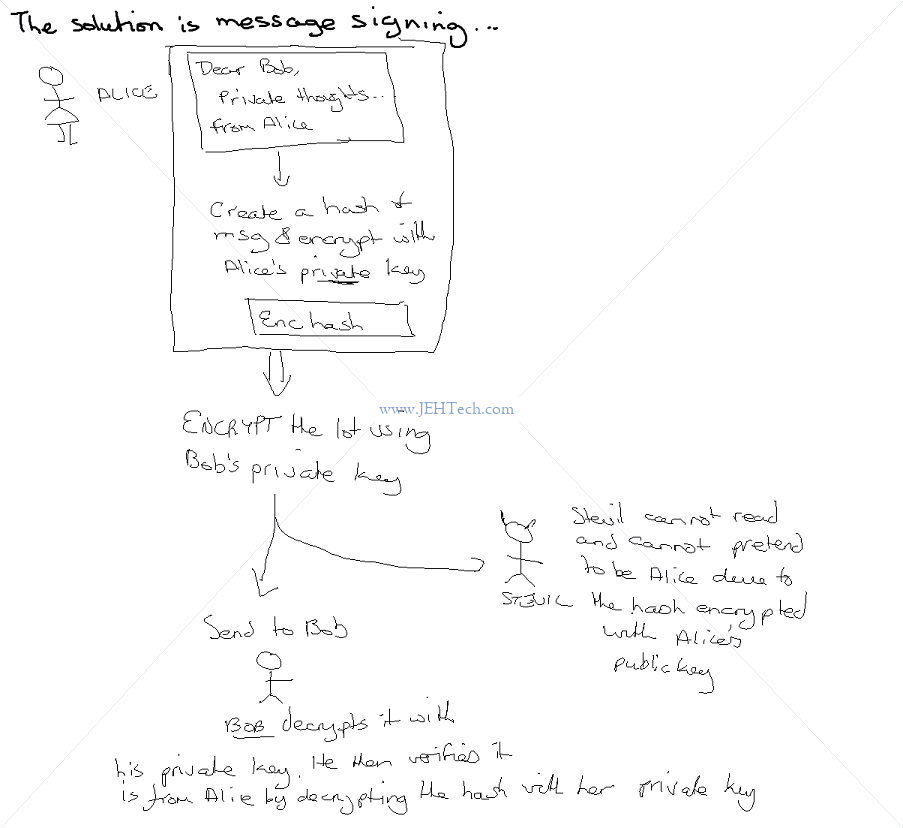
So what would happen if Alice was just talking to Bob without any protection? Well, the standard view involved the characters Alice and Bob, who we've met, but also involves a shady thrid party, Eve, who is going to try and listen to their conversation...
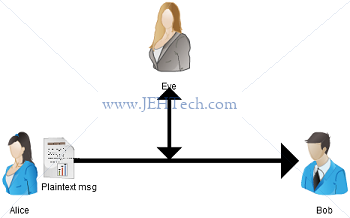
In the above diagram Alice sends a message plaintext to Bob. She's not done anything to it, it is in whatever format the document natively exists in. For example if she's sending a Word document then this is just a plain DOCX file that any one with Word can open. But because packets on the Ethernet are not private, Eve an easily pick up the document too and read it.
What Alice needs to do is jumble up her document in such a way that Bob will know how to un-jumble it and Eve will not. It is important that Eve cannot (easily) guess at how to un-jumble it either. To do this Alice and Bob encrypt their messages.
Manage Multiple Keys
On *nix systems you private & public keys are generally stored in your home directory
in the ~/.ssh/ directory. You can have multiple key pairs that you use for access
to different services. And, in fact, you should have multiple key pairs as using the same key
to access different services is generally considered to be weak security. Why? If you use
multiple keys and one is compromised, only one of the services you use is compromised. If
the same key were used for multiple services then, all those services could be
compromised by the one key being discovered!
To manage multiple keys on *nix systems use ssh-agent:
ssh-agent is a key manager for SSH. It holds your keys and certificates in memory, unencrypted, and ready for use by ssh. It saves you from typing a passphrase every time you connect to a server. It runs in the background on your system, separately from ssh, and it usually starts up the first time you run ssh after a reboot.
The SSH agent keeps private keys safe because of what it doesn’t do:
- It doesn’t write any key material to disk.
- It doesn’t allow your private keys to be exported.
Private keys stored in the agent can only be used for one purpose: signing a message.
The following is cribbed and annotated/extended from How To Manage Multiple SSH Key Pairs by Joseph Midura
# Generate a public/private key pair
# Best practice is to protect the key with a STRONG passphrase. RSA currently recommended key length
# at time of writing is 4096. Also consider using Ed25519 instead (see later section)
#    See: https://medium.com/risan/upgrade-your-ssh-key-to-ed25519-c6e8d60d3c54
# If you can link with a password manager than generates long, random, strong passphrases event better!
# E.g. for LastPass
#    CLI: https://github.com/lastpass/lastpass-cli
#    Random guide: https://svkt.org/~simias/lpass/
ssh-keygen -t rsa -f key-name -b 4096

# Create known hosts file. Joseph Midura's article recommends creating a known hosts file for each
# key. The file stores all hosts you connect to using this profile - easier debugging that putting
# all keys in one known hosts file and jumbling them all up!
touch known_hosts_github (~/.ssh/known_hosts_github)

# Create / append to config File (~/.ssh/config). This is an example for github...
Host github.com
   Hostname github.com
   User git
   AddKeysToAgent yes        # Specifies whether keys should be automatically added to a running
                             # ssh-agent(1). If this option is set to yes and a key is loaded from a
                             # file, the key and its passphrase are added to the agent...
   IgnoreUnknown UseKeychain # Only for macOS Sierra 10.12.2 or later to load the keys automatically
   UseKeychain yes           # Only for macOS Sierra 10.12.2 or later to load the keys automatically
   IdentifyFile ~/.ssh.github_key
   UserKnownHostsFile ~/.ssh/known_hosts_github # Specifies a file to use for the user host key
                                                # database instead of ~/.ssh/known_hosts.
   IdentitiesOnly yes        # Specifies that ssh should only use the identity keys configured in
                              # the ssh_config files, even if ssh-agent offers more identities.

# Add keys to ssh agent so you dont have to keep entering your password
eval "$(ssh-agent -s)"
#                  ^
#                  Generate Bourne shell commands on stdout. Use eval to execute in current shell
# Outputs something like this:
#    SSH_AUTH_SOCK=/tmp/ssh-FkzuDlePs3bV/agent.75; export SSH_AUTH_SOCK;
#    SSH_AGENT_PID=76; export SSH_AGENT_PID;
#    echo Agent pid 76;

# Add PRIVATE key
ssh-add path-to-prv-key

# Copy PUB key to clip board and paste into relevany service
cat key_file | pbcopy # or clip.exe in WSL
Keep Your Keys Fresh
Good practice to re-generate your keys at least yearly. Also regenerate to the currently recommended key length and algorithms. For example, 2048 is no long a sufficient key length for RSA, 4096 recommended at the time of writing. Also, could be worth using ED25519 instead of RSA:
The Ed25519 was introduced on OpenSSH version 6.5 ... It's using elliptic curve cryptography that offers a better security with faster performance ...
...
Today, the RSA is the most widely used public-key algorithm for SSH key. But compared to Ed25519, it's slower and even considered not safe if it's generated with the key smaller than 2048-bit length ...
E.g.:
ssh-keygen -o -a 100 -t ed25519 -f ~/.ssh/id_ed25519 -C "john@example.com"
Url, Uri Or Urn?
Summary...
-----------

URL: 	Uniform Resource Locator.
			[Scheme]://[Domain]:[Port]/[Path]?[QueryString]#[FragmentId]
		URL points to something "real", i.e., a resource on a network which can be located using
		the URL.

URN:	Uniform Resource Name.
			urn:[namespace identifier]:[namespace specific string]
		"Namespace identifier" is just a string that identifies how the "namespace specific string"
		should be evaluated. It is usually registered with IANA. E.g. isbn:1234567891234

URI:	Uniform Resource Identifier == URLs + URNs.
		It is a superset of URL and includes URLs and URNs. URI is just a unique string that
		identifies something and does not have to have any other meaning other than that. I.e., it
		does not have to "point" to anything real. Some example of URIs are, taken verbatim from the RFC:
			ftp://ftp.is.co.za/rfc/rfc1808.txt
			http://www.ietf.org/rfc/rfc2396.txt
			ldap://[2001:db8::7]/c=GB?objectClass?one
			mailto:John.Doe@example.com
			news:comp.infosystems.www.servers.unix
			tel:+1-816-555-1212
			telnet://192.0.2.16:80/
			urn:oasis:names:specification:docbook:dtd:xml:4.1.2

URLs both identify objects and tell you how to find them.
URIs just identify objects (so are a superset of URLs), and URNs are just URIs that may persists
through time.

More Detail...
---------------
The following StackOverflow thread [https://stackoverflow.com/a/176274] gives many really good
expanations. You can read the RFC here.

From the RFC an "identifier" is defined as follows:
	An identifier embodies the information required to distinguish what is being identified from all
	other things within its scope of identification.

So how is a URL different from a URI. The RFC also explains that:
	A URI can be further classified as a locator, a name, or both. The term "Uniform Resource
	Locator" (URL) refers to the subset of URIs that, in addition to identifying a resource, provide
	a means of locating the resource by describing its primary access mechanism (e.g., its network
	"location")

So, a _locator_ is something that will provide a means of locating the resource. A URL is therefore
an identifier and a locator, whereas a URI is an identifier, but not necessarily a locator.

I.e., URIs uniquely identify things but may not tell you how to find them. URLs are the subset of
URIs that tell you how to find the objects identified.

And what about URNs?
	The term "Uniform Resource Name" (URN) ... refer[s] to both URIs ... which are required to
	remain globally unique and persistent even when the resource ceases to exist or becomes
	unavailable, and to any other URI ...

So URNs are just URIs that may or may not persist even when the resource has ceased to exist. Kind
of a permanent URI which is more heavily regulated, usually by IANA.

So, to summarise we could say that URLs both identify objects and tell you how to find them. URIs
just identify objects, and URNs are just URIs that may persists through time.
Cookies
From https://www.kaspersky.com/resource-center/definitions/cookies:
    HTTP cookies, or internet cookies, are built specifically for Internet web browsers to track,
	personalize, and save information about each user’s session. A “session” just refers to the
	time you spend on a site.

Sent by servers, stored by browsers.
Stored using name/value in browser map. If site name exists in browser cookie cache then upon
site visit, bowser sends cookie to server.

Allows server to add STATE to the STATELESS HTTP protocol.

Two types of cookies:
    1. Session cookies. Only whilst in webstie domain. Not stored to disk.
	2. Persistent cookies. Stored to disk. Normally exire after some time. Used for authentication
	   and tracking.
Common Website Attack Types / Policies / Terminology
Same Origin Policy (SOP)
------------------------
From https://portswigger.net/web-security/cors/same-origin-policy:
    When a browser sends an HTTP request from one origin to another, any cookies, including
	authentication session cookies, relevant to the other domain are also sent as part of the
	request. This means that the response will be generated within the user's session, and include
	any relevant data that is specific to the user. Without the same-origin policy, if you visited
	a malicious website, it would be able to read your emails from GMail, private messages from
	Facebook, etc.
    ...
	...
	The same-origin policy was defined many years ago in response to potentially malicious
	cross-domain interactions, such as one website stealing private data from another. It generally
	allows a domain to issue requests to other domains, but not to access the responses.


Same origin == same port, URL scheme (HTTP != HTTPS for example) and domain.


Cross origin genarally applied to what JS code can access. For e.g. JS code from jeh-tech.com
won't generally be able to access resources on some-other-site.com using the SOP.


SOP not applied to img, video, script etc tags etc. Not generally applied to page resources.
BUT JS won't be able to read contents of resources loaded from different origins!


Cross Origin Resource Sharing (CORS)
------------------------------------
Sometimes SOP too restrictive... solution is CORS which enables controlled access to resources
located outside of a given domain.

From https://portswigger.net/web-security/cors:
    A controlled relaxation of the same-origin policy is possible using cross-origin resource
	sharing (CORS).

From: https://portswigger.net/web-security/cors/access-control-allow-origin:
    The cross-origin resource sharing specification provides controlled relaxation of the
    same-origin policy for HTTP requests to one website domain from another through the use
    of a collection of HTTP headers. Browsers permit access to responses to cross-origin
    requests based upon these header instructions.
	...
	The Access-Control-Allow-Origin header is included in the response from one website to
	a request originating from another website, and identifies the permitted origin of the
	request. A web browser compares the Access-Control-Allow-Origin with the requesting
	website's origin and permits access to the response if they match.

Caution! Badly configured CORS can cause security holes!

CORS is allowed by the server being contacted. It returns permission to the browser and
the browser then allows the client code to access these resources.

Normal Request:
    GET /data HTTP/1.1
    Host: jeh-tech.com
    Origin : https://some-resource

If jeh-tech.com is to be granted access to "some-resource", the HTTP response would look
something like the following (other responses using wildcards etc. also possible):
    HTTP/1.1 200 OK
    ...
    Access-Control-Allow-Origin: https://jeh-tech.com


The site https://portswigger.net has loads of good example of security vulnerabilities
that can be introduced by badly configured CORS as well as free labs!


Content Security Policy (CSP)
-----------------------------


Cross Site Scripting (XSS)
--------------------------
See: https://owasp.org/www-community/attacks/xss/
From: https://portswigger.net/web-security/cross-site-scripting
    XSS ... allows an attacker to circumvent the same origin policy, which is designed
	to segregate different websites from each other.  Cross-site scripting
	vulnerabilities normally allow an attacker to masquerade as a victim user, to
	carry out any actions that the user is able to perform ... If the victim user has
	privileged access ... [then da da daaaa!!]
    ...
	Cross-site scripting works by manipulating a vulnerable web site so that it returns
	malicious JavaScript to users ...


Cross Site Request Forgery (CSRF)
---------------------------------
A cross-origin attach.

Server-side request forgery (SSRF)
----------------------------------

XML External Entity (XXE) Injection
-----------------------------------
Secure Sockets Layer (Ssl) And Transport Layer Security (Tls)
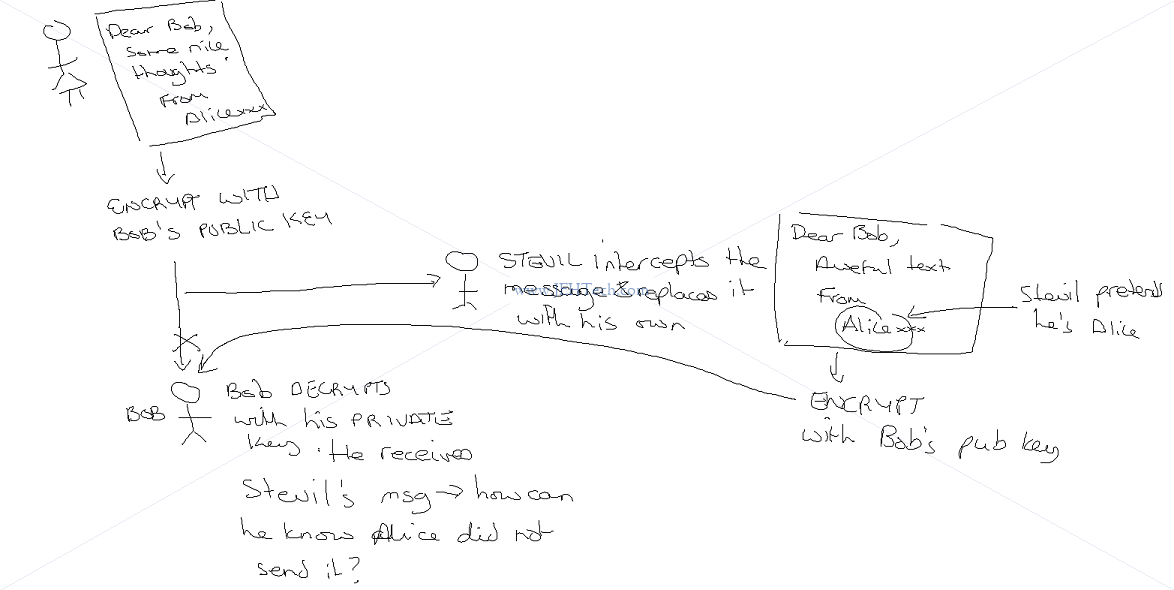
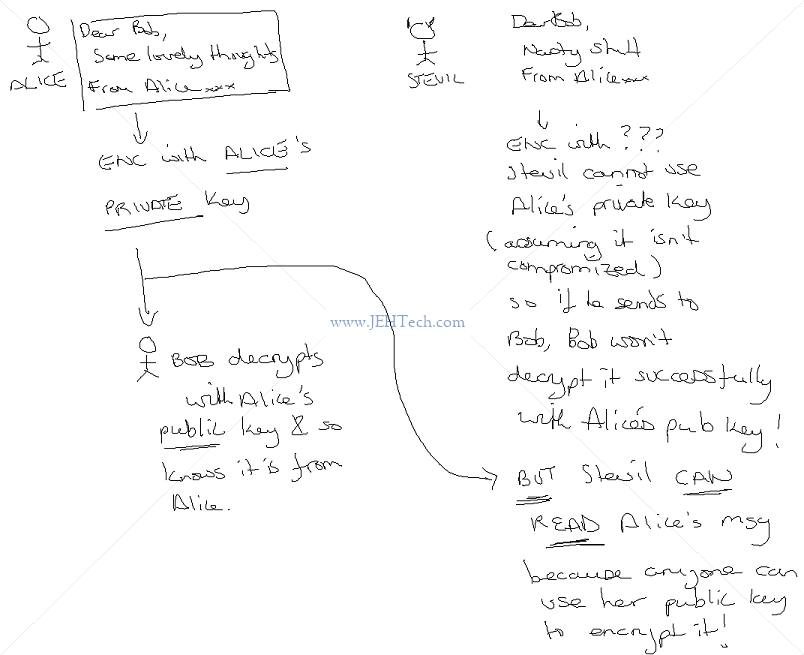
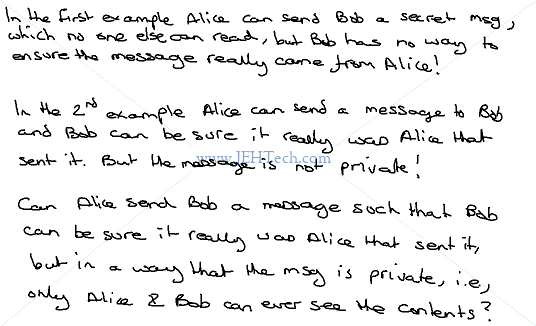
SSL and TLS are protocols that provide secure communications over a computer network or link.

SSL IS NOW DEPRECATED - IT IS SUPERCEEDED BY TLS

TLS is based on SSL, developed due to vulnerabilities in SSLv3.
SSL term is commonly used BUT NOW REFERS TO TLS, generally.

TLS provides
	- Encryption
		I.e. the message contents are "hidden" - just look like random crap.
	- Data integrity
		I.e. can be sure the message contents have not been changed.
	- Authentication
		I.e., the message came from the person you think it came from and not some imposter.

Encryption ONLY HIDES the message, but it does not tell you that the message came from the person
you think it did, or that it hasn't been changed:

	ALICE -------[Encrypted Msg] -------> Bob
	             [With Bob Pub Key]       [Decrypt with Bob Prv Key]
OR
	ALICE -------[Encrypted Msg] -------> Bad Guy -------> [New encrypted msg] -----> Bob
	             [With Bob Pub Key]                        [With Bob Pub Key]

To communicate with Bob, Alice encrypts her messages with Bob's public key. No one should be
able (reasonably to decrypt this message without Bob's private key. Thus, the message contents
are secret. But, as can be seen, nothing prevents a "bad guy" encrypting his own message with
Bob's public key, sending it to be Bob, whilst claiming to be Alice. Bob has no way to know he is
actually talking with the real Alice!

To verify the sender and be confident the message didn't change requires SIGNING. I.e.,
SIGNING PROVIDES AUTHENTICATION.


Types Of Keys
--------------
	1. Symmetric Keys:
		The same key encrypts and decrypts the message. E.g. like key to your door - it both locks
		and opens the door.
	2. Asymmetric Keys:
		Two different keys - one encrypts and one decrupts. It would be like having one key to
		lock your front door. Using the same key wouldn't unlock it, you'd need a different key.
		The keys are known as PUBLIC and PRIVATE keys and come as a KEY PAIR.


SSL/TLS use public/private key encryption.

Public keys can be made available to the world. But, because of this, you can't tell whether the
public key you have received from your bank, really is the bank's public key and not that of a
frauster. Enter DIGITAL CERTIFICATES.
Digital Certficiates & The Chain Of Trust
Digital Certificates
--------------------

A passport links a photo and a person. Link verified by TRUSTED AUTHORITY, in this case the passport
office. Passport hard to fake so when Alice presents her passport we can match the passport photo
with her face and then infer that Alice is indeed who she says she is.

Digital certificate does the same thing for a PUBLIC KEY. It LINKS PUBLIC KEY TO AN ENTITY and in
the same way as a passport, has been VERIFIED (SIGNED) BY A TRUSTED AUTHORITY.

Provides method to DISTRIBUTE TRUSTED PUBLIC KEYS.

To obtain a digital certificate is just like applying for passport. Send appropriate forms, the CA
does some checks and sends you back your keys enclosed in a certificate. The process of asking a CA
to verify your keys is called A CERTIFICATE SIGNING REQUEST (CSR).


What the Digital Certificate (SSL Cert) Looks Like
--------------------------------------------------

+------------------------------+
|      +----------------+      | }
|      |    SSL Cert    |      | } Information describing the mysite.com and the proxy
|      |   MySite.com   |      | } CA. Also the public key of MySite
|      |  Proxy CA Info |      | }
|      | MySite PUB KEY |      | }
|      +----------------+      | }
|                              |
|                              |
|    +--------------------+    |                          } The hash verifies that the SSL info
|    | +----------------+ |    | } A hash of the info     } has not been chaged.
|    | |      HASH      | |    | } describing mysite.com  } The encryption of the hash ensures that
|    | +----------------+ |    | } and the proxy          } the hash has not been changed or
|    |                    |    |                          } proofed.
|    |   Encrypted with   |    |                          } The encrypted block can be decrypted
|    |    private key     |    |                          } by anyone with the *public* key, so
|    |       of CA        |    |                          } is easily verifiable.
|    +--------------------+    |                          }
|                              |
|       SSL Certificate        |
|                              |
+------------------------------+

MySite's certficiate contains MySite's public key. This means that anyone can send MySite private
data - they encrypt with MySite's public key, and only MySite can decrypt this by using the private
key.

But when Alice accesses MySite, how does she know that the certificate she receives is actually
from MySite, and not an imposter? The answer lies in the encrypted hash of the certificate info.

The CA uses its private key to encrypt a hash of the certificate information that it has issued.
The CA, as a trusted thrid party, promises that they have verified that MySite is who it claims to
be.

Because the CA encrypts the hash with its private key, anyone can decrypt it with the CA's public
key. But, for this decryption to work, the encryption MUST have been done by the CA's private key,
so we know, assuming no compromised keys, that it definitely is the CA that generated the hash.

Then, as long as the decrypted hash matches the client generated hash of the certificate info, it
then can be sure that the certificate has been signed by the trusted third party, and so the
certificate and thus MySite, can be trusted to be who they say they are... nice!


Types Of Certificates
---------------------
	1. Domain Validated Certificates (DVC)
		X.509 digital certificate for TSL where ID of applicate has been validated by proving some
		control over a DNS domain.
		Not as trusted as EVC. It is the LEAST TRUSTED option.
		Validation process normally fully automated so is CHEAPEST.
		BAD FOR SENSITIVE DATA.
	2. Extended Validated Certificates (EVC)
		Used by HTTPS websites and proves ID of the legal entity that controlls the domain.
		MORE EXPENSIVE because requires verification of the reqiesting entity's ID by CA (i.e. we
		used the passport office!). Manual processes required.

Level of encryption the same, its just the degree of trust that differs.


Certficate Restrictions
-----------------------
Normally valid for use on single fully qualified domain name (FQDN). I.e if certificate issued for
www.jeh-tech.com, cannot be used on www.subdomain.jeh-tech.com or www.random-domain.com.

From Wikipedia:
	A fully qualified domain name (FQDN), sometimes also referred to as an absolute domain name,
	is a domain name that specifies its exact location in the tree hierarchy of the Domain Name
	System (DNS). It specifies all domain levels, including the top-level domain and the root zone.
	A fully qualified domain name is distinguished by its lack of ambiguity: it can be interpreted
	only in one way.

Secure multiple subdomains using WILDCARD CERTIFICATE, which would cover *.jeh-tech.com, for e.g.

NOTE: This ONLY COVERS SUBDOMAINS - it cannot cover totally different domains.

To cover multiple different domans requires a SAN (Subject Alternative Name) Certificate.


Root CAs
---------
Root CAs keep their private keys under numerous layers of security - they are the "gold standard"
super trusted, uncompromisable source of trust. We agree to totally trust the root CA and this trust
is built on their ability to keep their private keys, well, private!

This is super important because if their private keys are compromised then all of root CA's
certificates are compromised!!


Intermediate CAs & The Chain Of Trust
-------------------------------------
Act like a "proxy" for Root CAs. The root CA signs their certificates.

E.g. mysite.com makes a CERTIFICATE SIGNING REQUEST (CSR) to an intermediate CA (ICA), which signes
the cert and returns the SSL cert it to mysite.com. It is signed by the ICA, but another chained
certificate is provided that is the ICA certificate that is signed by the root CA - we get A CHAIN
OF CERTIFICATES.


mysite.com ---> Site's SSL certificate  AND  ICA's certificate  }
                       ^                           ^            } A chain of certificates, or trust.
                       |                           |            } Our SSL is signed by ICA, which
                   [Signed by]                     |            } vouches for our authenticity.
                       |                           |            } This certificate is CHAINED to
ICA ----------> ICA's Certificate -----------------+            } the ICA's own certificate, which
                       ^                                        } is vouched for by the root CA who
                       |                                        } everyone completely trusts. This
                   [Signed by]                                  } is the chain. Its like accepting
                       |                                        } a recomendation from a friend.
                    Root CA                                     }


A browser, for example, will have a list of CA authorities it deems as trust worthy. So when it
receives a certificate, it may not trust the proxy, but as long as it can travel down the chain to
find a source it does trust, it can decide to trust the proxy, as-if the party it trusts has
"recommonded" the proxy.

This means that the browser has a list of trusted public keys which it can use to decrypt one of
the certificates in ther certificate chain it receives, in order to verify it. It can decrypt the
hash, therefore it knows, if the decrypted hash matches the locally-generated hash for the cert,
     a) The hash definitely comes from who it says its from,
     b) The hash has not been tampered with

This means it can trust the public key contained in the cert and use that to decrypt down the chain
and so on to verify everything.


Commercial v.s. Roll-Your-Own
-----------------------------

Can create your own certificates and they will be just as secure. Only difference is that you will
have to install your certificate to your browsers list of trusted certificates manually, as opposed
to a commercial one which should already be, at least indirectly via a chain-of-trust, in your
browsers trust list.


Certificate Pinning
-------------------
From : https://owasp.org/www-community/controls/Certificate_and_Public_Key_Pinning
    Pinning is the process of associating a host with their expected X509 certificate or public key.
    Once a certificate or public key is known or seen for a host, the certificate or public key is
    associated or "pinned" to the host.

    Pinning effectively removes the "conference of trust". An application which pins a certificate
    or public key no longer needs to depend on others - such as DNS or CAs - when making security
    decisions relating to a peer's identity. For those familiar with SSH, you should realize that
    public key pinning is nearly identical to SSH's StrictHostKeyChecking option.
        [From https://www.ibm.com/docs/en/zos/2.2.0?topic=SSLTBW_2.2.0/com.ibm.zos.v2r2.foto100/sconfigf.htm:
             If [StrictHostKeyChecking is set to "yes"] ssh will never automatically add host keys
             to the ~/.ssh/known_hosts file and will refuse to connect to a host whose host key has
             changed. This provides maximum protection against trojan horse attacks, but can be
             troublesome when the /etc/ssh/ssh_known_hosts file is poorly maintained or connections
             to new hosts are frequently made. This option forces the user to manually add all
             new hosts.
        ]

    Pinning leverages knowledge of the pre-existing relationship between the user and an
    organization or service to help make better security related decisions. Because you already have
    information on the server or service, you don't need to rely on generalized mechanisms meant to
    solve the key distribution problem. That is, you don't need to turn to DNS for name/address
    mappings or CAs for bindings and status.
Let'S Encrypt And Certbot
Let's encrypt (https://letsencrypt.org/) "is a free, automated, and open certificate authority (CA),
run for the public’s benefit."

It provides digital certificates for free to enable the prolific use of TLS for websites. To
verify that the domain it issues a certificate for belongs to the person requesting the certificate
it uses the ACME protocol. This basically requires the domain owner to demonstrate that s/he owns
the domain by creating subdomains that the ACME can challenge (see
https://tools.ietf.org/html/draft-ietf-acme-acme-03#section-7).

CertBot (https://certbot.eff.org/) is a little tool that helps automate the ACME protocol to make
it easier for website owners to generate their own certificates. Requires SSH access to the server.

CertBot can, if you are using modern Linux and servers like Apache, NginX etc do both the obtaining
_and_ the installing of the certificates for you.
   See: https://certbot.eff.org/docs/using.html#certbot-commands

At the end of the issuance process you should obtain the following files:
   - The public SSL certificate (certificate.crt)
   - The private key (private.key)
   - Optionally, a list of intermediate SSL certificates or an intermediate SSL certificate bundle.
     (chain.pem and/or certificate_and_chain.pem)


Generic Cerbit *Nix Installation
--------------------------------
See: https://certbot.eff.org/lets-encrypt/pip-other

wget https://dl.eff.org/certbot-auto && \
sudo mv certbot-auto /usr/local/bin/certbot-auto && \
sudo chown root /usr/local/bin/certbot-auto && \
sudo chmod 0755 /usr/local/bin/certbot-auto


Manual Certificate Request
--------------------------
See: https://certbot.eff.org/docs/using.html#manual

To make the request on any machine other than your webserver you can perform the steps for domain
validation yourself.

Use CertBot in MANUAL MODE.

It can do an HTTP or DNS challenge. In the former you upload a specific file to you website to
demonstrate ownership and in the latter you add a DNS entry to demonstrate ownership. Similar to
webroot plugin:
	"... If you’re running a local webserver for which you have the ability to modify the content
	being served, and you’d prefer not to stop the webserver during the certificate issuance
	process, you can use the webroot plugin...""
		-- https://certbot.eff.org/docs/using.html#webroot

But, would this mean you could own the website hosting but not the domain name? I suppose that
situation is unlikey.

Use:
	sudo /usr/local/bin/certbot-auto certonly --manual
	^^^
	Installs dependencies for you which is why it needs sudo. Takes forever!

After the install the manual process is deliciously easy :) It defaults to HTTP challenges by
default. It will ask you to create 2 files with certain contents that can be publically accessed
from your website. When it can read back these challenges it knows you have control of the site and
can issue the certificate. You should see output similar to the following:
IMPORTANT NOTES:
     - Congratulations! Your certificate and chain have been saved at:
           /etc/letsencrypt/live/www.jehtech.com/fullchain.pem
       Your key file has been saved at:
           /etc/letsencrypt/live/www.jehtech.com/privkey.pem
       Your cert will expire on 2020-09-15. To obtain a new or tweaked
       version of this certificate in the future, simply run certbot-auto
       again. To non-interactively renew *all* of your certificates, run
       "certbot-auto renew"
     - If you like Certbot, please consider supporting our work by:

       Donating to ISRG / Let's Encrypt:   https://letsencrypt.org/donate
       Donating to EFF:                    https://eff.org/donate-le
Key Formats
See: https://www.codeproject.com/Articles/25487/Cryptographic-Interoperability-Keys
    https://www.ssl.com/guide/pem-der-crt-and-cer-x-509-encodings-and-conversions/
    https://www.ssl.com/faqs/what-is-an-x-509-certificate/
Secure Quick Reliable Login (Sqrl)
https://www.youtube.com/watch?v=Y6J1Yt8YYj0
Attack (-Defense) Trees
From https://www.youtube.com/watch?v=oi_CfBe_umU&ab_channel=Z.CliffeSchreuders
begin with hazard of interest eg. access to our system and work down tree through levels of
cause and events until we meet fundamental events. e.g. cause/event is an attack

From http://www.sti.uniurb.it/events/fosad05/attacktrees.pdf:
An attack tree is a tree in which the nodes represent attacks. The root node of the
tree is the global goal of an attacker. Children of a node are refinements of this goal,
and leafs therefore represent attacks that can no longer be refined
...
The purpose of an attack tree is to define and analyze possible attacks on a system in
a structured way. This structure is expressed in the node hierarchy, allowing one to
decompose an abstract attack or attack goal into a number of more concrete attacks
or sub-goals.

See: https://www.youtube.com/watch?v=ig0oLBzAXdQ&ab_channel=OWASPOttawaOWASPOttawa
     https://www.schneier.com/academic/archives/1999/12/attack_trees.html
     https://www.gmv.com/DocumentosPDF/checker/PoEM-2016.pdf
     https://satoss.uni.lu/members/piotr/adtool/
     https://link.springer.com/chapter/10.1007%2F978-3-642-19751-2_6
     https://satoss.uni.lu/members/barbara/papers/slides.pdf

Useful free tool is ADTree

Quantitative analysis of an attack-defense scenario:
	* Standard questions
		* What is the minimal cost of an attack?
		* What is the expected impact of a considered attack?
		* Is special equipment required to attack?
	* Bivariate questions
		* How long does it take to secure a system, when the attacker
		* has a limited budget?
		* How does the scenario change if both, the attacker and the
		  defender are affected by a power outage?

An attack tree only looks at the likelihood of an attack, not the impact.
Tend to only do attack trees for things that would cause significant damage.
For the L, M, H, E domain, the tool combines the scores in a relatively straight-forward way.
For nodes with 'AND' children, the node score is the highest of the child scores. For nodes with or
'OR' children, the node score is the lowest of the child scores. e.g. if a goal can be attained with
an 'L' child OR a 'H' child, then the goal is given an 'L' difficulty (because the attacker would do
the low-difficulty thing).  If a goal can be attaioned with an 'L' child AND an 'H' child, then the
goal is given an 'H' difficulty, because it's the most difficult thing to achieve. These just
propagate up the hierarchy. Hence... for a goal with OR children, you need to address ALL of the
lowest goal ratings in order to raise the rating of the goal.  With AND children you need to
address ANY of the lowest goal ratings in order to raise the rating of the goal. Hence the attack
tree helps you target mitigations to those things that are most worth doing. i.e. if a goal can be
achieved with an 'L' OR an 'M' child, there's little point in adding a mitigation that increases the
'M' to 'H' because the 'L' still dominates the goal... etc.

Attacker objects have
   - Clear motivation
   - Clear impacts (severities) on company / organisation / stakeholders

To list attacker objectives:
   - Make a list of types of attacker
   - Make a list of objectives
   - Ask, what affects the bottom line? E.g. revenue loss, theft, brand damage

Do a tree for each attacker and objective combination
Worry about WHAT not how.
Use the tree:
   - Summaries all attacker objectives
   - Detailed look at attack vectors
   - Anaylisis of risk based on likelihood
   - PRIORITISED list of mitigations

What should come out of the attack tree should be a list of actions that *need* to be done as being
necessary to appropriately secure the resource in question, relative to its positions/importance
withing the system context.
Coursera Course Notes - Introduction To Cybersecurity Tools & Cyber Attacks By Ibm
NIST - Info security is the protection of informations systems from unorthorized access, use, disclosure,
disruption, modification, or destruction in order to provide confidentiality, integrity, and availablilty.

CIA Triad:
	1. Confidentiality
		I.e., privacy - prevent unorthorized access to data. I.e., only the sender and the
		receiver, can understand the message.
	2. Information security
		Can involve authentication where the sender and receiver want to confirm each others
		identity in order to securly communicate.
	3. Integrity
		Ensure information is a accurate and not corrupted/spoofed etc in any way over its entire
		lifecyle. I.e., a message in transity, has it been tampered with?!
	4. Availability
		Requires routine manintenance and upgrades.

	The protection of information systems from unorthorized access, use, disclosure, distruption,
	modification, or destruvtion in order to provide CIA - confidentiality, information
	secutiry, integrity and availablility.

Vocab:
Vunerability: Flaw, loophole, oversight, or error that can be exploited to violate system
              security policy.
Exploit:      Defined way to breach secutiry of an IT system through a vunerability.
Threat:       Event, natural or man-made, able to cause negative impact to a system.
Risk:         Siutation involving exposure to danger.

THREATS ------> NATRUAL FACTORS ------> Lightning, hurricane etc
       \------> HUMAN FACTORS   ------> INTERNAL FACTORS  ------> Current employees
	                         \                           \------> Former employees
							  \ ------> EXTERNAL FACTORS  ------> Malicious events ------> Hackers/Crackers ------> Virus/Trojan/Worm

Early cyber security operations:
	* Clipper Chip
		Gov was going to try and put chips into all US phones to spy.
	* Moonlight Maze
		Attempted to collect passwords from *nix servers.
		Attackers used lots of proxies and tools.
	* Solar Sunrise
		Series of attacks to department of defense networks. Exploited a known OS vunerability.
		Left a backdoor and sniffer in the network!
		Many attacks launched in this way and on other countries and organisations.
		Attack was launched by two teenagers in California, not a nation state!!
	* Buckshoot Yankee
		he Buckshoot Yankee was categorized as the most significant breach of the US military
		computers ever by the Secretary of Defense, Willian J. Lynn.
	* Desert Storm
		Some of the radars are destroyed or are tampered with fake formation. So that's one of the
		things that the US military command used to successfully attack some of their key military
		buildings of Saddam Hussein.
	* Bosnia
		On Bosnia, there was a lot of cyber operations. But things like, for example, fake news,
		fake information delivered to the militaries in the field
	* Stuxnet (https://en.wikipedia.org/wiki/Stuxnet) - delivered into Iran nuclear plants. The worm
		is widely understood to be a cyberweapon built jointly by the United States and Israel in a
		collaborative effort known as the "Olympic Games".

In 2016 forbes estimated $400bn losses from cyber attacks. $100bn via cyber crime, $2.1bn data loss.

See also: IBM X-Force Threat Intellegence Index.

CYBER SECURITY PROGRAM
   |
   + ---- SECURITY PROGRAM: Evaluate, create teams, baselines, risks etc for monitoring and control
   |
   + ---- ASSET MANAGEMENT: Documents, for example, as assets. Classify assets and protect.
   |
   + ---- ADMIN CONTROLS: Policies, proceedures, standards, DR, compliance and physical security.
   |
   + ---- TECH CONTROLS: Network infrastructure such as fire walls, monitoring, logging etc.

Security challenges:
	* Simple high level requirements can turn into complex access management implementations...
	* Security solutions themselves can be attacked if they expose structures as targets
	* Protection of assets can cause complexity. E.g. program is easy to create for the
		purpose it is needed for but making it secure can add great complication.
	* Key management is hard
	* Protectors have to be right all the time, attackers just once!
	* No one likes the hassle of security until it is needed (seat belt philosophy)

- Challenge assumptions - ass/u/me
	- Eplicitly list all assumptions as they are thoughts/ideas that lead us to predict (incorrectly) outcomes
		- Invite all stakeholders
		- Brainstorm
		- Look for phrases like "Will always/never...", "Generally the case..."
	- Examine each:
		- Why do I think this is correct?
		- When could this be false?
		- How confidentam I that it is valid?
		- If it were invalid, what impact would it have and what is the severity?
	- Categorise based on evidence:
		- Solid & well supported
		- Correct, with caveats
		- Unsupported / questionable (doesn't necessarily mean wrong - need more data and iterate)
	- If any need more data, gather and re-do.
- Consider alternatives
	- Failure to consider missing data, which we may be assuming or interpolating unconciously, can lead to bad decisions
		- Brainstorm
		- Who/What/Why/Where/When/How
			- Who is involved and effected by the outcome
			- What is at stake? What could happen? Whats the problem? Whats the desired outcome?
			- Where did this take place? Where are the stakeholders? Where's the infrastructure? Does geography make a difference?
			- When did it take place? Does timing make a difference? WHen are the key dates?
			- Why are we doing this? What are the benifits? Key drivers? Motives?
			- How will we appoach this? Is it feasible? Be detailed and specific and think through all alternatives.
		- AVOID becoming engrossed in one explanation - always consider alternatives - brainstorm!!
			- Get different perspectives.
		- Consider the oposite of your assumption - the null hypothesis.
- Evaluate data
	- What does normal look like? This is the key to anomoly detection.
	- Establish basline for whats normal: web traffic, network sensors, endpoint activity, source/dest/ volume/velocity.
	- Lookout for inconsistent data
	- Test data against each hypothesis and discard those that dont fit.
- Identify key drivers
	- Technology
	- Regulatory - ISO27001 / GDPR / HIPAA / CyberEssentials
			- https://www.ncsc.gov.uk/cyberessentials/overview
				- Cyber Essentials is a simple but effective, Government backed scheme that will help you
				  to protect your organisation
			- https://www.iso.org/isoiec-27001-information-security.html
				- ISO/IEC 27001:2013 (also known as ISO27001) is the international standard for information
					security. It sets out the specification for an information security management system (ISMS).
					- ISO27001 includes things like screening employees on joining, etc, as well as other IT
						security measures that help address social engineering.
					- Provides requirements for establishing, implementing, maintaining and continually
						improving an information security management system by preserving the confidentiality,
						integrity and availability of information by applying a risk management process.
				- ISO/IEC 27000:2018 INFORMATION TECHNOLOGY
					Security for any kind of digital information, ISO/IEC 27000 is designed for any size of
					organization.
				- ISO/IEC 27001:2013 INFORMATION TECHNOLOGY
					Security for any kind of digital information, ISO/IEC 27000 is designed for any size of
					organization.
				- ISO/IEC 27002:2013 INFORMATION TECHNOLOGY
					Security techniques - Code of practice for information security controls.
	- Society
	- Supply Chain
	- Employees
	- Threat actors. WHat are they're technical capabilities and drivers etc.
- Understand context [most important![
	- The operation environment in which you are working
	- Consider the PERSPECTIVE of other stakeholders, managers, colleagues,clients.
		- Put yourself in other peoples shoes...
	- Framing techniques - does it need to be set in broader context.
		E.g. Slow elevator
		Problem framing: "Elevator too old and slow" ---> "Waiting is boring"
		Solutioon space: replace elevator            ---> Reduce perception of wait time.

Terminology:
Black Hats  - Black hats are criminals
White Hats  - White hats are security researchers or hackers who, when they discover a
              vulnerability in software, notify the vendor so that the hole can be patched.
Gray hats   - Gray hats fall into the middle ground between these two other hacker categories.
              Gray hats sell or disclose their zero-day vulnerabilities not to criminals, but
              to governments, i.e., law enforcement agencies, intelligence agencies or militaries.
Red hat     - Like white hat hackers, red hat hackers also want to save the world from evil hackers.
              But they choose extreme and sometimes illegal routes to achieve their goals.
Greenhat    - Newbie unskilled hacker
Hacktivists - The likes of Anonymous, LulzSec or AntiSec. Their mission is largely politically
              motivated or ideological.
Insider     - Insiders are made up of disgruntled employees, whistleblowers or contractors.
              Oftentimes their mission is payback
State Sponsored Hackers - unlimited potential resources to target systems such as national
                          infrastructure, in order to achieve political or military goals
Cyber Terrorists - Motivations based on political or paramilitary goals
Cyber Criminal - Money motivated


Some resources:
https://www.sans.org/critical-security-controls/
	The CIS Critical Security Controls are a recommended set of actions for cyber defense
	that provide specific and actionable ways to stop today's most pervasive and dangerous
	attacks.
https://wiki.owasp.org/index.php/Category:OWASP_Project#tab=Project_Inventory
https://www.issa.org/
	ISSA is the community of choice for international cybersecurity professionals
	dedicated to advancing individual growth, managing technology risk and protecting
	critical information and infrastructure..
https://www.first.org/membership/benefits
https://cybersecurityventures.com/cybersecurity-associations/#home/?view_1_page=1


2019 Ponemon Institute Study on the Cyber Resilient Organization:
https://www.ibm.com/account/reg/us-en/signup?formid=urx-37792&cm_mmc=Search_Google-_-Security_Resilient-_-WW_NA-_-%2Bponemon%20%2Binstitute_b_OV64453&cm_mmca1=000024FH&cm_mmca2=10006542&cm_mmca7=9021964&cm_mmca8=kwd-294934641027&cm_mmca9=_k_EAIaIQobChMI5OLK2tv_4QIVDp7ACh1sHwNWEAAYASAAEgL2w_D_BwE_k_&cm_mmca10=326203471649&cm_mmca11=b&gclid=EAIaIQobChMI5OLK2tv_4QIVDp7ACh1sHwNWEAAYASAAEgL2w_D_BwE

	High automation organizations are better able to prevent security incidents and disruption
	Computer Security Incidence Response Plan (CSIRP) that is applied consistently across the entire enterprise
	Communication with senior leaders about the state of cyber resilience occurs more frequently
	Senior management in high performing organizations are more likely to understand the correlation between cyber resilience and their reputation in the marketplace
	High performers are more likely to have streamlined their IT infrastructure and reduced complexity
	Steps taken to significantly improve cyber resilience
		Hiring skilled personnel
		Visibility into applications and data assets
		Improved information governance practices
		Implementation of new technology, including cyber automation tools such as artificial intelligence and machine learning
		Elimination of silo and turf issues
			https://www.lightercapital.com/blog/what-are-organizational-silos/
		Engaging a managed security services provider
		Training and certification for Cybersecurity staf
		Training for end-users
		C-level buy-in and support for the cybersecurity
		Board-level reporting on the organization’s cyber resilience
	High performers are more likely to reduce complexity in their IT infrastructures. A

	The eight most effective security technologies
		Identity management & authentication
		Security information & event management
		Incident response platform
		Cryptographic technologies
		Anti-malware solution (AVAM)
			Anti-malware and antivirus definitely aren’t the same. Antivirus depends more on the
			signatures of known viruses to detect specifics viruses or types of viruses, much like
			a flu shot. In comparison, anti-malware is made up of nonsignature-based anomalies that
			detect unknown anomalies (malware that may not have been detected before).
		Intelligence and threat sharing
		Network traffic surveillance
		Intrusion detection & prevention


Security threats +-------> Human Factors
                 |              +-----------> Internal
                 |                               +----------> Former employees
                 |                               +----------> Current employees
                 |              +-----------> Exernal - Malicious events - hackers - viruses,
                 |                                      trojans worms (malware)
                 -------> Natural Factors - Lightnigh, hurricane, floods etc


Examples of tools hacks use:
	SeaDaddy and SeaDuke (CyberBears US Election)
	BlackEnergy 3,0 (Russion Hackers)
	Shamoon
	Duqu and Flame
	DarkSeoul
	WaanaCry


See X.800 : Security architecture for Open Systems Interconnection for CCITT applications


Attack Classification
	Passive Attacks
		Eavesdropping - Can go undetected for a *long* time
		Traffic analysis - Frequency and size of messages.
			- Attacks confidentiality by infering data from traffic analysis
	Active Attacks
		Explicit interception and modification
		- masquerade - impersonation of an authorized user or known user
		- replay - copy of legitimate message captured and re-trasmitted. Attacks
		  integrity of system's data.
			- e.g replay the API call to transfer money from account A to account B.
		- modification
		- frabrication - a fake message from A to B, but really sent by C
		- destruction/corruption - destruction/corruption of data and/or other resources
		- denial/interruption of service
		- disclosure of sensitive information - an attack on the confidentiality of a message

Security services
	- Protect a system resource.
	- Security Analysis - Any analysis must take into account likely attacker goals and motivation to
	  put it in the appropriate context to provide input for prioritisation of issues and mitigations.
	- Security objectives are a statement from the perspective of what needs to be protected in
	  the system. Categorise into CIA.
		- must consider the breadth of confidentiality, integrity and availability issues in the
		  context of the associated business risk.
		- split into primary and secondary objectives and what in the CIA they are focussed on.
	- Analysis methodologies - ADTrees, STRIDE / Secure Development Lifecycle (SDL)
		- E.g. Microsoft Threat Modeling Tool 2016:
		  https://www.microsoft.com/en-us/download/details.aspx?id=49168
		- Thread risk scoring
			- Microsoft DREAD: https://docs.microsoft.com/en-gb/archive/blogs/david_leblanc/dreadful
				- Damage Potential
				- Reproducibility
				- Exploitability
				- Affected Users
				- Discoverability
			- CVSSv3 - Common Vunerability Scoring System
				- Has average of 3 levels to score against 8 criteria:
					- Attack Vector (AV): Network (N) Adjacent (A) Local (L) or Physical (P)
					- Attack Complexity (AC): Low (L) or High (H)
					- Privileges Required (PR): None (N) Low (L) or High (H)
					- User Interaction (UI): None (N) or Required (R)
					- Scope (S): Unchanged (U) or Changed (C)
					- Confidentiality Impact (C): None (N) Low (L) or High (H)
					- Integrity Impact (I): None (N) Low (L) or High (H)
					- Availability Impact (A): None (N) Low (L) or High (H)
			- See also: https://owasp.org/www-community/Application_Threat_Modeling
			            OWASP Security Knowledge Framework:
			               https://demo.securityknowledgeframework.org/
	- Intended to counter security attacks by securing transfers of data.
	- Implement security policies, which themselves are implemented by security mechanisms
		- Security policy is derived from the business policy
			E.g. business policy is no unauthorized data movements so a security policy may
			be protocol supression, the mechanism being disabling FTP, for ex.
		- the mechanism implements a policy, like ID & authentication, digital signatures,
		  access controls, etc
	- X.800
		- Authentication - I am who I say I am
		- Access Control - Only authorized people can access resource
		- Data Confidentiality - No unauthoirized disclosure
		- Data Integrity - Tamper proof
		- Non-Repudation - Can't be denied by one pary in the communications
		- Availability

A watering hole attack works by identifying a website that's frequented by
users within a targeted organisation, or even an entire sector, such as defence,
government or healthcare.That website is then compromised to enable the
distribution of malware.

Spectra class attacks exploit flaws in the interfaces between wireless cores in which one
core can achieve denial of service (DoS), information disclosure and even code execution
on another core.

MALWARE AND TYPES OF MALWARE:
-----------------------------
Malware: Short for malicious software. Any software used to disrupt computer or mobile operations,
gather sensitive information, gain access to private computer systems or display unwanted
advertising.

Many malware attacks attempt to remain hidden on the host using resources for potential uses
such as launching service attacks, hosting elicit data, accessing personal or business information.

Virus = malware that spreads from computer by computer via HUMAN INTERACTION. Tactics to "hide"
like polymorphic code etc.

Worm = self replication that does NOT RELY ON HUMAN INTERACTION.

Tojan = malware that damages system or gives access to host. spread by posing as a legitimate
piece of s/w, e.g. a game

Spyware = Track and report host usage or get files/browsing info etc

Adware = Duh!

RATS = Remote Access Tojans/Tools -  let attacker gain access and control of host

Ransomware = Restricts access to data on host to only attackers.
	- See https://securityintelligence.com/ransomware-response-guide/
	- See also https://www.ibm.com/downloads/cas/EV6NAQR4
	- most ransomware does NOT require administrative privileges
	- End users are often the first line of defense. If they are unable to recognize a
	  security event and report issues via effective channels, the attack may continue
	  uninterrupted and spread throughout the network
	- Most malware uses DNS to connect to control server - try https://www.quad9.net/ as
	  counter measure.
			Quad9 is a free service that replaces your default ISP or enterprise Domain Name Server (DNS)
			configuration. When your computer performs any Internet transaction that uses the DNS (and
			most transactions do), Quad9 blocks lookups of malicious host names from an up-to-the-minute
			list of threats.
	- Consider disabling windows scripting host
			Create the following registry key and value to disable:
				HKEY_LOCAL_MACHINE\SOFTWARE\Microsoft\Windows Script Host\
					Settings\ Enabled and set the ‘Value data’ field of Enabled to ‘0’
				(That is a zero without the quotes).
	- Develop and rehearse an incident response plan:
		- NIST Incident Response Process, contain four major steps:
			1. Preparation
			2. Detection and Analysis
			  - Detection
					- Identify any and all infected systems and those in imminent danger of
						becoming infected.
					- Contain the spread of the infection as soon as possible: isolate infected systems
					- CAUTION: just because only one infected host encrypting filesis found, it does not mean
						others have not! Remain vigilant.
					- Do not reboot or restart an infected system.
						The infected system should be hibernated and disconnected from the network immediately
						and IT security staff should be notified been affected
				- Analysis
					- Identifying the specific variant of ransomware in action
					- Determining how the malware entered the organization (root cause analysis)
			3. Containment, Eradication, and Recovery
			4. Post-Incident Activity


Protection against attacks:
	- Anti virus software
	- Inter-operation systems / Intrusion detection systems / Unified threat management systems
	- Updating / Patching - use latest versions to address security holes
	- IAM etc
	- Training staff
	- Policy


Internet Securty Threats
------------------------

1. Network Mapping (Casing the joint!)
	- Find out what services are implemented on the network.
	- Use ping to determine hosts on network
	- Port-scanning: try to connect to each port in sequence and see what happens
	- nmap

	- Counter measures:
		- Traffic monitoring and analysis
		- Use host scanners to record network structure and alert if unexpected computers
		  appear on network.
		- White list of MAC addresses to be allowed on network.
2. Packet sniffing
3. IP Spoofing
	- Any IP address can be put in the source address in the IP packet as well as any MAC in the
	  Ethernet frame etc.

	- Counter measures:
		- Doesn't counter everything but can use INGRESS FILTERING.
		  Routers should not forward outgoing packets with invalid source addresses - e.g. datagram
		  with IP source address not in router's network. Cannot be applied to every network.
4. [Distributed] Denial of Service (DDoS)
	- Counter measures:
		- filter out flooded packets (e.g. SYN) before they reach the network
		  but throws good out with bad.
		- Traceback to source of floods.
		- Neither options very effective short or long term
5. Host Insertions
	- Generally an INSIDER THREAT
	- Malicious computer placed on network
	- Countermeasures:
		- Network monitoring and profiling.
			- Host scanning to discover hosts against MAC address inventory.
		- Maintain inventory of computers on netowkr by MAC address
		- Missing hosts ok but new unknown hosts are BAD.

	- Rouge software processes
		- A malicious program on an authorized computer or good process co-opted for malicious puposes.
			- Used to gain access to sensitive info (exflitration of sensitive data)
			- Used to monitor network
			- Etc.


KILL CHAIN
----------
The set of work that needs to be done to compromise a victim.
1. Reconnaissance - Research, identification and selection of targets
2. Weaponization - Pairing remote access malware with exploit into a delivery payload - eg word doc
3. Delivery - Transport weapon to target (e.g. email with doc attachment)
4. Exploitation - Once delivered it is triggered to exploit vulnerable apps or systems.
5. Installation - Weapon installs backdoor on system allowing persistent access
6. Command and Control - Outside server comms with the weapons to provide "hands on keyboard access"
                         inside the target's network.
7. Actions on Objective


Social engineering
------------------
Fool victim into voluntarily giving attacker information
Toolkits like SET - Social Engineering Toolkit (SET) - (Kali Linux but independently installable
and available on GitHub!!) allow attacker to clone websites to create lookalikes.

Phishing & Vishing
------------------
Open source campaign tools like "Go Fish" allow you to guage your cybersecurity training program
inside your company is something that's adding value to the knowledge of the users, for example.


X-Force Research
----------------
IBM X-Force Threat Intelligence research reports can help you keep pace with an evolving threat
landscape and learn how to protect your networks and data from the latest threats and attack vectors.

https://www.ibm.com/security/data-breach/threat-intelligence
https://www.ibm.com/security/data-breach/mss-security-threat-research

	- More linux malware discovered in 2020 - 56 new malware families.
	- Ransomeware the biggest threat: 23% of all events X-Force responded to, $123m+ made by attackers!
	- Citrix flaw used in 25% of all attacks in first 3 months of 2020


MITRE ATT&CK FRAMEWORK
----------------------
https://attack.mitre.org/

MITRE ATT&CK is a globally-accessible knowledge base of adversary tactics and techniques based on
real-world observations. The ATT&CK knowledge base is used as a foundation for the development of
specific threat models and methodologies in the private sector, in government, and in the
cybersecurity product and service community.


Security event manager
----------------------
Security event management (SEM), and the related SIM and SIEM, are computer security disciplines
that use data inspection tools to centralize the storage and interpretation of logs or events
generated by other software running on a network.

Security information management (SIM): Long-term storage as well as analysis and reporting of
    log data.
Security event manager (SEM): Real-time monitoring, correlation of events, notifications and
    console views.
Security information and event management (SIEM): Combines SIM and SEM and provides real-time
    analysis of security alerts generated by network hardware and applications.[
Self-Signed CA, Server & Client Keys, Using Open SSL
Creating A Test Certificate Authority
The online documentation is good but it still took me a little while to put all the pieces together by reading around different sites and posts on StackOverflow etc, so below are the steps I've used to create my own CA with a self-signed certificate using openssl on Linux.
The following is mostly based on the examples from "Network Security with OpenSSL" by Pravir Chandra et al...
To begin with create the directory structure for the CA. The OpenSSL CA utility expects the CA data to live in its own directory with certain subdirectories and files.
 Click to expand directory structure details...
| Filename | Reason |
|---|---|
| private | A directory which should have permissions set such that only the CA and other privaledged users can access it. It will store the CAs private key which must be kept secret. |
| certs | Directory containing all certificates issued by the CA. The file names will be in the format serial_number.pem |
| index.txt | This is a text file containing a "database" of the
certficiates issued. It will map certificate serial number to certificate details.
V 160105171237Z 01 unknown /CN=.../ST=.../C=.../emailAddress=.../O=.../OU=... ^ ^ ^ ^ ^ ^ ^ Certificate details ^ ^ Serial number of certificate ^ Valid until date Certificate is valid. (R if revolked, which will also create a revokation date field after the valid until field) |
| serial | This file is used to keep track of the next certificate serial number to be issued. It is represented in ascii as a hex string which must be at least 2 digits long (hence the leading zero in the initialisation below). When a new certificate is issued, as you will see later, the current index is saved as serial.old and is used to create the new certificate. serial is updated with the next sequential number. |
Use the following bash commands to create the CA utility directory and required files. The environment variable YOUR_CA_DIR can be set to any directory of your choosing (which should not exist yet or at least be empty).
mkdir -p $YOUR_CA_DIR
cd $YOUR_CA_DIR

mkdir -p private              # private stores the CA's private key
chmod g-rwx,o-rwx private     # make directory only accessable by owner
mkdir -p certs                # certs stores all certificates PA issues
touch index.txt               # "database" to keep track of issues certificates
echo '01' > serial            # serial file contains a hex index (of at least 2 digits) used by
                              # OpenSSL to generate unique certificate numbers
Now begin to write our the openssl.cnf file. This is the config file used by the CA. One thing I found was that the certificates generated were made to be valid from tomorrow (based on system date) and I wanted them valid from the day of creation. Hence, below I set a default start date (TODO: re-check this!)
#
# Start to write the configuration file that will be used by the OpenSLL command line
# tool to obtain information about how to issue certificates.
# Note: Set default start date so that self-signed certificate is valid from NOW!
DEFAULT_STARTDATE=$(date +'%y%m01000000Z')
cat <<EOF >openssl.cnf
[ ca ]
default_ca = your_test_ca

[ your_test_ca ]
certificate       = $YOUR_CA_DIR/cacert.pem
database          = $YOUR_CA_DIR/index.txt
new_certs_dir     = $YOUR_CA_DIR/certs
private_key       = $YOUR_CA_DIR/private/cakey.pem
serial            = $YOUR_CA_DIR/serial

default_crl_days  = 7
default_days      = 356
default_md        = sha256
default_startdate = $DEFAULT_STARTDATE

policy            = your_test_ca_policy
x509_extensions   = certificate_extensions

[ your_test_ca_policy ]
commonName              = supplied
stateOrProvinceName     = supplied
countryName             = supplied
emailAddress            = supplied
organizationName        = supplied
organizationalUnitName  = optional

[ certificate_extensions ]
basicConstraints  = CA:false

EOF
Click to expand a more detailed commentry on the above...
#
# Next add information to the configuration file that will allows us to create a self-signed
# root certificate. NOTE: This is only for internal in-house use. We should use a real
# CA-issued certificate for production!!
cat <<EOF >>openssl.cnf
[ req ]
default_bits         = 2048
default_keyfile      = $YOUR_CA_DIR/private/cakey.pem
default_md           = sha256
default_startdate    = $DEFAULT_STARTDATE
default_days         = 356

prompt               = no
distinguished_name   = root_ca_distinguished_name
x509_extensions      = root_ca_extensions

[ root_ca_distinguished_name ]
commonName           = Your Mini CA
stateOrProvinceName  = Hampshire
countryName          = UK
emailAddress         = ca@yourdomainname.com
organizationName     = Your Organisation Name Ltd

[ root_ca_extensions ]
basicConstraints = CA:true

EOF
Click to expand a more detailed commentry on the above...
The next thing to do is to tell the openssl tool where to find the config file that was just created. You can do this by exporting the environment variable OPENSSL_CONF. Another option is to use the -config option to the openssl req command, which will override anything set in OPENSSL_CONF...
OPENSSL_CONF=$YOUR_CA_DIR/openssl.cnf
export OPENSSL_CONF
Now it is time to actually create the CA. In this one command we will create the CA's private key and a certificate request which will be used to generate a certificate (which includes the public key) signed using the CA's private key...
NOTE: In the following example I use expect to automate the generation of the CA key set because for me this is just a little test CA which I won't be using to actually publish certificates... for that I'd get a certificate from a real CA! Embedding passwords in a script like this is very insecure, so unless your just playing around, don't do it.
#
# Now generate self-signed certificate and generate key pair to go with it...
# This will place the file cakey.pem in the CA's "private" directory
echo "Creating self-signed certificate with password \"3nigma\""
expect - <<EOF >> ca_debug.txt
puts [concat "OPENSSL_CONF =" \$::env(OPENSSL_CONF)]
spawn openssl req -x509 -newkey rsa:2048 -out cacert.pem -outform PEM -verbose
expect "PEM pass phrase:"
send "your-password\r"
expect "PEM pass phrase:"
send "your-password\r"
expect eof
EOF

if [ ! -f $YOUR_CA_DIR/private/cakey.pem ] || [ ! -f $YOUR_CA_DIR/cacert.pem ]; then
	echo "### ERROR: Failed to create certificate authority!"
	exit 1
fi
At this point the CA is fully created and can be used to generate signed certificates. The CA certificate is self-signed however so if you are going to use it with an HTTPS server and want to connect to it with your browser, you will need to be able to tell your browser to accept certificates signed by this new CA. For this, the cacert.pem must be converted into PKCS12 format so that it can be loaded into your browsers trusted root CAs list.
#
# This is the certificate for use with web browser...
echo "Now attempting to create cacert PFX P12 key for web browser"
expect - <<EOF >> ca_debug.txt
spawn openssl pkcs12 -export -in cacert.pem -out cacert.p12 -name "MyLittleTestCACertificate" -cacerts -nokeys
expect "Enter Export Password:"
send "a-password-of-your-choosing\r"
expect "Enter Export Password:"
send "a-password-of-your-choosing\r"
expect eof
EOF

if [ ! -f cacert.p12 ]; then
   echo_error "### ERROR: Failed to export CA certificate to PKCS12 format"
   exit 1
fi
Importing The CA Certificate Into Chrome
The browser I'm using is Chrome, so here is how to load this certificate into Chrome...
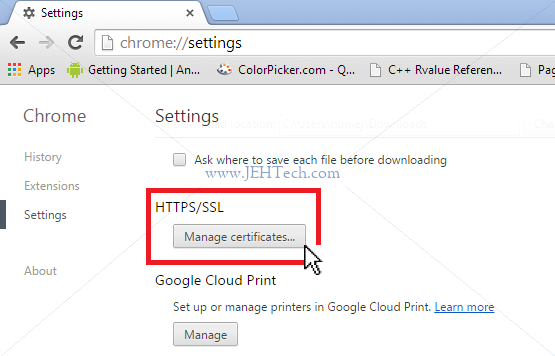
- Browse to the location chrome://settings/
- Expand the settings list to show advanced settings
- Navigate down to the "HTTPS/SSL" section a click on "Manage certificates"
- In the resulting pop-up, selected the "Trusted Root Certification Authorities" tab
and then click the "Import..." button. The certificate import wizard will pop up.
Click "Next >"
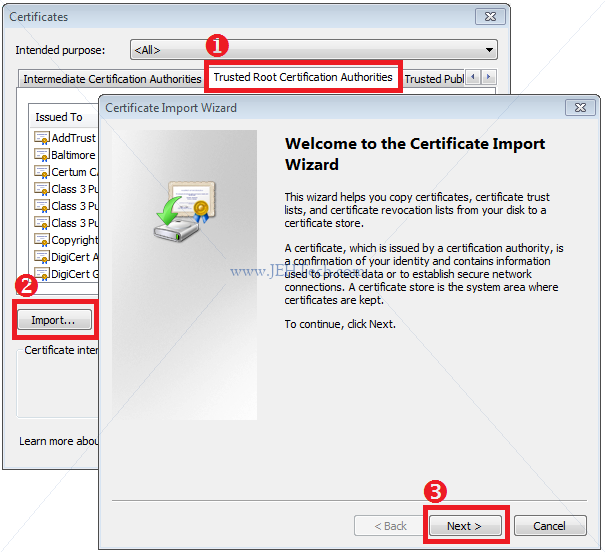
- Follow through the rest of the dialog until your certificate has been imported. You will be promted to enter the password you used for the export password. Once imported instead of getting an unknown CA error when navigating to your HTTPS pages you will see the hallowed green padlock.
Generating Private Keys And Signed Certificates From The Test CA
I ended creating a script to automate this as well. It has quite a few shortcomings but remember, this is just a test script... I'm playing around!
The script defines one function called "generate_certificate_and_keys". It's supposed to automate as much of the certificate issuing as possible for me (I only want a client and server certificate/private key in my little test scenario). Given this, the function only lets you set the common name and password for the certificate. It could easily be extended to accept all the certificate information as parameters rather than the hard coded details...
Lets start with the function header with all the initialisation stuff.
function generate_certificate_and_keys {
	if [ $# -ne 3 ]; then
		echo_error "### ERROR: Must call with 3 parameters: target, passphrase, cn"
		return 1
	fi

	: ${YOUR_CA_DIR:=~/my_ca}   # Default dir for CA
	TARGET=$1
	PASSPHRASE=$2
	CN=$3
	DEBUG_FILE=${TARGET}_debug.txt
	PRV_KEY_FILE=${TARGET}_priv_key.pem
	CERT_REQ_FILE=${TARGET}_key_request.pem

	echo "\n\n######################################################"
	echo " Generating a key set and certificate for $TARGET"
	echo "    - Your_CA_DIR = $YOUR_CA_DIR"
	echo "######################################################"

	if [ ! -d $YORU_CA_DIR ]; then
		echo "### ERROR: The directory $YOUR_CA_DIR does not exist. You must create the"
		echo "           certificate authority first by running ./make_ca.sh"
		return  1
	fi
So, pretty simple so far. The function makes sure the CA exists and accepts 3 arguments, the name of the target we're gerating for, the passphrase for the target's private key, and the common name to input into the certificate.
Because in the CA generation example we used the environment variable OPENSSL_CONF to specify a config file for the certificate generation whilst creating the CA, we must be sure to unset it so that the default OpenSSL configuration will be used.
unset OPENSSL_CONF #< Make sure we're using the default OpenSSL configuration
Now we want to go ahead and create the private key for our target and a certificate request, which will be "sent" to our CA to be signed.
	#
	# Generate two files
	#   1. ${CERT_REQ_FILE} contains the certificate request
	#   2. ${PRV_KEY_FILE} contains the private key associated with the public key
	#      embedded in `${TARGET}_key_request.pem`
	expect - <<EOF > $DEBUG_FILE
		spawn openssl req -newkey rsa:2048 -keyout $PRV_KEY_FILE -keyform PEM -out $CERT_REQ_FILE -outform PEM
		expect "PEM pass phrase:"
		send "$PASSPHRASE\r"
		expect "PEM pass phrase:"
		send "$PASSPHRASE\r"
		expect "Country Name"
		send "Your Country\r"
		expect "State or Province Name"
		send "Your State\r"
		expect "Locality Name"
		send "Your Locality\r"
		expect "Organization Name"
		send "Your Test $TARGET Request\r"
		expect "Organizational Unit Name"
		send "Your Unit Name\r"
		expect "Common Name"
		send "$CN\r"
		expect "Email Address"
		send "someone@your-company.com\r"
		expect "A challenge password"
		send "QWERTY\r"
		expect "An optional company name"
		send ".\r"
		expect eof
EOF

	if [ ! -f $PRIV_KEY_FILE ] || [ ! -f $CERT_REQ_FILE ]; then
		echo_error "### ERROR: Failed to generate the certificate request for $TARGET properly"
		return 1
	fi
Now that the target has it's own private key and a certificate request (which will contain it's public key), get the CA to signed the certificate with it's private key.
Note that once again, because we are using our own CA we must export OPENSSL_CONF (or use the -config option) to ensure the OpenSSL tools use our CA's specific configuration.
	OPENSSL_CONF=${YOUR_CA_DIR}/openssl.cnf
	export OPENSSL_CONF
Our CA configuration now being in play we can run the certificate request processing. I found that it seemed to generate certificates which were only valid from tomorrow (relative to current system time). I wanted to use them straight away so I forced a specific start date...
	expect - <<EOF >> $DEBUG_FILE
		puts [concat "OPENSSL_CONF =" \$::env(OPENSSL_CONF)]
		# Set certificate startdate to start of TODAY (otherwise they seem to be dated for tomorrow?)
		set startdate [clock format [clock seconds] -format %y%m01000000Z]
		puts [concat "START DATE IS " \$startdate]
		spawn openssl ca -in ${TARGET}_key_request.pem -startdate "\$startdate"
		# Pass phrase is for the CA's certficate
		expect "Enter pass phrase"
		send "CA-certificates-password (see section on Creating The CA)\r"
		expect "Sign the certificate?"
		send "y\r"
		expect "1 out of 1 certificate requests certified, commit?"
		send "y\r"
		expect eof
EOF
At this point several things have happened:
- Whilst creating the certificate, in order to generate certificates with a unique serial number, the file serial.txt was consulted. It is a requirement of X509 certificates that they contain a serial number unique to the CA. Therefore, the CA common name and serial number provide a globaly unique identified for the certificate. The hexadecimal number in serial.txt is used as the new certificates serial number. The file is then saved as serial.txt.old and a new serial.txt is written with the next sequential serial number to be used in the next certificate generation. So, assuming no simultaneous/concurrent use of the CA (which I'm not sure is supported anyway), I think I'm safe to find the most recently generated certificate using the text in serial.txt.old - the CA stored the certificate in certs/<serial-number>.pem.
- The CA utility has updated it's index.txt file, adding in information about the certificate that has just been generated.
	SERNO=$(cat ${YOUR_CA_DIR}/serial.old)
	CA_SERNO_FILE=${YOUR_CA_DIR}/certs/${SERNO}.pem
	cp ${CA_SERNO_FILE} ${TARGET}_certificate.pem
	if [ $? -ne 0 ]; then
		echo_ERROR "### ERROR: Failed to access the ${TARGET} certificate"
		return 1
	fi
	echo "The certificate is now available in ${YOUR_CA_DIR}/certs/${SERNO}.pem and will be copied to ${TARGET}_certificate.pem"
The above snipped copies the newly created certificate from certs/<serial-number>.pem into a more readable directory name and certificate file name.
The next thing I do is to do a quick sanity check to make sure that the target's private key and its new certificate that I copied to ${TARGET}_certificate.pem do indeed belong together. To do this I get the OpenSSL utilities to print out the moduli for the private key and the certificate. If these match then all's good. This method was taken from an article on command line fanataic.
 	PRIV_KEY_MODULUS=$(openssl rsa -in ${PRV_KEY_FILE} -noout -modulus -passin pass:$PASSPHRASE)
	CERT_MODULUS=$(openssl x509 -in ${TARGET}_certificate.pem -noout -modulus)
	if [ "$PRIV_KEY_MODULUS" != "$CERT_MODULUS" ]; then
		echo "### ERROR: The private key and certificate for ${TARGET} do not appear to be matched"
		echo "           pkey modulus is $PRIV_KEY_MODULUS"
		echo "           cert modulus is $CERT_MODULUS"
		return 1
	fi
The next job is to convert the private key to an RSA private key. I'm doing this because TclHttpd requires the server private key in this format...
	expect - <<EOF >> $DEBUG_FILE
		spawn openssl rsa -in ${PRV_KEY_FILE} -inform PEM -out ${TARGET}_priv_key.rsa
		expect "Enter pass phrase for ${PRV_KEY_FILE}"
		send "${PASSPHRASE}\r"
	expect eof
EOF

	if [ ! -f ${TARGET}_priv_key.rsa ]; then
		echo_error "### ERROR: Failed to generate ${TARGET}_priv_key.rsa"
		return 1
	fi
And then finally create a PKCS12 certificate that includes both the public and private key for the target. I used this when trying out client authentication. Could install this to Chrome (in the same way as previously described but using the "Personal" tab in the Certificates dialog) and then have the client authenticate with the server
	expect - <<EOF >> $DEBUG_FILE
	spawn openssl pkcs12 -export -inkey ${PRV_KEY_FILE} -in ${TARGET}_certificate.pem -out ${TARGET}_certificate_with_priv_key.p12 -name "Test${TARGET}Key"
		expect "Enter pass phrase"
		send "${PASSPHRASE}\r"
		expect "Enter Export Password:"
		send "${PASSPHRASE}\r"
		expect "Enter Export Password:"
		send "${PASSPHRASE}\r"
		expect eof
EOF
	if [ ! -f ${TARGET}_certificate_with_priv_key.p12 ]; then
		echo_error "### ERROR: Failed to generate P12 certificate-with-private-key"
		return 1
	fi
The last thing I did was to copy all of the generated certificates into a location under the CA-root-dir/certs directory... CA-root-dir/certs/<serno>_<target name>/...
	#
	# Now move all these files back into the CA under a directory "full_certs" so that
	# they can all live in one place that we can then keep track of in SVN (and not clutter
	# up this directory)
	CERTS_DEST_DIR=${YOUR_CA_DIR}/certs/${SERNO}_$(echo $TARGET | tr " " "_")
	CERT_FILES="debug.txt
	            key_request.pem
	            priv_key.pem
	            certificate.pem
	            certificate_with_priv_key.p12
	            priv_key.rsa"
	echo "Moving certificates to $CERTS_DEST_DIR"
	mkdir -p $CERTS_DEST_DIR

	for file in $CERT_FILES
	do
		file=${TARGET}_${file}
		mv ${file} $CERTS_DEST_DIR
		if [ $? -ne 0 ]; then
			echo_error "### ERROR: Failed to move ${file} to $CERTS_DEST_DIR"
			exit 1
		fi
	done
	echo_bold "\nAll $TARGET certificates now reside in $CERTS_DEST_DIR"
	return 0
}
Now to generate my CA automatically and the client and server certificate and private keys that I want for my little test, I just use the following.
#!/bin/bash
source gen_keys.sh
: ${YOUR_CA_DIR:=../Some-Default-Dir}   # Default dir for CA

# Create the Certificate Autority with self-signed certificate
./gen_ca.sh
if [ $? -ne 0 ]; then exit 1; fi

# Generate certificates and private keys for a test server
generate_certificate_and_keys "server" "password" "xx.xx.xx.xx"
if [ $? -ne 0 ]; then exit 1; fi

# Generate certificates and private keys for a test client
generate_certificate_and_keys "client" "password" "www.my-new-test-client.com"
if [ $? -ne 0 ]; then exit 1; fi
Note that the common name (CN) used in the above examples, at least for the server, must match the actual domain name of the server. So if your server just has some IP address replace the "xx.xx.xx.xx" with its IP address. If it has a domain name replace with the root domain name.
Keys And Formats
ASN.1, BER and DER
ASN.1 refers to the ITU's Abstract Syntax Notation One: specification available from the ITU website.
The idea of ASN.1 notation is to provide a mechanism to specify complex datatypes in a manner that is independent of how the data is going to be transmitted/represented. In other words, using ASN.1 notation, complex datatypes can be specified in a standard language. Then when we want to send the datatype it can be converted from this standard language to any representation needed, like smoke signals, bytes on a wire, etc. The point is that the application is decoupled from the transfer. The application knows what it wants to do with data and what sort of data it is but doesn't need to concern itself with the inifinite different representations that might be needed when transferring this data to other people on arbirary platforms over arbirary communications channels.
ASN.1 lets one build up complex datatypes from a set of simple types. The character set it uses is very limited and includes only the characters "A-Z", "a-z". "0-9" and a set of punctutation characters such as ";:=,{}<.()[]-". As such it is very portable in the sense that everyone knows how to store and represent an ASCII character! Related to cryptography, this is the format in which some keys are written. It must, for exampe, be used when writing keys using X.509 and PKCS #8 [6].
So, ASN.1 is just an description of a dataset. The actual dataset itself constitues the private/public key, maybe some information about it, possibly encrypted with a password. The dataset and its structure depends on who produced the key set and whether they use their own proprietary format or a standard open format.
BER referes to the Basic Encoding Rules for ASN.1 and gives one or more ways to represent any ASN.1 value as an octet string. [7]
DER refers to the Distinguished Encoding Rules for ASN.1. The rules are a subset of BER, and give exactly one way to represent any ASN.1 value as an octet string. DER is intended for applications in which a unique octet string encoding is needed, as is the case when a digital signature is computed on an ASN.1 value. [7]
Another good resource is the Layman's Guide to a Subset of ASN.1, BER, and DER. It has the following to say:
... a service at one layer may require transfer of certain abstract objects between computers; a lower layer may provide transfer services for strings of ones and zeroes, using encoding rules to transform the abstract objects into such strings ...
... OSI's method of specifying abstract objects is called ASN.1 (Abstract Syntax Notation One, defined in X.208), and one set of rules for representing such objects as strings of ones and zeros is called the BER (Basic Encoding Rules, defined in X.209). ASN.1 is a flexible notation that allows one to define a variety data types, from simple types such as integers and bit strings to structured types such as sets and sequences, as well as complex types defined in terms of others. BER describes how to represent or encode values of each ASN.1 type as a string of eight-bit octets. There is generally more than one way to BER-encode a given value. Another set of rules, called the Distinguished Encoding Rules (DER), which is a subset of BER, gives a unique encoding to each ASN.1 value ...
PEM Files
PEM stands for Privacy-enhanced Electronic Mail.
CER, CRT, DER Files
PKCS Files
OpenSSH
For information, at your command prompt, type man ssh_config. You will probably find your OpenSSH configuration file at ~/.ssh/config.
Partly, the configuration file maps host to private-key file used. The format you will see is something like:
Host 192.168.1.* alias_to_this_address
    IdentityFile ~/.ssh/your_key_file_name
    User your-user-name
This is how OpenSSH knows to use the key ~/.ssh/your_key_file_name when you SSH to a host at say 192.168.1.2 as the user "your-user-name".