Linux Kernel notes
How to configure and build the Linux kernel and write device drivers for it (e.g. adding device driver for Wii Nunchuck by going through the FreeElectons tutorials).
Page Contents
References / To Read
- Linux Kernel In A Nutshell, Greg Kroah-Hartman, O'Reilly Media (PDF of entire book release by free electrons!).
- Essential Linux Device Drivers, Sreekrishnan Venkateswaran, Prentice Hall (Not sure if this is legit?)
- Exploiting Recursion in the Linux Kernel ,
- Linux Kernel and Driver Development Training Lab Book, FreeElectrons.com.
- Linux Kernel and Driver Development Training Slides, FreeElectrons.com.
- Linux Device Tree For Dummies Thomas Petazzoni.
- Device Tree: The Disaster so Far, Mark Rutland 2013
- Device Tree presentations papers articles.
- Linux Insides, GitBook by @0xAX
- The sysfs Filesystem
- http://irl.cs.ucla.edu/~yingdi/web/paperreading/smp_locking.pdf
- https://stackoverflow.com/questions/20301591/m-option-in-make-command-makefile
- https://sysplay.in/blog/linux-kernel-internals/2015/04/kernel-threads/
- http://www.evanjones.ca/software/threading-linus-msg.html - Linus on COE
- https://www.kernel.org/doc/Documentation/timers/timers-howto.txt
- include/linux/jiffies.h and kernel/time/jiffies.c
- https://0xax.gitbooks.io/linux-insides/content/SyncPrim/sync-3.html
- http://elinux.org/Debugging_by_printing
- http://www.makelinux.net/ldd3/chp-11-sect-5
- http://www.linuxfromscratch.org/lfs/downloads/stable/LFS-BOOK-8.0.pdf
- http://www.linuxinternals.org/blog/2014/05/07/spinlock-implementation-in-linux-kernel/
- Interrupts - https://elinux.org/images/8/8c/Zyngier.pdf
- Scripts to build a minimal linux from scratch! - https://github.com/ivandavidov/minimal
- https://www.oreilly.com/library/view/linux-device-drivers/0596005903/ch07.html - Time, delays etc
- https://www.ibm.com/developerworks/library/l-kernel-memory-access/index.html
- https://stackoverflow.com/questions/442833/forcing-driver-to-device-match
- https://www.ibm.com/developerworks/library/l-initrd/index.html
- https://www.digikey.com/eewiki/display/linuxonarm/BeagleBone+Black#BeagleBoneBlack-LinuxKernel
- http://blog.logikonlabs.com/how-to-create-a-custom-microsd-card-image-for-the-beaglebone-black/
- https://www.digikey.com/eewiki/display/linuxonarm/BeagleBone+Black
- https://www.element14.com/community/community/designcenter/single-board-computers/next-gen_beaglebone/blog/2015/12/05/mainline-linux-kernel-on-beaglebone-black
- https://kernelnewbies.org/ ************
- https://vadl.github.io/beagleboneblack/2016/07/29/setting-up-bbb-gpio
- http://www.rdrop.com/users/paulmck/scalability/paper/whymb.2010.06.07c.pdf - memory barries
- https://community.arm.com/processors/b/blog/posts/memory-access-ordering---an-introduction
- https://www.cs.umd.edu/~mvz/cmsc430-s07/M24risc.pdf
- https://www.quora.com/How-does-the-out-of-order-execution-work-in-microprocessors
- https://lwn.net/Articles/691882/ - SMATCH
- https://lwn.net/Articles/51437/ - The Zen Of KObjects
- https://lwn.net/Articles/54651/ - KObjects and sysfs
Generally Useful Links
The Kernel Development Timeline

[Information from https://kernelnewbies.org/LinuxVersions.]
Configure & Build the Linux Kernel
Downloading The Kernel Source & A Look At Its Structure
To download the latest, bleeding edge, of the kernel source, do the following:
git clone (html|git)://git.kernel.org/pub/scm/linux/kernel/git/torvalds/linux.git
Now we can have a look at the first level of the directory structure:
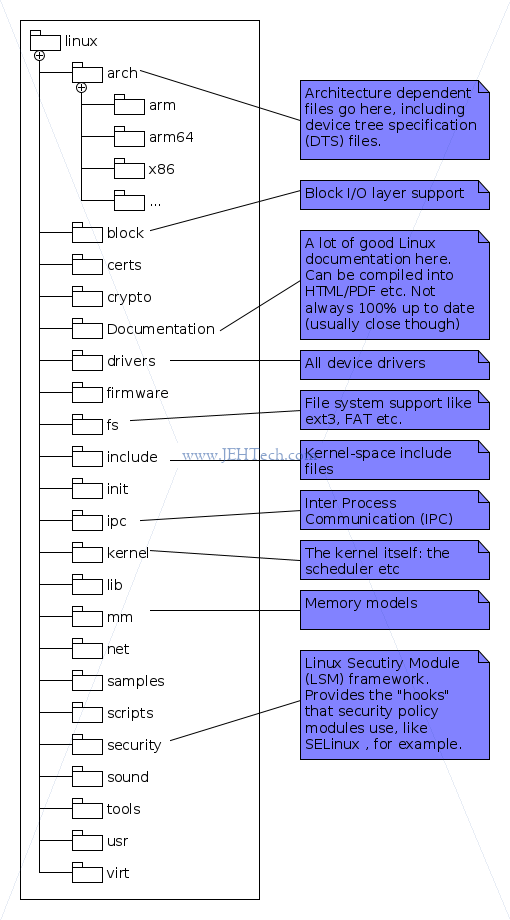
The arch directory contains all of the architecture dependent code. This code is specific
to each platform that the kernel will run on. The kernel itself is as generic as possible, but
because at this low level it does have to be concerned with architecture specifics this is where
you'll find the implementations.
The block directory contains the Linux block I/O layer files which are used to help
manage block devices, like your hard disk, for example.
The Documentation directory is very useful! Here you can find many bits of documentation
on the Linux kernel. The files are mostly text files, but under Documentation/DocBook
you will find a set of files that can be built using make to produce PDF or HTML
documentation.
If, for example you are interested in learning about the kernel debugger, there
is a book on that in kgdb.xml. If you want to compile the documentation for just
this, for example, edit the Makefile under Documentation/DocBook/Makefile and change
the variable DOCBOOKS. You can do this by renaming or commenting out the existing
variable and re-defining it with just the resource you want (you might want to do this as the
build of the complete set of books fails sometimes - or at least did for me).
To compile your DocBook, return to the root directory of the Linux source and run make pdfdocs.
The PDF will be build and stored in the DocBooks directory.
The drivers directory contains a slew of device drivers organised under their type.
So, for example, input device drivers (think keyboard, touchpad etc) are found under drivers/input and
PCI device drivers under drivers/pci. There may be further hierarchical organisation too. For example,
under drivers/input there are further subdirectories for keyboards, touch screens, mice etc.
Other character device drivers such as /dev/null are found under drivers/char.
The fs directory houses file system modules. These support a variety of file systems
like FAT, NTFS, ext3, ext4 and more. These allow the Linux user to mount Windows file systems,
use the Linux file systems and many more, including Mac.
Configuring The Kernel
The Kernel... a pretty complex beast. As such there is a lot of configuration that can be done.
Most hardware providers will have reference configurations that are used as a basis for product
specific configurations. Some distributions will provide the configuration file used to build
the kernel in the /boot directory. Or sometimes in /proc/config.gz,
but this is often not configured as a build option.
Anyway, all these configurations are found in configuration files (.config files), which
are generally many thousands of lines long.
Given that there are so many options, Linux provides utilities to help with the configuration processes (as well as reference configurations from various distros/manufacturers etc).
There are three main ways to configure the Linux kernel. Each of them uses the current config and gives you a way to update it:
- config - this is a basic command line interface: a ton of yes/no style of questions, which you don't want to use!
- menuconfig - an ncurses inferface with help options etc.
- nconfig - a newer version of menuconfig with improved user interface, still ncurses based.
- xconfig - a GUI based interface.
These targets can all be found in scripts/kconfig/makefile.
The current config is stored in the root directory in the file .config. The default
config file used can be taken from your system. For example, when I ran menuconfig it creates
the configuration file from /boot/config-4.4.0-78-generic.
When you are compiling your own kernel you will probably specify the architecture so you'd specify
something like make ARCH=arm menuconfig, for example. But, this will still use a
default config and probably not the one you want. Therefore the full make command will be something
like make ARCH=arm menuconfig arch/arm/configs/corgi_config, if you're building for the
ARM Corgi platform. When you do this, the old .config will be overwritten by your
new configuration.
Interestingly, but perhaps unsurprisingly, launching most of the config tools will involve a
compilation step on the host machine. You can see the exact steps taken by running the make command
with the extra option V=1. The make step is required to build the config tool being
used.
Menuconfig
Menuconfig presents a nice ncurses display that you can navigate around using the instructions at the top of the window. If you do not have ncurses installed, install it using:
sudo apt-get install libncurses5-dev
You can run menu config using:
make menuconfig
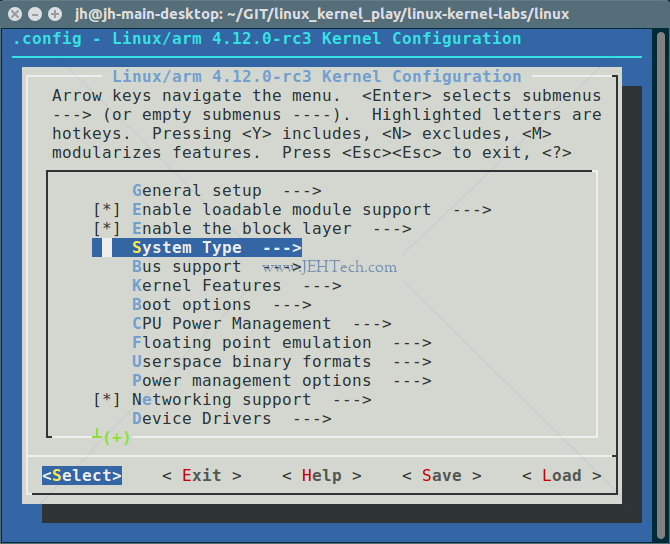
What you'll notice is that there are a nice set of menus and when you use the help you will
be given some information about the item you've selected.
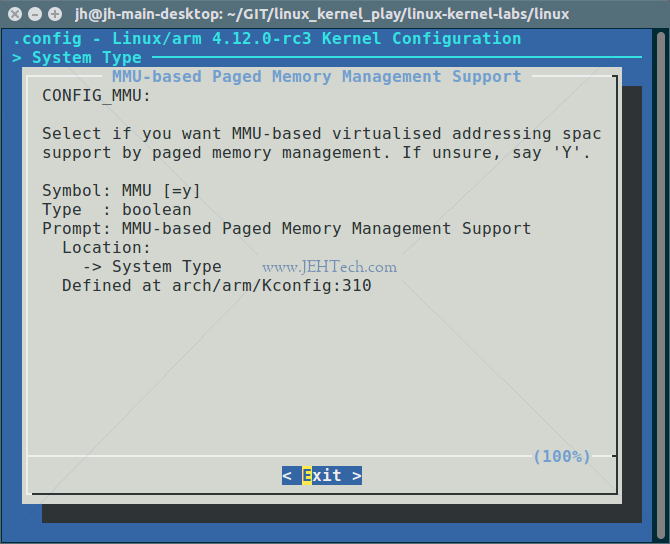
For example, the help for System Type > MMU-based Paged Memory Management Support,
reads as follows:
Nice, but how does menuconfig know all this stuff?! When it runs it reads the main Kconfig
file, found in the root directory. This will source the main Kconfig for the architecture you are compiling
for. The variable SRCARCH is used as it is a slightly modified, depending on platform,
version of ARCH. The main Kconfig file is taken from arch/$SRCARCH/Kconfig. So,
if we're compiling for arm, the Kconfig file would be found in arch/arm/Kconfig. This file
defines a lot of things but also sources a ton of other Kconfig files!
We can look in this file to get an idea of the syntax:
...
menu "System Type"

config MMU
   bool "MMU-based Paged Memory Management Support"
   default y
   help
      Select if you want MMU-based virtualised addressing space
      support by paged memory management. If unsure, say 'Y'.
...
We can see that a menu called "System Type" is being defined. If we look in the first menuconfig screenshot we can see that menu item highlighted. We can drill into this menu to find the menu item "MMU-based Paged Memory Management Support". If we then select the help feature for this item, we see the second screenshot shown above, which matches the description we found in our main Kconfig file :)
Not every menu item is defined in the main file however. It sources many others and will also pull in all Kconfig files it finds. For example there is a Kconfig file in most of the leaf directories of the drivers tree.
Xconfig
Nicer GUI application that requires QT. If you no not have QT installed, you can do so by running the following command:
sudo apt-get install libqt4-dev
Involked in the same way (following our example so far):
make ARCH=arm xconfig arch/arm/configs/corgi_config
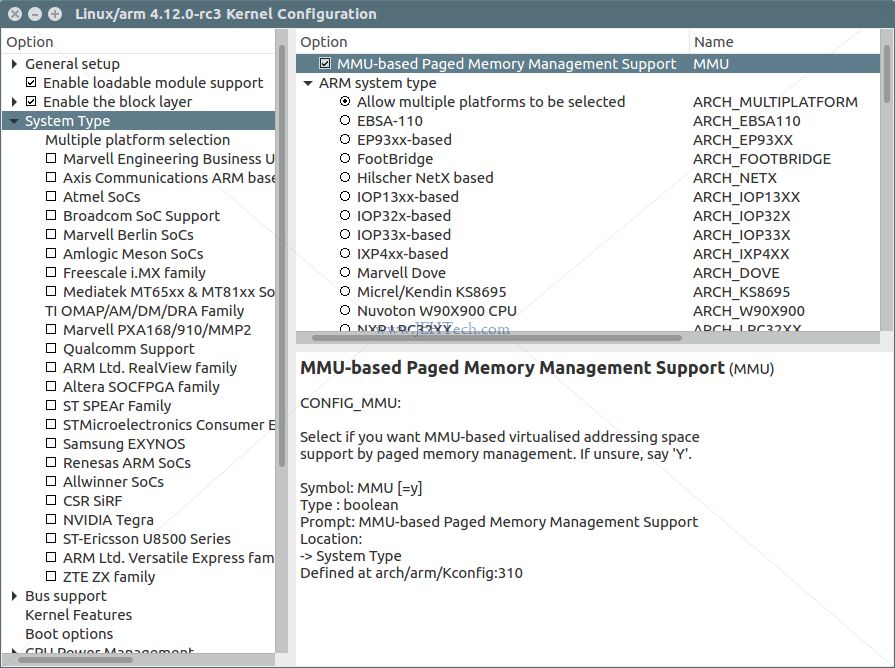
Xconfig has a few nice advantages like a GUI which will show you the symbols next to the menu descriptions and a beefed up find functionality.
Building The Kernel
The Kernels own documentation in Documentation/kbuild/makefiles.txt is very comprehensive!
The makefile target make oldconfig reads the existing .config file and prompts the user for options in the current kernel source that are not found in the file. This is useful when taking an existing configuration and moving it to a new kernel
[Ref].
Before the command is run you would have copied an older kernel config file into the kernel
root as .config. This make target "refreshes" it by asking questions
for newer options not found in the config file.
https://serverfault.com/questions/568395/what-is-creating-the-generated-autoconf-h
# From kernel README
    "make ${PLATFORM}_defconfig"
                        Create a ./.config file by using the default
                        symbol values from
                        arch/$ARCH/configs/${PLATFORM}_defconfig.
                        Use "make help" to get a list of all available
                        platforms of your architecture.

# See also scripts/kconfig/Makefile:
%_defconfig: $(obj)/conf
        $(Q)$< --defconfig=arch/$(SRCARCH)/configs/$@ $(Kconfig)
https://devtalk.nvidia.com/default/topic/906942/failed-to-compile-kernel-module-gcc-cannot-recognize-aarch64-option-mgeneral-regs-only-/
https://developer.android.com/ndk/guides/standalone_toolchain.html
Aaaah cross compile for android, make sure you are using the Android prebuilt toolchains!
export PATH=/path-to-android-src-root/prebuilts/gcc/linux-x86/aarch64/aarch64-linux-android-4.9/bin:$PATH
make prepare ARCH=arm64 CROSS_COMPILE=aarch64-linux-android- V=1
https://glandium.org/blog/?p=2664 - saving my arse!
Modules.symvers ???
Unbind A Kernel Driver
Most drivers have an entry under /sys/bus/xxx/drivers/yyy. For example if you
ls the directory /sys/bus you will see somthing similar to the
following (list snipped to shorten it):
/sys/bus
|-- i2c
|-- pci
|-- pci_express
|-- platform
|-- pnp
|-- scsi
|-- sdio
|-- serio
|-- spi
|-- usb
<snip>
The different types of buses are listed. Under each bus, the following structure is seen:
/sys/bus/XXX
|-- devices
\-- drivers
We're interested in the drivers subdirectory. Let's take a look at a sample directory
for I2C drivers:
/sys/bus/i2c/drivers
|-- 88PM860x
|-- aat2870
<snip>
Under the drivers directory we can see (above) a list of devices for which drivers
exist.
Building The Kernel
http://newandroidbook.com/Book/Input.html
=========================================

/proc/interupts - To look at interrupt lines claimed by drivers - architecture dependent
/proc/stat      - shows interrupt count

Input driver model docs:
    Documentation/input/, and in particular input.txt

When driver registers as input device, the following is auto created:
  /dev/input/eventX (cat this to get dump of Linux input events as they happen)
As well as sysfs entries.

/proc/bus/input/devices - Where system keeps track of all devices

/sys/class/input/eventX - directory - info about device assoc. with this event
    cat /sys/class/input/eventX/uevent to get device info such as major and minor number etc

getevent and sendevent command:
    system/core/toolbox/(get|send)event.c.
For example 'getevent -l' lists the devices and their human readable names and associated "eventX"

Both tools seem to use the /dev/input/eventXX to read and write events. To write events you need
to have root access to make /dev/input/eventXX writeable!

https://wiki.ubuntu.com/DebuggingTouchpadDetection/evtest
http://stackoverflow.com/questions/16695432/input-event-structure-description-from-linux-input-h
http://www.usb.org/developers/hidpage
https://www.kernel.org/doc/Documentation/input/multi-touch-protocol.txt
https://source.android.com/devices/input/touch-devices.html
# kbuild supports saving output files in a separate directory.
# To locate output files in a separate directory two syntaxes are supported.
# In both cases the working directory must be the root of the kernel src.
# 1) O=
# Use "make O=dir/to/store/output/files/"
#
# 2) Set KBUILD_OUTPUT
# Set the environment variable KBUILD_OUTPUT to point to the directory
# where the output files shall be placed.
# export KBUILD_OUTPUT=dir/to/store/output/files/
# make
#
# The O= assignment takes precedence over the KBUILD_OUTPUT environment
# variable.
###
# External module support.
# When building external modules the kernel used as basis is considered
# read-only, and no consistency checks are made and the make
# system is not used on the basis kernel. If updates are required
# in the basis kernel ordinary make commands (without M=...) must
# be used.
#
# The following are the only valid targets when building external
# modules.
# make M=dir clean     Delete all automatically generated files
# make M=dir modules   Make all modules in specified dir
# make M=dir           Same as 'make M=dir modules'
# make M=dir modules_install
#                      Install the modules built in the module directory
#                      Assumes install directory is already created
Linux Kernel and Driver Development Training Lab Book
References:
- Linux Kernel and Driver Development Training Lab Book by FreeElectrons.com.
- Linux Kernel and Driver Development Training Slides, Free Electrons.
- BeagleBone Black System Reference Manual, Rev C.1.
- AM335xSitaraTM Processors Datasheet.
- AM335x and AMIC110 SitaraTM Processors Technical Reference Manual.
- BeagleBone, Robert Nelso.
- Setting Up the BeagleBone Black's GPIO Pins.
- BBB Schematic.
Todo read:
https://embedjournal.com/kernel-compilation-beaglebone-black/
https://embedjournal.com/custom-rfs-beaglebone-black/
https://www.elinux.org/Beagleboard:BeagleBoneBlack#Software_Resources
http://derekmolloy.ie/write-a-new-image-to-the-beaglebone-black/ -- writes to onboard eMMC
https://wiki.beyondlogic.org/index.php?title=BeagleBoneBlack_Upgrading_uBoot
https://www.twam.info/hardware/beaglebone-black/u-boot-on-beaglebone-black
http://processors.wiki.ti.com/index.php/SD/MMC_format_for_OMAP3_boot
https://www.digikey.com/eewiki/display/linuxonarm/BeagleBone+Black#BeagleBoneBlack-ARMCrossCompiler:GCC
https://elinux.org/Beagleboard:BeagleBoneBlack_Rebuilding_Software_Image
Notes created whilst working through Linux Kernel and Driver Development Training Lab Book by FreeElectrons.com, whilst consulting the accompanying slides.
Use the lab slides! To begin with I hadn't found them and thought the lab book was a little short on descriptions. When I found out they also had slides it made a lot more sense!
Setup
Note: To begin with I had a rather limited setup where I was doing this. I was compiling on a Linux server but only had a Windows desktop PC. Setting up an NFS server from Windows or from a Virtual Box running Linux or through Cygwin took way too much time and was getting in the way of actually learning anything so I gave up and used a pure Linux system... I'd advise anyone reading this to do the same!!!
Download The Source
Download the linux kernel:
git clone git://git.kernel.org/pub/scm/linux/kernel/git/torvalds/linux.git --depth=1
The flag --depth=1 means we ignore all history to make download faster.
Use stable releases:
cd ~/linux-kernel-labs/src/linux/
git remote add stable git://git.kernel.org/pub/scm/linux/kernel/git/stable/linux-stable.git
git fetch stable [--depth=1]
Again you can use --depth=1 to speed up the download, but note you won't have
any log history
Select a branch:
# list available braches
git branch -a

# Create a local branch starting from that remote branch
git checkout -b 4.9.y stable/linux-4.9.y
Setup USB to Serial
Picocom is a minimal dumb-terminal emulation program. Type Ctrl+A, Ctrl+X to exit once connected.
sudo apt-get install picocom
sudo adduser $USER dialout
picocom -b 115200 /dev/ttyUSB0
Setup TFTP Server
sudo apt-get install tftpd-hpa
By default all files you want to be TFTP'able should be placed in /var/lib/tftpboot.
In my install, the directory was owned by root and not in any group which was a pain, so
sudo chgroup YOUR_GROUP /var/lib/tftpboot so you can get easier access to this
directory. YOUR_GROUP should be a group you already belong to, or a new group,
up to you. If you wanted to add a new group, say tftp_users, for example, you
could run sudo groupadd tftp_users and then run
sudo adduser jh tftp_users , to add yourself to the group and then
sudo chgroup tftp_users /var/lib/tftpboot to put the directory in this same group.
Then probably sudo chmod g+w /var/lib/tftpboot to give this new group write
permissions on the directory.
Alternatively you could change the root directory that the sever uses (see below).
To start/stop etc the server use the following commands:
service tftpd-hpa status # Usefully also prints out logs
service tftpd-hpa stop
service tftpd-hpa start
service tftpd-hpa restart
To edit the server configuration edit /etc/default/tftpd-hpa. The default when
I installed it was this:
TFTP_USERNAME="tftp"
TFTP_DIRECTORY="/var/lib/tftpboot"
TFTP_ADDRESS=":69"
TFTP_OPTIONS="--secure"
To the options I added --verbose.
Setup NFS Server
The Linux Kernel, as configured for the lab book exercises, mounts the root file system over NFS. Thus we need to setup the NFS server on our machine. Note: I tried doing this from a Windows box and it is torture so just use a native Linux machine and save yourself heartache...
sudo apt-get install nfs-kernel-server
Run sudo vi /etc/exports to add this line, replacing "<user>"
with your username and the IP address with your board's IP address.
/home/<user>/linux-kernel-labs/modules/nfsroot 192.168.2.100(rw,no_root_squash,no_subtree_check)
Restart server:
sudo /etc/init.d/nfs-kernel-server restart
Now unpack the lab files so that you get the directory mentioned above:
cd /home/<user>
wget http://free-electrons.com/doc/training/linux-kernel/linux-kernel-labs.tar.xz
tar xvf linux-kernel-labs.tar.xz
For futher information on how to configure the NFS server and even shorted the export path used, see the Ubuntu community guide SettingUpNFSHowTo.
Setup Uboot
The version of UBoot I had by default on my BB did not have the "saveenv"
command :( So, for now at least, I will type the boot commands manually rather than worrying
about creating a new UBoot image. Can do that later if this becomes a real pain.
setenv serverip 192.168.2.1
setenv ipaddr 192.168.2.100
tftp 0x81000000 test.txt
md 0x81000000
The memory dump showed contents of test.txt, so we know the TFTP server is
running correctly.
NOTE: In UBoot, if you want to copy-past these into picocom copy the text into an editor and then replace newlines by "&&" to get a one-liner.
Compiling & Booting The Kernel (+ DTB)
References
- Linux Kernel Makefiles, Kernel Documentation.
- Device Tree For Dummies, T Petazzoni.
- A Symphony of Flavours: Using the device tree to describe embedded hardwarw, G Likely, J Boyer.
An Alternative Setup
I needed to create a Kernel build and file system from "kinda-scratch" to boot off an SD card. The instructions I had to follow were slightly different and I've put some brief notes here.
Compiling The Kernel
This section of the lab book was a little thin. Export the following:
sudo apt-get install gcc-arm-linux-gnueabi # Get the cross compiler tool chain
dpkg -L gcc-arm-linux-gnueabi # Find out path and name of tool chain
If the folder for the gcc-arm-linux-gnueabi- toolchain is not on your PATH,
add it, then export the following environment variables...
export CROSS_COMPILE=arm-linux-gnueabi-
export ARCH=arm
To configure the kernel type:
make menuconfig omap2plus_defconfig
Note the file omap2plus_defconfig is found in arch/arm/configs/.
Made sure config had CONFIG_ROOT_NFS=y set. To find this hit "/" and
type CONFIG_ROOT_NFS. The search results will look like this:
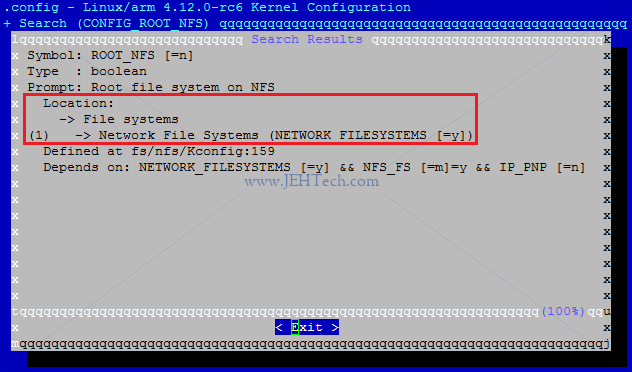
The red box highlights the information we need: how to find this configuration option in the menu system, which can be quite a maze. Navigate File Systems > Network File Systems and you should see the menu shown below:
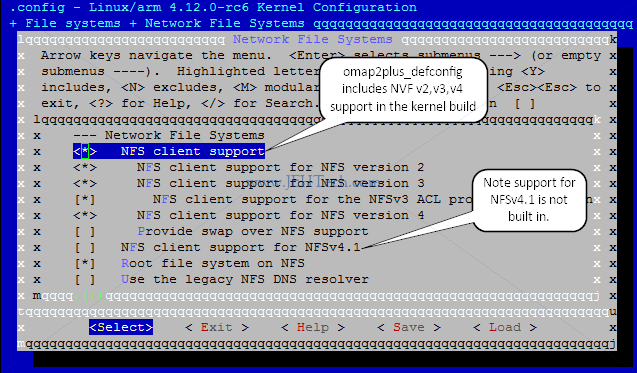
The image above shows a [*] next to "NFS client support". This means that
the support will be compiled into the kernel image. All of the other options with an [M]
next to them are compiled as modules. They will not be included in the compiled kernel image
but can be loaded separately as modules later. Modules marked with [ ] are not
compiled at all.
Exit and save your config. You will see the exit message:
# configuration written to .config
The config system has copied the file arch/arm/configs/omap2plus_defconfig to the
root directory and merged in any changes you made manually from the menuconfig utility.
Now set the build the kernel:
# * -jX (optional) sets number of threads used for parallel build.
# * V=1 (optional) puts the build into verbose mode so that you can
#   see the toolchain commands being invoked.
make -j16 V=1
The last build message you should see is...
Kernel: arch/arm/boot/zImage is ready
If you list the directory arch/arm/boot you will see the zImage file
and another file named dts/am335x-boneblack.dtb. This is the Linux Device Tree blob.
It gives the entire hardware description of the board in a format the Kernel can read & understand.
[Ref]. Copy both files to TFTP home directory.
What Are The zImage and DTB Files?
So, we have two files: arch/arm/boot/zImage and arch/arm/boot/dts/am335x-boneblack.dtb,
but what are they?
The zImage is a compressed kernel image that has a little bit of code in front of
the compressed blob that will makes it bootable and self extracting so that the kernel proper
can be decompressed into RAM and then run.
The am335x-boneblack.dtb is a Linux Device Tree Blob. This is a binary format
that the kernel can read and contains the description of the hardware
[Ref]. This method was adopted
to try and standardise how hardware information was passed to the kernel because in the
embedded world there was little standardisation and systems varied considerably [Ref].
In the simplest terms, a device tree is a data structure that describes the hardware configuration. It includes information about the CPUs, memory banks, buses, and peripherals. The operating system is able to parse the data structure at boot time and use it to make decisions about how to configure the kernel and which device drivers to load.
So, this is what the .dtb file is. It is generated by many .dts files,
which are text files containing a human readable "map" (tree really) of the system's
hardware.
Using DTB's we can somewhat decouple the kernel build from the hardware it is running on, rather than having to do a specific kernel build for every hardware variant out there!
Mostly everything is moving towards using device trees. If CONFIG_OF is defined
you know you are in Kernel with device tree and open firmware support enabled.
Booting The Kernel
Now we can boot the kernel. From UBoot type:
setenv bootargs root=/dev/nfs rw ip=192.168.2.100 console=ttyO0 nfsroot=192.168.2.1:/home/<user>/linux-kernel-labs/modules/nfsroot
setenv serverip 192.168.2.1
setenv ipaddr 192.168.2.100
tftp 0x81000000 zImage
tftp 0x82000000 am335x-boneblack.dtb
bootz 0x81000000 - 0x82000000
The NFS directory it booted from (you should see a message "VFS: Mounted root (nfs filesystem) on device 0:14")
should contain the data from the course labs TAR file.
If it does not, you will see a kernel panic saying "Kernel panic - not syncing: No working init found". If you
see this, make sure that the directory you shared as /home/<user>/linux-kernel-labs/modules/nfsroot contains the modules\nfsroot folder from the
lab file.
Based on the previous section we can understand what we have done here. We are booting a zImage. The first argument is the address of the zImage. The second argument is the hyphen, which specifies the address of the initrd in memory as non-existent, i.e., there is no ramfs, and the third argument is the address of the DTB that UBoot will pass to the Kernel.
The other important environment variable set is bootargs. This is a string that
is passed to the kernel. UBoot will pass this to the kernel. In this case it contains all the
information required to tell the kernel to try and mount the root directory over NFS and boot
from it.
Writing Modules
References
- Linux Kernel Development, Third Edition, Robert Love.
- Building External Modules, Linux Kernel Documentation.
- Building A Linux Kernel Module Without The Exact Kernel Headers, Glandium.org.
- My solutions to exercises.
Building and Loading
The lab book instructions at this point really are pretty sparse. Writing the module isn't
hard and grepping the source code for files with "version" in their name brought me to
<linux-root>/fs/proc/version.c, which shows how to get the Linux version.
My solution is
here on GitHub and
a snapshot is shown below:
static int __init hello_init(void)
{...}

static void __exit hello_exit(void)
{...}

module_init(hello_init);
module_exit(hello_exit);
The only interesting things in the snippet are the tokens __init and __exit.
The functions marked by __init can be removed after either kernel boot or module load completes
and the functions marked by __exit can be removed by the compiler if the code is built
into the kernel, as these functions would never be called.
Navigate to the NFS file system you unpacked and exported over NFS. Change to the root/hello.
In the Makefile, I have changed the value of $KDIR as I stashed the kernel source
in a different location to that specified in the lab book. Run make all to build.
Once built, from the board's console you can type insmod /root/hello/hello_version.ko
to load the module.
In my GitHub area, I've used my own external build, outside the lab directory, but doing it the lab way will also do an external build. I preffered the former so that I could stash everything in my GitHub repo more easily.
How Linux Verifies & Loads Modules
At this point I want to use some previous learning to talk about how the Kernel loads modules and why you should build modules with the exact kernel headers used to compile your kernel [Ref][Ref]. In summary...
...The Linux kernel contains data structures whose layout varies not only from version to version but also depending on the compilation options. As a consequence, when you compile a kernel module, you need to have not only the header files from the kernel source, but also some header files that are generated during the kernel compilation...
When you build your module you'll get a whole load of files generated in your module's directory.
One file of importance is Module.symvers, which contains a list of all
exported symbols from a kernel build [Ref]
and their corresponding CRC (if CONFIG_MODVERSIONS is enabled, which it is in this lab).
This set of exported kernel symbols is known as the exported kernel interfaces. Modules
can only use these explicitly exported functions which are marked as exported in the kernel code
by the macro EXPORT_SYMBOL_[GPL] (the _GPL suffix is option, i.e., we have 2 macros here).
Another file of import is hello_version.mod.c, which is auto-generated by the build
and compiled into the resulting .ko kernel object file. The file contains some information
that is used to "tag" the module with the verssion of the kernel it was built against,
so that when it is loaded, the running kernel can check that the module was compiled against the
correct kernel headers [Ref].
In hello_version.mod.c, the macro MODULE_INFO(vermagic, VERMAGIC_STRING)
is used (define in linux/moduleparam.h). This macro will define a static and constant variable in the section .modinfo.
The variable name is based on the tag, which in this case is "vermagic". The value is defined by VERMAGIC_STRING which is
based on the the kernel version and git repo status. Thus, when
the module is loaded the kernel can scan the .modinfo section of the module object file
for the "vermagic" symbol and check that it matches the kernel's own version magic, in
this way checking that the module being loaded is indeed written for this version of the kernel.
In this file we also see how the module intialisation and exit functions are found by the kernel,
and also realise what the macros module_init and module_exit do:
__visible struct module __this_module
__attribute__((section(".gnu.linkonce.this_module"))) = {
    .name = KBUILD_MODNAME,
    .init = init_module,
#ifdef CONFIG_MODULE_UNLOAD
    .exit = cleanup_module,
#endif
    .arch = MODULE_ARCH_INIT,
};
So here we can see a structure that is stored in a specific section. When loading the module
the kernel will be able to find this structure in this section and consult the member variables
.init and .exit to locate the module's initialisation and exit functions.
Debugging
Bugger! The first problem I saw was when I tried to load the module using insmod:
[ 7121.807971] hello_version: disagrees about version of symbol module_layout
insmod: can't insert 'hello_version.ko': invalid module format
This implies a mismatch between the kernel version and the header files the module was compiled against! This is very strange as I must surely be building against the right kernel... I've built the kernel and loaded it on the BB after all!
Refering back to the file hello_version.mod.c, this symbol can be found:
static const struct modversion_info ____versions[]
__used
__attribute__((section("__versions"))) = {
    { 0xb1dd2595, __VMLINUX_SYMBOL_STR(module_layout) },
...
This structure is declared in include/linux/module.h and looks like this:
struct modversion_info {
  unsigned long crc;
  char name[MODULE_NAME_LEN];
};
So we can see that the .mod.c file is creating an array of modversion_info
structs in the section named __versions. The symbol named "module_layout"
(the macro __VMLINUX_SYMBOL_STR just strigifies it's argument) is given a CRC value of
0xb1dd2595.
This CRC value has been read out of Module.symvers.
So, the "invalid module format" message is due to a mismatch between the module's
recorded CRC for the symbol module_layout and the CRC the kernel expects (see
check_version() in kernel/module.c). Question is how on earth
has this happened?!
Just using modprobe -f <module>[Ref] won't get
me out of trouble here either :(
So, now deciding to enable debug for just kernel/module.c so that the pr_debug() macros
will become non-empty and emmit debugging information
[Ref].
When re-building the kernel I used the following:
make clean && make -j16 CFLAGS_module.o=-DDEBUG
If you type dmesg with debug enabled for module.c, you'll see a lot
more information output to the system log.
Balls! Cleaning and recompiling kernel solved this issue!
Adding A Parameter To The Module
Modules can be given parameters at either boot time, if compiled into the kernel, or on module load. They allow some flexibility in module configuration so that, for instance, you could take the same binary and run it on different systems by just toggling a parameter... useful!
Define using:
/* params:
 *   name - name if parameter variable you declared in your code and
 *          the name exposed to user (to use different names use
 *          module_param_named())
 *   type - paramers data type: byte | [u]short | [u]int | [u]long |
 *          charp | [inv]bool
 *   perm - octal format or by or'ing S_IRUGO | S_IWUSR etc etc
 */
... definition-of-your-variable-name ...
module_param(name, type, perm);
So for the lab exercise, have to add:
static char *who_param = NULL;
module_param(who_param, charp, 0644);
Another way of doing this would be to get the kernel to copy the string into a buffer:
#define MAX_WHO_SIZE 25
static char who_param_buf[MAX_WHO_SIZE];
module_param_string(who_param, who_param_buf, MAX_WHO_SIZE, 0644);
Recompile the module and then load it by typing, for example:
insmod hello_version.ko who_param=JEHTech
If you want to see the parameters with which a module was loaded you can use this for a list of patameters:
ls /sys/module/<modul's name>/parameters
To find out what the parameter's value is, cat the file with the parameter's name you're interested in.
Adding Time Information
See include/linux/timekeeping.h.
/*** In your driver */
#include <linux/time.h>
void do_gettimeofday(struct timeval *tv)

/*** From include/uapi/linux/time.h */
struct timeval {
  __kernel_time_t   tv_sec;   /* seconds */
  __kernel_suseconds_t  tv_usec;  /* microseconds */
};
So for our driver, we need to record the time when it was loaded and then record the time when it was removed and calculate the difference. Also note that floating point operations should not be done in kernel code, in case you were thinking of converting values to doubles to do the maths.
/*** Global variables: */
struct timeval load_time, unload_time;

/*** In the init function: */
do_gettimeofday(&load_time);

/*** In the exit function */
struct timeval diff_time;
do_gettimeofday(&unload_time);

diff_time.tv_sec = unload_time.tv_sec - load_time.tv_sec;
diff_time.tv_usec = unload_time.tv_usec - load_time.tv_usec;
if (diff_time.tv_usec < 0) {
   diff_time.tv_usec += 1000000;
   diff_time.tv_sec -= 1;
}

printk(KERN_ALERT "Driver loaded for %ld seconds, %ld usec\n", diff_time.tv_sec, diff_time.tv_usec);
printk(KERN_ALERT "Goodbye\n");
Follow Linux Kernel Coding Standards
~/linux-kernel-labs/src/linux/scripts/checkpatch.pl --file --no-tree hello_version.c
I2C Driver For Wii Nunchuck
References
- Essential Linux Device Drivers, S. Vankateswaran, Prentice Hall.
- How To Instantiate I2C Devices, Linux Docs.
- Writing I2C Clients, Linux Docs.
- Checking I2C Functionality Supported, Linux Docs.
- Free Electrons Guide To Wii Nunchuck I2C Inteface.
Device Tree Setup
Beagle Bone Black DTS file is in arch/arm/boot/dts/am335x-boneblack.dts. So, I need
do two three: First, check that the pinmux puts the I2C bus on the J9 pins, second enable the second I2C bus,
and third create a definition for the new device on that bus.
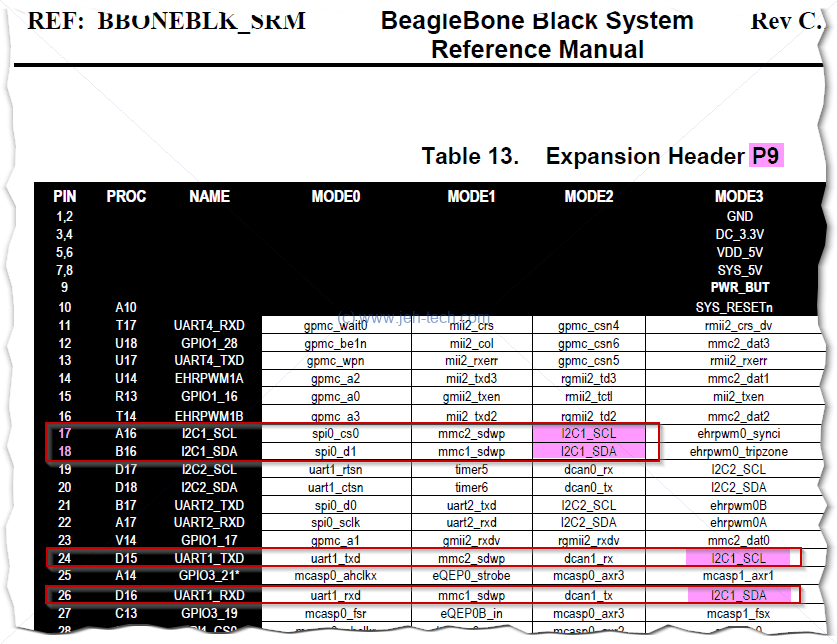
Snapshot of P9 muxing from data sheet:
The ARM Cortex-A8 memory map can be found in the AM335x Tech Ref Manual[Ref] and the pad control registers (0x44E1_0000) and I2C registers (0x4802_A0000) can be found in section 9.2.2 of the same document.
For the register offsets see section 9.3.1. If we look in the am33xx.dtsi file for the
our chip we will find that the i2c1 interface is located at that address:
i2c1: i2c@4802a000 {
  compatible = "ti,omap4-i2c";
  ...
This is the only place where i2c1 is defined in the Beagle Bone Black device tree files.
What we're interested in is the MUX mode as in the image above we can see that we will want either mode 2 or mode 3 as these are the only two modes for which the I2C1 pins are muxed onto the P9 connector.
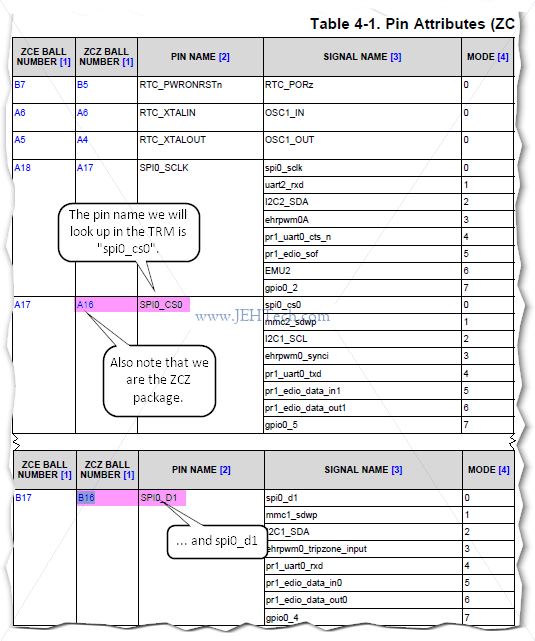
What is a little annoying is that in the above image there are a lot of signal "names". These names relfect the pin functionality when used in a particular way (i.e., the signal that will be output), but there is a specific name for the actual pin. To find this out one has to refer to the AM335x data sheet:
To investigate the I2C setup a little further we'll look back at the first I2C bus, I2C0, to see how it is being configured in the DTS files...
The pin mux for the first I2C bus looks like this in arch/arm/boot/dts/am335x-bone-common.dtsi:
am33xx_pinmux {
  pinctrl-names = "default";
  pinctrl-0 = <&clkout2_pin>;

...

  i2c0_pins: pinmux_i2c0_pins {
      pinctrl-single,pins = <
        AM33XX_IOPAD(0x988, PIN_INPUT_PULLUP | MUX_MODE0) /* i2c0_sda.i2c0_sda */
        AM33XX_IOPAD(0x98c, PIN_INPUT_PULLUP | MUX_MODE0) /* i2c0_scl.i2c0_scl */
      >;
  };
This block of DTS script is defining the pin controller device. It uses the "alternative"
binding discussed in the Linux pin control bindings doc [Ref]. This means that the pin binding is specified
using a "hardware based index and a number of pin configuration values", which we see
specified in the AM3XX_IOPAD() macro.
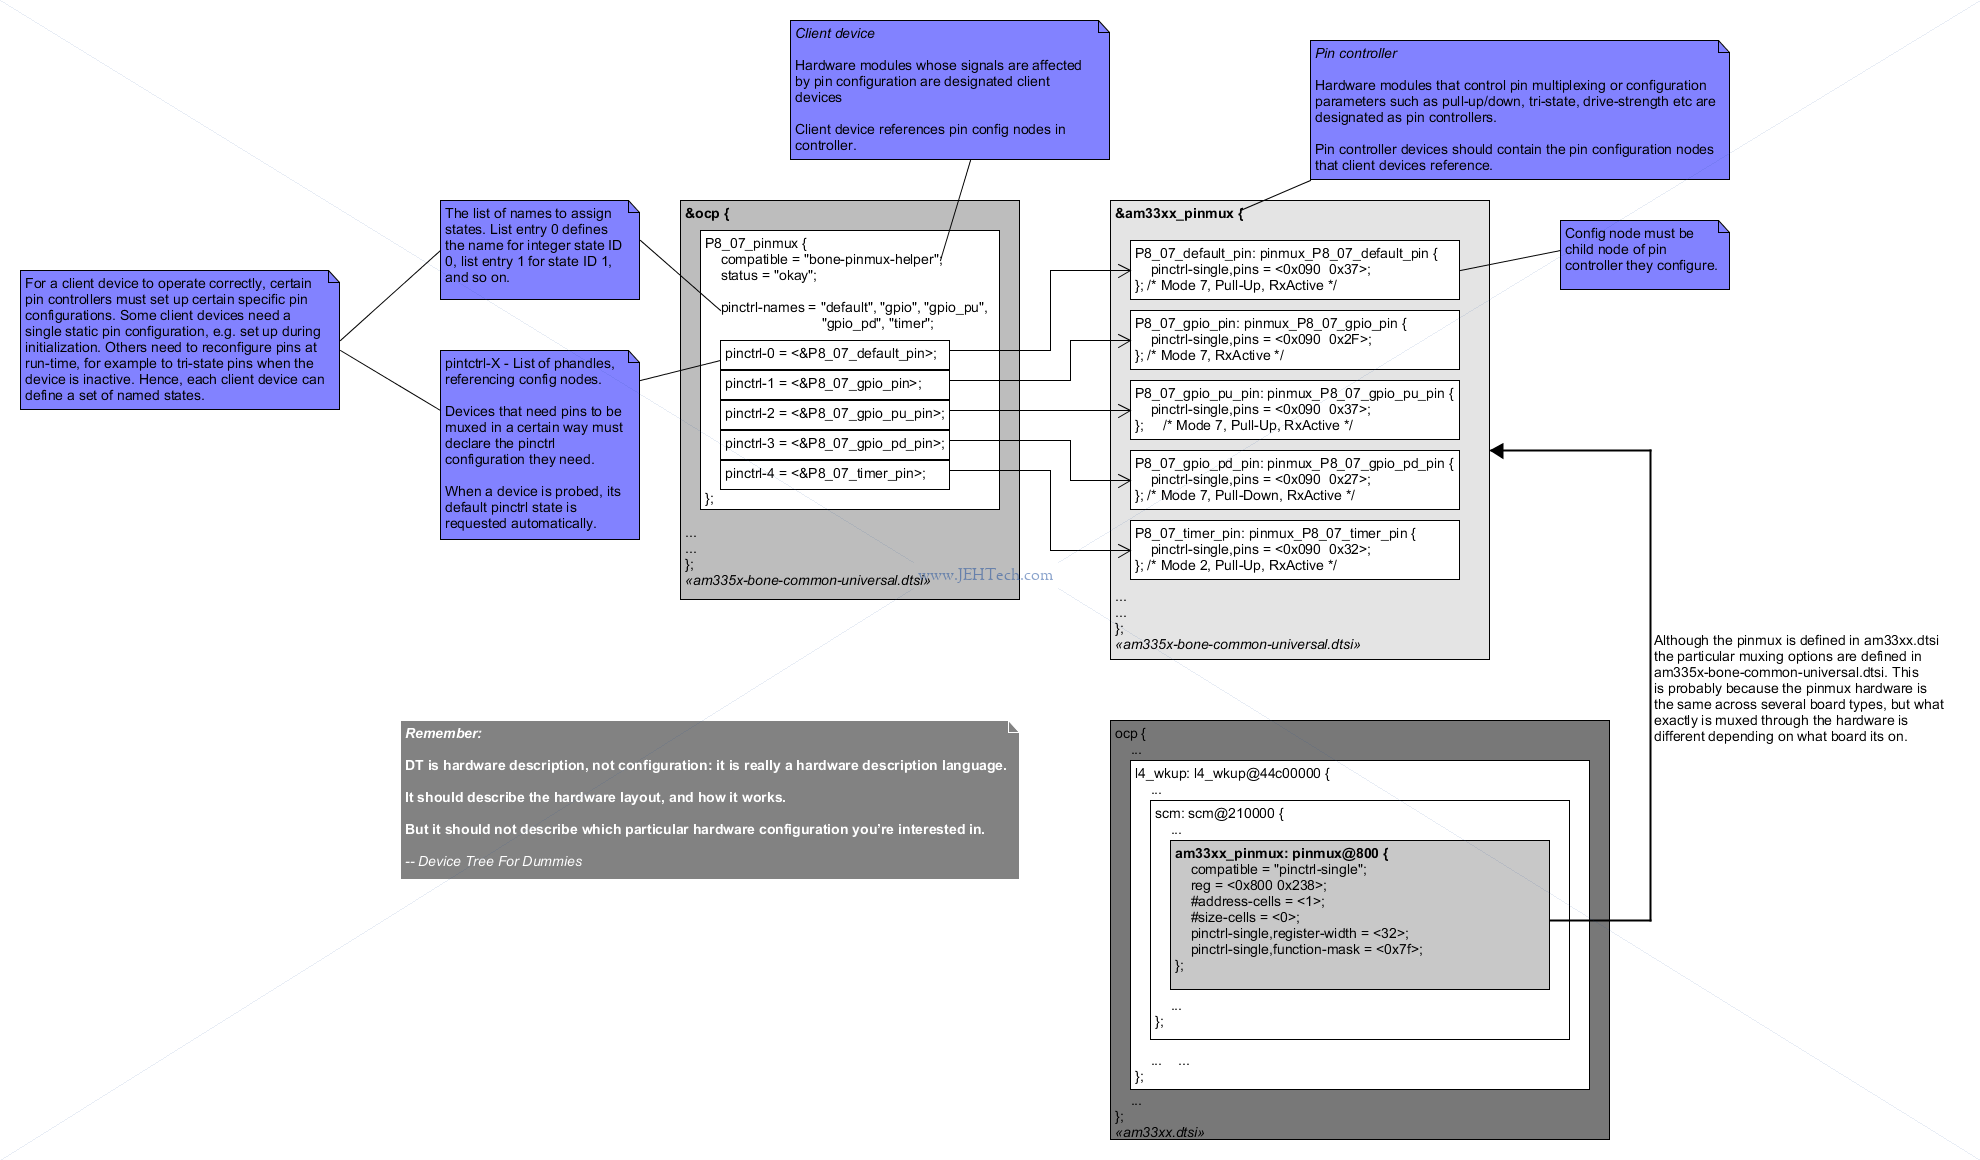
The node "pinmux_i2c0_pins", annotated with the label "i2c0_pins" is a a pin configuration child node that a client device (any module whose signals are affected by pin configuration) can reference. So, we would expect the I2C0 config to reference this... and it does:
&i2c0 {
  pinctrl-names = "default";
  pinctrl-0 = <&i2c0_pins>;
Now some vocabulary: a client device is any module whose signals are affected by pin configuration
[Ref]. The node
i2c0 shown above is a client device as it's signals are affected by how the pinmux controller is
configured.
Each client device can have one or more "pin states", which are assigned contiguous numbers, starting from zero. So, this client device only has the one "state".
The field "pinctrl-0" is state number 0. It specifies a list of phandles pointing at pin config nodes, which must be (grand)children of the pin controller device.
The field "pinctrl-names" gives a textual name to this particular state that can be used. Where there "pinctrl-1"..."pintctrl-N" states, the names list would have N+1 members and the first name would name "pinctrl-0", the second "pinctrl-1" and so on. In this case there is only one state named "default".
Back to the node labelled "i2c0_pins" in the pin controller device... what does the child node "pinctrl-single,pins"
mean? Well, the contents of each of those ... child nodes is defined entirely by the binding for the
individual pin controller device. There exists no common standard for this content"
[Ref]. There is some clue however... it seems that there does seem to be
some kind of, at least de-facto, naming convention. Where we see "pinctrl-single,pins",
the part before the comma generally is the driver name. So we know (also helps that the lab book
tells us) that the pinctrl-single driver is being used and a quick search leads us to
drivers/pinctrl/pinctrl-single.c.
If we look at the driver we can see that it is described as a one-register-per-pin type device tree based pinctrl driver
,
and that in the function pcs_parse_one_pinctrl_entry() it parses the device tree
looking for device nodes with the name "pinctrl-single,pins". The telling part of the
function is:
/* Index plus one value cell */
offset = pinctrl_spec.args[0];
vals[found].reg = pcs->base + offset;
vals[found].val = pinctrl_spec.args[1];
The "pinctrl-single,pins" property is a list of offsets and value "tuples", which agrees with what we noted about the pin binding being specified using a "hardware based index and a number of pin configuration values".
In the AM335x, each configurable pin has its own configuration register for pull-up/down control and for the assignment to a given module: okay good, matches the pinctrol-single driver's description. Section 9.3 of the TRM, table 9-10, lists the memory-mapped registers for the control module. From this we can see that registers 0x988 and 0x98C are labelled conf_i2c0_sda and conf_i2c0_scl respectively, which is what we would expect for the I2C0 interface.
Great, i2c0 looks good, which gives us confidence to construct something for i2c1. We have already looked up the pin names for i2c1: "spi0_cs0" and "spi0_d1" (we're using mode 2), so we need to look these up in the same table. The table gives us the respective offsets 0x95C and 0x958, so we can construct our addition to the DTSI file...
The pin controller and i2c bus/devices ar defined in am335x-bone-common.dtsi and am335x-boneblack.dts.
So, as the lab book instructs I will put my definitions in a new am335x-customboneblack.dts file where I can define the extension
to the pin controller and a new i2c1 bus node and its nunchuck device node:
am33xx_pinmux {
  i2c1_pins: pinmux_i2c1_pins {
      pinctrl-single,pins = <
        AM33XX_IOPAD(0x958, PIN_INPUT_PULLUP | MUX_MODE2) /* i2c1_sda */
        AM33XX_IOPAD(0x95c, PIN_INPUT_PULLUP | MUX_MODE2) /* i2c1_scl */
      >;
  };
};

&i2c1 {
  pinctrl-names = "default";
  pinctrl-0 = <&i2c1_pins>;

  status="okay";
  clock-frequency = <100000>;

  wii_nunchuck {
    compatible = "nintendo,nunchuk";
    reg = <0x52>;
  };
};
One last question is where does the make system get information about what DTB to construct for
our target. The file arch/arm/boot/dts/Makefile lists which DTBs should be
generated at build time [Ref]. In this file we can see the
Linux make target dtb-$(CONFIG_SOC_AM33XX), which lists am335x-boneblack.dtb
as a target. This is a classic kbuild definition. If CONFIG_SOC_AM33XX is defined then
this target will be built, otherwise it is ignored.
Once build the precise build command used are saved in arch/arm/boot/dts/.am335x-boneblack.dtb.cmd.
I'm copying am335x-boneblack.dts to am335x-boneblack-wiinunchuck.dts and
adding its DTB as a dependency for the dtb-$(CONFIG_SOC_AM33XX) target.
Can build it using:
make dtbs
This outputs the file arch/arm/boot/dts/am335x-boneblack-wiinunchuck.dtb. This needs
to be copied to the tftp directory on the host and the UBoot boot command changed to download this
rather than the "stock" DTB file.
Urg... working on another BBB kernel compilation and have created the following, which explains how pinctrl driver is found...
This still left me with the question, how does the device that requests a certain pin-muxing, get that pin-muxing? After all, in most
devices I see requesting a pin-muxing in the device-tree, the doesn't appear to be anything to read the pin-muxing in their probe() function.
The reason is this (kinda - see paragraphs after the quote too!):
When a device driver is about to probe, the device core will automatically attempt to issue pinctrl_get_select_default() on these devices. This way driver writers do not need to add any of the boilerplate code ... ... So if you just want to put the pins for a certain device into the default state and be done with it, there is nothing you need to do besides providing the proper mapping table. The device core will take care of the rest.
Err... is this true? I've had a little search through the 4.4 kernel and the references I find to pinctrl_get_select_default() are pretty
minimal. They seem to occur in some device specific files and then ones that look more generic like gpio-of-helper.c::gpio_of_helper_probe(). But even that seems like it is a specific driver, which probably does the pinctrl "boilerplace", but would need to be compiled into the kernel, and
in any case only would apparently work for GPIOs.
A search for the device manager and where it might probe devices revealed dd.c::really_probe(), part of the attempt to bind a device with a driver, which calls pinctrl_bind_pins() before probing the device. The comment for pinctrl_bind_pins() says ...called by the device core before probe...
, which gives us the answer for this kernel. And, in fact, it calls pinctrl_set_state() for the default state. What I also found is that there is an "&init" state too that will superceed the default state at initialisation. The above quote is either inaccurate or for another kernel version.
The Linux I2C Core
The I2C core is a set of convenience functions for driver developers that "hook" into the Linux driver infrastructure...
The I2C core is a code base consisting of routines and data structures available to host adapter drivers and client drivers. Common code in the core makes the driver developer's job easier.
The Linux Device Tree
References:
- Device Tree Usage, ELinux.org
- Linux Device Tree For Dummies Thomas Petazzoni.
- A Symphony of Flavours: Using the device tree to describe embedded hardware, G. Likely, J Boyer
- Device Tree presentations papers articles.
- Device Tree Compiler Manual.
- How To Compile And Install The Device Tree Compiler On Ununtu.
Linux uses device trees to avoid having to recompile the kernel for every single variation of a board, for example. So, on one architecture, say for example 64-bit Arm, we don't have to recompile the kernel for every possible combination of 64-bit Arm chip and its peripherals. Instead, a device tree is stored somewhere, for example an EPROM, and can be passed to the kernel at boot time so that the same binary kernel image can run on multiple platforms and the platforms themselves tell the kernel binary what they "look" like.
The following is a good explanation of what a device tree is:
In the simplest terms, a device tree is a data structure that describes the hardware configuration. It includes information about the CPUs, memory banks, buses, and peripherals. The operating system is able to parse the data structure at boot time and use it to make decisions about how to configure the kernel and which device drivers to load.
The following image gives a basic, high-level introduction to the device tree file syntax...

Device tree files can also import other device tree files and also C header files so that it is easy and less error prone to share named quantities between kernel code and the device tree.
The device tree is exposed in Linux under the /proc/device-tree/ directory. The directories are paths in the device tree
and the nodes can all be cat'ed. If you have the device tree compiler on your system, which is contained in the device-tree-compiler package, you can use dtc -I fs /sys/firmware/devicetree/base [Ref].
Building DTC From Scratch
I wanted to run dtc natively on my target to double check that the DTB blobs it was using were correct. To cross build the DTC itself:
git clone git://git.kernel.org/pub/scm/utils/dtc/dtc.git
cd dtc
export CROSS_COMPILE=arm-linux-gnueabihf-
export ARCH=arm
make V=1 NO_PYTHON=1 # NO_PYTHON stops it trying to build Python library/bindings
Linux DTB Accessor Functions Source
The device tree access functions are found under the directory drivers/of:
Interrupts
References:
- Interrupt definitions in DTS (device tree) files for Xilinx Zynq-7000 / ARM, Eli Billauer's Tech Blog.
- https://saurabhsengarblog.wordpress.com/2015/11/28/device-tree-tutorial-arm/
- https://github.com/devicetree-org/devicetree-specification/blob/master/source/devicetree-basics.rst
- https://elinux.org/Device_Tree_Usage
- http://invo-tronics.com/linux-kernel-irq-domain/
In the above image we saw the part of the DTS file that read interrupts = <intr-specifiers>. The interrupt specifiers are an n-tuple, the meaning of which seems specific to the interrupt controller. For example, PCI interrupt numbers only use one cell, whereas the system interrupt controller uses 2 cells for the irq number and falgs. When it is a 3-tuple, it looks like it is likely to mean the following:
- SPI flag - 0 means device is not using a Shared Peripheral Interrupt (SPI), anything else means that it is a shared interrupt.
- Interrupt line number. This is the hardware interrupt number. It is a peripheral interrupt identifier in the actual hardware interrupt controller.
-
Interrupt type - edge, level triggered etc. This can be an ORed combination of some of the flags in
irq.h. For example, it could beIRQ_TYPE_LEVEL_HIGHorIRQ_TYPE_EDGE_RISING.
TODO
  interrupt number loose all kind of correspondence to hardware interrupt numbers:

 mechanism to separate controller-local interrupt numbers, called hardware irq’s, from Linux IRQ number: irq_alloc_desc*() and irq_free_desc*() APIs provide allocation of irq numbers

#address-cells
    property indicate how many cells (i.e 32 bits values) are needed to form the base address part in the reg property

#interrupt-cells
    indicates the number of cells in the interrupts property for the interrupts managed by the selected interrupt controller
    #interrupt-cells property is used by the root of an interrupt domain to define the number of <u32> values needed to encode an interrupt specifier.

    https://github.com/devicetree-org/devicetree-specification/blob/master/source/devicetree-basics.rst


include/linux/of.h:struct device_node {
    const char *name;
    const char *type;
    phandle phandle;
    char    *full_name;

    struct  property *properties;
    struct  property *deadprops;    /* removed properties */
    struct  device_node *parent;
    struct  device_node *child;
    struct  device_node *sibling;
    struct  device_node *next;  /* next device of same type */
    struct  device_node *allnext;   /* next in list of all nodes */
    struct  proc_dir_entry *pde;    /* this node's proc directory */
    struct  kref kref;
    unsigned long _flags;
    void    *data;
#if defined(CONFIG_SPARC)
    char    *path_component_name;
    unsigned int unique_id;
    struct of_irq_controller *irq_trans;
#endif
};

struct property {
    char    *name;
    int length;
    void    *value;
    struct property *next;
    unsigned long _flags;
    unsigned int unique_id;
};

include/linux/of_irq.h: struct of_irq {
    struct device_node *controller; /* Interrupt controller node */
    u32 size;                       /* Specifier size */
    u32 specifier[OF_MAX_IRQ_SPEC]; /* Specifier copy */
};

irq_of_parse_and_map()
  |
  | (and then irq_create_of_mapping():kernel/irq/irqdomain.c)
  v
In of_irq_map_on()
    Get interrupts property - returns an array of u32s
    Get reg property - returns a device_node struct pointer
    interrupt cells
    Get the parent interrupt controller

    Call of_irq_map_raw(p, intspec + index * intsize, intsize, addr, out_irq:of_irq);
                        ^  ^                          ^        ^     ^
                        ^  ^                          ^        ^     stuct filled
                        ^  ^                          ^        reg property
                        ^  ^                          number of values in intr property
                        ^  pointer to first interrupt property in the list
                        ^  + index of the interrupt to resolve
                        ^  * intsize - the #cells in an interrupt property
                        The parent controller

        Search up the interrupt tree to find the first #interrupt-cells property.
        Then search there and further up to find the interrupt-controller and then
        split out the intspec into the out_irq struct's specifier[] array.


irq_create_of_mapping - translate a device tree interrupt specifier to a valid linux irq number.

LOOK IN LOGS FOR: pr_debug("%s: mapped hwirq=%i to irq=%i, flags=%x\n",
         controller->full_name, (int)hwirq, irq, type);
Linux Device Drivers
References
- Linux Device Driver Model Overview, Linux Docs.
- Device Drivers, Linux Kernel Docs.
- Linux Kernel and Driver Development Training Slides, FreeElectrons.com.
Intro
The slides do a fantastic job of describing the Linux driver infrastructure. The following image is an annotated rehash of their diagrams with some extra added in from the Linux docs...
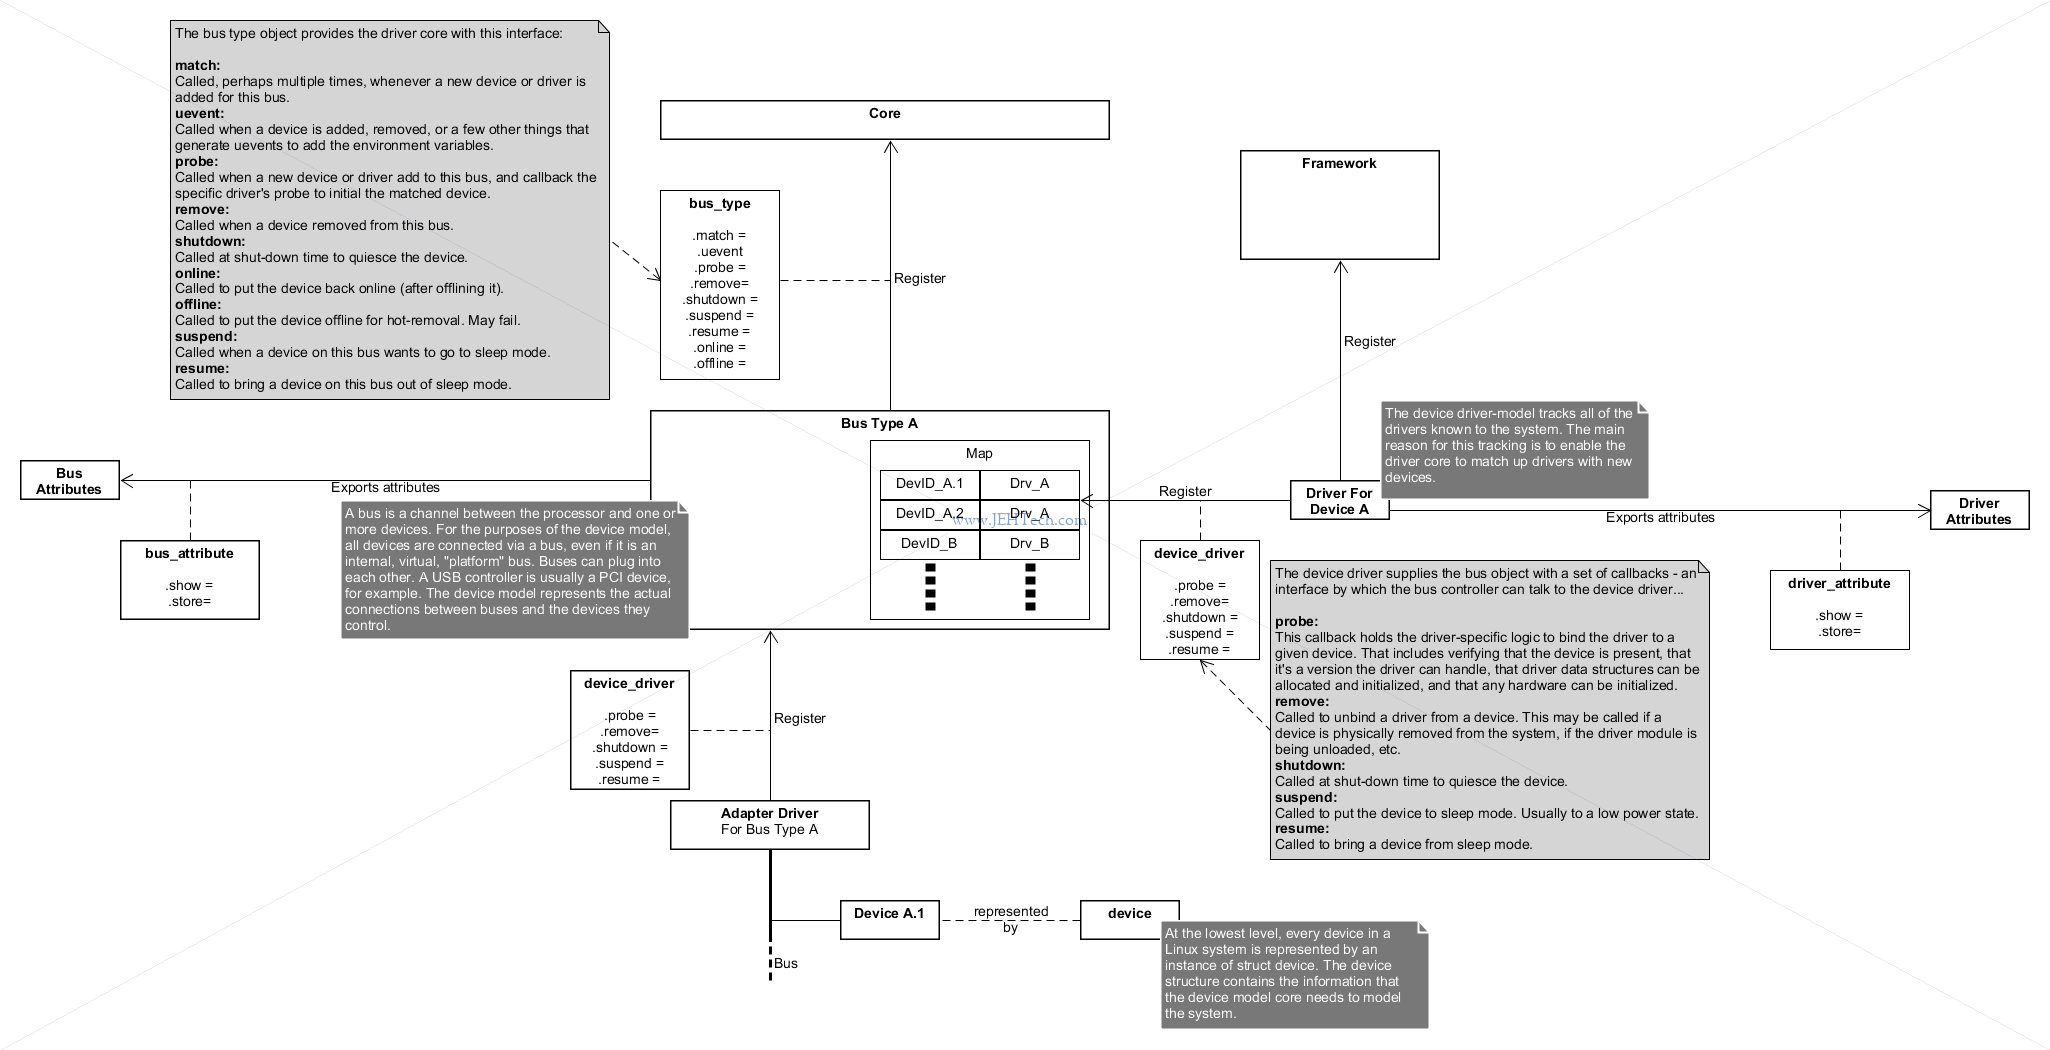
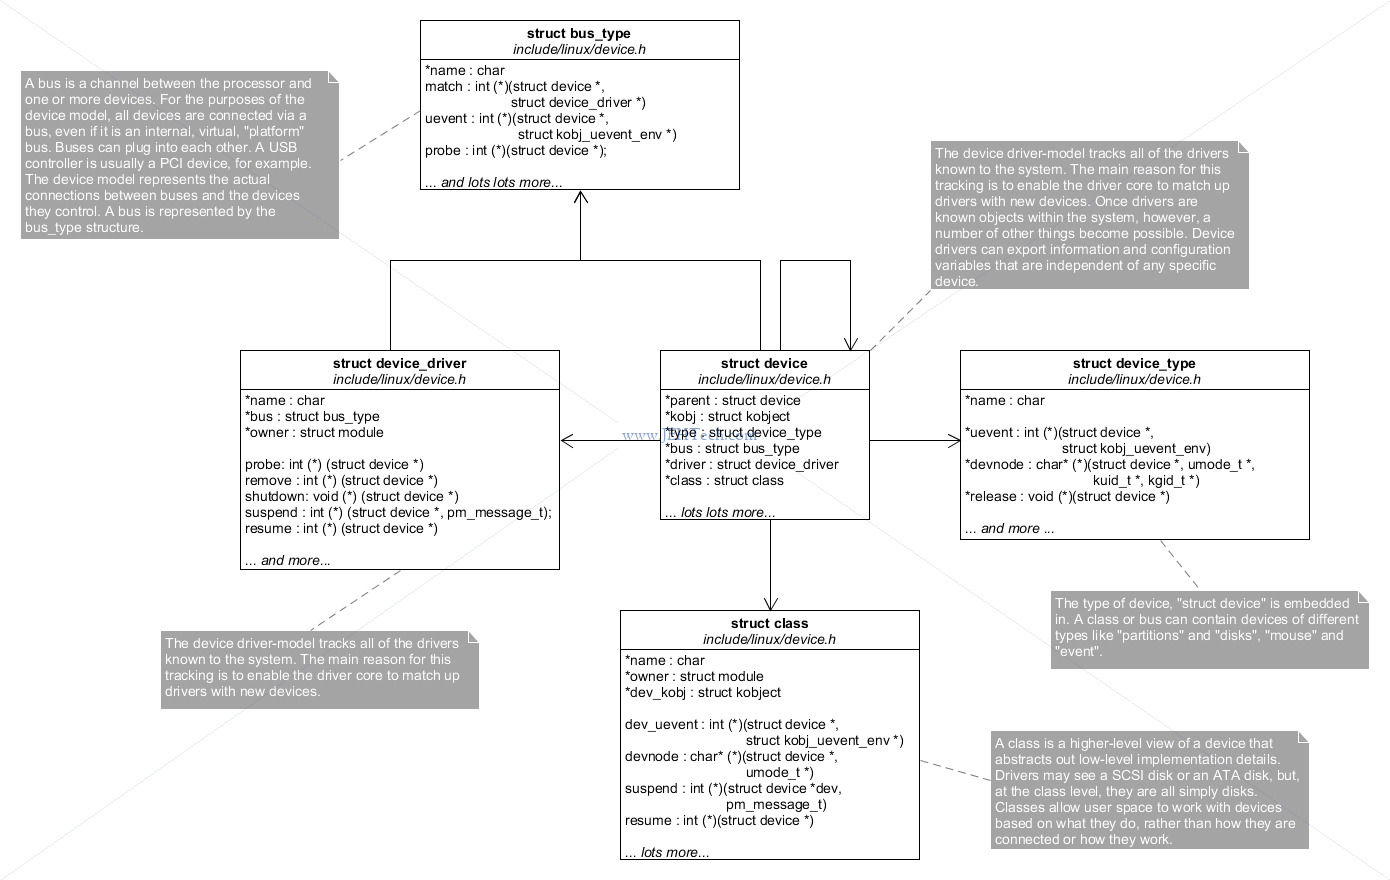
So what is the Linux device driver core? It is a central "repository" that tracks all the device busses in the system and their types, all the available drivers and all the devices and marries drivers with devices when they are detected.
Bus types define, surprisingly, a type of bus, for example PCI or I2C. The physical hardware that manages access to a physical instance of the bus type is called an "adapter driver". The device structure represents physical devices that are attached to am adapter driver and device_drivers are bound to devices when a device is detected by the system. All devices have a class so that the user can generalise devices by their use.
Having looked through the driver core's code a little it looks like devices will be detected,
except hot pluggable devices which must have another route to driver binding, like this. The
driver will register the device(s) for which it caters either at system start-up or dynamically
(when insmod is called to load a driver). This will eventually result in a call
to the driver cores device_add(), which will do things like creating the sysfs entries
for the device, adding the device to the bus_type via bus_add_devices(),
and finally calling bus_probe_device() which will eventually via either the bus_type
or directly, call the drivers probe() method. Buses that support hot-plug devices,
such as USB for example, must have another way to alert the core that a device has become
available. For now, I'm ending my learning-via-code-base as its probably a bit more depth than I
need right now.
Which Drivers
You can see which drivers are statically compiled into the kernel using the following command [Ref].
cat /lib/modules/$(uname -r)/modules.builtin
You can see which drivers are loaded as modules using the following:
cat /proc/modules
# Or to pretty print it...
lsmod
Device Attributes
References:
- Sysfs - The file system for exporting kernel objects, Linux Kernel documentation.
Attributes can be represented in the sysfs file system for kobjects, which is useful from a device point of view because it allows the driver to intercept read and writes of these attributes in order to control a device. For example, the Atmel MaxTouch device driver creates several attributes, such as "pause", which when written to can be used to pause the touch screen device being driven. Or, for example, it could export an attribute that would let the user configure touch sensitivity for example.
Attributes are defined via the device_attribute structure:
struct device_attribute {
   struct attribute attr;
   ssize_t (*show)(struct device *dev, struct_device_attribute *attr, char *buf);
   ssize_t (*store)(struct device *dev, struct_device_attribute *attr, char *buf, size_t count);
};
You'd make one of these for each attribute you want to create and then register it using:
int device_create_file(struct device *, const struct device_attribute *);
To make defining these structures easier use:
DEVICE_ATTR(myname, mode, showFunc, storeFunc)
                          ^^^^^^^^^^^^^^^^^^^
                          Normally you always have a read but may not
                          want to allow a write, in which case
                          storeFunc can be NULL.
It will create and initialise a device_attribute struct for you and give it the name
dev_attr_myname, which you can then pass to device_create_file.
The MaxTouch driver has quite a few attributes so stores them in an array of struct attribute,
which it then embeds in a struct attribute_group, which can be passed in bulk to
sysfs_create_group():
static DEVICE_ATTR(myname1, mode1, showFunc1, storeFunc1);
...
static DEVICE_ATTR(mynameN, modeN, showFuncN, storeFuncN);

static struct attribute *mxt_attrs[] = {
   &dev_attr_myName1.attr,
   ...
   &dev_attr_myNameN.attr };

static const struct attribute_group mxt_attr_group = {
  .attrs = mxt_attrs,
};

...

// Later during initialisation...
error = sysfs_create_group(&dev.kobj, &mxt_attr_group);
Pin Multiplexing
References:
- Linux Kernel and Driver Development Training Slides, Free Electrons.
- PINCTRL (PIN CONTROL) subsystem, Linux Docs.
- Pin Control Bindings, Linux Docs.
- BeagleBone Black System Reference Manual, Rev C.1.
- GPIOs on the Beaglebone Black using the Device Tree Overlays, Derek Molloy.
Introduced in v3.2:
Hardware modules that control pin multiplexing or configuration parameters such as pull-up/down, tri-state, drive-strength etc are designated as pin controllers. Each pin controller must be represented as a node in device tree, just like any other hardware module.
The pinmux core takes care of preventing conflicts on pins and calling the pin controller driver to execute different settings.
For example, the Beagle Bone Black has a limited number of output pins and you can choose what gets output via the P9 header. For example, P9 pin 17 can be used by either the SPI, I2C, UART or PWM components of the SoC [Ref].
A list of a load of pin control device-tree bindings can be found in the Linux source tree documentation folder under devicetree/bindings/pinctrl.
From a driver's point of view, it must request a certain pin muxing from the pin control sub system,
although generally it is discouraged to let individual drivers get and enable pin
control
. So, for example, in the Free Electrons Lab book we would assume that out Wii Nunchuck
is permanently connected to the system and so our BeagleBone configuration would always be
setup to enable the I2C muxing on the P9 connector.
To see a list of the claimed pin muxes (and the GPIOS) you can type the following: cat /sys/kernel/debug/pinctrl/44e10800.pinmux/pinmux-pins. Just remember these are the pins of the chip, not just, for example, the GPIO pins!!
Wait Queues
References:
- Driver porting: sleeping and waking up, Corbet on LWN.net.
- Wait queues vs semaphores in Linux, answer StackOverflow by user Anirudh Ramanathan .
- My little toy example. Wait queues and timers.
The wait queue is a mechanism that lets the kernel keep track of kernel threads that are waiting for some event. The event is programmer defined, so each bit of code can declare its own wake queues, add kthreads to this queue when they should block waiting on a condition and then signal all kthreads waiting on that condition when it is met. The queue, accessed through the wait-queue API, is always accessed atomically so many threads can use the same queue to wait on the same condition(s).
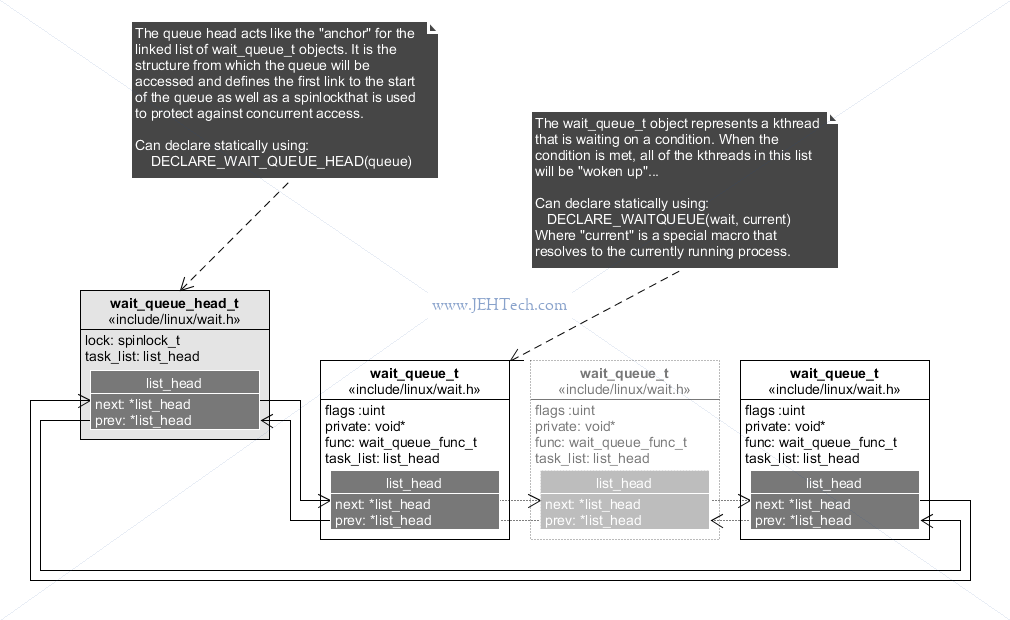
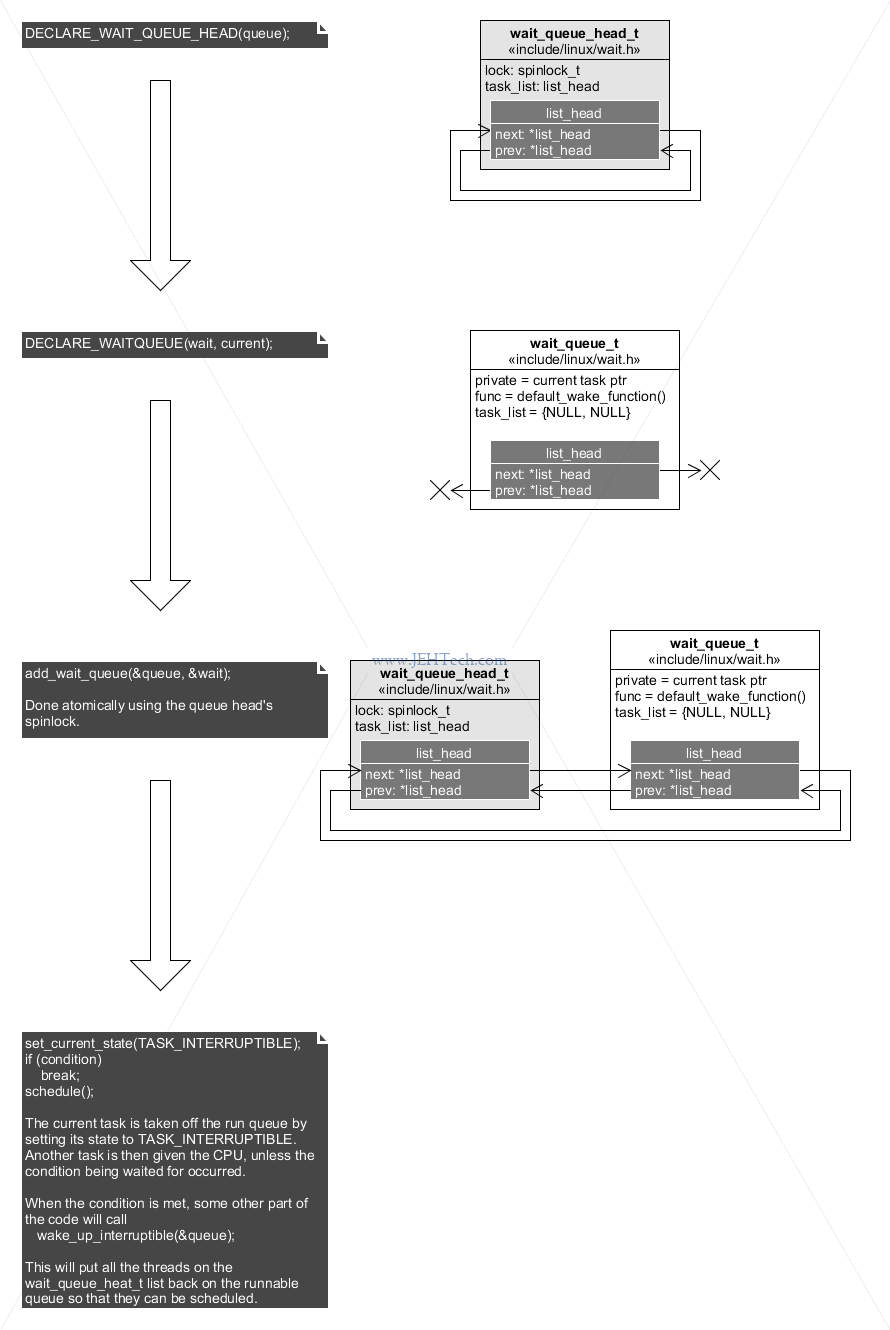
The basic code structure for waiting on a condition (ripped verbatim, comments added, from the reference) is:
// Define the root of the list of kthreads that wish to
// sleep on whatever condition this queue represents
DECLARE_WAIT_QUEUE_HEAD(queue);

// The wait_queue_t structure that we will add to the above list. This
// struct will hold our task details so we can be woken up later on
// when the condition is met
DECLARE_WAITQUEUE(wait, current);

while(true) {
   // Add this task to the wait queue
   add_wait_queue(&queue, &wait);

   // Tell the scheduler to take us off the runnable queue.
   set_current_state(TASK_INTERRUPTIBLE);

   // The conditions wasn't met so allow scheduler to put someone
   // else on the CPU (won't be use because we've said we dont
   // want to be on the read queue by setting out state above)
   schedule();

   // Check for the condition that is set somewhere else...
   if (condition)
      break;

   // We're awake again which means we either got a signal or
   // the condition has been met
   remove_wait_queue(&queue, &wait);
   if (signal_pending(current))
      return -ERESTARTSYS;
}
set_current_state(TASK_RUNNING);
There's one small thing to note in the above example vs the reference... I had to move where the condition was checked. I think their logic was a little wrong because if you don't check after the schedule, you'll always do one more wait that you need to!
One thing that I wondered was why would I use a waitqueue over a semaphore or vice versa. Luckily just typing it int good led me to this answer:
One or two examples I came across use something called interruptable_sleep_on(), but
apparently this is deprecated since 2.6 because it is prone to race conditions
[Ref].
A semaphore is more of a concept, rather than a specific implementation ... The Linux semaphore data structure implementation uses a wait-queue. Without a wait queue, you wouldn't know which process demanded the resource first, which could lead to very large wait times for some. The wait-queue ensures fairness, and abates the resource starvation problem.
Or, instead of using macros to initialisee static variables, you can use:
init_waitqueue_head(&waitq_head);
init_waitqueue_entry(&waitq_entry, current);
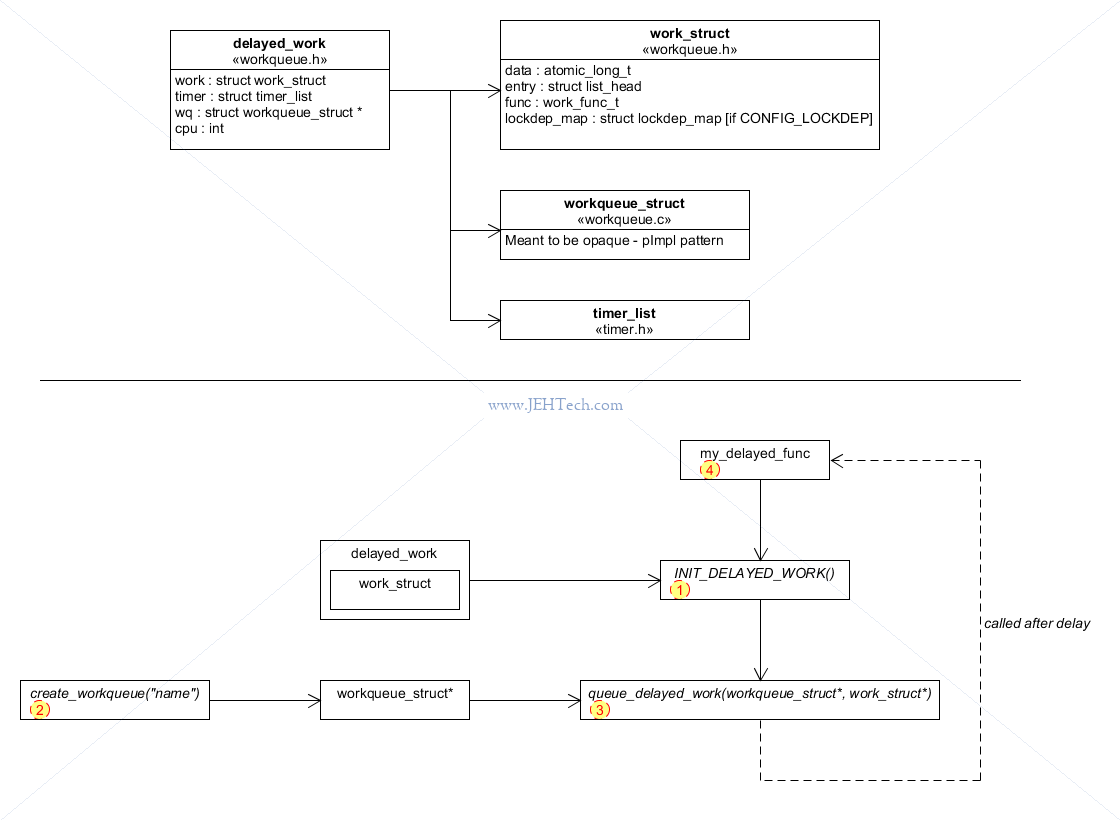
Work Queues
Work queues allow you to request that code be run at some point in the future...
How Drivers Request Firmware
Snippets from kernel v3.18.20 so possibly already quite out of date :(.
Drivers for devices that require firmware may want to provide a facility
by which the firmware can be updated. To do this the driver will call
the kernel function requst_firmware():
requst_firmware(const struct firmware **firmware_p,
                const char *name,
                struct device *device)
Where firmware_p is used to return the firmware image
identified by the name for the specified device.
Following the code one can see that there are various ways that the firmware can be located.
The first location to be searched is the "built-in" location,
i.e., in the kernel image itself. A special section of the kernel image,
called .builtin_fw, is created to hold the name and data
associated with firmware images and is searched as follows:
# include/linux/firmware.h
struct builtin_fw {
        char *name;
        void *data;
        unsigned long size;
};

# drivers/base/firware_class.c
extern struct builtin_fw __start_builtin_fw[];
extern struct builtin_fw __end_builtin_fw[];

static bool fw_get_builtin_firmware(struct firmware *fw, const char *name)
{
  struct builtin_fw *b_fw;

  for (b_fw = __start_builtin_fw; b_fw != __end_builtin_fw; b_fw++) {
    if (strcmp(name, b_fw->name) == 0) {
      fw->size = b_fw->size;
      fw->data = b_fw->data;
      return true;
    }
  }

  return false;
}
But how do these files make it into the firmware image in the first place?
The answer comes for the Makefile firmware/Makefile, a
snippet of which appears below. Note that the kernel
must have been built with CONFIG_FIRMWARE_IN_KERNEL=y.
#./firmware/Makefile
cmd_fwbin = FWNAME="$(patsubst firmware/%.gen.S,%,$@)";                \
            FWSTR="$(subst /,_,$(subst .,_,$(subst -,_,$(patsubst      \
                          firmware/%.gen.S,%,$@))))";                  \
            <snip>
            echo "/* Generated by firmware/Makefile */"           > $@;\
            echo "    .section .rodata"                           >>$@;\
            echo "    .p2align $${ASM_ALIGN}"                     >>$@;\
            echo "_fw_$${FWSTR}_bin:"                             >>$@;\
            echo "    .incbin \"$(2)\""                           >>$@;\ ## The binary firmware data inserted here
            echo "_fw_end:"                                       >>$@;\
            echo "   .section .rodata.str,\"aMS\",$${PROGBITS},1" >>$@;\
            echo "    .p2align $${ASM_ALIGN}"                     >>$@;\
            echo "_fw_$${FWSTR}_name:"                            >>$@;\
            echo "    .string \"$$FWNAME\""                       >>$@;\
            echo "    .section .builtin_fw,\"a\",$${PROGBITS}"    >>$@;\ ## Section identified by symbol __start_builtin_fw in gcc
            echo "    .p2align $${ASM_ALIGN}"                     >>$@;\
            echo "    $${ASM_WORD} _fw_$${FWSTR}_name"            >>$@;\ ## struct builtin_fw->name
            echo "    $${ASM_WORD} _fw_$${FWSTR}_bin"             >>$@;\ ## struct builtin_fw->data
            echo "    $${ASM_WORD} _fw_end - _fw_$${FWSTR}_bin"   >>$@;  ## struct builtin_fw->size

<snip>
$(patsubst %,$(obj)/%.gen.S, $(fw-shipped-y)): %: $(wordsize_deps)
    $(call cmd,fwbin,$(patsubst %.gen.S,%,$@))
The patsubst macro finds all white-space seperated words in
$fw-shipped-y and replaces them with
$(obj)/<word>.gen.S to create a list of targets for this
command.
For each of those targets the command cmd_fwbin is called to
create the target by echoing the linker section asm commands into an asm
file (the .incbin puts the image into the section so that
the firware becomes part of the compiled kernel image). Thus once the
asm files are created, built and linked into the kernel image, the kernel
includes these bits of firmware in its final binary.
$fw-shipped-y is part of the KBuild sytax:
fw-shipped-$(CONFIG_DRIVER_NAME) += ...
When a driver defines this variable it will, via the KBuild magic, get
included in $fw-shipped-y assuming that the kernel was build
using the CONFIG_FIRMWARE_IN_KERNEL=y config option.
If the image is not found in the built-ins, the next port of call is to engage a user-mode helper to grab the contents of the firmware from a file and "pipe" it into a driver buffer.
How do we know where on the file system to look? The answer is found in
drivers/base/firmware_class.c:
/* direct firmware loading support */
static char fw_path_para[256];
static const char * const fw_path[] = {
  fw_path_para,
  "/lib/firmware/updates/" UTS_RELEASE,
  "/lib/firmware/updates",
  "/lib/firmware/" UTS_RELEASE,
  "/lib/firmware",
  "/firmware/image"
};
Where fw_path_para is a string that can be passed to the kernel
via the command line to allow boot time configuration of where firmware files
can be looked for.
Debugging
FTrace
References:
- Debugging the kernel using Ftrace - part 1.
- Debugging the kernel using Ftrace - part 2.
- trace-cmd: A front-end for Ftrace.
- Secrets of the Ftrace function tracer.
- https://opensource.com/article/17/7/dynamic-tracing-linux-user-and-kernel-space
- https://events.static.linuxfound.org/sites/events/files/slides/linuxconjapan-ftrace-2014.pdf
The above are two really useful references on how to use ftrace to see what is going on inside the kernel using files
found in /sys/kernel/debug/tracing.
Use the article "Secrets of the Ftrace function tracer" to see how to limit the increasible amount of information that can be thrown at you through the trace.
To get a nicer interface to the above take a lookg at trace-cmd.
TO DO
Firmware
http://www.makelinux.net/ldd3/chp-14-sect-8
Jiffies
Defined in http://elixir.free-electrons.com/linux/latest/source/include/linux/jiffies.h
See functions like  time_after(a,b) or time_in_rance(a,b,c) to deal with timer wrapping.
Other time
const u64 now = ktime_to_ns(ktime_get());
const u64 end = ktime_to_ns(ktime_get()) + 10; /* 10ns */
Sleeping
https://www.kernel.org/doc/Documentation/timers/timers-howto.txt
Kernel Threads
See: http://elixir.free-electrons.com/linux/v4.8/source/kernel/kthread.c

struct task_struct *kthread_create(int (*threadfn)(void *data), void *data, const char *namefmt, ...);
struct task_struct *kthread_run(int (*threadfn)(void *data), void *data, const char *namefmt, ...);
int kthread_stop(struct task_struct *thread);
/**
 * kthread_stop - stop a thread created by kthread_create().
 * @k: thread created by kthread_create().
 *
 * Sets kthread_should_stop() for @k to return true, wakes it, and
 * waits for it to exit. This can also be called after kthread_create()
 * instead of calling wake_up_process(): the thread will exit without
 * calling threadfn().
 *
 * If threadfn() may call do_exit() itself, the caller must ensure
 * task_struct can't go away.
 *
 * Returns the result of threadfn(), or %-EINTR if wake_up_process()
 * was never called.
 */
Kernel Semaphores
http://cs.unc.edu/~blate/courses/comp530H_F14/pdf/Sync_Schedulie.pdf
http://www.makelinux.net/ldd3/chp-5-sect-3
    if (down_interruptible(&dev->sem))
        return -ERESTARTSYS;

Quote verbatim:
Note the check on the return value of down_interruptible; if it returns nonzero, the operation was interrupted. The usual thing to do in this situation is to return -ERESTARTSYS. Upon seeing this return code, the higher layers of the kernel will either restart the call from the beginning or return the error to the user. If you return -ERESTARTSYS, you must first undo any user-visible changes that might have been made, so that the right thing happens when the system call is retried. If you cannot undo things in this manner, you should return -EINTR instead.

#include <linux/semaphore.h>
Kernel Times
To schedule a recurring short task that executes in interrupt context and on the CPU that create the timer.
Refernce: http://www.makelinux.net/ldd3/chp-7-sect-4

void timed_function(unsigned long tmrdata)
{
    struct my_data *data = (struct my_data *)tmrdata;
    /* Code to generate the key press */
    /* Atomically access the direction */
    if (I should still be running)
    {
        /* Atomically access configured delay */
        timer.expires += + msecs_to_jiffies(10);
        add_timer(&data->something.timer);
    }
}

struct timer_list timer;
init_timer(&timer);
timer.data = (unsigned long)&mxt_data;
timer.function = volume_key_press_generator_thread;
timer.expires = jiffies + msecs_to_jiffies(10);

-------
See also del_timer() to remove timer from queue and del_timer_sync()
-------

https://github.com/jameshume/MessingWithLinux/blob/master/kernel_timers/kernel_timers_play.c
Build On Ubuntu
ref: https://www.cyberciti.biz/tips/build-linux-kernel-module-against-installed-kernel-source-tree.html
Wanted this to quickly test and play with some driver stuff that didn't require any actual hardware... just get familiar with some API
$ uname -r
4.4.0-83-generic
= Misc Notes
== Building Kernel and Drivers
You need to know exactly the confiuration of the kernel on which your modules will be loaded, which means you must compile your kernel before compiling your modules so that you have what is needed to compile your module.

More and more of linux func is modules
1. Reduce size of kernel
2. Speedup the boot time

The kernel build makefile is very complex and needs at least two options to cross compile it - ARCH and CROSS_COMPILE. Default ARCH is the architecture of the host machine, not x86 necessarily.

GCC is the only compiler that can compile the linux kernel. Linux kernel is not a C compliant program because it uses features of GCC that are not specified by the language. But these features are needed to make a kernel, which made the kernel specific to the compiler on which it was tested as these are undefined features of the C language.

Use the "O" option to cmompile out of source so that you can use same source for different build variants.

Never modify .config manually because
1. Tools can check this automatically - use them to detect dependencies between options etc. Avoids incorrect configs.
2. The C compiler cannot read this file. It reads .h files that procide the same options. The config tools generate the .h files in an autogenerated location in the build tree that will duplicate the configuration options provided in the .config file. The source is .config and the output is the .h.

There are 1000s of config options so start with a default config for your board [my_board_or_soc]_defconfig. Used to be board specific but is now SoC specific. The device tree is the BSP. THe kernel tends to be generic for all boards made from one given SoC or even SoCs of a given family and the device tree provides the customisations due to constraints on the system designed using the SoC, e.g. PCB layout.

Build outputs is zImage, uImage. UBoot traditionally use uImage, an image packaged for uBoot, but now uBoot doesn't need this anymore and use, usually, a zImage or a plain image. Images generally include a checksum of some form.

Can avoid mix-and-match attacks when ram disk and kernel version and device tree are not what expected. Built into the new images - FITs. That is why new image isn't used any more. FIT has the same syntax as a device tree with options that can specify how to boot the kernel. FIT = flattened image tree. [See https://elinux.org/images/f/f4/Elc2013_Fernandes.pdf].

zImage not always favoured as decompression works without the MMU, without caches so it is faster to read a non-compressed image. Also before uncompressing itself it has to relocate itself, otherwise it is doing decompression in place which doesnt work. So on 64 bit systems (ARM) normally boot with plain image but 32 bit use zImage.

vmlinux is the ELF file that corresponds to the linux kernel as it will be loaded in virtual memory for execution. Exactly the same format as a linux application. not always ubootable.

INSTALL_PATH and INSTALL_MOD_PATH are useful and used in installation makefile targets.

Modules are generated througout the build tree so theser have to be grouped to a known location on your ram disk - so use 'make modules_install'. Once here must use 'depmod -a' to create the files needed for Linux device module to work correctly.

When compiling out-of-source render the src tree read-only - it is good practice so that you don't screw up your source tree and need to start using make commands such as 'distclean' etc. (chmod a=rX)

= Linux Modules
init_module and cleanup_module should have a module specific name. Good practice to print loading and unloading message for module load and unload event. But use short messages because prink() disables interrupts whilst using busy-waiting to poll for characters - eek! Don't use printk() elsewhere for this reason - there are new and better debug options!