Installing The Eclipse C/C++ IDE For ARM Development
Page Contents
Installing The GNU ARM Embedded Toolchain
We'll need a cross compiler to create our ARM apps and Eclipse will need to know where to find the compiler and its related tool chain utilities. The ARM website describes what the tool chain is:
The GNU Arm Embedded toolchains are integrated and validated packages featuring the Arm Embedded GCC compiler, libraries and other GNU tools necessary for bare-metal software development on devices based on the Arm Cortex-M and Cortex-R processors.
The tool chains includes the (cross) compiler, binutils, debugger and more!
Visit the download page and download the tool chain archive.
Extract the archive to a directory of your choosing and remember the path. For the purposes of the notes
on this page we will assume it has been extracted to the user-local directory ~/gcc-arm-none.
We will need to tell Eclipse where we extracted the toolchain to later.
Installing Eclipse Plugins
The Eclipse C/C++ Development Tools SDK
The Eclipse C/C++ Development Tools (CDT) run on the eclipse platform and add extra functionality that will help with developing C/C++ applications, including things like syntax highlighting and code indexing.
The CDT Project provides a fully functional C and C++ Integrated Development Environment based on the Eclipse platform. Features include: support for project creation and managed build for various toolchains, standard make build, source navigation, various source knowledge tools, such as type hierarchy, call graph, include browser, macro definition browser, code editor with syntax highlighting, folding and hyperlink navigation, source code refactoring and code generation, visual debugging tools, including memory, registers, and disassembly viewers.
To install the CDT follow these steps:
-
From the main Eclipse window menu bar select
Help > Install New Software: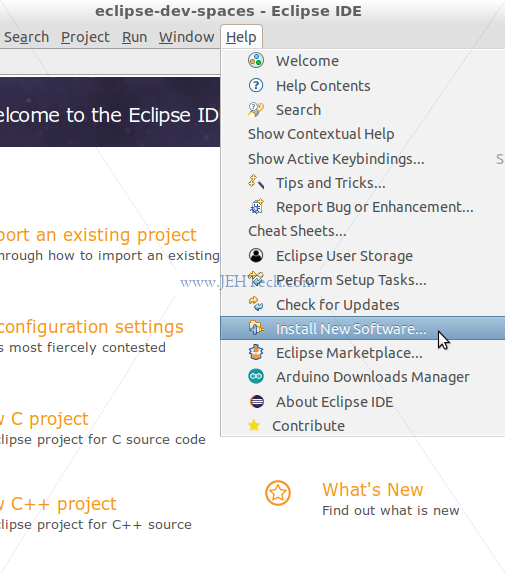
-
In the window that pops up click on the
Managebutton.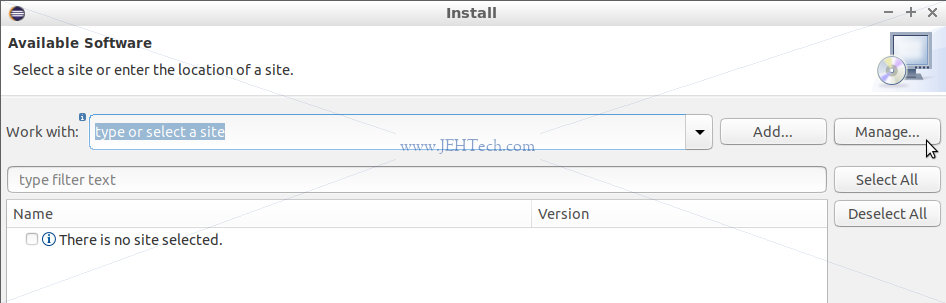
-
In the resulting pop-up select CDT and click
Apply and Close
-
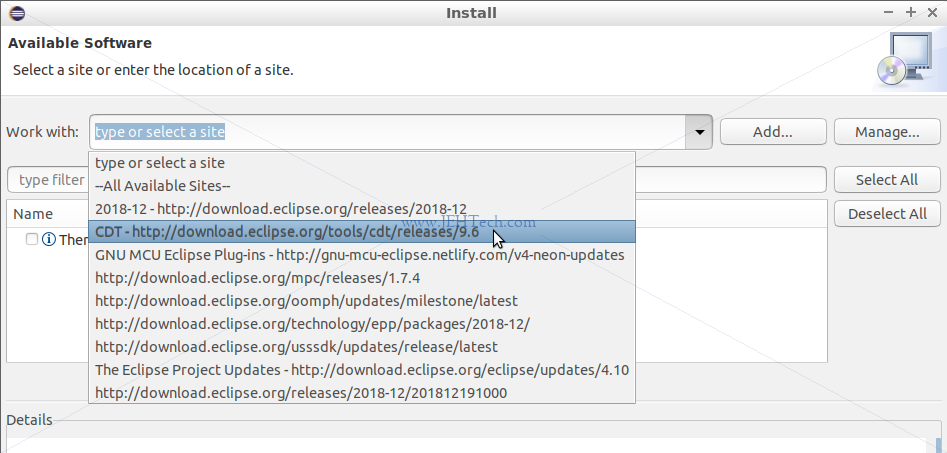
You will return to the previous "Available Software" window. Drop the "work with" list down and select CDT as shown.
-
Select "CDT Main Features" and click
Next.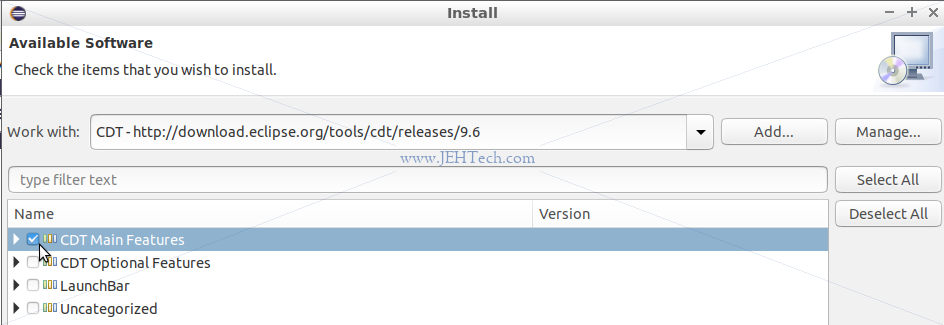
Click next through the remain screens accepting an license conditions.
At this point you must now restart Eclipse if not prompted to do so.
GNU ARM Plugin
This plugin extends the CDT plugin installed in the previous seciton by providing a mechanism with which to use the GNU toolchain, which you installed in the first section, through the Eclipse GUI.
The GNU MCU Eclipse plug-ins allow to create, build, debug and in general to manage ARM & RISC-V projects (executables and static/shared libraries, in both 32 and 64-bit versions) with the Eclipse framework...
To install this plugin follow these steps:
From the main Eclipse menu select
Help > Eclipse Marketplace.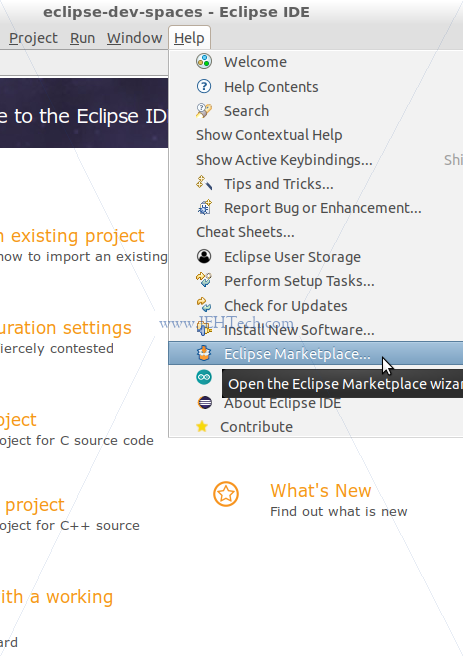
-
In the pop-up window that appears type "gnu arm eclipse" in the "Find" textbox and click on
Goto kick off the search. The first entry found should be as shown, "GNU MCU Eclipse a.b.c". Click oninstalland follows the steps.
At this point you must now restart Eclipse if not prompted to do so.
Once Eclipse has restarted, from the main window's menu select
Help > Install New Software.
-
In the resulting window select to work with "GNU MCE Eclipse.
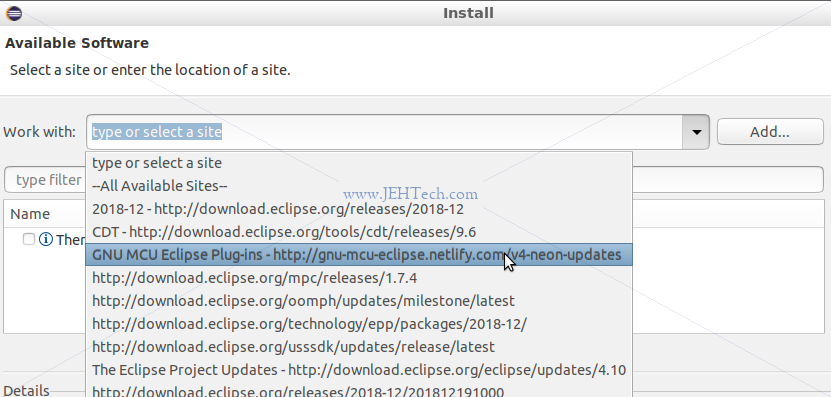
-
Select "GNU ARM & RISC c/c++ Cross Development TOols" and clicj
Next, clicking through the installation screens and accepting agreements.
At this point you must now restart Eclipse if not prompted to do so.
OpenOCD
Installing OpenOCD
Included on the devlopment boards I've been playing with is the ST-LINK in-ciruit debugger and programmer. To use take advantage of this and use it with Eclipse we need to install OpenOCD, which provides on-chip programming and debugging support.
The best resource here is the OpenOCD README file.
To install the OpenOCD debugger:
Install the required libraries for ST-LINK debugging:
sudo apt install libusb-1.0-0-dev
Download OpenOCD from sourceforge.
Extract the downloaded archive to a directory of your choice. From the command line change into that directory and type:
./configure --enable-stlink # or use --help for help
	make
	sudo make install
When I compiled I had build errors. They were due to warnings that were converted to errors so I got fed up and disabled
-Werrorin the Makefile to "solve" the issue... OpenOCD ran fine after :)Now, to grant the correct USB permissions so that OpenOCD can be run using your user account and not root, copy the UDEV rule
60-openocd.rulesto/usr/local/share/openocd/contrib/99-openocd.rules.It creates the group
plugdev. You may need to add yourself to this group usingusermod -a -G plugdev.
Having installed OpenOCD you can run it from the command line by typing:
openocd -f /usr/local/share/openocd/scripts/board/your_boards_config_file.cfg
For the ST-Nucleo boards the file will be named something like st_nucleo_fx.cfg,
for example.
When you run the openocd command it starts a service that will communicate
with your target using JTAG. The service can be controlled by connecting to it using
telnet, for example, or GDB.
To connect to the service using telnet type telnet localhost 4444.
Add OpenOCD To The Eclipse IDE
-
From the main window menus select
Run > External Tools > External Tools Configuration....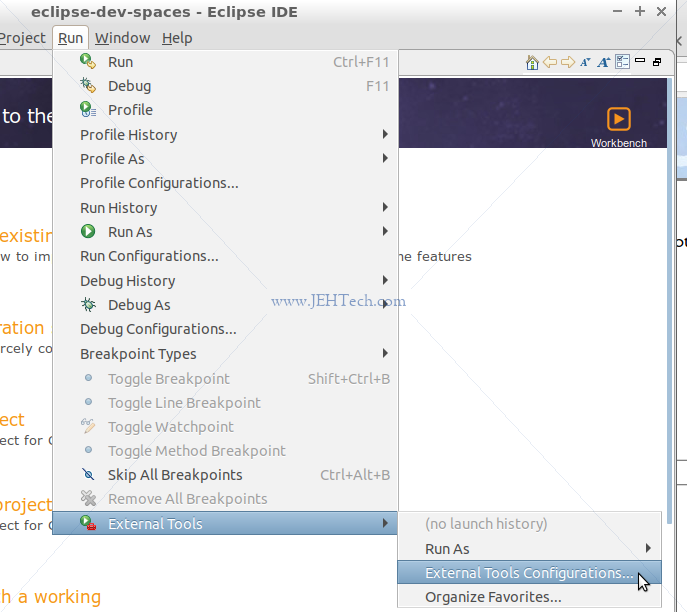
Install On Windows
Got from here https://github.com/arduino/OpenOCD-build-script/blob/static/compile_win_openocd.sh

Run WSL:
   sudo apt install libusb-dev
   sudo apt install libhidapi-libusb0 libhidapi-dev
   ./configure --enable-cmsis-dap
   make all -j 8
   sudo make install

Then create (see https://arduino.stackexchange.com/questions/28566/arduino-zero-error-unable-to-find-cmsis-dap-device):
   sudo vim /etc/udev/rules.d/98-openocd.rules
      ACTION!="add|change", GOTO="openocd_rules_end"
      SUBSYSTEM!="usb|tty|hidraw", GOTO="openocd_rules_end"
      ATTRS{product}=="*CMSIS-DAP*", MODE="664", GROUP="plugdev"
      LABEL="openocd_rules_end"

   sudo udevadm control --reload # to force reload if you make a mistake

Then make sure you are in group plugdev


Also tried here because I have a WSL problem - it cant find the CMSIS-DAP device - https://qiita.com/qawsed477/items/2f93f2c1ff0de6fef038

THIS DOES NOT APPEAR TO BE POSSIBLE IN WSL YET :'( Moving on to looking at other options.

Trying this: https://docs.espressif.com/projects/esp-idf/en/latest/api-guides/jtag-debugging/setup-openocd-windows.html