Linux Security
Page Contents
General References
I found the following series of articles on the Vigil Code blog to be really useful:
- Ubuntu Server Initial Security - Quick Secure Setup Part I
- UFW with Fail2ban - Quick Secure Setup Part II
- Using AppArmor - Quick Secure Setup Part III.
Security-Enhanced (SE) Linux
References
- Red Hat Enterprise Linux 6, Security-Enhanced Linux User Guide.
- Note: this "article"/section is mainly notes based on this reference. This is a r-e-a-l-l-y good bit of documentation!
- Managing Red Hat Enterprise Linux, D J Walsh, K MacMilan.
- Note: this "article"/section is mainly notes based on this reference.
- The SELinux Notebook, 4th edition.
- Note: this "article"/section is mainly notes based on this reference.
- Discretionary access control, Wikipedia.
- Mandatory access control, Wikipedia.
- Principle of Least Privilege, Wikipedia.
- Linux Security Modules, Wikipedia.
- SELinux concepts, Android Docs.
- SE Linux Colouring Booko, RedHat.
- SE Linux Saves: Examples where SE Linux prevent exploits.
To Read
https://www.systutorials.com/docs/linux/man/1-audit2why/
Linux without the SE
The Linux kernel controls that access that a process has to resources. In the standard Linux Discrtionary Access Controll (DAC) this is does by assigning users and resources to groups. Processes are given the same group and user IDs as the user that started the process. The process can then access a resource if it shares either the same user or group ID with the resource, or if the resource is "public".
I.e., a process accesses a resource based on the resource access bits:
- If the resource available to anyone, the the process can access it,
- Otherwise if the process and resource are in the same group then the the process can access it,
- Otherwies if the process and resource are owned by the same user, the process can access it,
- Otherwise the process cannot access the resource.
This is called a security policy. The policy is the set of rules used to make access control decisions.
Therefore, access to system resources must be set by the system admin, who will decide which
users belong to which groups and which system resources belong to which group (and user). However,
the system is discretionary in the sense that a subject with a certain access permission is capable of passing that permission (perhaps indirectly) on to any other subject
[Ref].
This discretionary access means that the system admin is not totally in control of who accesses what. For example, Bob can change the group associated with a file he owns and suddenly give a different set of individuals the right to read/write/execute that file. This is not in the system admin's control. Bob has been able to make to make a policy decision!
The main RedHat article referenced [Ref], describes some of the disadvantages in more detail. In summary they are:
- Processes' access is based on users' access: the kernel can not distinguish applications from users,
- Processes can change security properties: discretionary access control. Processes can escape security policy!
- Only 2 privilege levels, user and root: too simplistic and no way to enforce "least-privilege" (i.e., a process should be given only those privileges essential for it to perform its work) [Ref]
Summary of terminology:
- Security policy is the set of rules used to make access control decisions.
- Discretionary access means that a subject with a certain access permission is capable of passing that permission on.
- Least-privilege describes a security mindset that states that a process should be given only those privileges essential for it to perform its work.
SELinux: A Bird's Eye View
SELinux stands for Security Enhanced Linux. It is built on years of the NSA's security research and is an application of their Flash security architecture, implemented as part of the Linux Security Module (LSM) framework. It adds Manditory Access Controll (MAC) to Linux:
...With mandatory access control, this security policy is centrally controlled by a security policy administrator; users do not have the ability to override the policy ... By contrast, discretionary access control ... allows users the ability to make policy decisions and/or assign security attributes. ... MAC-enabled systems allow policy administrators to implement organization-wide security policies. Under MAC (and unlike DAC), users cannot override or modify this policy, either accidentally or intentionally ... in principle ...
Most interestingly, for me at least, Android uses SELinux (since 4.3) [Ref] which means that it is a very heavily used and "industry-leading" security measure. If you're going to work in the guts of Android, a little knowledge of SELinux goes a long way... hence why I'm trying to learn a little about it.
So, a more secure Linux: access control is mandatory (default denial - anything not explicitly allowed is denied), more fine grained (no longer just root and not-root) and also implements the principle of least-privilege.
There are thee forms of access control, the only one I've made notes on is Type Enforcement (TE), which is the primary SELinux mechanism.
The basic, 30k foot view of SELinux operation is this... Whenever a process accesses a file (this could be disk-based, a socket or shared memory, for example) or some other resource, this is intercepted in the kernel by SELinux. It will check all of the rules in the security policy and if the rules allow it access is granted, otherwise it is denied. The same is true when a user attempts to start a process. Note though that it runs after the built in Linux DAC. If the DAC blocks it SELinux won't even get a look in.
The SELinux Parlance
Cribbed almost verbatim from:
| Term | Meaning |
| User | Linux users mapped 1-to-1 to SELinux users. |
| Roles | Gateway between user and process. Roles defines which users can access which processes. |
| Subject | Person, process, or device. Anything that can affect an object. |
| Object | Anything that can be acted upon. E.g. file. |
| Permissions | Actions that a subject can perform on an object are the subject's permissions. |
| Domain | Domains are for Subjects. Security context associated with a process: it tells the process what it can and can't do. |
| Type | Types are for Objects: Dictates the objects purpose. |
| Policy | Set of rules used to make access control decisions. |
| Type Enforcement (TE) | Where a process running within a particular domain can perform only certain operations on certain types of objects. |
Modes
SELinux can be run in one of three modes:
- Enforcing: Policy is actively enforced.
- Permissive: Policy is not enforced but violations are still logged. Good for debug.
- Disabled: Not running :(
You can check what mode you're in by running either of the commands getenforce
or sestatus.
Security Contexts
All processes and files have a security context. A security context defines the security settings applied to a subject (person, process, or device). I guess the entire set of security contexts applied to everything in a system constitutes the security policy.
Security context: security settings applied to a person, process or device (aka "object").
The SELinux security context (aka "(security) label") is applied via a label associated with every user, process and resource. To put it another way, we can say that the rights of a process depend on it's security context. A security context is defined as follows:
user:role:type:level
The field type is used for type enforcement (TE), the role and level fields I will
ignore.
Access is only allowed between types via the security policy and every process and resources used by that processes must have a security context (remember denial by default).
A "domain" is a little bit of jargon you'll hear a lot: The security context associated with a process is called the processes' domain.
When a type is associated with a process, it defines what processes (or domains) the SELinux user (the subject) can access.
When a type is associated with an object, it defines what access permissions the SELinux user has to that object.
So... we label all of our resources and all of our subjects and then define rules which say which subjects can do what with which objects.
Get SELinux Running On Ubuntu?
References
- https://wiki.debian.org/SELinux/Setup
- https://www.centos.org/docs/5/html/Deployment_Guide-en-US/rhlcommon-chapter-0001.html
- Android Security Internals, chapter 12.
The SELinux Ubuntu Setup
Okay, to do this I am going to follow the Debian tutorial as the Ubuntu one points to it.
Following the instructions went pretty well. I now have SELinux running in permissive mode on my desktop:
sudo apt-get install selinux-basics selinux-policy-default auditd
sudo cp ~/Downloads/_load_selinux_policy /usr/share/initramfs-tools/scripts/init-bottom
update-initramfs -u
sudo update-initramfs -u
selinux-activate
sudo selinux-activate
sudo reboot now
sudo check-selinux-installation
sudo audit2why -al
The last command audit2what -al outputs a shed load of denial messages. Unfortunately
that's where the first references Debian setup tutorial ends.
In an earlier paragraph we talked about Linux users being mapped 1-to-1 onto SELinux users. Let's see what this new setup has configured for us...
~$ sudo semanage login -l

Login Name           SELinux User         MLS/MCS Range        Service

__default__          unconfined_u         SystemLow-SystemHigh *
root                 unconfined_u         SystemLow-SystemHigh *
system_u             system_u             SystemLow-SystemHigh *
We can also see what roles exist:
~$ seinfo -r

Roles: 14
   auditadm_r
   dbadm_r
   guest_r
   staff_r
   user_r
   logadm_r
   object_r
   secadm_r
   sysadm_r
   system_r
   webadm_r
   xguest_r
   nx_server_r
   unconfined_r
We can also see the security contexts in terns of rolls and types that users a labelled with:
~$ id -Z
unconfined_u:unconfined_r:unconfined_t:SystemLow-SystemHigh
Remember when we said a security context looked like "user:role:type:level"?
Well, here is the only security context in our system. The user unconfined_u
has the roll unconfined_r, with a type unconfined_t.
So, have our files been labelled as the tutorial claimed? Lets see...
~$ ls -lZ
total 84
drwxrwxr-x.  3 jh   jh   unconfined_u:object_r:user_home_t:SystemLow 4096 Feb  3  2017 Android
drwxrwxr-x.  3 jh   jh   unconfined_u:object_r:user_home_t:SystemLow 4096 Feb  3  2017 AndroidStudioProjects
drwxrwxr-x.  2 jh   jh   unconfined_u:object_r:user_home_t:SystemLow 4096 May 16 19:57 bin
drwxr-xr-x. 10 jh   jh   unconfined_u:object_r:user_home_t:SystemLow 4096 Aug 29 17:34 Desktop
drwxr-xr-x.  4 jh   jh   unconfined_u:object_r:user_home_t:SystemLow 4096 May  1 18:31 Documents
...
Here we see that, for example, the directory Android has a security context
unconfined_u:object_r:user_home_t:SystemLow. This means that, if we are using
type enforcement (TE), any user that has the type user_home_t or is, in fact,
the user unconfined_u can access the directory.
But where is all of this defined? Well, it appears the SELinux policy is compiled and exists in binary trees, which are compiled from source trees [Ref]. Binary policy files are used for performance reasons [Ref]. Doing a little grep we find this:
~$ grep -R user_home_t /etc/selinux/default/
...
/etc/selinux/default/contexts/files/file_contexts.homedirs:/home/[^/]*/.+   unconfined_u:object_r:user_home_t:s0
/etc/selinux/default/contexts/files/file_contexts.homedirs:/root/.+ unconfined_u:object_r:user_home_t:s0
...
So, the file file_contexts.homedirs is defining a rule that matches all direct
subdirectories of /home and labels them with the security context
unconfined_u:object_r:user_home_t:s0. Presumably this was compiled into a binary
policy tree, which was applied to create the default labelling of the file system when I first
setup SELinux, following the Debian tutorial referenced.
Other Linux Security Modules (LSMs)
SMACK: https://en.wikipedia.org/wiki/Smack_(software)
TOMOYO
AppArmor
Yama
Uncomplicated Firewall (UFW)
References
- Uncomplicated Firewall, Debian Wiki.
- Uncomplicated Firewall, Ubuntu Wiki.
About
UFW is a nice front end to the more complicated iptables firewall. It really is nice and user friendly. IPTables always looked to complicated to learn to me because I'm not a hard-core system administrator. I just want an easy to use firewall that will do a good job.
UFW is described as:
... iptables provide a complete firewall solution that is both highly configurable and highly flexible ...
... Becoming proficient in iptables takes time, and ... can be a daunting task ...
... the Uncomplicated Firewall (ufw) is a ... particularly well-suited for host-based firewalls. ufw provides ... a command-line interface for manipulating the firewall. ufw aims to provide an easy to use interface for people unfamiliar with firewall concepts, while at the same time simplifies complicated iptables commands to help an administrator who knows what he or she is doing ...
Installing And First Super Restrictive Setup
Could not be easier:
sudo apt-get install --yes ufw
sudo ufw enable
sudo ufw default deny incoming
sudo ufw default allow outgoing
sudo ufw allow ssh
sudo ufw limit ssh/tcp
sudo ufw status verbose
This installs UFW and sets it up to deny all incoming traffic except for SSH connections but allow all outgoing traffic.
UFW Commands
The man page and the above links will tell you pretty much everything you need to know about UFW, but here is a quick cheat sheet and a little view into some of the more complicated command line options.
| Status: | ufw status verbose |
| Enable Firewall: | ufw enable |
| Deny/Block All Incoming: | ufw deny incoming |
| Deny/Block A Specific IP: | IP: ufw deny from 1.2.3.4IP & Subnet: ufw deny from 1.2.3.4/24Incoming TCP to pert 80: ufw deny proto tcp to any port 80
|
| Allow All Outgoing: | uft default allow outgoing |
| Allow SSH Incoming: | ufw allow ssh |
| Rate Limit (SSH): | ufw limit ssh/tcp |
| Allow Protocol/Port Range: | ufw allow 1234:4321/(ip|udp|tcp) |
| Allow Specific IP Incoming: | ufw allow x.x.x.x |
| Allow SSH from IP range: | ufw allow proto tcp from 192.1.1.0/24 port 22 |
| Show Numbered Rules: | ufw status numbered |
| Delete Rules: | ufw delete (allow|deny) ... |
| See Apps: | ufw app list |
| Get App Info:: | ufw app info app-name |
A little note on how to read some of the more complicated command lines. When you see something like this:
ufw deny proto tcp to any port 80
Read it as "ufw, deny proto tcp to any, port 80". I.e., do not read it as
denying tcp "to any port". It is denying tcp to any address on the host using port 80.
The reason it reads like this is that on a mulihomed
you might only want to ban on a specific IP, so you might write ufw deny proto tcp to xxx.xxx.xxx.xxx port 80,
for example.
UFW Rule Order
To view the order of the rules in the UFW table type:
sudo ufw status numbered
Rules are applied in order, starting at rule 1. The first rule that matches will be used and the others will not be evaluated. this is why specific rules should be put first and generic rules second.
To insert rules at a specific index use the following:
sudo ufw insert INDEX allow from IP_ADDR [port PORT] [to IP_ADDR [port PORT] [proto PROTO]]
To delete a rule at a specific idex use:
sudo ufw delete INDEX
Where, in both cases, INDEX is the number with which the rule is listed by the numbered status command shown above.
UFW Apps
When you see commands like "ufw allow OpenSSH", the "OpenSSH"
bit is an "app", which is just a name which UFW maps to a title, description, port and
protocol.
The app definitions reside in /etc/ufw/applications.d. Let's say I have a server
that I have build called JEHServ and I would like to be able to write something like:
"ufw allow JEHServ". To accomplish this create the file
/etc/ufw/applications.d/jeh-serv with the following contents:
title = JEHTech server, a silly example
description=A really long description about JEHTech server
ports=12345/tcp|4321|99,105:110/udp
The only "complicated bit" is the ports. For the ports you can use
a pipe delimited sequence of port numbers, ranges and protocols as shown.
After creating this file you will need to force UFW to re-read it. Type
ufw reload.
Logs
UFW logs can be found using dmesg or in /var/logs/ufw*.
MAC Addresses
You will see MAC addresses like the following. The string is split into the 6-octet destination MAC, 6-octet source MAC and 2-octet EtherType.
[UFW BLOCK] IN=wlan0 OUT= MAC=b8:27:eb:ed:4c:77:6e:ad:3b:c2:8e:60:08:00...
                              ^^^^^^^^^^^^^^^^^ ||||||||||||||||| ^^^^^
                              ^^^^^^^^^^^^^^^^^ ||||||||||||||||| Ether type (80:00 == IPv4)
                              ^^^^^^^^^^^^^^^^^ Destination MAC
                              Source MAC
Routing
As UFW is a friendly wrapper for IpTables, it is worth understanding something About the IpTables structure [Ref]:
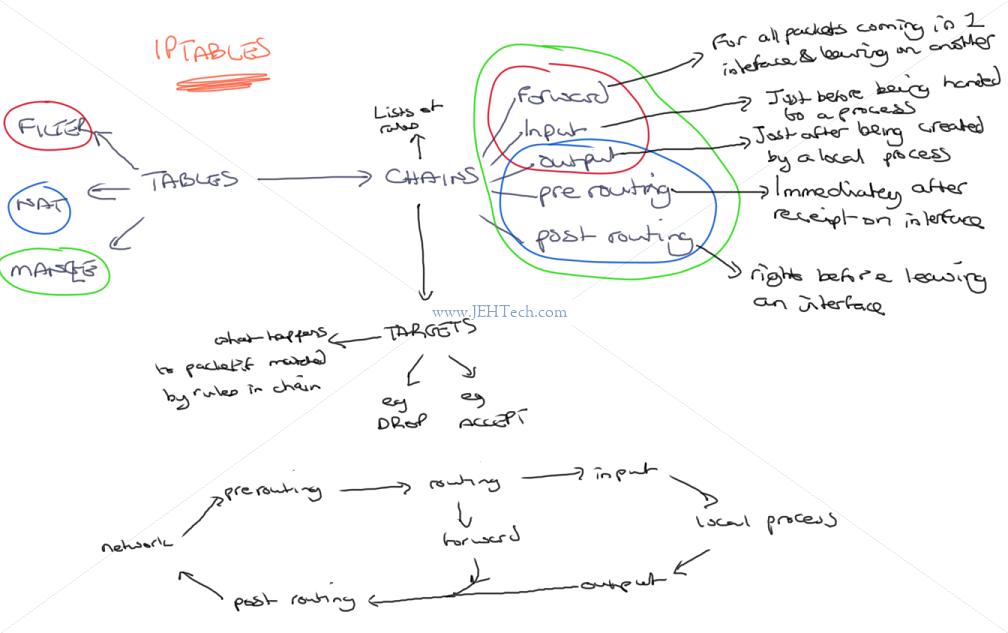
Having said that, maybe not that necessary. The following are notes from this SO thread [Ref]. Some rules examples:
# Allow all traffic routed to eth2 and coming in on eth1 to traverse the firewall:
ufw route allow in on eth1 out on eth2

# Allow any packets coming in on eth0 to traverse the firewall out on eth1 to tcp port 80
# on 12.34.45.67.
ufw route allow in on eth0 out on eth1 to 12.34.45.67 port 80 proto tcp
Must also setup IP formwarding by setting the following in /etc/ufw/sysctl.conf:
net/ipv4/ip_forward=1
net/ipv6/conf/default/forwarding=1
net/ipv6/conf/all/forwarding=1
Then restart UFW. You can then check if IP forwarding is enabled by typing:
# Either
sysctl net.ipv4.ip_forward

# Or
cat /proc/sys/net/ipv4/ip_forward
Fail2Ban
References
- Fail2Ban Manual, Fail2Ban Wiki.
- Fail2Ban Command Cheat Sheet, Fail2Ban Wiki.
- How To Protect SSH with Fail2Ban on Ubuntu 14.04 , DigitalOcean.
- System: Monitoring the fail2ban log, The Art Of Web.
- UFW with Fail2ban - Quick Secure Setup Part II, Vigil Code blog.
- Using Fail2ban with Nginx and UFW, Johnny Chadda in Technology, August 4, 2014
Intro
Fail2Ban is a log parser that monitors a set of logs for messages that look "suspicious", and then uses those messages to ban IP addresses (i.e., add a firewall rule to block that IP). So if a server prints out an error message that contains the client IP address, Fail2Ban can be configured to detect that message, extract the host IP and add a firewall rule to block that IP, if for example, the message is logged more than 10 times in 1 second. The ban usually is not permanent.
Cheat Sheet
| Get status: | sudo fail2ban status |
||||||
| View logs: | sudo cat /var/log/fail2ban.log |
||||||
| Set log level: | fail2ban-client set loglevel (CRITICAL|ERROR|WARNING|NOTICE|INFO|DEBUG|HEAVYDEBUG) |
||||||
| Start/stop/reload/get status: | fail2ban-client start|stop|reload|status [jail-name] |
||||||
| Un-ban an IP | sudo fail2ban-client set jail-name unbanip ip-address |
||||||
| Dump config: | fail2ban-client -d |
||||||
| Jail Information: |
|
||||||
| Test A Jail Regex: | fail2ban-regex /path/to/log/file /etc/fail2ban/filter.d/my-silly-server.conf [regex-to-ignore]
fail2ban-regex /path/to/log/file "a test regex"
|
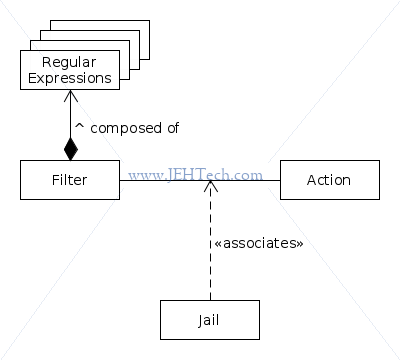
Jails, Filters & Actions
Jails define the conditions that will lead an IP address to be banned by associating a filter with an action.
The filter is just a set of regular expressions which are used to extract the IP address out of log messages. The action is self explanatory: usually adds a rule to the firewall but can do anything like send emails etc.
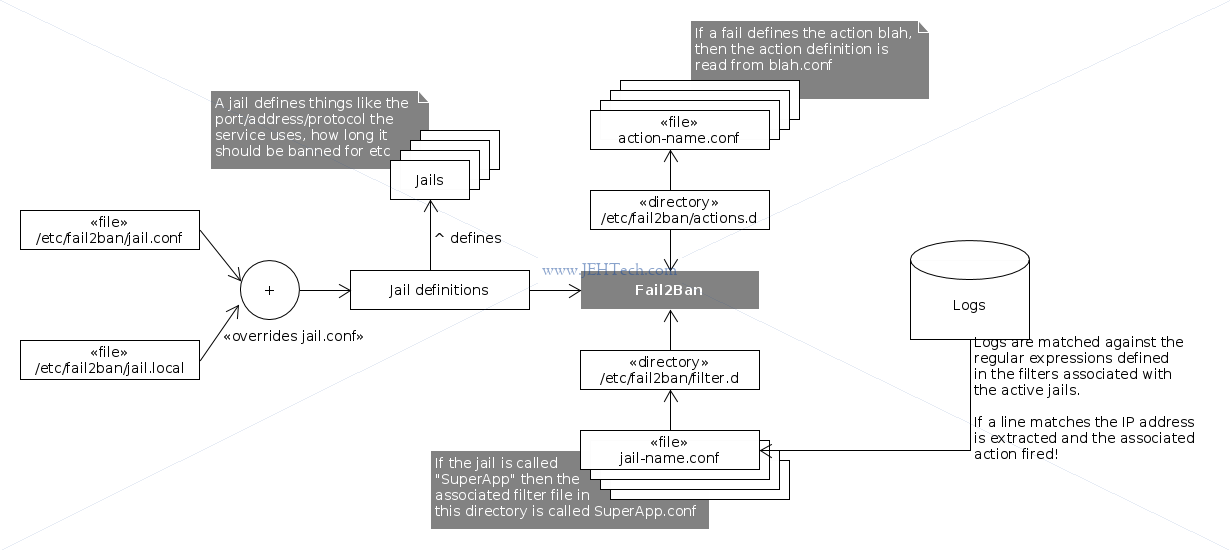
Jails are found in /etc/fail2ban/jail.conf. Don't modify this file! Put new changes
in /etc/fail2ban/jail.local. Any settings in this file override those in the
.conf file. You do not need to copy the .conf file... just
insert the changes you wish to make into the .local file. Think of it as an
inheritance relationship. The .local file inherits everything from the .conf
file and then applies specific overrides and extensions. An alternative way to specify a jail is
to add it, in its own file, to /etc/fail2ban/jail.d/.
Actions are found in /etc/fail2ban/action.d/. Filters are found in /etc/fail2ban/filter.d/.
The default action for everything is to ban an IP address. The default firewall being used is
iptables. Note: if you are using UFW you will have to reconfigure Fail2Ban to use UFW.
Note, that to begin with all jails are disabled by default. You should only enable
the jails that are required for you system. For example, a basic system with only an SSH server
running, might only have this in /etc/fail2ban/jail.local:
[sshd]
enabled = true

[sshd-ddos]
enabled = true
Because these settings override or add to the existing settings in jail.conf, thats
all we need to specify for SSH... all the other settings like the filter and actions have already
been defined: the jail only needs enabling.
Working With UFW
By default, Fail2Ban will use iptables to block IP addresses. What I found was that, at least on
Debian (9.4), that it still worked, i.e., IP addresses were still banned, but the ban status
did not show up when executing a ufw status command. To get it working with UFW
all you need to do is add the following to your /etc/fail2ban/jail.local file:
[DEFAULT]
banaction = ufw
This works by overriding the default ban action because of the file /etc/fail2ban/action.d/ufw.conf
that is nicely provided for us :)
To go into a little more detail have a look at /etc/fail2ban/jail.conf. Inside
you will see the following definition:
action = %(action_)s
This is the default action that will be taken when fail2ban bans an IP address. It is set to
a macro expansion. In this case it expands the macro "action_".
If we look at this macro we can see it defined as this:
action_ = %(banaction)s[name=%(__name__)s, bantime="%(bantime)s", port="%(port)s", protocol="%(protocol)s", chain="%(chain)s"]
It is itself a string that contains multiple macros that are in turn expanded. The most important macro,
if we want to do anything other than the default ban action is, "banaction". Thus
by overriding this variable we have cause the default action to use UFW.
One thing you might be wondering is why each expansion has an "s" appended at the end, like for example,
on the line %(action_)s. What does the trailing "s" do? It is there because Fail2Ban uses
Python string interpolation
and the trailing "s" means that the variable is converted to a string using the Python str() function.
Sending Email Alerts
There are other interesting actions available that we can find, including "action_mwl". We'd want to use
this if we not only want to ban IP addresses but also send the server admin an email about the event. To use this rule, we
simply modify the DEFAULT section of our jail.local jail as follows:
[DEFAULT]
destemail = admin@email.address
sender = sender@email.address
banaction = ufw
action = %(action_mwl)s
There is one little caveat you will have to address. Sendmail, which is the mail client fail2ban will
use by default, will want a fully qualified domain name as the hostname. It gets this by indirectly looking up
the /etc/hosts file (via OS APIs). So you need to change the following line in /etc/hosts:
127.0.0.1 localhost
To something like:
127.0.0.1 my.client-name.com localhost
Now sendmail won't barf on startup and on trying to send mail! You want a real, or at least a unique, domain name so that if you have different servers sending events to you, you can identify which server sent it.
There is also the option of hardcoding the FQDN in /etc/mail/sendmail.mc, but you will still
have to modify /etc/hosts anwyay [Ref].
Define Your Own Ban
Lets say I have a service that I have created that dumps error messages to a log file. Define
the service in /etc/fail2ban/jail.local:
[my-silly-server]
enabled = true
port = 1234
logpath = /var/log/my-silly-server-log
bantime = ...
findtime = ...
maxretry = ...
This tells Fail2Ban to create and enable a jail called "my-silly-server" for a
service listening to port 1234 that writes to the log file /var/log/my-silly-server-log.
Other configuration options like bantime, findtime and maxretry
can also be specified. The value for maxretry specifies the number of failures that have to
occur in the last findtime seconds in order to ban the IP. The parameter bantime
dictates how many seconds the ban is in place for.
However, what this doesn't tell Fail2Ban is what log messages it should scan for. To do that you
must add a .conf file with the same name as the jail to the directory /etc/fail2ban/filter.d.
So in this case the file would be /etc/fail2ban/filter.d/my-silly-server.conf. That file must contain
the following:
[Definition]
failregex = Some error from <HOST>
            The client <HOST> sent yet another regex-defined error
The Developing Filters section of the Fail2Ban docs contains much more detailed information.
In the above, failregex, defines the regular expressions that Fail2Ban will match against
each line of the log file specified. The "<HOST>" part of the expression
is a special Fail2Ban regex that will match any IP address or host name. This will be used in the
ban action. Thus, in the above, should the log contain "Some error from 1.2.3.4:4321",
or "The client 1.2.3.4 sent yet another regex-defined error", then the
IP address 1.2.3.4 will be blocked by adding a rule to the firewall in use.
You can test out your regex using the fail2ban-regex as so:
fail2ban-regex /path/to/log/file /etc/fail2ban/filter.d/my-silly-server.conf [regex-to-ignore]
Or:
fail2ban-regex /path/to/log/file "a test regex"
Backends
The following is taken from this fail2ban github thread. You should set your backend for sshd jail to systemd. File-backends (like pyinotify, polling as well as auto) do montoring of the log-files only (not systemd-journals).
[sshd]
backend = systemd
And for check it via fail2ban-regex you can use:
# for >= 0.10:
fail2ban-regex systemd-journal sshd
# or for 0.9:
fail2ban-regex systemd-journal /etc/fail2ban/filter.d/sshd.conf
SECure COMPuting - Seccomp
The idea behind seccomp is to restrict the system calls that can be made from a process ... The Linux kernel has a few hundred system calls, but most of them are not needed by any given process ...
Secure Shell (SSH)
Installing the SSH client is very simple:
sudo apt-get install ssh
Once installed use sudo systemctl status ssh to get the status of the SSH daemon. To start/stop the daemon use sudo systemctl start/stop ssh.
For security, root access via SSH is sometimes disabled and password authentication is always disabled (prefer public/private keys). You can also run the SSH daemon on a non standard port. Especially useful is to setup Fail2Ban to monitor system log files for suspicious SSH activity (see above).
The SSH daemon configuration file is located at /etc/ssh/sshd_config. To disable root loging grep for the line containing "PermitRootLogin"
and make sure it reads:
PermitRootLogin no
To disable password authentication grep for the line containing "PasswordAuthentication" and make sure it reads:
PasswordAuthentication no
You should also disable PAM:
UsePAM no
You may also want to use LogLevel VERBOSE, so that the key fingerprint of SSH keys used for login are recorded.
Once you have made the changes you want type:
sudo systemctrl restart ssh
To setup a new public/private key pair with, at the time of writing, some future proofing in the key length, use the following:
ssh-keygen -t rsa -b 3072 -C "A meaningful description" -f file-name-for-your-key-pair
Make sure you enter a secure password for your key. I.e., use upper and lower case as well as numbers at the very least with a reasonable length. Two new files will have
been created in the directory from which your ran the ssh-keygen command: file-name-for-your-key-pair and file-name-for-your-key-pair.pub.
Move these to a secure location and keep the private key secret! The minute this key is compromised, so is your server.
You can have as many key pairs as you like, probably for each user of your system. You will then need to add these to your SSH server's allowed list. Note, never do this as root. To add a key to the SSH servers allowed list do:
cat file-name-for-your-key-pair.pub >> ~/.ssh/authorized_keys
If the .ssh directory does not exist you can create it using mkdir ~/.ssh && chmod 700 ~/.ssh. If the authorized_keys file
did not exist make sure to has 600 permissions. Lastly move your key file into the ~/.ssh directory.
One thing you might notice is that the key file is in the user's local directory. This can be fine if you want users to be able to dictate who can login to the system,
but can also be a massive security hole! To overcome this you can edit /etc/ssh/sshd_config and make sure the key AuthorizedKeyFile reads as:
AuthorizedKeysFile /etc/ssh/authorized-keys/%u
Where the "%u" expands during connection setup to the user-name of the user trying to log in.
To use a specific key to log into the SSH server use:
ssh -i /path/to/private-key user-name@server_ip
SSH Tunneling
References
- Quick-Tip: SSH Tunneling Made Easy, by Frank Wiles
- SSH tunnel, SSH Achademy.
- SSH Port Forwarding Example, SSH Achademy.
-f Requests ssh to go to background just before command execution.
-L [bind_address:]port:host:hostportSpecifies that the given port on the local (client) host is to be forwarded to the given host and port on the remote side. This works by allocating a socket to listen to port on the local side, optionally bound to the specified bind_address. Whenever a connection is made to this port, the connection is forwarded over the secure channel, and a connection is made to host port hostport from the remote machine. Port forwardings can also be specified in the configuration file. IPv6 addresses can be specified by enclosing the address in square brackets. Only the superuser can forward privileged ports. By default, the local port is bound in accordance with the GatewayPorts setting. However, an explicit bind_address may be used to bind the connection to a specific address. The bind_address of -localhost- indicates that the listening port be bound for local use only, while an empty address or -*- indicates that the port should be available from all interfaces.
-N Do not execute a remote command. This is useful for just forwarding ports (protocol version 2 only).
This diagram will help explain it:
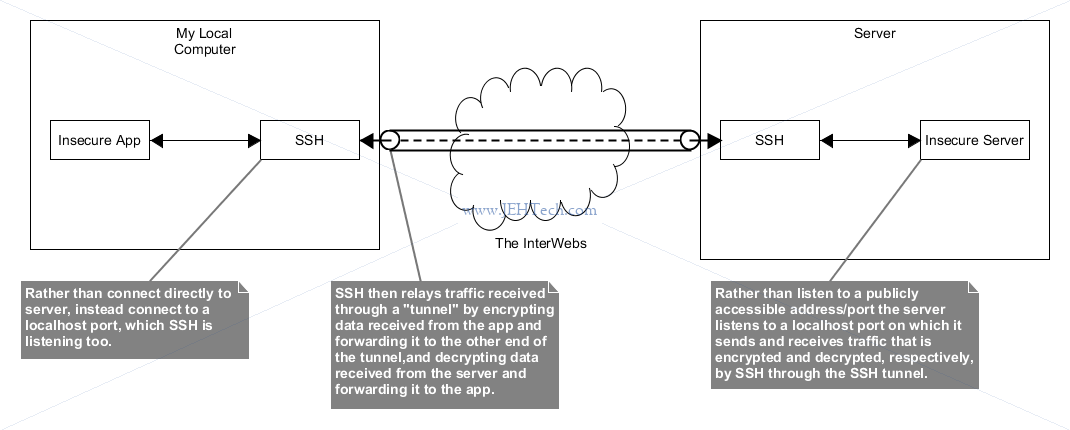
This is why the following works [Ref]:
ssh -N -f user@server.com -L 2000:server.com:25 -N
#   ^  ^  ^^^^^^^^           ^^^^^^^^^^^^^^^^^^^^^
#   ^  ^  ^^^^^^^^           Host port 2000 is forwarded to port 25 on remote server server.com.
#   ^  ^  ^^^^^^^^
#   ^  ^  User on remote server.
#   ^  ^
#   ^  Go into background.
#   ^
#   Do not execute a remote command.