wxPython Notes
Page Contents
References
- The wxPython Linux Tutorial by Jan Bodnar
- Events and Event Handling in wxPython docs.
- Binding Multiple Widgets to the Same Handler from the Python Library Blog.
- The article "self.Bind vs. self.button.Bind" from wxPyWiki.
- wxListCtrl on wxWiki.
- Use Arbitrary WX Objects As A Column In A wx.ListCtrl on StackOverflow.
- wx.FileDialog And "Recently Opened Files" On Ubuntu on StackOverflow.
- Model View Presenter in wxPython Tutorial on wxPyWiki.
- wxGlade: a GUI builder for wxWidgets.
Install
sudo apt install -y python3 python3-pip python3-dev build-essential libgtk-3-dev libwebkit2gtk-4.0-dev

sudo apt install -y libjpeg-dev libtiff-dev libsdl2-dev libgstreamer-plugins-base1.0-dev \
   libnotify-dev freeglut3-dev libsm-dev libgtk2.0-dev \
   libgtk-3-dev libwebkit2gtk-4.0-dev libgl1-mesa-dev libglu1-mesa-dev \
   libgstreamer1.0-dev libgstreamer-plugins-base1.0-dev


pip3 install pyext
pip3 install wxPython

# Test
python3 -c "import wx; app = wx.App(); frame = wx.Frame(None, title='Hello World'); frame.Show(); app.MainLoop()"

# Or if that doesn't work coz its a PITA use...
pip install -U wxPython --find-links https://extras.wxpython.org/wxPython4/extras/linux/gtk3/ubuntu-22.04
The Basic wxPython App
The Start
wxPython is the Python binding to the C++ multi-platform GUI library wxWidgets.
The most basic Python app looks like this:
import wx

class MyDummyWindow(wx.Frame):
   def __init__(self, parent, title):
      wx.Frame.__init__(self, parent, title=title)
      #...
      self.Show()

app = wx.App(False)
frame = MyDummyWindow(None, "A Stupid Example")
app.MainLoop()
Inherit from wx.Frame. In the frame constructor you create all the components that are going to go onto the window. Give it a NULL parent to make it the main window.
Add Buttons
Add a button by adding the following into your Frame/ Panel (Note: really you should add everything to a panel or some other container and not directly to the Frame to render correctly on all platforms... but for the sake of brevity in the examples I do).
import wx

class MyDummyWindow(wx.Frame):
   def __init__(self, parent, title):
      wx.Frame.__init__(self, parent, title=title)
      self._btn1 = wx.Button(self, wx.ID_ANY, "Click me")
      self._btn2 = wx.Button(self, wx.ID_ANY, "Click you")
      self.Show()

app = wx.App(False)
frame = MyDummyWindow(None, "A Stupid Example")
app.MainLoop()
The wx.ID_ANY (-1) is the component ID... this is a special ID that means wxWidgets assigns a unique ID to it... saves us the effort, otherwise we have to supply a unique ID ourselves :)
Eek! There is a problem... the Python script has rendered all the buttons on top of eachother. We could place them using absolute coordinates manually, but it is much easier to get wxWidgets to organise them for us.
Basic Sizers
Layout Elements Statically
To get Python's wxWidgets to automatically position and size our components we use sizers. These come in many flavours, the simplest of which is the BoxSizer:
class MyDummyWindow(wx.Frame):
   def __init__(self, parent, title):
      wx.Frame.__init__(self, parent, title=title)
      self._btn1 = wx.Button(self, wx.ID_ANY, "Click me")
      self._btn2 = wx.Button(self, wx.ID_ANY, "Click you")

      sizer = wx.BoxSizer(wx.HORIZONTAL)
      sizer.Add(self._btn1)
      sizer.Add(self._btn2)
      self.SetSizerAndFit(sizer)

      self.Show()
Now, at least, our buttons are not on top of each other: they are properly rendered and have a reasonable size. As each button is Add()'ed to the sizer it is placed horizontally to the right of the last added component. This is because we specified wx.HORIZONTAL. The other layout option is wx.VERTICAL.
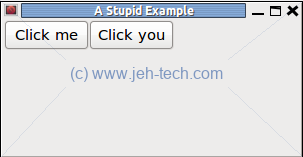
The image above shows a Python wxWidgets (pyWidgets) window that has been expanded a little. What we see is that the buttons stay in the same location and do not scale with our window, which may be exactly what we want. But what if we'd like then to fill the window?
Grow Elements With Their Container
When we Add() an element to a sizer we can tell the sizer to automatically size the element to fill up the space available using the wx.EXPAND flag.
In the case of a wx.BoxSizer, the sizer will expand as far as possible in all directions. It will then give you the option as to which directions the contained elements are expanded.
The next parameter to Add() is the proportion of the space in the wx.HORIZONTAL or wx.VERTICAL direction you wish the element to expand. The proportion is an integer number. Zero means don't resize and any other number is the proportion as a fraction of the total proportions of all elements in the sizer, that the element size will be.
For example, if you add two components, A and B, with proportions 1 and 2 respectively, element A will take up 1/3 of the space and element B will take up 2/3 of the space in the sizer's direction.
So, let's start with a simple example by changing our Add() calls from the previous example to the following:
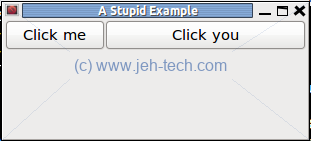
sizer = wx.BoxSizer(wx.HORIZONTAL)
sizer.Add(self._btn1, 1) #<< Note the extra parameter
sizer.Add(self._btn2, 2) #<< Note the extra parameter
Now when the window is expanded we will see the following. As you would expect, the buttons expand horizontally to fill the space available and the first button takes up 1/3 of the space and the second button 2/3.
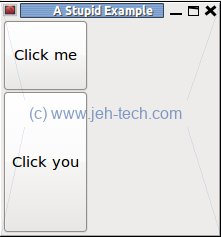
If we changed our example to use a wx.BoxSizer(wx.VERTICAL) we would see the opposite. The elements will fill the vertical direction and keep a constant size in the horizontal direction?
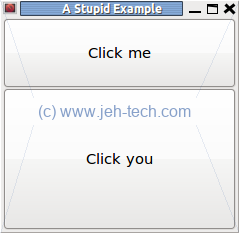
So, that's great, but what if I want the buttons to take up the space in the other direction to the box sizer? I.e, if we take the vertical box sizer example, how do I get the buttons not only to expand in the vertical direction but also take up the available horizontal space? The answer is a third parameter to the Add() function... namely wx.EXPAND. This flag tells the sizer to take up all the available space and size elements to take up all the available space. Again, lets modify our code a little bit:
sizer = wx.BoxSizer(wx.HORIZONTAL)
sizer.Add(self._btn1, 1, wx.EXPAND) #<< Note the extra parameter
sizer.Add(self._btn2, 1, wx.EXPAND) #<< Note the extra parameter
Using the above, as we expand the window, we will now see that the buttons expand in both the horizontal and vertical directions.
So, the wx.EXPAND tag tells a sizer to expand its components in all directions. To size with a horizontal box sizer we get automatic horizontal expansion. To fill the remaining space we then need to use the wx.EXPAND flag. The same applies for a vertical box sizer. We get the vertical expansion "for free" and use the expand flag for the rest of the space.
Space Out
So, we've seen statically placed buttons that don't move when the window expands and buttons that expand with the window. But what if we want a bit of padding between the buttons. There are two things we can do.
- Add in a static amount of space around the object. This space is static because it will not change with the window size.
- Add in a spacing element that will resize in the same way that an object would and therefore is proportional to window size.
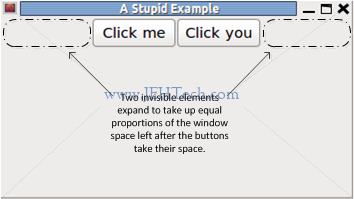
We'll start with the latter. Let's say I want to keep the buttons in the center of the window and at a constant size. The solution is to add two spaces on the left and right of the buttons which will expand to fill the space available. We do this by modifying our last example with the additions in bold:
sizer.AddStretchSpacer(1)
sizer.Add(self._btn1, 0)
sizer.Add(self._btn2, 0)
sizer.AddStretchSpacer(1)
What this has done is to add what acts like an invisible element each side of the two buttons. The buttons will not grow as the window expands because they have a zero proportion. The invisible elements each have an equal proportion so once the space for the buttons has been accounted for the spacers will take up the remaining window space, which effectively centres the buttons:
If you wanted a spacer of a fixed width or height in pixels you could also investigate sizer.AddSpacer(size). This spacer will not expand relative to window size: it will keep a constant size.
More
The parameters we used can be more explicitly stated:
sizer.Add(self._btn1, proportion=, flag=, border=, ...)
Border is the border of padding that is to be applied to the component. Which of the top, botton, left and right borders are used, or padded, is dictated by the flag option.
Flag is used, as said, partly to specify which borders will have the padding added to them and which will be left alone. This is done using the following flags: wx.TOP, wx.BOTTOM, wx.LEFT, wx.RIGHT, wx.ALL.
Flag also is used to dicate how the element is aligned in it's box: wx.ALIGN_CENTER, wx.ALIGN_LEFT, wx.ALIGN_RIGHT, wx.ALIGN_TOP, wx.ALIGN_BOTTOM.
Basic Event Handling
We've got a few buttons, now we need to do something when the user clicks 'em... enter events...
class MyDummyWindow(wx.Frame):
   def __init__(self, parent, title):
      wx.Frame.__init__(self, parent, title=title)
      self._btn1 = wx.Button(self, wx.ID_ANY, "Click me")
      self._btn2 = wx.Button(self, wx.ID_ANY, "Click you")

      self._btn1.Bind(wx.EVT_BUTTON, self.OnBtnClick)
      self._btn2.Bind(wx.EVT_BUTTON, self.OnBtnClick)

      sizer = wx.BoxSizer(wx.HORIZONTAL)
      sizer.Add(self._btn1, 1, wx.EXPAND)
      sizer.Add(self._btn2, 2, wx.EXPAND)
      self.SetSizerAndFit(sizer)

      self.Show()

   def OnBtnClick(self, event):
      ctrl_id = event.GetEventObject().GetId()
      if ctrl_id == self._btn1.GetId():
         wx.MessageBox("You pressed the first button")
      else:
         wx.MessageBox("You pressed the second button")
The function OnBtnClick() has been created to handle button clicks. It receives two objects. The first is the standard self reference to this class instance. The second is the event object which describes the event.
The event object can be used to get the control that fired the event using GetEventObject(). Once you have the wxWidget that fired the event, you can call it's function GetId() to get the control's ID. This can then be used to compare the event-source ID against all the possible widget IDs you are handling.
To handle the click event you must register either the button or one of its parent windows as a handler for the EVT_BUTTON type of event. The line self._btn1.Bind(...) in the above example registers the button "window" as handling this event. When the event fires, the OnBtnClick() function will be called.
Event Bubbling
See the referenced article [4] for a deeper look at this...
When an object generates a command event, the object or the closest containing window to the event source handles the event first. By default this would be it... the event ends here. However, the event can be "bubbled" upwards so that the next closest containing window moving up from parent to parent can also get a shot at responding to the event:
class MyDummyWindow(wx.Frame):
   def __init__(self, parent, title):
      wx.Frame.__init__(self, parent, title=title)
      self._btn1 = wx.Button(self, wx.ID_ANY, "Click me")
      self._btn2 = wx.Button(self, wx.ID_ANY, "Click you")

      self._btn1.Bind(wx.EVT_BUTTON, self.OnBtnClick)
      self._btn2.Bind(wx.EVT_BUTTON, self.OnBtnClick)

      self.Bind(wx.EVT_BUTTON, self.OnBtnClick2)
      self.Bind(wx.EVT_BUTTON, self.OnBtnClick2)

      sizer = wx.BoxSizer(wx.HORIZONTAL)
      sizer.Add(self._btn1, 1, wx.EXPAND)
      sizer.Add(self._btn2, 2, wx.EXPAND)
      self.SetSizerAndFit(sizer)

      self.Show()

   def OnBtnClick2(self, event):
      wx.MessageBox("Button intercepted")
      # If you uncomment the line below, first the btn handler and then the
      # frame handler respond to this event, otherwise only the btn handler will
      #event.Skip()

   def OnBtnClick(self, event):
      ctrl_id = event.GetEventObject().GetId()
      if ctrl_id == self._btn1.GetId():
         wx.MessageBox("You pressed the first button")
      else:
         wx.MessageBox("You pressed the second button")
In the above example an event handler is registered for the button and for the frame (the button's parent container).
If the event.Skip() function is left commented out, when you click the button, only the message box reading "Button intercepted" will display. If you uncomment the command you will see first the "Button intercepted" message box and then the "You pressed..." message box.
The More Common wxPython Controls
Plain Buttons
Pretty simple control. You can get or set the label, specify the label alignment, decide which
button in the containing window has focus by default (wx.Button.SetDefault()),
and enable and disable them:
import wx

class MyDummyWindow(wx.Frame):
   _DISABLE_STR = "Disable"
   _ENABLE_STR  = "Enable"
   def __init__(self, parent, title):
      wx.Frame.__init__(self, parent, title=title)

      self.mainPanelSzr  = wx.BoxSizer(wx.VERTICAL)
      self.mainPanel     = wx.Panel(self)

      self.toggleBtn     = wx.Button( self.mainPanel
                                    , wx.ID_ANY, self._DISABLE_STR)
      self.defaultBtn    = wx.Button( self.mainPanel
                                    , wx.ID_ANY, "Does nothing")
      self.leftAlignBtn  = wx.Button( self.mainPanel
                                    , wx.ID_ANY, "Left", style=wx.BU_LEFT)
      self.rightAlignBtn = wx.Button( self.mainPanel
                                    , wx.ID_ANY, "Right", style=wx.BU_RIGHT)

      self.mainPanelSzr.Add(self.toggleBtn, 1, wx.EXPAND)
      self.mainPanelSzr.Add(self.defaultBtn, 1, wx.EXPAND)
      self.mainPanelSzr.Add(self.leftAlignBtn, 1, wx.EXPAND)
      self.mainPanelSzr.Add(self.rightAlignBtn, 1, wx.EXPAND)

      self.defaultBtn.SetDefault()
      self.toggleBtn.Bind(wx.EVT_BUTTON, self._OnToggleClick)

      self.mainPanel.SetSizerAndFit(self.mainPanelSzr)
      self.winSizer = wx.BoxSizer(wx.HORIZONTAL)
      self.winSizer.Add(self.mainPanel, 1, flag=wx.ALL | wx.EXPAND)
      self.SetSizerAndFit(self.winSizer)
      self.Show()

   def _OnToggleClick(self, event):
      if self.toggleBtn.GetLabel() == self._DISABLE_STR:
         self.toggleBtn.SetLabel(self._ENABLE_STR)
         self.defaultBtn.Enable(False)
      else:
         self.toggleBtn.SetLabel(self._DISABLE_STR)
         self.defaultBtn.Enable(True)

app = wx.App(False)
frame = MyDummyWindow(None, "Static GridBagSizer Example")
app.MainLoop()
Image Buttons
Can have image or image and text.
wx.BitmapButton(<owner>, wx.ID_ANY, wx.Bitmap(<path to image>))
A Text Entry Box
For text entry you can use a wx.TextCtrl widget.
GetValue()/SetValue().SetEditable(<bool>).
Build Your Own Progress Dialog
The standard wx.ProgressDialog is really good and I
only learnt about it after building my own. I wanted to present
messages in my progress dialog so this was my own little effort at constructing
one. It is a pubsub aware dialog that receives progress and
termination messages (the thread must send at least
the latter).
import sys
import os
import threading
import time
import wx
from wx.lib.pubsub import setupkwargs #< Put pubsub into "newer" mode
from wx.lib.pubsub import pub

class MyLongRunningThread(threading.Thread):
   def __init__(self, pubNameProgress, pubNameFinished, simulateErrorAtStep=-1):
      super(MyLongRunningThread, self).__init__()
      self._numSteps = 15
      self._pubNameProgress = pubNameProgress
      self._pubNameFinished = pubNameFinished
      self._simulateErrorAtStep = simulateErrorAtStep
      self._errMsg = None
      self._isCanceled = threading.Event()
      self.start()

   def Cancel(self):
      self._isCanceled.set()

   def GetErrorMessage(self):
      return self._errMsg

   def run(self):
      msg = "Error"
      try:
         pub.sendMessage(self._pubNameProgress, percent=0.0, msg="Calculating time...")
         time.sleep(1) # Emulate some pause before progress starts

         for step in range(self._numSteps):
            if self._isCanceled.is_set():
               msg = "Canceled"; break
            time.sleep(1) # Emulate some processes, may raise exception
            pub.sendMessage(self._pubNameProgress, percent=float(step)/self._numSteps*100.0, msg="Something {}".format(step))

            if self._simulateErrorAtStep >= 0 and self._simulateErrorAtStep == step:
               raise Exception("Oops a simulated error occurred")

         if step == self._numSteps - 1:
            msg = "Completed"
      except Exception as e:
         self._errMsg = str(e)
      except:
         self._errMsg = "Unknown error"
      finally:
         pub.sendMessage(self._pubNameFinished, msg=msg)

class MyProgressDialog(wx.Dialog):
   def __init__(self, parent, pubNameProgress, pubNameFinished, workerThread):
       wx.Dialog.__init__(self, parent)

       self._workerThread    = workerThread
       self._pubNameProgress = pubNameProgress
       self._pubNameFinished = pubNameFinished

       self._progress = wx.Gauge(self, range=100)
       pub.subscribe(self._MyThreadProgress, self._pubNameProgress)
       pub.subscribe(self._MyThreadFinished, self._pubNameFinished)

       self.Bind(wx.EVT_CLOSE, self._OnClose)

       self._msg = wx.TextCtrl(self, style=wx.TE_READONLY)
       self._msg.SetValue("Waiting to start...")
       sizer = wx.BoxSizer(wx.VERTICAL)
       sizer.Add(
             wx.StaticText(
                 self,
                 label="Performing results extraction summarisation:"),
                 0,
                 wx.EXPAND | wx.ALL, 5)
       sizer.Add(self._progress, 0, wx.EXPAND | wx.ALL, 5)
       sizer.Add(self._msg, 0, wx.EXPAND | wx.ALL, 5)
       self.SetSizerAndFit(sizer)

       self.SetSize((550,-1))
       self.SetMinSize((550,-1))

   def _OnClose(self, event):
      event.Veto(True)
      self._msg.SetValue("Please wait whilst operation is canceled...")
      self._workerThread.Cancel()

   def _MyThreadProgress(self, percent, msg):
      def inner():
         if msg is not None:
            self._msg.SetValue(msg)
         self._progress.SetValue(percent if percent <= 100 else 100)
      wx.CallAfter(inner)

   def _MyThreadFinished(self, msg):
      def inner():
         code = wx.ID_ABORT
         if msg == "Completed":  code = wx.ID_OK
         elif msg == "Canceled": code = wx.ID_CANCEL
         self.EndModal(code)
      wx.CallAfter(inner)

class MyDummyWindow(wx.Frame):
   GO_STR = "Go!"
   UPDATE_STR = "MyDummy.Update"
   FINISH_STR = "MyDummy.Finish"

   def __init__(self, parent, title):
      wx.Frame.__init__(self, parent, title=title)

      self.workingThread = None
      self.workingDlg    = None
      self.mainPanelSzr  = wx.BoxSizer(wx.VERTICAL)
      self.mainPanel     = wx.Panel(self)
      self.errorChk      = wx.CheckBox(self.mainPanel, wx.ID_ANY, "Sim error?")
      self.goBtn         = wx.Button( self.mainPanel, wx.ID_ANY, self.GO_STR)
      self.goBtn.Bind(wx.EVT_BUTTON, self._OnToggleClick)

      self.mainPanelSzr.Add(self.goBtn, 1, wx.EXPAND)
      self.mainPanelSzr.Add(self.errorChk, 0, wx.EXPAND)
      self.mainPanel.SetSizerAndFit(self.mainPanelSzr)

      self.winSizer = wx.BoxSizer(wx.HORIZONTAL)
      self.winSizer.Add(self.mainPanel, 1, flag=wx.ALL | wx.EXPAND)
      self.SetSizerAndFit(self.winSizer)
      self.Show()

   def _OnToggleClick(self, event):
      if self.goBtn.GetLabel() == self.GO_STR:
         assert(self.workingThread is None)
         self.goBtn.SetLabel("Wait...")
         self.goBtn.Enable(False)

         stepErr = 3  if self.errorChk.IsChecked() else -1
         self.workingThread = MyLongRunningThread( self.UPDATE_STR
                                                 , self.FINISH_STR
                                                 , simulateErrorAtStep = stepErr)
         self.workingDlg = MyProgressDialog( self
                                           , self.UPDATE_STR
                                           , self.FINISH_STR
                                           , self.workingThread)

         result = self.workingDlg.ShowModal()
         if result == wx.ID_ABORT:
            wx.MessageBox(self.workingThread.GetErrorMessage())
         elif result == wx.ID_CANCEL:
            wx.MessageBox("User cancelled")
         else:
            wx.MessageBox("All OKAY!")

         self.goBtn.SetLabel(self.GO_STR)
         self.goBtn.Enable(True)
         self.workingThread = None

app = wx.App(False)
frame = MyDummyWindow(None, "Static GridBagSizer Example")
app.MainLoop()
More wxPython Sizers
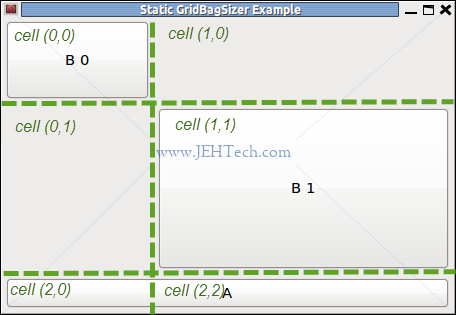
GridBagSizer
- Allows you to layout elements in a grid or table-like fashion,
- Each column sized to the largest element in that column (can be modified re "merged" cells which span more than one column),
- Each row sized to the largest element in that row (can be modified re "merged" cells which span more than one row),
- Any set of columns can be made "growable" in seperate proportions:
AddGrowableRow(<row-num>, proportion=<number>). By default columns will not resize, - Any set of rows can be made "growable" in seperate proportions:
AddGrowableCol(<col-num>, proportion=<number>). By default rows will not resize, - Cells can be seperated with margins (
wx.GridBagSizer(hgap=5, vgap=5)) and can have padding (GridBagSizer.Add(..., border=<number>)).
import wx

class MyDummyWindow(wx.Frame):
   def __init__(self, parent, title):
      wx.Frame.__init__(self, parent, title=title)

      self.mainPanelSzr = wx.GridBagSizer(hgap=5, vgap=5)
      self.mainPanel    = wx.Panel(self)
      for idx in range(2):
         self.mainPanelSzr.AddGrowableRow(idx, proportion=idx+1)
         self.mainPanelSzr.AddGrowableCol(idx, proportion=idx+1)

         self.mainPanelSzr.Add( wx.Button( self.mainPanel
                                         , wx.ID_ANY, "B {}".format(idx)
                                         )
                              , pos=(idx,idx) # Cell: row,col
                              , span=(1, 1)   # Cell spans rows,cols
                              , flag=wx.ALL | wx.EXPAND
                              , border=2
                              )
      self.mainPanelSzr.Add( wx.Button( self.mainPanel
                                      , wx.ID_ANY, "A".format(idx)
                                      )
                           , pos=(2,0)   # Cell: row,col
                           , span=(1, 2) # Cell spans rows,cols
                           , flag=wx.ALL | wx.EXPAND
                           , border=2
                           )

      self.mainPanel.SetSizerAndFit(self.mainPanelSzr)

      self.winSizer = wx.BoxSizer(wx.VERTICAL)
      self.winSizer.Add(self.mainPanel, 1, flag=wx.ALL | wx.EXPAND)
      self.SetSizerAndFit(self.winSizer)
      self.Show()

app = wx.App(False)
frame = MyDummyWindow(None, "Static GridBagSizer Example")
app.MainLoop()
The above example produces the following (annotation in green added):
wxPython Dialogs
Message Boxes
Easy to show and can be yes/no, ok/cancel kinds.
result = wx.MessageBox( "Do you want to do something?",
                         "Hello",
                         style=wx.YES_NO)
if result != wx.YES:
   ## Do something ##
Unlike the other dialogs below where you check the result against wx.ID_xxx for the MessageBox you check agsint wx.xxx where xxx is the button name. For example, to check result for the wx.OK button you check against wx.OK and not wx.ID_OK
The following styles determine what buttons you get:

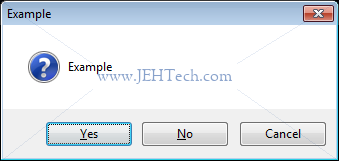
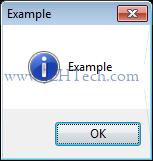
You can determine which button has the initial, default, focus by or'ing the the styles wx.OK_DEFAULT, wx.CANCEL_DEFAULT, wx.NO_DEFAULT or wx.YES_DEFAULT.
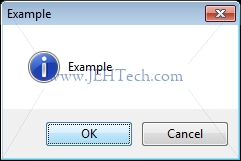
You can change the icon displayed in the message box using the following styles: wx.ICON_EXCLAMATION, wx.ICON_ERROR, wx.ICON_HAND, wx.ICON_QUESTION, or wx.ICON_INFORMATION (or wx.ICON_AUTH_NEEDED (on later versions of wxPython)).
Open/Load/Save File Dialog
Very easy to create:
dlg = wx.FileDialog(self,
                    "Open a file",
                    default_directory,
                    default_file,
                    semi_colon_separated_wildcard_string,
                    wx.FD_OPEN)
if dlg.ShowModal() == wx.ID_OK:
   selectedFile = dlg.GetPath() # Do not use GetFilename()/GetDirectory()
   # do stuff...
One thing I often want to do is make the dialog remember where you last were if you re-open it. It is important do use the dialog method GetPath(), which returns the full path to the selected file, and not a combination of GetFilename() and GetDirectory(). These no longer work, especially on Ubuntu!
In the window that is opening the dialog, I usually have a "protected" instance variable _dirNameChache, initialised to the empty string, that is updated everytime the dialog selects a new file.
dlg = wx.FileDialog(self,
                    "Open file",
                    self._dirnameCache,
                    "",
                    "My files (*.my)|*.my",
                    wx.FD_OPEN)

if dlg.ShowModal() == wx.ID_OK:
   path = dlg.GetPath()
   self._dirnameCache = os.path.split(path)[0]
   # do more stuff...
There are more window styles other than wx.FD_OPEN. The ones I most commonly use are wx.FD_SAVE, which will make it a save not a load dialog. wx.FD_OVERWRITE_PROMPT for save dialog only. It will make the dialog prompt for a confirmation if a file will be overwritten. FD_FILE_MUST_EXIST to make the load dialog ensure the file exists when it is selected by the user.
Directory Dialog
dlg = wx.DirDialog(self,
                   "Choose directory",
                   "",
                   wx.DD_DEFAULT_STYLE | wx.DD_DIR_MUST_EXIST)
if dlg.ShowModal() == wx.ID_OK:
    print dlg.GetPath()
DIY Dialogs
When trying to force a close of your DIY dialog use the
EndModal(<exit code>) function. Don't destroy
the dialog.
Publish/Subscribe with wxPython
See the wxPython Pub Sub wiki entry.
Import the pubsub libraries as follows. The first import puts the module API into the "newer" mode.
from wx.lib.pubsub import setupkwargs #< Put pubsub into "newer" mode
from wx.lib.pubsub import pub
Note: If you are receiving pub/sub events from another thread and
want to update widgets remember to use the wx.CallAfter(func, *args)
function: ...wx.CallAfter takes a function and its arguments, and calls the function when the current event handler has exited. It is a safe way of requesting action of a Window from another thread...
.
To publish a message do the following:
pub.sendMessage("unique string identifying event", key1=value1, key2=value2, ...)
The key/value pairs are passed to any subscriber-functions as named parameters.
To subscribe to a message do the following:
pub.subscribe(function, "unique string identifying event")
... <snip> ...
def SubscriberFunction(key1, key2, ...):
   ... <snip> ...
The following is an example using Pub/Sub to create a progress dialog that listens for "progress events" and updates its progress bar and status message when the event is received.
WORKER_PROGRESS="some string identifier you like"

class MyProgressDialog(wx.Dialog):
    def __init__(self, parent):
        wx.Dialog.__init__(self, parent)

        self._progress = wx.Gauge(self, range=100)
        pub.subscribe(self._MyThreadProgress, WORKER_PROGRESS)

        self._msg = wx.TextCtrl(self, style=wx.TE_READONLY)
        self._msg.SetValue("Waiting to start...")
        sizer = wx.BoxSizer(wx.VERTICAL)
        sizer.Add(wx.StaticText(self, label="This is my demo progress:"), 0, wx.EXPAND | wx.ALL, 5)
        sizer.Add(self._progress, 0, wx.EXPAND | wx.ALL, 5)
        sizer.Add(self._msg, 0, wx.EXPAND | wx.ALL, 5)
        self.SetSizerAndFit(sizer)

        self.SetSize((550,-1))
        self.SetMinSize((550,-1))

    def _MyThreadProgress(self, percent, msg):
       def inner():
          if msg is not None: self._msg.SetValue(msg)
          self._progress.SetValue(percent if percent <= 100 else 100)
       wx.CallAfter(inner)
Whilst the dialog is being shown you could for example start a worker thread that periodically published progress events. For example...
pub.sendMessage(WORKER_PROGRESS, percent=int(amountDone*100/totalAmount), msg="Some descriptive message")
Making wxPython Widgets Drop Targets
Want the ability to drop a file or directory on a control and receive the path to that file or directory? This is how. Based entirely on this wxPython wiki entry, which does into far more detail.
The snippet was made to allow a wx.TextCtrl to receive a single file/directory and have the path to it entered in as its text value...
class FileDropTarget(wx.FileDropTarget):
   def __init__(self, obj):
      wx.FileDropTarget.__init__(self)
      self._obj = obj

   def OnDropFiles(self, x, y, filenames):
      self._obj.SetInsertionPointEnd()
      if len(filenames) > 0:
         self._obj.Clear()
         self._obj.WriteText(filenames[0])

... <snip> ...

class MyPanel(wx.Panel):
   def __init__(self, *args, **kwargs):
      super(MyPanel, self).__init__(*args, **kwargs)

      ... <snip> ...

      self._myTxtCtrl = wx.TextCtrl(self, wx.ID_ANY)
      self._myTxtDT = FileDropTarget(self._myTxtCtrl)
      self._myTxtCtrl.SetDropTarget(self._myTxtDT)

      ... <snip> ...
Draw To A Device Context And Scrollable Windows In wxPython
Based on this example.
It appears that to reset the scrollable region you should use SetVirtualSize() instead of SetScrollBars() as the latter will always reset the window location, so at very least, couldn't be called on a repaint anyway. The former worked for me. SetScrollBars() creates them but then to resize the what the window thinks is the scrollable region you SetVirtualSize().
import wx

class MyCanvas(wx.ScrolledWindow):
    def __init__(self, *args, **kwargs):
        super(MyCanvas, self).__init__(*args, **kwargs)
        self.EnableScrolling(True, True)
        self.SetScrollbars(20, 20, 20, 20)
        self.Bind(wx.EVT_PAINT, self.OnPaint)

    def my_draw(self,dc):
        dc.BeginDrawing()
        lines=[(50,50,507,507)]
        dc.DrawLineList(lines)
        print dc.CanGetTextExtent()
        txtSize = dc.GetFullTextExtent("JEHTech")
        # text, x, y
        print txtSize
        for i in range(200):
           dc.DrawRectangle(10*i,10*i, txtSize[0], txtSize[1])
           dc.DrawRotatedText("JEHTech", 10*i, 10*i, 0)

        dc.EndDrawing()
        return 200*10+txtSize[0]+ txtSize[1]

    def OnPaint(self, evt):
        dc = wx.PaintDC(self)
        self.PrepareDC(dc)
        n = self.my_draw(dc)
        self.SetVirtualSize((n,n))

class MyDummyWindow(wx.Frame):
   def __init__(self, parent, title):
      wx.Frame.__init__(self, parent, title=title)
      mainSzr = wx.BoxSizer(wx.VERTICAL)
      p = MyCanvas(self, -1)
      mainSzr.Add(p, 1, wx.EXPAND)
      self.SetSizerAndFit(mainSzr)
      self.Show()

app = wx.App(False)
frame = MyDummyWindow(None, "A Stupid Example")
app.MainLoop()
PyCairo And wxPython
TODO wxPython and Cairo with PyCairo... look at this Wiki guide.
From
On Windows you can get a Cairo DLL from here:
http://www.gtk.org/download-windows.html
You'll also want to get the zlib and libpng binaries from the same page. Once you get those files extract the DLLs from each of the zip files and copy them to some place on your PATH. Finally, there is an installer for the pycairo pacakge here:
Need to try this out as the wxPython 3.x.x demo has a pyCairo section to it!